Electro-pneumatic Basics: Embossing Device ( Sequencing Multiple Actuators)
1. Introduction
In this blog, we make an electro-pneumatic circuit that models the operation of a embossing device. In this blog, we discuss on properly sequencing the pneumatic cylinders to achieved the desired response or operation. The problem is describe as
Plastic parts are manually placed in a holder by which it is . A pneumatic cylinder pushes the holder under an embossing cylinder 2.0 (B). This cylinder embosses names in the plastic. After embossing, the cylinder 2.0 (B) returns immediately to its initial position. Only then does cylinder 1.0 (A) return.
The problem stated that cylinder A activates first to hold the plastic part before the embossing cylinder extended. We placed a sensors at both cylinder to detect the position of the piston head. This sensors helped the cylinder to have the correct sequencing. In the next section, we present the circuit and discussed the operation in details.
2. Circuit and Simulations
Embossing devices are a staple in plastic manufacturing industry. Typically, creating an embossed tag uses a die set to press a full design into metal or plastics. In this scenario, the cylinder will emboss names in the plastic. In this section, we present a electro-pneumatic circuit that mirrors the operation of an embossing device. The pneumatic circuit is completed with a set of double-acting cylinders, a single solenoid 5/2-way directional control valve and a one-way flow control valve. For the control circuit, a set relays, solenoid and push button was used.
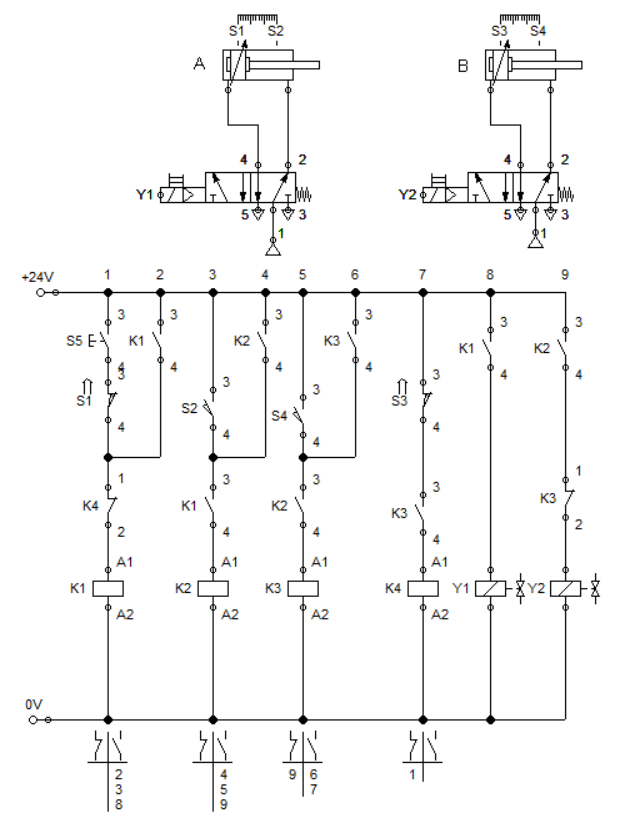
Figure 1: Electro-pneumatic circuit for Embossing Device.
In Figure 1, pressing the push button S5 activates the circuit. Once S5 is pressed, electricity flows across the relay contact K1 which energized it. All latched contacts to K1 switched from open to close position or in reverse. Relay coil K1 sustains activation hence latched K1 is active. When contact K1 at ladder 8 switched to closed position, solenoid Y1 is activated that causes the 5/2 way DCV to open port 4. After opening port 4, air flows across the cylinder that actuates it to extend.
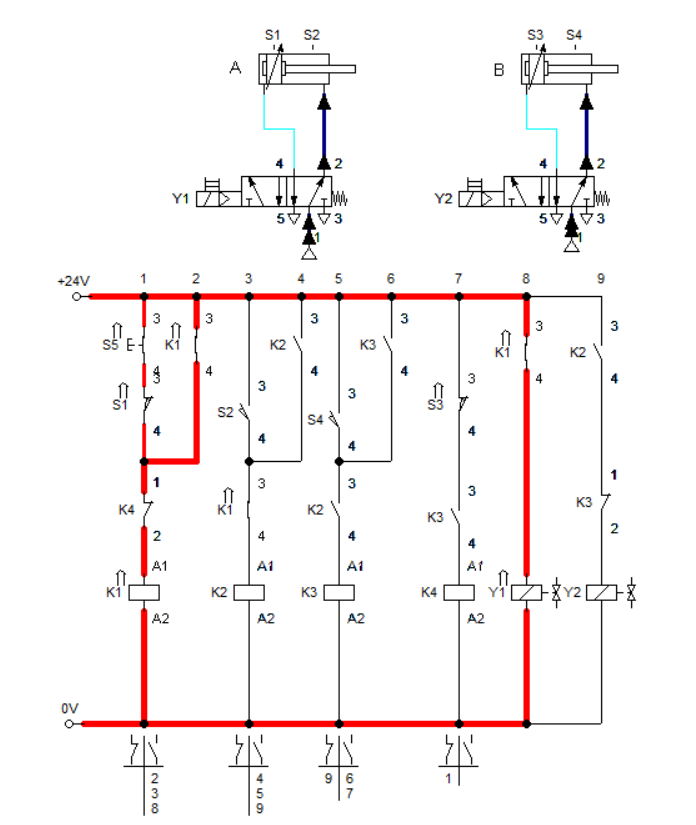
Figure 2: S5 is pressed
When the cylinder A is fully extended, the sensor S2 is activated. Closing sensor S2 allowed the current to flow across relay coil K2 and activate it. Activating K2 results to switching of all latched contact K2 to closed. At ladder 9, K2 switched to closed position and energized solenoid Y2. This allowed the 5/2 way DCV at cylinder B to open port 4. As result of opening port 4, cylinder b extends.
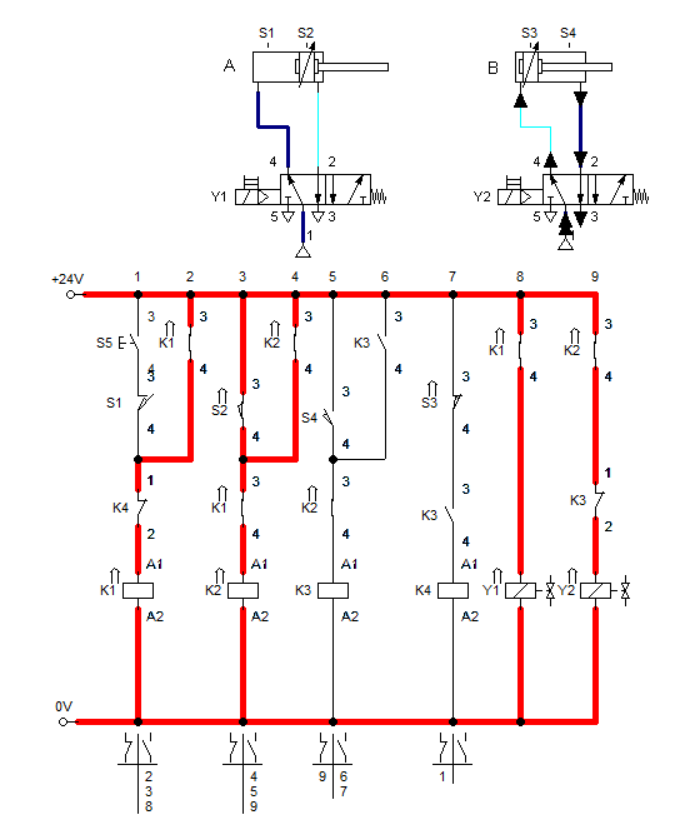
Figure 3: S2 is activated after cylinder A is fully extended.
When cylinder B is fully extended, sensor S4 is triggered which caused relay coil K3 to activate. When relay K3 is activated, contact K3 at ladder 9 switched from closed to open position. This cut the electricity across solenoid Y5.
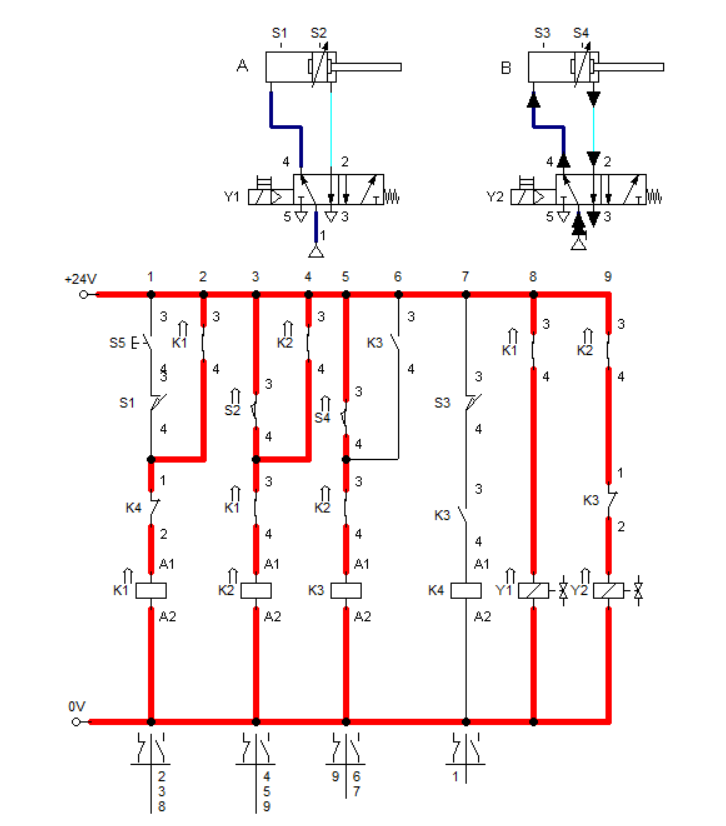
Figure 2: S4 is activated after cylinder B is fully extended.
Solenoid Y5 closes port 4 of the 5/2 way DCV at cylinder B which returns cylinder B to initial position. When cylinder B reached full retracted position, sensor S3 is activated. This result to deactivation of relay coil K4 and solenoid Y1 that leads to closing the port 4 of the 5/2 way DCV ay cylinder A. The full simulation is shown in Figure 4.
Figure 4: Full Simulation
3. Conclusion
We present a circuit in response to the describe operation of an embossing device. The circuit properly sequenced the motion of two double-acting cylinders. Cylinder A (holder) holds the plastic in placed while cylinder B (embosser) embossed the plastic. The holder clamps the plaster in placed as long as the embosser is not in its initial state. The sensors allowed the sequencing motion to be achieved by detecting the position of each cylinder.
4. References
[1] Pneumatic Basic Level. online access
[2] Pneumatic Advanced Level. online access
[3] Electro-pneumatic Basic Level. online access
(Note: All images and diagram in the text are drawn by the author (@juecoree) except those with separate citation.)
If your are Interested in pneumatic and electro-pneumatic system, you can read:
1. Pneumatic Basics: Direct Control
2. Pneumatic Basics: Indirect Control
3. Pneumatic Basics: AND and OR Logic
4. Pneumatic Basics: Memory Circuit and Speed Control
5. Pneumatic Basics: Dependent control
6. Pneumatic Basics: Multiple Actuators
7. Electro-pneumatic Basic: AND and OR Logic
8. Electro-pneumatic Basics: Interlocking, Latching and XOR logic
9. Electro-pneumatic Basics: Distribution of Workpiece
10. Electro-pneumatic Basic: Ejecting a workpiece
11. Electro-pneumatic Basics: Basic Automation
12. Electro-pneumatic Basics: Automation with Counter
12. Electro-pneumatic Basics: Automating with Timer
Electro-pneumatic Basics: Cementing Press (Time Dependent Control)
Posted with STEMGeeks