Installing the Mosquitto mqtt broker on Raspberry Pi
Good morning! In the previous post we went over the setting up of your first flow with Node-Red and my irl brother Randy @mytechtrail shared his first setup. I was going to go through my breadboarding process and share some tips and tricks with you, but I didn't get a chance to take all of the pics for my post. So I'll save that for tomorrow and go thru the installation of the Mosquitto mqtt broker on the Pi and how I integrate it with Node-Red.
There is much debate on what mqtt stands for, and my understanding is that IBM was working on a protocol MQ (not Message Queue, because the broker doesn't queue messages...grin) for satellite communications and the TT stands for telemetry transport. Regardless it is a great publish / subscribe transport protocol for IoT devices. I gave a brief description of my understanding of it in Post VI of my Home Automation series. In brief:
- A devices subscribes to a topic "home/kitchen/lights" to your mqtt broker
- A different device publishes an "on" message to that topic "home/kitchen/lights"
- That message is received by the mqtt broker and sent out to all of the devices that have subscribed to that topic.
- The receiving device receives the "on" message and turns the lights on
There are two awesome sites that have great mqtt & Node-Red resources, RandomNerdTutorials and steves-internet-guide. Both Rui Santos of Random-Nerd-Tutorials and Steve of, well, Steves-Internet-Guide do a fantastic job of walking your through mqtt and Node-Red processes. I've signed up for several of Rui's courses on ESP-32 devices and will be sharing my adventures with those awesome little powerhouses in some posts down the road!
Anyway back to mqtt, I would use the following commands to install the mosquitto broker and client tools;
- sudo apt update && sudo apt upgrade -y
Run both update & upgrade and answer yes to upgrade questions
- sudo apt install mosquitto mosquitto-clients
install mosquitto broker and mosquitto clients (sub & pub) that we'll be using for testing.
In my opinion, the easiest way to test a mosquitto mqtt broker is to subscribe to a topic and then send some test messages to it.
mosquitto_sub -h "pi-ip-address" -t "test"
I'm using the same Pi, so my host address is localhost, and the topic I'm subscribing to is test.

In a separate terminal window, I've sent the publish command with the message "on"

And you can see the 'on' message was received by the mosquitto_sub command.

So we confirmed that we can send and receive a message, and the sub and pub commands could be on different machines, as long as both are pointed at the same broker (grin). So how do we integrate this with Node-Red:
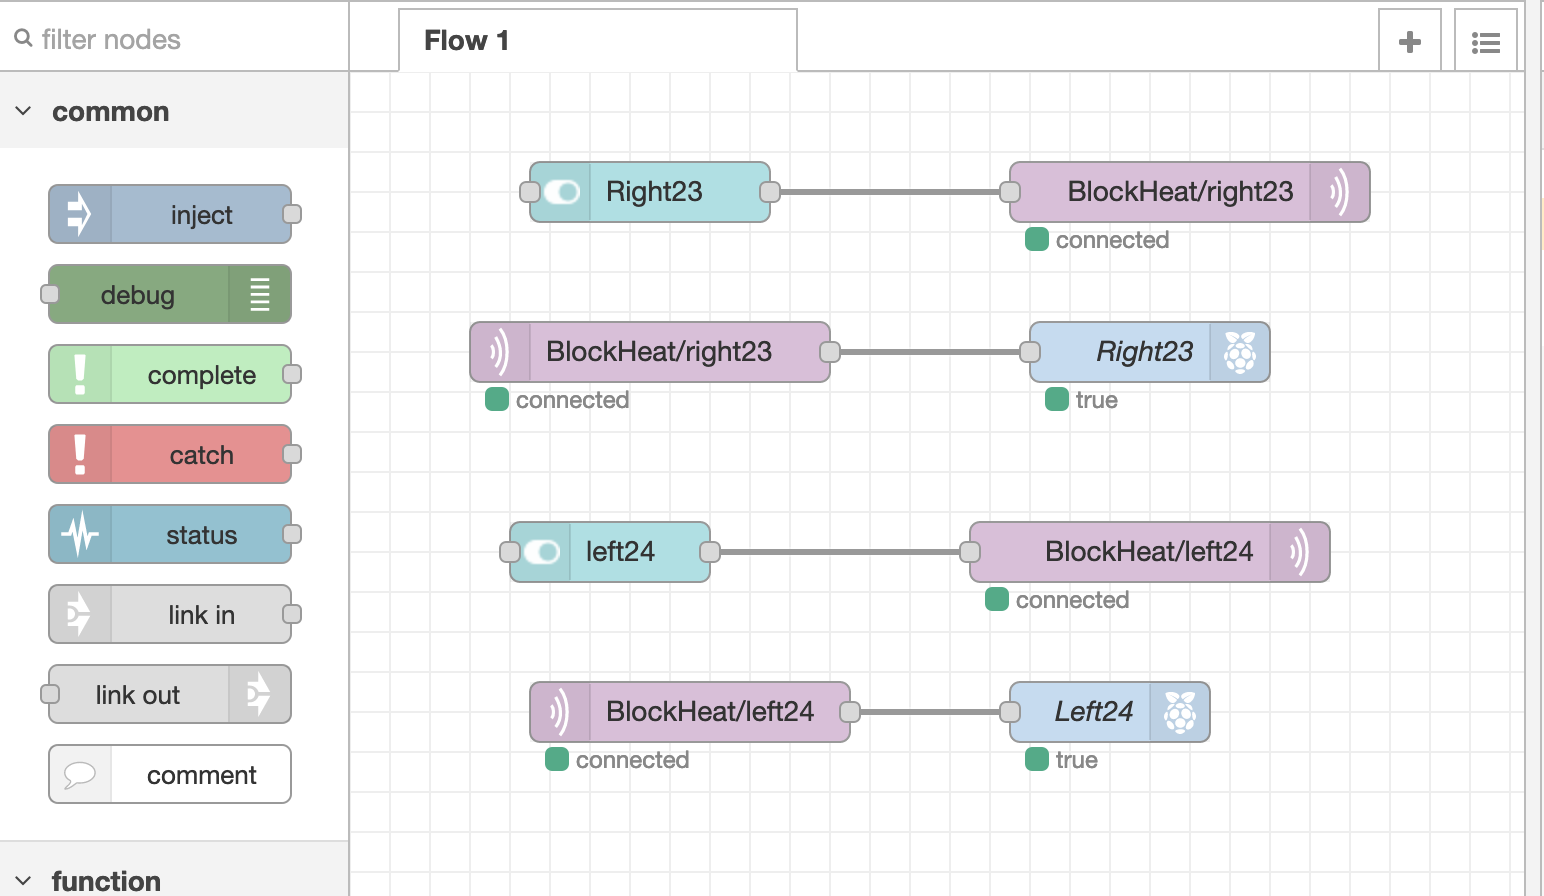
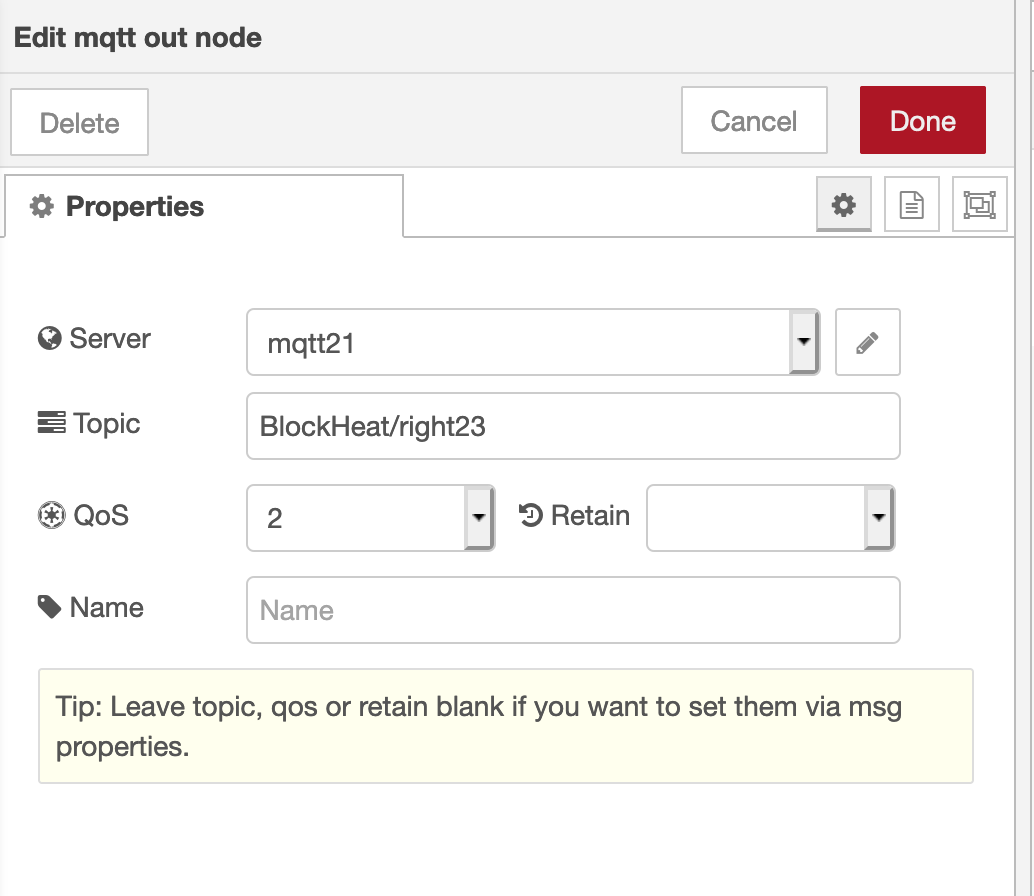
In the previous post we went straight from the switch node to the Pi output node. Here we're publishing our switch node to our mqtt broker and our Pi output is subscribed to the same topic. And here is a pic of the seup for my mqtt node:
Why did I do it this way, you might ask? I wanted to be able to remote control my Pi GPIO pins from any device and by going through mqtt, I am able to do so. In addition, by publishing the switch state, I can use a Pi ZeroW to subscribe to that topic with python3 and then activate it's GPIO pin. So now any device can send a publish message to any subscribed device whether they are running through Node-Red or python3.
Tomorrow I'll get those pics taken of my bread boarding process and share them with you.
Thanks for viewing!
Robin
Posted with STEMGeeks
Could use a little more detail on the MQTT node configuration...
I agree. I was getting a bit concerned that the post was too long, so I really didn't go into detail. I'll follow this post up with another that will go into greater detail about the Node-Red matt node configuration