Matrix display control using PIC16F877a and C code EN/ES
After a week with little activity I am back to resume learning about microcontrollers. Previously we presented what is a Matrix Display going into detail with its operation.
Luego de una semana con poca actividad estoy de vuelta para retomar el aprendizaje sobre microcontroladores. Anteriormente presentamos lo que es un Display matricial entrando en detalle con su funcionamiento.
Today we are going to use a microcontroller to generate the images that we want to show on the Display. For this we will rely on the C language oriented to microcontrollers using PIC C Compiler and the Proteus simulator
Hoy vamos a usar un microcontrolador para generar las imágenes que se desean mostrar por el Display. Para ello nos apoyaremos en el lenguaje C orientado a microcontroladores usando PIC C Compiler y el simulador Proteus.
 source code part made for @electronico
MAX7219 |
|---|
Controlling a matrix Display trying to light LED by LED in each sweep can be a quite tedious task, it is possible to do it using only a microcontroller but besides the arduous work to be done which can be made easier with some tools, the main problem is that you would need 2 ports of the microcontroller, that is, 16 pins in total. Using a microcontroller just to drive a Display is not something we want to do because of the waste of resources.
Controlar un Display matricial intentando encender LED por LED en cada barrido puede ser una tarea bastante tediosa, es posible hacerlo usando solo un microcontrolador pero además de la ardua labor que se debe realizar la cual puede hacerse más sencilla con algunas herramientas, el problema principal es que se necesitarían 2 puertos del microcontrolador, es decir, 16 pines en total. Usar un microcontrolador solo para manejar un Display no es algo que queramos hacer por el derroche de recursos.
Fortunately there is a component dedicated to this task, it is called MAX7219 and allows us to establish the control of one or more displays using only 3 pins of the microcontroller, it is useful for matrix displays and also for 7-segment displays providing the advantage of being able to control several simultaneously. In this case we will control only one but we will use it to include it in the learning.
Por suerte existe un componente dedicado a esta tarea, se llama MAX7219 y nos permite establecer el control de uno o más displays usando solo 3 pines del microcontrolador, es útil para Displays matriciales y también para displays 7 segmentos brindando la ventaja de poder controlar varios de forma simultánea. En este caso controlaremos solo uno pero lo usaremos para incluirlo en el aprendizaje.
 alldatasheet
 THE PROGRAM |
|---|
To use the max7219 component we must add a library and configure some additional parameters to the ones we are used to. That is why our header will present some variations to the previous ones.
Para usar el componente max7219 debemos añadir una librería y configurar unos parámetros adicionales a los que estamos acostumbrados. Por eso nuestro encabezado presentará algunas variaciones a los anteriores.
#include <16f877a.h>

#device PASS_STRINGS = IN_RAM

#fuses HS,NOWDT,NOPROTECT,NOPUT,NOLVP,BROWNOUT

#use delay(clock=20M)

#use standard_io(D)

#define DATA PIN_D0

#define LOAD PIN_D1

#define CLK  PIN_D2

#include <MAX7219.c
You can notice that the MAX7219.h library is added and additionally configured by #define DATA PIN_D0, LOAD PIN_D1 and CLC PIN_D2, thus establishing the 3 pins that will be used to control the MAX7219 which in turn will control the Display.
Se puede notar que se añade la librería MAX7219.h y adicionalmente se configura mediante #define DATA PIN_D0, LOAD PIN_D1 y CLC PIN_D2, de esta forma se establecen los 3 pines que se usarán para controlar el MAX7219 quien a su vez controlará el Display.
You will also need the command line display_init(0); to initialize the display and seg_putc("1"); to indicate the number of displays we are going to control in our program, for this case it will be only one.
También se necesitará la línea de comando display_init(0); para inicializar el display y seg_putc("1"); para indicar la cantidad de displays que vamos a controlar en nuestro programa, para este caso será solo uno.
To print a character on the display just use the command display_char('char'); where char would be the character we want to show on the display. It seems like a simple thing to do so in our program we will print the letters so that they form the name ELECTRONICO and then display it as a scroll.
Para imprimir un caracter en el display solo bastaría usar el comando display_char('char'); donde char sería el caracter que queremos mostrar en el display. Parece algo sencillo de hacer así que en nuestro programa imprimiremos las letras de manera que formen el nombre ELECTRONICO y luego lo mostraremos en forma de scroll.
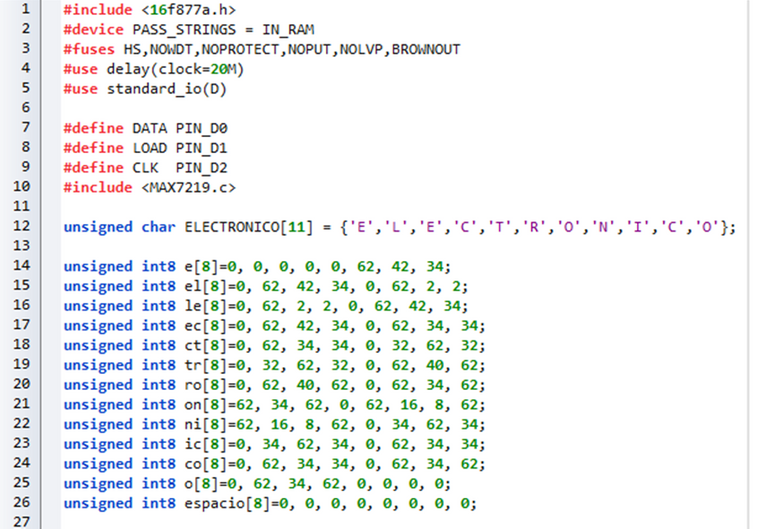
Printing with display_char will turn on the LEDs that form the desired character but what if we want to print something other than a character? In this case we rely on display_digits(variable,digits) so we can turn on the LEDs using integer variables. So the next step in our program is to define the variables.
Imprimir con display_char encenderá los LEDs que formen el caracter deseado pero ¿qué pasa si queremos imprimir algo distinto a un caracter? en este caso nos apoyamos en display_digits(variable,digitos) de esta forma podemos encender los leds usando variables enteras. Así que el siguiente paso en nuestro programa es definir las variables.
unsigned char ELECTRONICO[11] = {'E','L','E','C','T','R','O','N','I','C','O'};

unsigned int8 e[8]=0, 0, 0, 0, 0, 62, 42, 34;

unsigned int8 el[8]=0, 62, 42, 34, 0, 62, 2, 2;

unsigned int8 le[8]=0, 62, 2, 2, 0, 62, 42, 34;

unsigned int8 ec[8]=0, 62, 42, 34, 0, 62, 34, 34;

unsigned int8 ct[8]=0, 62, 34, 34, 0, 32, 62, 32;

unsigned int8 tr[8]=0, 32, 62, 32, 0, 62, 40, 62;

unsigned int8 ro[8]=0, 62, 40, 62, 0, 62, 34, 62;

unsigned int8 on[8]=62, 34, 62, 0, 62, 16, 8, 62;

unsigned int8 ni[8]=62, 16, 8, 62, 0, 34, 62, 34;

unsigned int8 ic[8]=0, 34, 62, 34, 0, 62, 34, 34;

unsigned int8 co[8]=0, 62, 34, 34, 0, 62, 34, 62;

unsigned int8 o[8]=0, 62, 34, 62, 0, 0, 0, 0;

unsigned int8 espacio[8]=0, 0, 0, 0, 0, 0, 0, 0;

int tiempo=500;
The char variables will allow me to print the characters in order to form the ELECTRONIC name letter by letter. The int8 variables are special variables that represent an integer but composed by a string of 8 values, so when I use one of these variables the system will print the complete string for display purposes. The variable time allows me to define how long each screen will be displayed for. Now we will create the ELECTRONIC name with the char variables using a for and a few lines.
Las variables del tipo char me permitiran imprimir los caracteres en orden para formar el nombre ELECTRONICO mostrando letra por letra. Las variables int8 son variables especiales que representan un entero pero compuesto por una cadena de 8 valores, de esta forma cuando use una de estas variables el sistema imprimirá la cadena completa para propósitos del display. La variable tiempo me permite definir por cuanto tiempo se mostrará cada pantalla. Ahora crearemos el nombre ELECTRONICO con las variables char usando un for y unas pocas líneas.
void main()

{

   display_init(0);

   seg_putc("1");

   while(true)

   {

   for(int i=0; i<11; i++)

   {

   display_char(ELECTRONICO[i]);

   delay_ms(tiempo);

   }
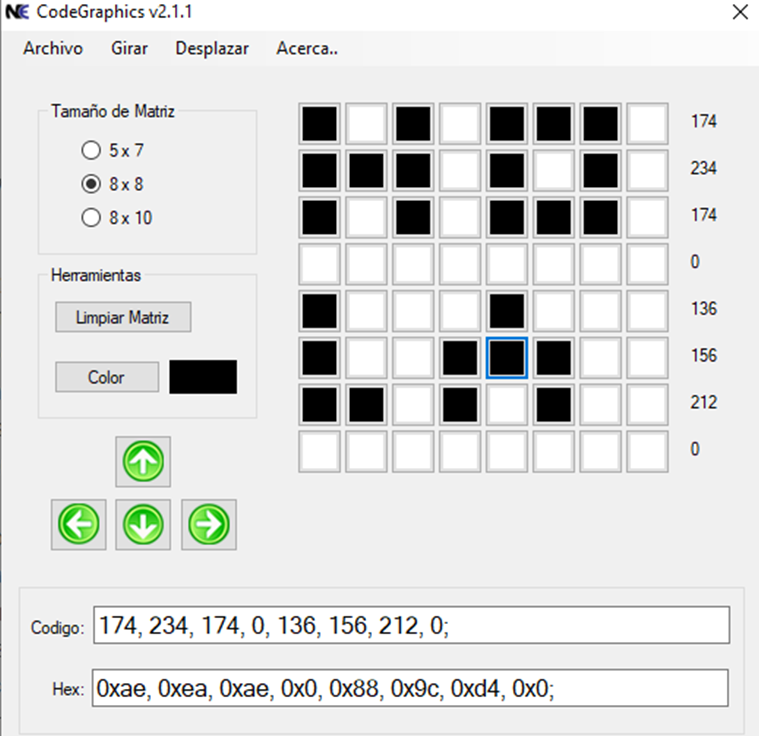
That should be enough to print the word letter by letter. Now the scroll is not so simple because we must find the code that we must write to form each screen, since most of the time we will have two letters per screen we can't use the char variable so we will use digits. Our code for each screen will be found using the codegraphics software, a software that presents the matrix and you only have to mark the points you want to make visible to generate the code.
Con eso debería bastar para imprimir la palabra letra por letra. Ahora el scroll no es tan sencillo porque debemos encontrar el código que debemos escribir para formar cada pantalla, dado que la mayor de las veces tendremos dos letras por pantalla no podemos usar la variable char así que usaremos digits. Nuestro código para cada pantalla lo encontraremos usando el software codegraphics, un software que presenta la matriz y solo debes marcar los puntos que quieres hacer visible para generar el código.
Generating the scroll has meant 13 screens including a pause shutdown. This has made me generate 13 codes that are already described in the definition of variables. They cannot be shown in a few lines with a FOR so I had to print screen by screen making the corresponding pause.
Generar el scroll me ha supuesto 13 pantallas incluyendo una apagada de pausa. Esto me ha hecho generar 13 códigos que ya están descritos en la definición de variables. No se pueden mostrar en pocas líneas con un FOR así que he tenido que imprimir pantalla por pantalla haciendo la pausa correspondiente.
      display_digits(e,8);

      delay_ms(tiempo);

      display_digits(el,8);

      delay_ms(tiempo);

      display_digits(le,8);

      delay_ms(tiempo);

      display_digits(ec,8);

      delay_ms(tiempo);

      display_digits(ct,8);

      delay_ms(tiempo);

      display_digits(tr,8);

      delay_ms(tiempo);

      display_digits(ro,8);

      delay_ms(tiempo);

      display_digits(on,8);

      delay_ms(tiempo);

      display_digits(ni,8);

      delay_ms(tiempo);

      display_digits(ic,8);

      delay_ms(tiempo);

      display_digits(co,8);

      delay_ms(tiempo);

      display_digits(o,8);

      delay_ms(tiempo);

      display_digits(espacio,8);

      delay_ms(tiempo);

 }

}
Having our code we proceed to create our proteus assembly, using the described components and the connections that we defined in the program.
Teniendo ya nuestro código procedemos a crear nuestro montaje en proteus, usando los componentes descritos y las conexiones que definimos en el programa.
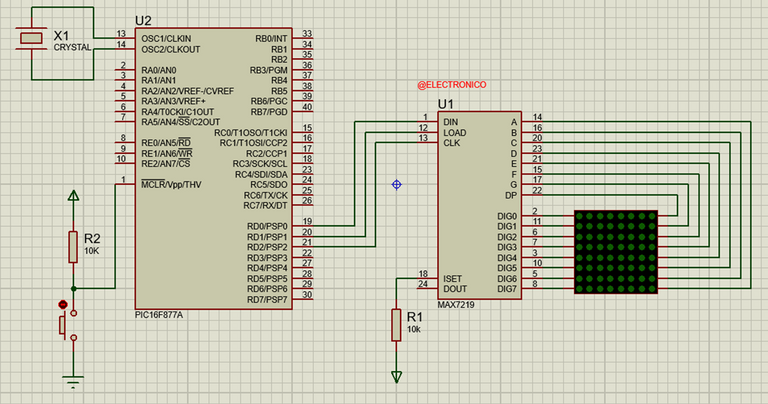
Finally, we load the program in the microcontroller and proceed with the simulation.
Para terminar cargamos el programa en el microcontrolador y procedemos con la simulación.

¡Enhorabuena!
✅ Has hecho un buen trabajo, por lo cual tu publicación ha sido valorada y ha recibido el apoyo de parte de CHESS BROTHERS ♔ 💪
♟ Te invitamos a usar nuestra etiqueta #chessbrothers y a que aprendas más sobre nosotros.
♟♟ También puedes contactarnos en nuestro servidor de Discord y promocionar allí tus publicaciones.
♟♟♟ Considera unirte a nuestro trail de curación para que trabajemos en equipo y recibas recompensas automáticamente.
♞♟ Echa un vistazo a nuestra cuenta @chessbrotherspro para que te informes sobre el proceso de curación llevado a diario por nuestro equipo.
🏅 Si quieres obtener ganancias con tu delegacion de HP y apoyar a nuestro proyecto, te invitamos a unirte al plan Master Investor. Aquí puedes aprender cómo hacerlo.
Cordialmente
El equipo de CHESS BROTHERS
Muchas gracias!!
thanks for that

!1UP
You have received a 1UP from @gwajnberg!
@stem-curator, @vyb-curator, @pob-curator, @neoxag-curator
And they will bring !PIZZA 🍕.
Learn more about our delegation service to earn daily rewards. Join the Cartel on Discord.
Thank you so much sr!
I gifted $PIZZA slices here:
@curation-cartel(5/20) tipped @electronico (x1)
Learn more at https://hive.pizza!
Thanks for your contribution to the STEMsocial community. Feel free to join us on discord to get to know the rest of us!
Please consider delegating to the @stemsocial account (85% of the curation rewards are returned).
You may also include @stemsocial as a beneficiary of the rewards of this post to get a stronger support.
Yay!! Thank you so much.!! God bless you!!
Congratulations @electronico! You have completed the following achievement on the Hive blockchain And have been rewarded with New badge(s)
Your next target is to reach 7000 upvotes.
You can view your badges on your board and compare yourself to others in the Ranking
If you no longer want to receive notifications, reply to this comment with the word
STOPCheck out our last posts:
Support the HiveBuzz project. Vote for our proposal!
¡Felicitaciones!
1. Invierte en el PROYECTO ENTROPÍA y recibe ganancias semanalmente. Entra aquí para más información.
3. Suscríbete a nuestra COMUNIDAD, apoya al trail de @Entropia y así podrás ganar recompensas de curación de forma automática. Entra aquí para más información sobre nuestro trail.
4. Creación de cuentas nuevas de Hive aquí.
5. Visita nuestro canal de Youtube.
Atentamente
El equipo de curación del PROYECTO ENTROPÍA