Getting Started with Kivy: How to Code Desktop and Mobile Apps with Python
There are many advantages to Python but one of my favorite aspects is that Python is cross-platform. Not only can you develop for every modern desktop operating system, you can also code for many old operating systems, and even embedded software too.
If you want to code for mobile apps, though, how do you do that?
That is where Kivy comes in!
And, yes, they are real, native apps.
A while ago I created a YouTube video that showed how to control an Arduino using your own custom mobile app. Even though I explain in the description and the video that my particular approach at that time was to use a Python interpreter, I got a lot of complaints that "This is not a rEaL aPp!1".
If I was to recreate that video, Kivy is the way I would go about it.
You see, with Kivy you have all the benefits of Python, and the huge community behind it, from open source modules through to support forums, but you also get access to the native features of your mobile device, allowing you to use the camera, GPS, and so on.
It's pretty nimble too, with OpenGL and compiled C libraries, plus what you create is yours to profit off, so even mobile game developers use Kivy to create their app store creations.
If you are curious for what can be built, check out the gallery here.
Getting Started with Kivy
Before you go ahead and install Kivy itself, ensure you have all the required dependencies because, as mentioned above, there are things like OpenGL and the GUI classes.
Installing Kivy can be done in a few ways but if you already have Python you might as well go ahead and use Pip.
python3 -m pip install --upgrade pip wheel setuptools
python3 -m pip install --upgrade pygame
python3 -m pip install --upgrade kivy
Kivy Hello World
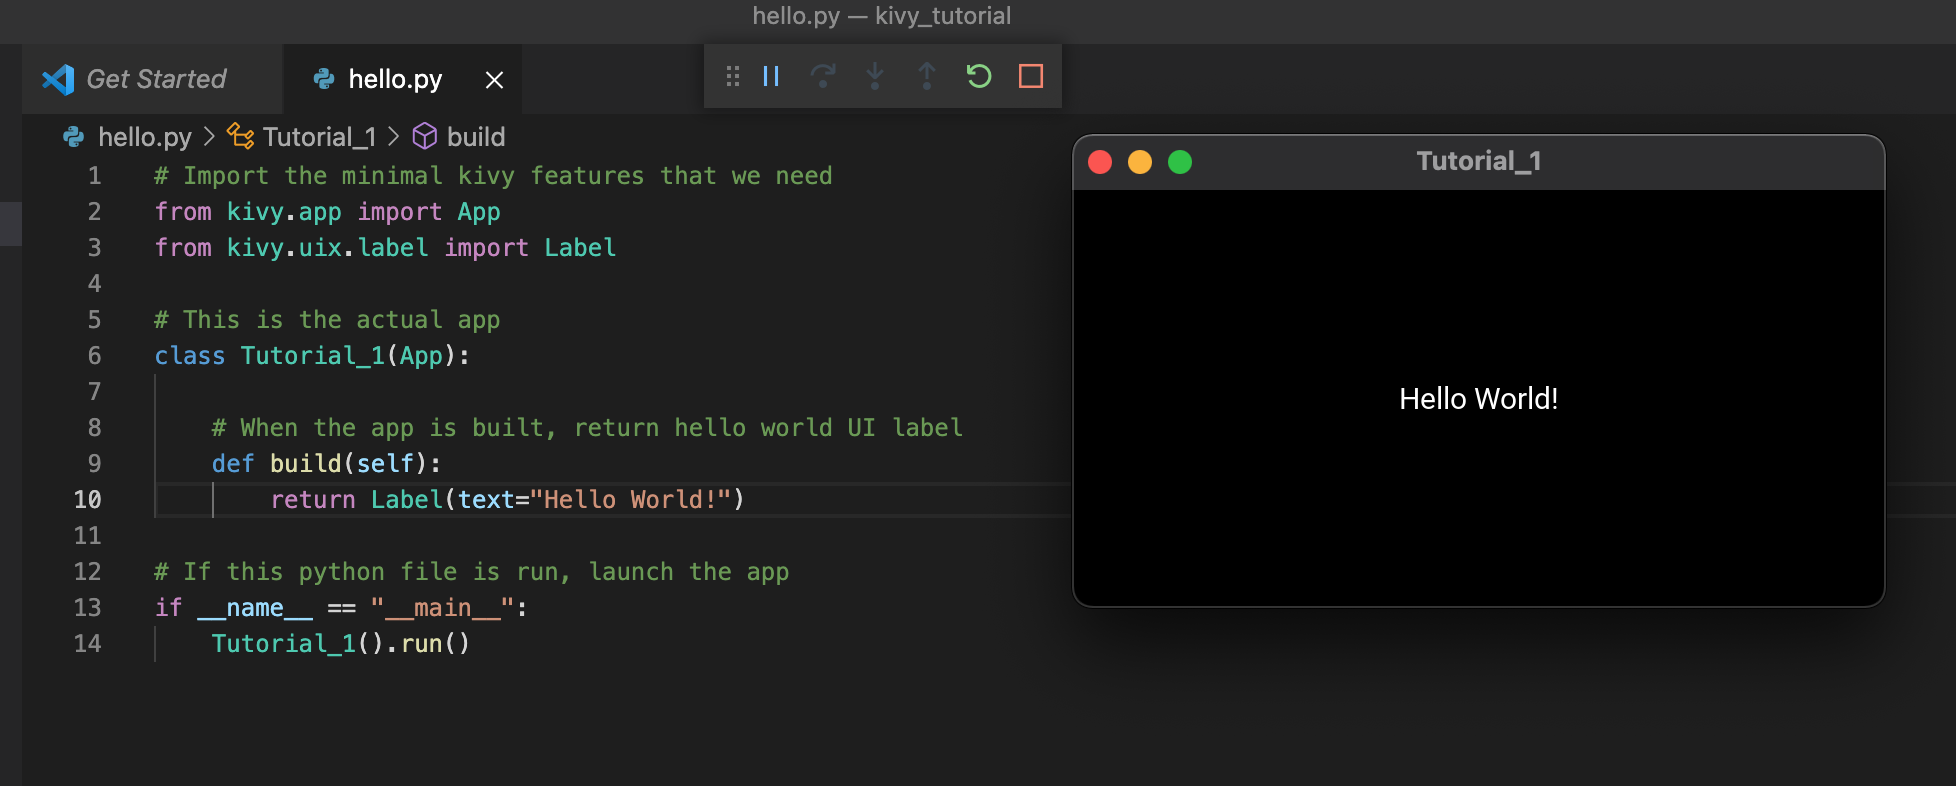
The best way to test if all of this worked is to do the classic "Hello World" program!
# Import the minimal kivy features that we need
from kivy.app import App
from kivy.uix.label import Label

# This is the actual app
class Tutorial_1(App):

    # When the app is built, return hello world UI label
    def build(self):
        return Label(text="Hello World!")

# If this python file is run, launch the app
if __name__ == "__main__":
    Tutorial_1().run()
Here we simply include the bare minimum required Kivy library features just to output a label with the text of our message.
Execution happens from the bottom, where Python checks if we ran the program directly from this python file, and if so launches our App, which we have arbitrarily named Tutorial_1.
Kivy is object oriented, and event-driven, much like coding desktop apps in C++ or C#, so our app inherits from the App class and our only method is build.
Build is one of the very first things that happens when our app is launched, right after Python itself executes. This is where your base UI is constructed, essentially the container for everything else that comes later, if at all.
In our case we only have one UI element, a label, so that is all we return!
Multiple Kivy UI Widgets and Properties
It would be a strange app that simply showed "Hello World" so we need to build out a little more.
As mentioned above, in the build class method, our root widget is added to form the foundation of our UI.
Various layout options are available to us to help organize the widgets that are added later, two of the most popular are BoxLayout and GridLayout.
Once we have inherited a layout for our form, we can add whichever widgets we need on __init__, or initialization, and in our case we add the label from before but also a button:
# Import the minimal kivy features that we need
from kivy.app import App
from kivy.uix.label import Label
from kivy.uix.button import Button
from kivy.uix.boxlayout import BoxLayout

# Our UI
class Example_Form(BoxLayout):

    def __init__(self, **kwargs):
        super(Example_Form, self).__init__(**kwargs)
        self.padding=40
        self.add_widget(Label(text="Hello World!"))
        self.add_widget(Button(text="CLICK ME!"))


# This is the actual app
class Tutorial_1(App):

    # When the app is built, return hello world UI label
    def build(self):
        return Example_Form()

# If this python file is run, launch the app
if __name__ == "__main__":
    Tutorial_1().run()
Instead of just returning the one widget as in the previous example, this time we return our whole form.

We now have a user interface! It doesn't do anything, yet, but it is a UI.
Button Click Event
Now we need to add code so something happens when you click the button.
# Import the minimal kivy features that we need
from kivy.app import App
from kivy.uix.label import Label
from kivy.uix.button import Button
from kivy.uix.boxlayout import BoxLayout

# Our UI
class Example_Form(BoxLayout):

    # Function to call on button click
    def pressed(instance, value):
        print("YOU CLICKED ME!")

    # The form with label and button
    def __init__(self, **kwargs):
        super(Example_Form, self).__init__(**kwargs)
        self.padding=40

        # Give the label a name so we can reference it later
        label = Label(text="Hello World!")
        self.add_widget(label)

        # Give the button a name so we can set the callback
        click_me = Button(text="CLICK ME!")
        click_me.bind(on_press=self.pressed) # This is our click event
        self.add_widget(click_me)


# This is the actual app
class Tutorial_1(App):

    # When the app is built, return hello world UI label
    def build(self):
        return Example_Form()

# If this python file is run, launch the app
if __name__ == "__main__":
    Tutorial_1().run()
There are two significant changes here, first we name our widgets so we can reference them, and second we bind a callback function to our button so we can fire off some code when the button is pressed.
Kivy Widget Properties
For our final example, let's tweak some properties.
Properties are variables that define the attributes or appearance of a widget. We already saw one obvious property which is the label .text property that sets the message we wish to display.
Another cool option is to take our layout and make the widgets stack vertically rather than horizontally.
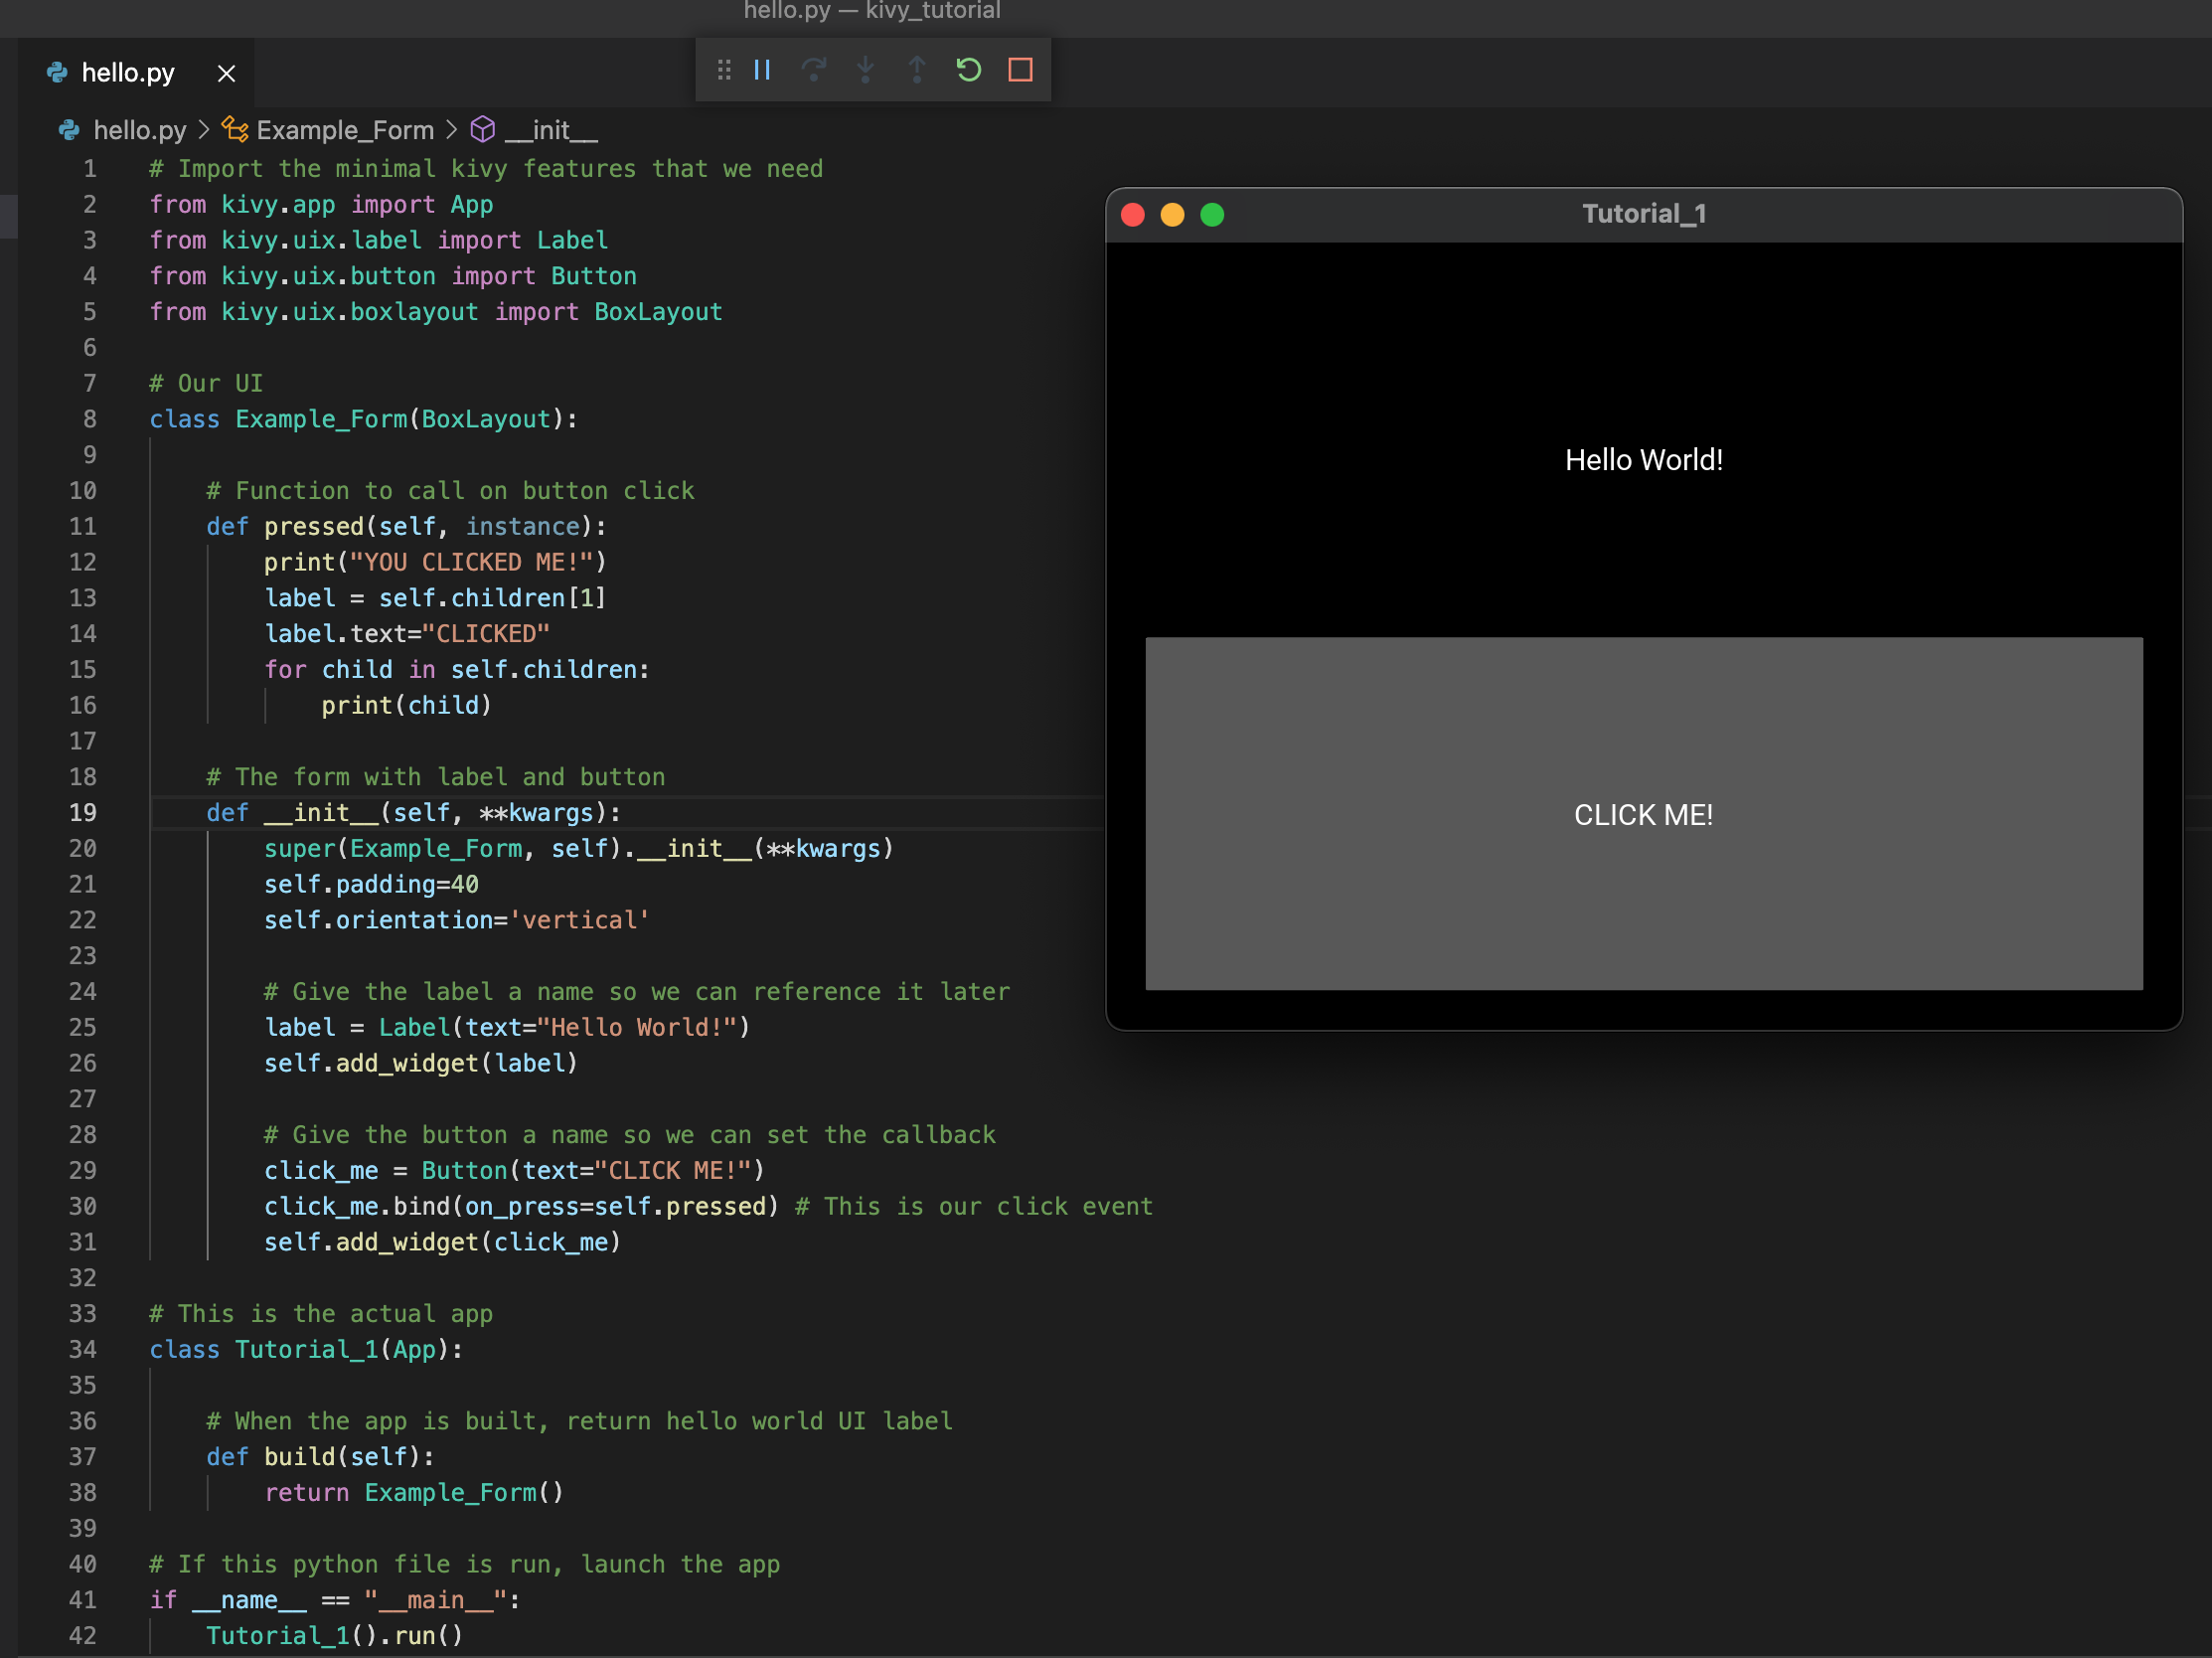
# Import the minimal kivy features that we need
from kivy.app import App
from kivy.uix.label import Label
from kivy.uix.button import Button
from kivy.uix.boxlayout import BoxLayout

# Our UI
class Example_Form(BoxLayout):

    # Function to call on button click
    def pressed(self, instance):
        print("YOU CLICKED ME!")
        label = self.children[1]
        label.text="CLICKED"
        for child in self.children:
            print(child)

    # The form with label and button
    def __init__(self, **kwargs):
        super(Example_Form, self).__init__(**kwargs)
        self.padding=40
        self.orientation='vertical'

        # Give the label a name so we can reference it later
        label = Label(text="Hello World!")
        self.add_widget(label)

        # Give the button a name so we can set the callback
        click_me = Button(text="CLICK ME!")
        click_me.bind(on_press=self.pressed) # This is our click event
        self.add_widget(click_me)

# This is the actual app
class Tutorial_1(App):

    # When the app is built, return hello world UI label
    def build(self):
        return Example_Form()

# If this python file is run, launch the app
if __name__ == "__main__":
    Tutorial_1().run()
As you can see in this example, you can iterate through the parent/child hierarchy of the widgets, so as well as outputting to the console, we can dynamically set the label text when the button is clicked.
Posted with STEMGeeks
Great work @makerhacks. This is my first time seeing code that shows what creating a mobile app with kivy looks like, I highly utilized Django a web framework built with python for Backend Development.
I recently discovered kivy in a presentation of Python Pizza Holguin (an event of which I am one of the organizers) and looks interesting. I always used pyqt but I'll check kivy soon. Thanks for this post