Tutorial: Splicing from bad to good bonbilla [eng/eng]. josuerr29

English
Hello friends of geek zone How are you I am @josuerr29 and this time I bring a video a little different.
At this time I was repairing a lamp in an apartment where we met to share a while on the Bible, but this lamp was so long without turning on that now we do not remember where was the socket or switch, I at least did not know where any switch of what you saw was turned on, all gave voltage and as the bulb was bad was not easy so it had to be tested at every moment with a multimeter and therefore decided to place these solutions.
**We decided to join this bulb to another bulb that we already knew where the switch was and its voltage wire the only thing we had to do is to stick the extension that we are going to take out of the bad bulb to the bulb that we already knew where its switch was.
source
Tools to use
- An Exacto or cutter
- A scissors pliers
- A slotted screwdriver
- A slotted screwdriver
- Anti-electricity adhesive
- a multimeter
When the voltage path is directed towards a bulb we can simply uncover the copper inside the wires going to the bulb and connect another wire from another bulb to those wires and do it right after where the connection to the switch goes, this will cause the voltage path to also be directed towards the bulb we are putting in.
Solution process.
We uncover the wires that go to the first lamp that works, locate the wires to the switch, uncover it and leave it uncovered.
We went down and disassembled the lamp that we don't know where the voltage is to uncover its wires and remove the extension of it, at the same time we had to remove its old voltage source and connection.
Then we must connect a longer wire from the lamp and connect it to the bulb socket and then bring the bad bulb back up to its place where it goes as if it were connected to the same power supply wire, but it is connected to the new wire that we will take out and splice with the other bulb.
This cable we will take it out very carefully without calling much tension disguising it behind the tubes that I show in the video, so that it does not show we must take it to the bulb that if we know where the switch is.
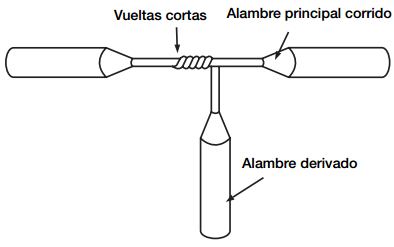
As at the beginning of the video we manage to discover the cables of the bulb which has the switch just to splice we have the extension that we took out of the bad bulb to this good bulb we have to stick a cable to a cable and the other to the other in parallel, without these cables touch one with the other, it does not matter the order since it is alternating current.
Each connection would be in a T-shape because what we did was to uncover the wire that goes to the good bulb and connect the extension to each wire, then we have to cover it with anti-electricity adhesive to avoid electrical cuts.
To do this we had to have removed the good bulb before and to uncover the wires so in this last step we will simply return the good bulb to its place, making sure that the wires are not touching anything undue and are covered with the adhesive.
After having done this step we would already have our bulb with our wires working the joint of the old bulb to the good bulb would be perfect and with a single switch will light the two bulbs.
This was all friends thank you very much for watching the video I hope you like it if you liked it leave a comment.
| content sources |
|---|
- Translation of the text: https://www.deepl.com
- Separator taken from: Here
- Photo and video: Picsart pro. YouCut. Samsung Galaxy j6 plus.
- Authoring Source: original own
- Gift creation: https://www.canva.com.
- Intro of the video made in canca: Gift creation: https://www.canva.com
- Music of the video Copyright free: Here
Español
Hola amigos de geek zone Cómo están yo soy @josuerr29 y en esta oportunidad traigo un vídeo un poco distinto.
En este momento estuve reparando una lámpara de un apartamento donde nosotros nos reunimos a compartir un rato sobre la Biblia, pero está lámpara resultó qué lleva tanto tiempo sin encender que ahora no recordamos dónde estaba el toma-corriente o el switch, yo por lo menos no supe donde se encendía ningún switch de lo que se veían, a todos les daba voltaje y como la bombilla estaba mala tampoco era fácil así tenia que probarse en cada momento con un multímetro y por esto decidimos colocar estás soluciones.
Decidimos unir está bombilla a otra bombilla que ya sabíamos Dónde estaba el switch y su cable de voltaje lo único que debimos hacer es Palmar la extensión que vamos a sacar de la bombilla mala a la bombilla que ya sabíamos donde estaba su switch.
fuente
Herramientas a utilizar
- Un Exacto o cutter
- Un alicate de tijeras
- Un destornillador de paleta
- Un destornillador de estría
- Adhesivo anti electricidad
- un multímetro
Cuando el paso de voltaje se dirige hacia una bombilla podemos simplemente descubrir el cobre dentro de los cables que van hacia la bombilla y conectar otro cable de otro bombilla a esos cables y hacerlo justo después de dónde va la conexión al switch, esto hará que el paso de voltaje se dirija también hacia la bombilla que estamos colocando.
Proceso de solución.
Destapamos los cables que van a la primera lámpara qué funciona, localizamos los cables del switch, los destapamos lo descubrimos y lo dejamos descubierto.
Bajamos y desarmamos la lámpara que no sabemos Dónde está el voltaje para descubrir sus cables y sacar la extensión de ella, al mismo tiempo tuvimos que quitar su antigua fuente de voltaje y conexión.
Luego debemos conectar un cable más largo desde la lámpara y conectarlo al socket de la bombilla y luego volver a subir la bombilla mala a su sitio donde va como si estuviera conectado al mismo cable de fuente de alimentación, pero está conectado al nuevo cable que sacaremos y empalmaremos con la otra bombilla.
Este cable lo sacaremos de forma muy cuidadosa sin que llame mucho la tensión disimulándolo detrás de los tubos que muestro en el vídeo, para que no se muestre debemos llevarlo hasta la bombilla que si sabemos dónde está el switch.
Cómo al principio del vídeo logramos descubrir los cables de la bombilla qué tiene el switch justamente empalmar hemos la extensión que sacamos de la bombilla mala a esta bombilla buena tenemos que pegar un cable a un cable y el otro al otro en paralelos, sin que estos cables se toquen uno con el otro, no importa el orden Ya que es corriente alterna.
Cada conexión quedaría en forma de T porque lo que hicimos fue descubrir el cable que va hacia la bombilla buena y conectamos la extensión a cada cable, luego tenemos que cubrirlo con adhesivo anti electricidad para evitar cortes eléctricos.
Para hacer esto tuvimos que haber quitado la bombilla buena antes y lograr descubrir los cables así que en este último pasó simplemente devolveremos la bombilla buena a su sitio, muy pendiente de que los cables no estén tocando nada indebido y estén cubiertos con el adhesivo.
Después de haber hecho este pasó ya tendríamos nuestra bombilla con nuestros cables funcionando el empalme de la bombilla antigua a la bombilla buena quedaría perfecto y con un solo switch encenderán las dos bombillas.
Esto fue todo amigos muchas gracias por ver el vídeo espero les guste si les gustó dejen comentario
| fuentes del contenido |
|---|
- Traducción del texto: https://www.deepl.com
- Separador tomado de: Aqui
- Foto y video: Picsart pro. YouCut. Samsung Galaxy j6 plus.
- Fuente de Autoría: original propio
- Creación de gift: https://www.canva.com.
- Intro del video realizada en canca: Creación de gift: https://www.canva.com
- Musica del video Sin derecho de autor: Aqui


▶️ 3Speak
Congratulations @josuerr29! You have completed the following achievement on the Hive blockchain and have been rewarded with new badge(s):
Your next target is to reach 4750 upvotes.
You can view your badges on your board and compare yourself to others in the Ranking
If you no longer want to receive notifications, reply to this comment with the word
STOPCheck out the last post from @hivebuzz:
Support the HiveBuzz project. Vote for our proposal!
Excelente tuto mi brooo, por ahora no he usado nunca ninguno para las cosas de mi hogar por suerte. Pero no tengo dudas de que el día que tenga algún problema lo primero que haré es ingresar a tu blog a ver si está la solución JAJAJA. Saludos y que estés muy bien !
!LOLZ
lolztoken.com
I said is that a fret?
Credit: reddit
@josuerr29, I sent you an $LOLZ on behalf of @bananasfallers
Use the !LOL or !LOLZ command to share a joke and an $LOLZ
(4/8)
Muchas gracias por observar el turorial y compartir un rato. Si trato de ayudar a todos. Espero lo hayas disfrutado Y gracias por pasarte por aquí. 🖐
Que buen oficio el de electricista, algo con lo que me llevo muy mal, de pedo se cambiar un foco jaja, pero bueno he de admitir que aprendo mucho con tus tutoriales josuerr! Muchas gracias por traer contenido de calidad a la geekzone.
Gracias a ti querido amigo por pasarte. La electricidad no es mala, tampoco hay que jugar con ella solo hay que respetarla por que tambien es una falsa amiga. Jejejej con mucho cuidado todo. Gracias por pasarte querido amigo 👍
Que buen tutorial, me gusta un poco la parte electricidad y me ha tocado usar ese tipo de empalmes, es muy cómodo y uno se ahorra tiempo.
Buen post.
Un Abrazo.
Muchas gracias a migo por visitar este post y bueno si es algo facil. Es bueno trabajar con electricidad pero tambien hay que respetarla un poco jejej
Claro, eso es muy importante, tener medidas de seguridad, para que no ocurran accidentes.
Un abrazo.