DIY Compost tea aerator
In last week's DIY post from Ligaya Garden, I mentioned a compost tea aerator. Well, here's the instructional on how to make one.
Of course, you can get away with just a bucket and a bit of hose, but we DIY folks are made of sterner stuff (aren't we?) and I like something a bit more permanent. Here's how to make one that you could back over in a car and it would still work!
The theory is that all the extra oxygen gives the bacteria and chemical reactions a kick and makes them more effective. Basically, you just hang a mesh bag of compost or worm castings in the water and bubble away, introducing oxygen and activating the microbes and biochemistry in the water.
Components & building the aerator
As usual, I was pretty flexible on the design, using what I had sitting around in the shed. You may see different options at your place.
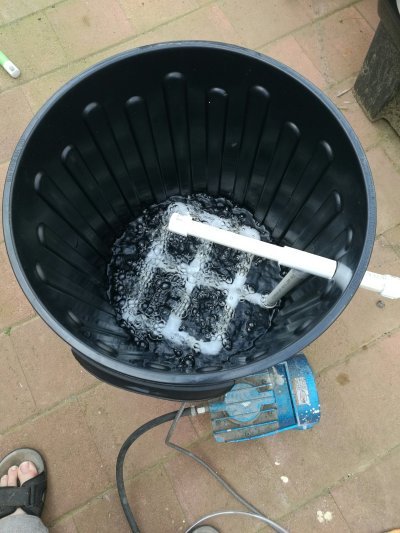
First, we need a big container. Large enough to make a reasonable amount of brew. I chose a standard, 60L plastic garbage bin, available from all hardware stores.
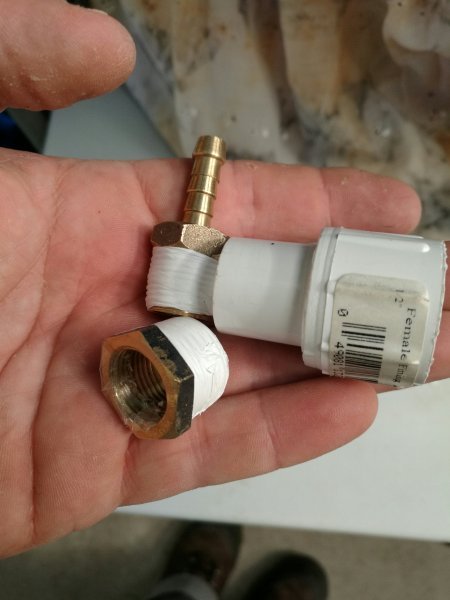
Then, we need an air pump. I used my trusty (if rather old) 70L/min compressor. Thick aquarium hose and a couple of adaptors that I had laying around provided the means to get the air from the compressor to the bin.
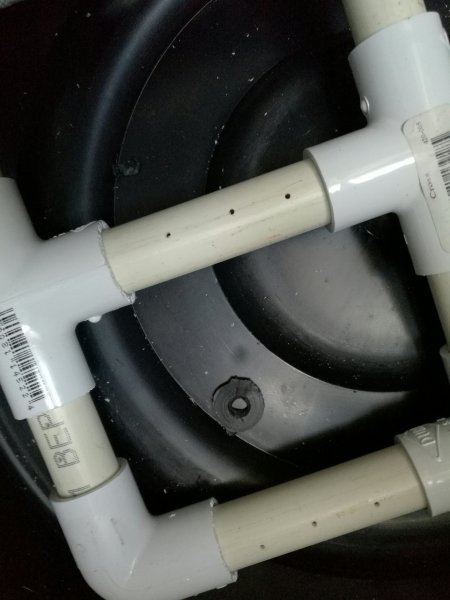
The biggest choice was the choice of pipe size and layout, then the number and size of the holes that would allow the air out while mixing it with the liquid in a way that would allow for maximum aeration.
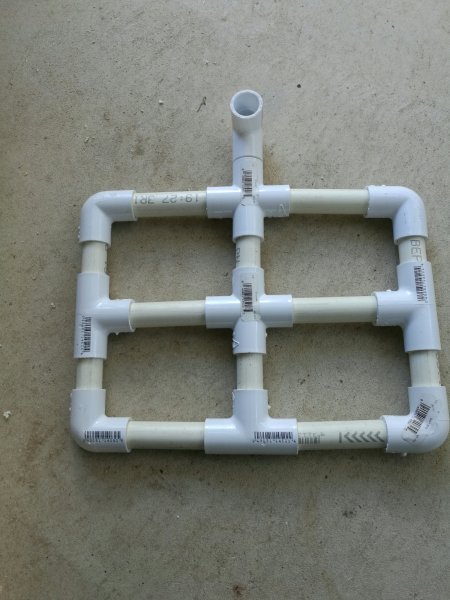
I chose 15mm PVC pipe (because it is the smallest rigid pipe I had) and the ‘crosshair’ design that you can see in the pics. I call that the ‘aeration bed’.
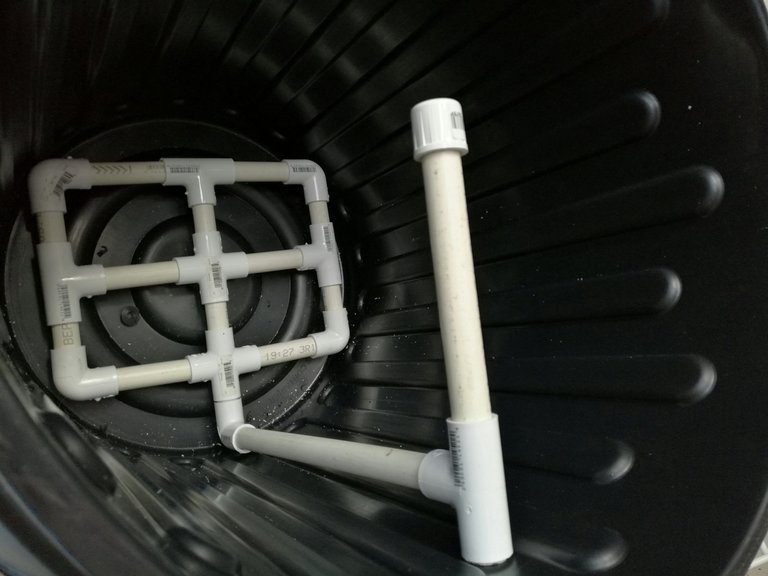
The fiddly bit was to get it all to fit flush with the bottom of the bin. That took a couple af disassemblies and recuts but was eventually done. I decided that the inlet should be through the side of the bin, then continued that pipe across to the middle of the bin to suspend the compost bag from. It just looked better that way.
A t-piece allowed a second run of pipe to allow the air down into the aeration bed and to act as a support for the cross piece and bag.
2mm holes were selected (because that’s the smallest drill bit l had that didn’t break). I placed 2 holes in each of the shorter sections, 3 in the longer. At this stage, I didn’t drill into the connecting pieces (tees and elbows) because they cost money!
It all came together over an hour or so. Not because it was difficult, but it took a while because I was fiddling with the design as I went along.
Test #1 was a good blow through the pipe via my mouth. That worked OK. The next went flawlessly to, so the compressor was attached and let loose. No problems there either.
Options
With all of these DIY projects, there is more than one way to do them.
Make your holes as big as you want. The aertion doesn’t come so much from the microbes being in contact with the bubbles but from the time that they spend on the surface. The airflow is to bring them there.
You don’t need to use PVC pipe, 13 mm poly pipe will do the job equally well. You can get the cross shaped connectors locally in 13 mm but not in 19 mm or over. There are ‘structural PVC’ pieces available in some hardware stores. You can get all kinds of corners and crosses in these, they’re used in making frames and greenhouses but not every store stocks (or has even heard of) them.
For this one, you can do away with the central cross piece if you want and just run a loop of softer pipe about half way out from the centre. It’ll need a bit more pressure to give a good mix but will do the job.


I can imagine your whole garden is bubbling away like a chemistry lab. Garden potions brewing everywhere!
Definitely a mad scientist at heart
Your content has been voted as a part of Encouragement program. Keep up the good work!
Use Ecency daily to boost your growth on platform!
Support Ecency
Vote for new Proposal
Delegate HP and earn more
That’s very cool. Remind me of the ones I made. I have one that create a vortex too.
I've tried vortexes. Do You reckon they're effective?
Technically they are more effective, they have three points of oxygenation of water:
Also because it twirls, there is minimal stagnation spot.
Here is an old video of mine showing this:
With an air filter, the main source of oxygen is the bubbles going up (and large bubbles don’t work as well as small bubbles like ones from air stones) and a bit on the surface. Also they have more stagnation spot at the bottom, below and around the pipes for example. That means there are potential for anaerobic spots.
But for home use I don’t think the difference is that important.
If you are into this, here is a very lengthy page of someone who has done a lot of experiment with a microscope and is also sharing plans of an efficient brewer. Worth reading everything or skipping parts that are too difficult. Might takes multiple reading sessions to finish haha:
http://www.microbeorganics.com/
nice setup. I've wondered about how to get a decent sized diy cone?
The cone is great but not necessary. The one I have is an old dock edge piling cap.
but it looks so cool!
!hivebits