RB0 INTERRUPT ON PIC16F877A AT HIGH SPEED EN/ES
After being introduced to interrupts at a theoretical level it is time to complement the knowledge with some practical applications, that is why today we will start with our first application for an interrupt.
We will use the external interrupt RB0 but instead of applying it to control a critical process we will use it to measure the RPM in a motor, this way besides giving it a useful application we can have an idea of what is the speed of response. We are at high speed so follow me without blinking so you don't miss anything 😉.
Luego de habernos introducido en las interrupciones a nivel teórico llegó el momento de complementar los conocimientos con algunas aplicaciones prácticas, es por eso que hoy iniciaremos con nuestra primera aplicación para una interrupción.
Usaremos la interrupción externa RB0 pero lo que haremos en lugar de aplicarla para el control de un proceso crítico lo usaremos para medir las RPM en un motor, de esta forma a parte de darle una aplicación útil podemos tener una idea de cual es la velocidad de respuesta. Estamos a alta velocidad así que sigueme sin pestañar para que no te pierdas de nada 😉.

Circuit created for the simulation in PROTEUS by @electronico
Motor with encoder |
|---|
Measuring the revolutions per minute in an engine seems a complicated task at first glance, how to know how many revolutions per minute a motor is giving when its blades move with such speed? From a certain level of RPM our eye becomes useless to detect even one of the blades, how much more to count the revolutions. That's where electronics makes a complicated task easy for us.
But this is supposed to be understood by everyone, so I will explain it in such a simple way that you can understand it even while watching TV, and I'm not kidding!
Medir las revoluciones por minutos en un motor parece una tarea complicada a simple vista, ¿cómo saber cuantas vueltas por minuto está dando un motor cuando sus aspas se mueven con tanta velocidad? a partir de cierto nivel de RPM nuestro ojo se vuelve inútil para detectar siquiera una de las aspas, cuanto más para contar las vueltas. Es ahí donde la electrónica nos hace fácil una tarea complicada.
Pero se supone que esto debería entenderlo cualquiera así que lo explicaré de una forma tan sencilla que podrás entenderlo incluso mientras ves la tele, y no estoy bromeando!
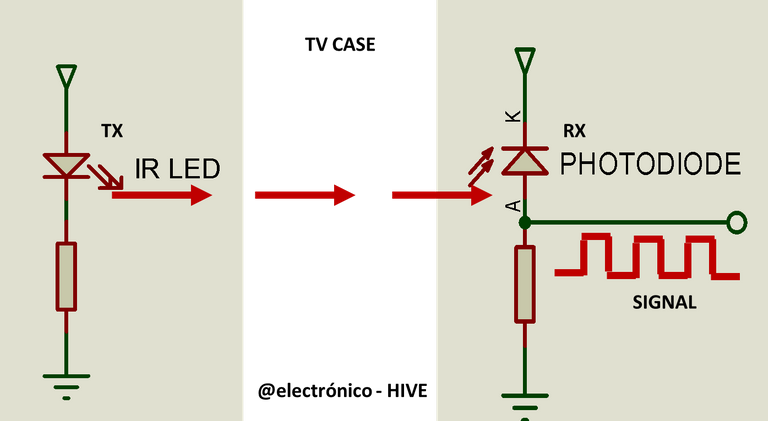
 Pixabay
Right there on the remote control of your TV, in the part that you point to the TV when you want to change the channel there is something remarkable because it is different from the rest of the edge, it is a LED but despite being a LED you will never see it emit any kind of light and it is not that it does not, it just does it in a spectrum that is not visible to your eye, it is an infrared light emitting diode.
When you press a button this led blinks a number of times and a receiver of the same nature in the TV is able to capture this blinking and interpret what signal is being sent, give volume, change channel or anything related.
This signal can be interfered with physical objects, if someone gets between the control and the TV, there will be no response to the keystrokes on the control because the signal will not reach the receiver on the TV, although it is not useful for the TV it is useful for infrared alarms in which a continuous beam is emitted between the transmitter and the receiver and an interruption in the beam means the presence of intruder so the alarm is triggered.
Justo ahí en el control remoto de tu TV, en la parte que apuntas hacia la TV cuando deseas cambiar el canal hay algo notable porque es distinto al resto del borde, se trata de un led pero a pesar de serlo nunca lo verás emitir ningún tipo de luz y no es que no lo haga, solo que lo hace en un espectro que no es visible para tu ojo, se trata de un diodo emisor de luz infrarroja.
Cuando pulsas un boton este led parpadea una cantidad de veces y un receptor de la misma naturaleza en la TV es capaz de captar este parpadeo e interpretar que señal se está enviando, dar volumen, cambiar canal o todo lo relacionado.
Esta señal puede ser interferida con objetos físicos, si alguien se interpone entre el control y el tv no habra respuesta a las pulsaciones en el control porque la señal no llegará al receptor en el tv, aunque no es útil para la tv lo es para las alarmas infrarrojas en los que se emite una haz continuo entre el emisor y el receptor y una interrupción en el haz significa presencia de intruso por lo cual se activa la alarma.
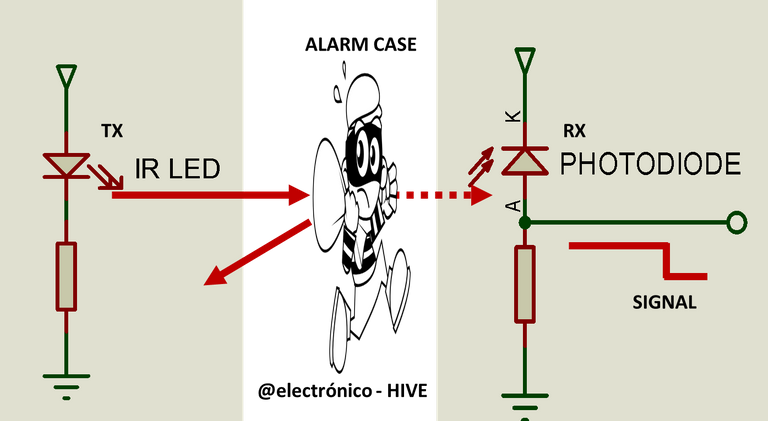
Now we are going to apply both concepts to a motor of which we want to know its RPMs at all times, first we would apply the alarm technique by activating an emitter on one side and a receiver on the other, we should have a continuous signal at the output. But if a blade interferes between the LEDs there will be an interruption of the signal.
This interruption can be used to create a pulse train where each pulse means that a blade has crossed the communication line, if we know how many blades the motor has we can know when it has made a complete turn since a turn would be when the number of interruptions equals the number of blades, motors with encoders usually have this type of logic for measuring RPMs.
Ahora vamos a aplicar ambos conceptos a un motor del cual deseamos conocer sus RPMs en todo momento, en primer lugar aplicaríamos la técnica de la alarma activando un emisor en un lado y un receptor en el otro, deberíamos tener una señal continua en la salida. Pero si un aspa interfiere entre los leds ocurrirá una interrupción de la señal.
Esta interrupción la podemos aprovechar para crear un tren de pulsos donde cada pulso significa que un aspa ha cruzado la línea de comunicación, si conocemos cuantas aspas tiene el motor podemos saber cuando ha dado una vuelta completa ya que una vuelta sería cuando el número de interrupciones iguala el número de aspas, los motores con encoder por lo general presentan este tipo de lógica para la medición de RPMs.
Our application |
|---|
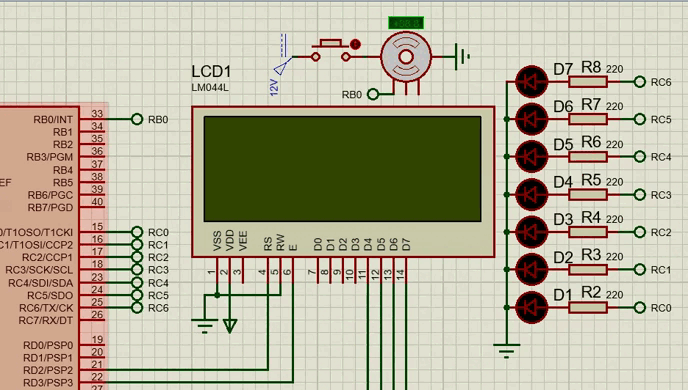
What we will do will be to take that train of pulses generated in the internal electronics of the motor and we will make it enter in the PIN RB0 of our microcontroller, for it we will activate the interruption by RB0 so that when entering a pulse the routine of the interruption can count it, meanwhile in the main program we will make the routine to process the data and to print them in screen.
Additionally a led bar with different colors will increase as the revolutions do, this way a visual effect is created that can give a notion of the state of the motor, although the precise data will be shown in a display.
Lo que nosotros haremos será tomar ese tren de pulsos generado en la electrónica interna del motor y lo haremos entrar en el PIN RB0 de nuestro microcontrolador, para ello activaremos la interrupción por RB0 para que al entrar un pulso la rutina de la interrupción pueda contarlo, mientrastanto en el programa principal haremos la rutina de procesar los datos e imprimirlos en pantalla.
Adicionalmente una barra de led con distintos colores incrementará a medida que lo hagan las revoluciones, de esta forma se crea un efecto visual que puede dar una noción del estado del motor, aunque los datos precisos serán mostrados en un display.
Programming |
|---|
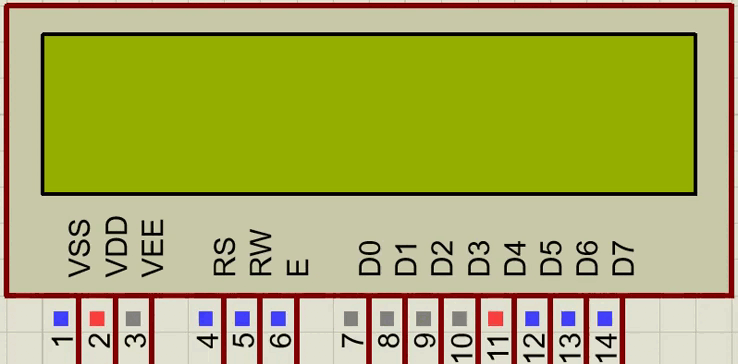
We write our first lines as usual, but now we will use a 20x4 LCD instead of the usual 16x2, just to be noticed that the handling is identical except that instead of adding the 16x2 library we add the corresponding LCD20x4, also we will enable the PORTC as output for the management of the LEDs that will give the visual effect.
Escribimos nuestras primeras líneas como de costumbre, pero ahora usaremos un LCD 20x4 en lugar del 16x2 acostumbrado, solo para que se note que el manejo es identico salvo que en lugar de añadir la librería 16x2 añadimos la LCD20x4 correspondiente, además habilitaremos el PORTC como salida para el manejo de los LEDs que darán el efecto visual.
#include <16f877a.h>

#fuses HS,NOWDT,NOPROTECT,NOPUT,NOLVP,BROWNOUT

#use delay(clock=20M)

#use fast_io(B)

#use standard_io(D)

#use standard_io(C)


#define LCD_DB4  PIN_D4

#define LCD_DB5  PIN_D5

#define LCD_DB6  PIN_D6

#define LCD_DB7  PIN_D7

#define LCD_RS   PIN_D2

#define LCD_E    PIN_D3

#include <LCD_20X4.c
Now we create the variables, count stores the count of incoming pulses, RPM stores the calculated value for the RPMs in blades_rev we must define the number of blades our motor has.
Ahora creamos las variables, count almacena la cuenta de pulsos entrantes, RPM almacena el valor calculado para las RPMs en blades_rev debemos definir la cantidad de aspas que posee nuestro motor.
long count = 0;

double RPM;

int blades_rev = 5;
In the following lines we are going to configure our interruption, as there are different types we must define the one we are going to use and immediately the subroutine (line of code) that will be executed when it occurs, this is done with #INT_Case where Case must be replaced by the interruption, in our case RB0 is known as EXT so it must be #INT_EXT, if it were of another type EXT is changed by the corresponding one, we will see this as we progress in explaining each one of them for future articles.
When we write this definition we are only setting the address of our code associated with that interrupt, but for it to work we must enable the interrupt with the enable_interrupts(INT_EXT) command; and the global interrupts must be enabled with the enable_interrupts(GLOBAL) instruction;
Now following with our code we create the line of code for our interruption, in it we want that when the pulse arrives it is counted increasing the count variable and at the same time according to the RPMs the leds of visual effect will be turned on.
En las siguientes líneas vamos a configurar nuestra interrupción, cómo existen distintos tipos debemos definir la que vamos a usar e inmediatamente la subrutina (línea de códigos) que se ejecutarán cuando ocurra, esto se hace con #INT_Case donde Case se debe reemplazar por el la interurpción, en nuestro caso RB0 se conoce como EXT asi que debe ser #INT_EXT, si fuese de otro tipo se cambia EXT por la correspondiente, veremos esto a medida que avancemos en explicar cada una de ellas para artículos futuros.
Cuando escribimos esa definición solo estamos estableciendo la dirección de nuestro código asociado a esa interrupción, pero para que pueda funcionar se debe activar la interrupción mediante el comando enable_interrupts(INT_EXT); y se deben activar las interrupciones globales con la instrucción enable_interrupts(GLOBAL);
Ahora siguiendo con nuestro código creamos la línea de código para nuestra interrupción, en ella queremos que al llegar el pulso sea contado incrementando la variable count y a la vez según sean las RPMs se encenderan los leds de efecto visual.
#INT_EXT

void interruption_RB0()

{

  count++;

        if(RPM<50)

      {

      output_C(0x00);

      }

      else if(RPM >= 50 && RPM < 100)

      {

      output_C(0b00000001);

      }

      else if(RPM >= 100 && RPM < 150)

      {

      output_C(0b00000011);

      }


      else if(RPM >= 150 && RPM < 200)

      {

      output_C(0b00000111);

      }

      else if(RPM >= 200 && RPM < 250)

      {

      output_C(0b00001111);

      }

      else if(RPM >= 250 && RPM < 300)

      {

      output_C(0b00011111);

      }

      else if(RPM >= 300 && RPM < 350)

      {

      output_C(0b00111111);

      }

      else if(RPM >= 350)

      {

      output_C(0b01111111);

      }

}
We must take into account that although we are writing these lines of code at the beginning they are part of the interrupt and will not be executed until the interrupt occurs, as so far we have not enabled the interrupts but we do it in the main program, we can say that this code is never executed first than the main program even if the interrupt condition is present from the beginning.
Now in our main program we initialize our LCD, configure port B as input and enable the interrupt we will use and the global ones (which is the permissive for the use of interrupts).
Debemos tomar en cuenta que a pesar de que estamos escribiendo estas líneas de código al inicio forman parte de la interrupción y no se ejecutaran sino solo hasta que ocurra la interrupción, como hasta ahora no hemos habilitado las interrupciones sino que lo hacemos en el programa principal, se puede decir que este código nunca se ejecuta primero que el programa principal aunque la condición de interrupción esté presente desde el inicio.
Ahora en nuestro programa principal inicializamos nuestro LCD, configuramos el puerto B como entrada y habilitamos la interrupción que usaremos y las globales (que es el permisivo para el uso de interrupciones).
void main()

{

   lcd_init();

   set_tris_b(0xFF);

   enable_interrupts(INT_EXT);

   ext_int_edge(L_TO_H);

   enable_interrupts(GLOBAL);
In our while loop we create the formula to calculate the RPMs according to the pulses received, and subsequently print that value on the screen (along with other data that is for stylistic purposes only 😎).
En nuestro bucle while creamos la fórmula para calcular las RPMs según los pulsos que se reciban, y posteriormente imprimimos ese valor en pantalla (junto con otros datos que solo tienen fines estilísticos 😎).
   while(true)

   {

      RPM = count*60/blades_rev;    // Conversion para RPM

      count = 0;

      lcd_clear();

      lcd_gotoxy(1,1);

      printf(lcd_putc,"MOTOR SPEED");

      lcd_gotoxy(1,2);

      printf(lcd_putc,"RPM: %f  ",RPM);

      lcd_gotoxy(1,3);

      printf(lcd_putc,"@electronico - HIVE");

      lcd_gotoxy(1,4);

      printf(lcd_putc,"Original Content");

      delay_ms(400);

   }

}
Simulation |
|---|
To finish we are going to test our simulation, I have put a push button to feed the motor manually, this way we can hold to increase revolutions or release to decrease, so we can test the count and see the effect on the leds.
Para finalizar vamos a probar nuestra simulación, he puesto un pulsador para alimentar el motor de forma manual, de esta forma podemos mantener para aumentar revoluciones o soltar para disminuir, así probamos el conteo y vemos el efecto en los leds.

Congratulations @electronico! You have completed the following achievement on the Hive blockchain And have been rewarded with New badge(s)
Your next target is to reach 70 posts.
You can view your badges on your board and compare yourself to others in the Ranking
If you no longer want to receive notifications, reply to this comment with the word
STOPTo support your work, I also upvoted your post!
Check out our last posts:
Only 60? I haven't been very active it seems, we have a lot of lost time to make up!!!! Although I am striving to see if I can at least manage one a day because writing an article takes me up to 4 hours and sometimes more.
Right now I have a lot of motivation because my account has grown a lot these last few months, I am very grateful to everyone who has supported me. Including you Mr. Cybor, without your valuable data I wouldn't even know how well or bad I'm doing. Thank you!
But you already made your confession, don't want to back out now!!!! 😏
You see you're not the only one who carries his (and everyone's) stuff in a well-recorded way! 😁
Thanks for your contribution to the STEMsocial community. Feel free to join us on discord to get to know the rest of us!
Please consider delegating to the @stemsocial account (85% of the curation rewards are returned).
You may also include @stemsocial as a beneficiary of the rewards of this post to get a stronger support.
¡Enhorabuena!
✅ Has hecho un buen trabajo, por lo cual tu publicación ha sido valorada y ha recibido el apoyo de parte de CHESS BROTHERS ♔ 💪
♟ Te invitamos a usar nuestra etiqueta #chessbrothers y a que aprendas más sobre nosotros.
♟♟ También puedes contactarnos en nuestro servidor de Discord y promocionar allí tus publicaciones.
♟♟♟ Considera unirte a nuestro trail de curación para que trabajemos en equipo y recibas recompensas automáticamente.
♞♟ Echa un vistazo a nuestra cuenta @chessbrotherspro para que te informes sobre el proceso de curación llevado a diario por nuestro equipo.
🏅 Si quieres obtener ganancias con tu delegacion de HP y apoyar a nuestro proyecto, te invitamos a unirte al plan Master Investor. Aquí puedes aprender cómo hacerlo.
Cordialmente
El equipo de CHESS BROTHERS
Muchas gracias amigos, su apoyo siempre es bien recibido!!! 🤗
@tipu curate 2
Upvoted 👌 (Mana: 6/46) Liquid rewards.