Our 2011 Assignment Regarding Visual Basic 6
Note
This is my Visual Programming assignment that I translated to English myself (Bahasa Indonesia dibawah / Indonesian language at the bottom) during my undergraduate study at the Department of Electrical Engineering, Udayana University, 2011. Indeed, this assignment is far behind times but it can be an entertainment in the future where Visual Basic sophistication is very advanced and when seeing this assignment, old programmers will feel nostalgic and young programmers will be surprised at how underdeveloped Visual Basic was then. This assignment has never been published anywhere. I and Muhammad Audy Bazly, as the author and copyright holder, license this task with CC-BY-SA where anyone can share, share, republish and sell on condition to state name us as authors and let us know that the original and open versions are available here.
Get to know Visual Basic 6.0
Basic language is basically a language that is easy to understand so programming in the Basic language can be easily be done even by people who are just learning to program. This is even easier after the presence of Microsoft Visual Basic, which was built from the idea of creating a simple and easy scripting language for the graphic user interface developed in the Microsoft Windows operating system.
Visual Basic is a programming language that is very easy to learn, with visual programming techniques that allow users to be better creative in producing an application program. This can be seen from the basic creation in Visual Basic is FORM, where users can set the appearance of the form and then run it in a very easy script. The explosion in the use of Visual Basic is marked by the ability of Visual Basic to be able to interact with other applications in the Windows operating system with ActiveX Control components. With this component it allows users to call and use all existing data models in the Windows operating system. This is also supported by programming techniques in Visual Basic which adopt two types of programming, namely Visual Programming and Object Oriented Programming (OOP). Visual Basic 6.0 is actually a development from the previous version with several additional components that are currently trending, such as internet programming capabilities with DHTML (Dynamic HyperText Mark Language), and several additional database and multimedia features that are getting better. Until the time this book was written, it can be said that Visual Basic 6.0 is still the first choice in making application programs that exist in the national software market. This is due to the ease in carrying out the development process of the application being created.
Visual Basic 6.0 Interface
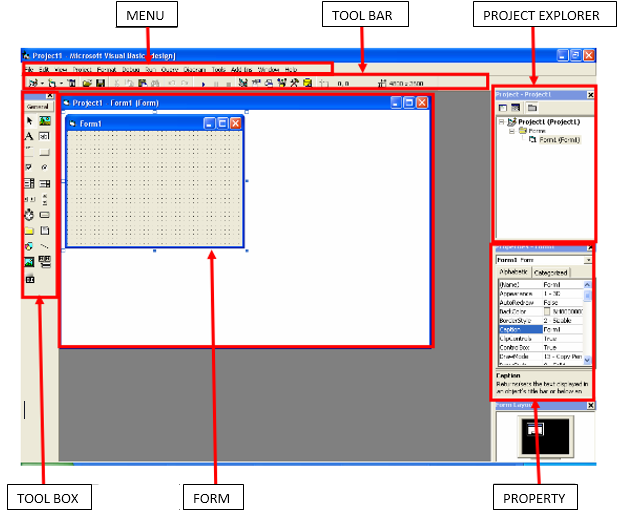
The Visual Basic 6.0 interface contains menus, toolbars, toolboxes, forms, project explorer and properties as shown in Figure 1 below.:

Figure 1 Visual Basic 6.0 interface
Making an application program using Visual Basic is done by making an application display on the form, then given the program script in the required components. The form is composed of components that are in the [Toolbox], and each component that is used must have its properties set via the [Property] window. Menus are basically standard operations in the Windows operating system, such as creating new forms, creating new projects, opening projects and saving projects. In addition, there are visual basic usage facilities on the menu. For more details, Visual Basic provides a very complete and detailed help in MSDN.
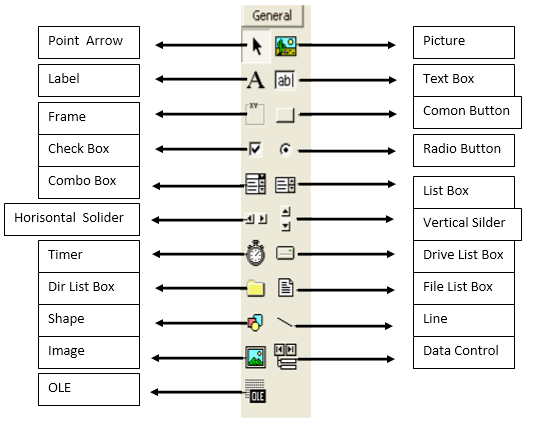
The toolbox contains components that can be used by an active project, meaning that the contents of the components in the toolbox really depend on the type of project being built. The standard components in the toolbox can be seen in Figure 2 below.

Figure 2 Standard Components in the Toolbox
The functions of the control components in the ToolBox in Visual Basic:
- Pointer: use Pointer if you want to select control components that are already installed in the form.
- Label: to make text such as title, and so on. Labels cannot be changed by the user.
- Frame: to create a frame.
- CheckBox: to create select control, where this control is selected when the user clicks. CheckBox can be selected 1 or more.
- ComboBox: to create combination control between TextBox and ListBox.
- HScrollBar: to create a horizontal Scrollbar.
- Timer: for time control.
- DirListBox: to display a directory or folder.
- Shape: to make a box, rectangle or circle.
- Image: to create an image.
- OLE: to link other software to the form.
- PictureBox: to display images on the form.
- TextBox: to create text that can be changed by the user.
- CommandButton: to create buttons, such as the OK button, cancel, and so on it's up to you.
- OptionButton: functions the same as CheckBox, but OptionButton can only be selected 1 by the user.
- ListBox: to create a list of choices.
- VScrollBar: to create a vertical Scrollbar.
- DriveListBox: to display the drives on the computer.
- FileListBox: to display files.
- Line: to make a line.
- Data: to connect the database to the form.
Basic Concepts of Programming in Visual Basic 6.0
The basic concept of Visual Basic 6.0 programming is making forms by following the property, method and event programming rules. This is means:
- Property: Each component in Visual Basic programming can set its properties according to application needs. Property that should not be forgotten for each component is "Name", which means the name of the variable (component) that will be used in scripting. The property "Name" can only be set via the Properties window, while the values for other properties can be set via the script.
- Method: That the running of the program can be set according to the application by using the programming method set as the action of each component. This method is the place to express the programming logic of creating an application program.
- Event: Each component can act via events, such as the click event on the command button written in the Command1_Click script screen, or the Mouse Down event on the picture which is written as Picture1_MouseDown. Event settings in each component that will run all the methods created.
Create a New Project
To start making application programs in Visual Basic, what is done is to create a new project. Project is a set of forms, modules, functions, data and reports used in an application. Creating a new project can be done by selecting the [File] >> [New Project] menu or by pressing the [new project] icon on the Toolbar which is located in the upper left corner. After that a confirmation will appear for the type of project from the application program that will be created as shown in Figure 3 below.
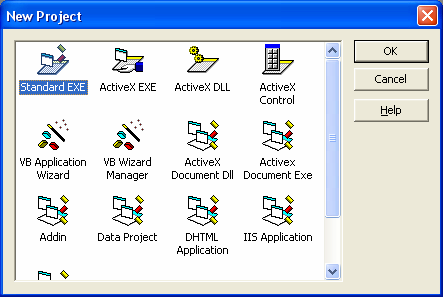
Figure 3 Project type selection screen
Visual Basic 6.0 provides 13 types of projects that can be created as shown in Figure 3 above. There are several projects that are commonly used by many Visual Basic users, including:
- Standard EXE: standard project in Visual Basic with standard components. This type of project is very simple, but has the advantage that all its components can be recognized by all computer units and all users even though they are not administrators. This book will use the Standard EXE project as a visual programming concept.
- ActiveX EXE: this project is an ActiveX project that contains components of the ability to interact with all applications on the windows operating system.
- ActiveX DLL: this project produces a library application which can then be used by all applications on the windows operating system.
- ActiveX Control: this project generates new components for other Visual Basic applications
- VB Application Wizard: This project guides users to easily create applications without having to bother with programming commands.
- Addin: a project like Standard EXE but with a variety of additional components that allow users to be creative.
- Project data: this project completes its components with database components. So it can be said that this project is provided for database application development purposes.
- DHTML Application: this project is used to create internet applications on the client side (client side) with DHTML functions.
- IIS Application: this project produces server side internet applications with CGI (Common Gateway Interface) components.
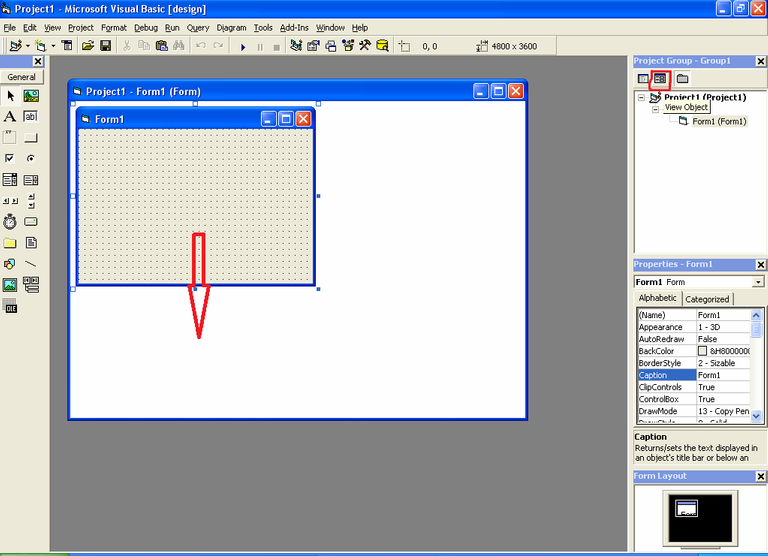
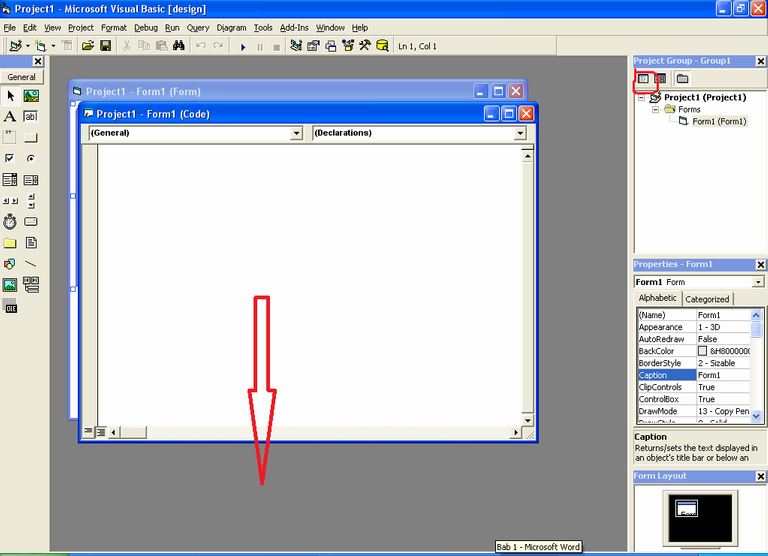
Then select Standard EXE and press [Ok]. Then the display of Standard Exe appears as shown in Figure 1. Thus the project is ready to be created. In making the previous project double click on the form created so that there is a hidden window in the form of a window for programming or a code window. This can be done by selecting the icon for the form window or the code window in [Project Explorer]. This can be seen in Figure 4 and Figure 5.

Figure 4 Form Window
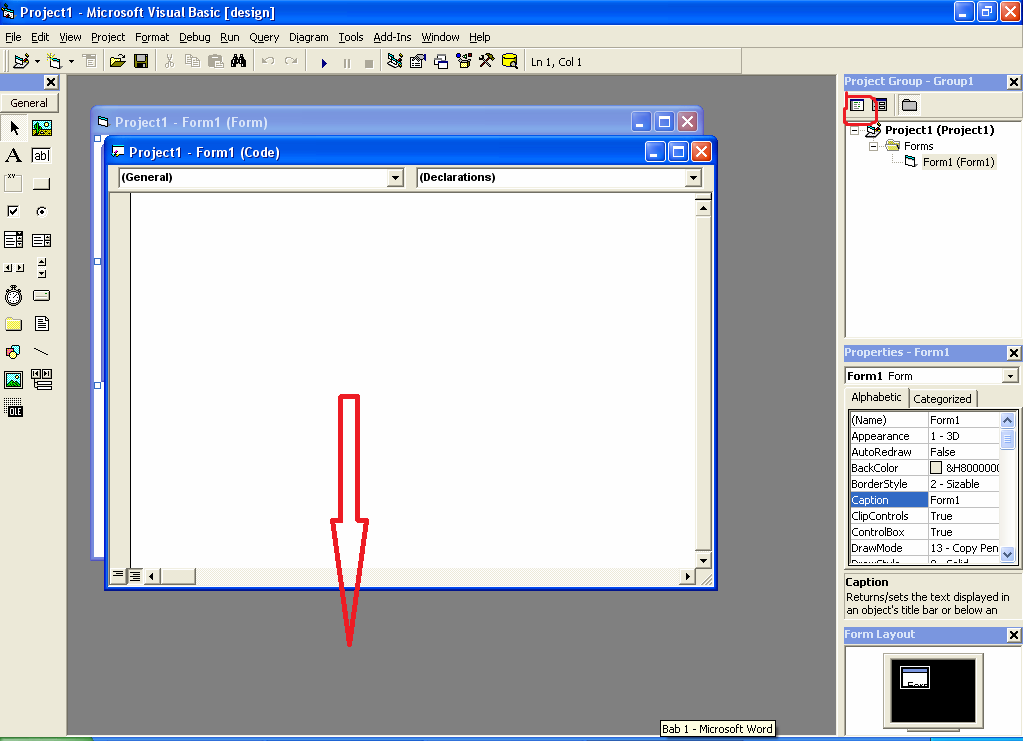
Figure 5 Code Window
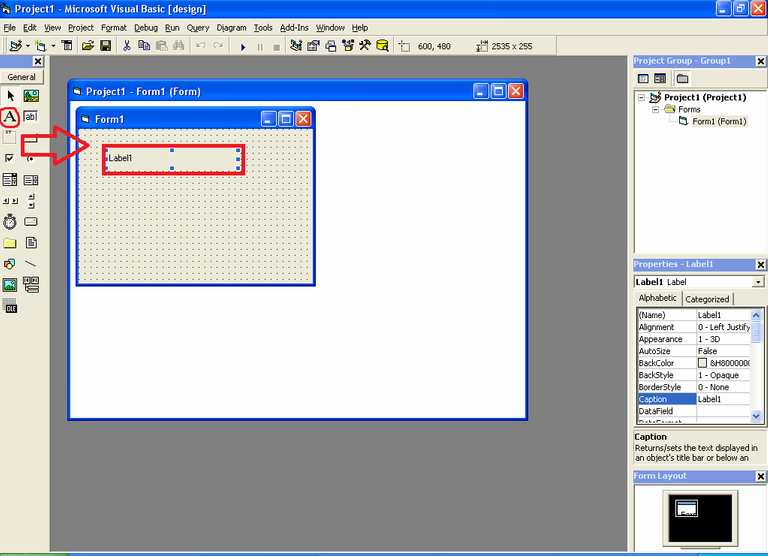
In the form window, the user builds the appearance of the application program that will be created by adjusting the components both their location, properties and events. To retrieve a component from the [Toolbox], you can click on the component, then click or drag it to the correct position on the form. For example, taking a label from the Toolbox can be done in a way like Figure 6 below.
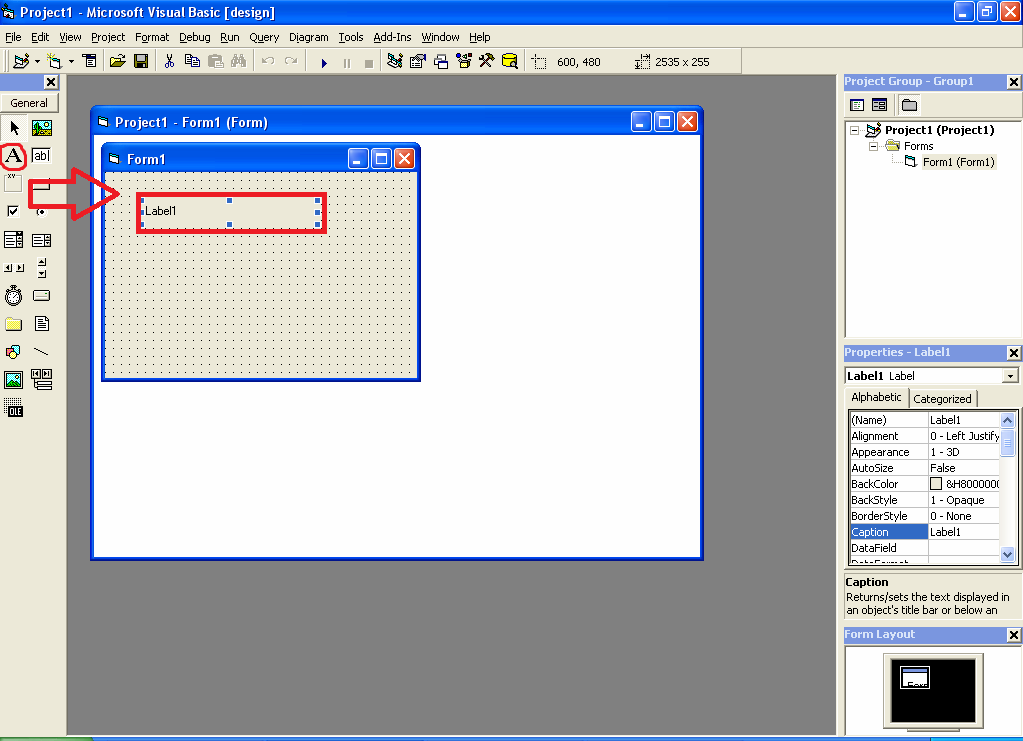
Figure 6 Retrieving labels from the Toolbox
The steps for retrieving a label from the toolbox to attach it to the form are as follows:
- Click the [Label] icon on the [ToolBox]
- Move it to the position where the label will be placed
- Click and drag until the size is correct then release
Note: don't forget to set the property name of each component used, because name is the identity of the object that will be used in writing the program. The next step is to provide text on the label, for example "Hello world", then select the Caption property, and fill it with Hello world. The program display results are as follows:
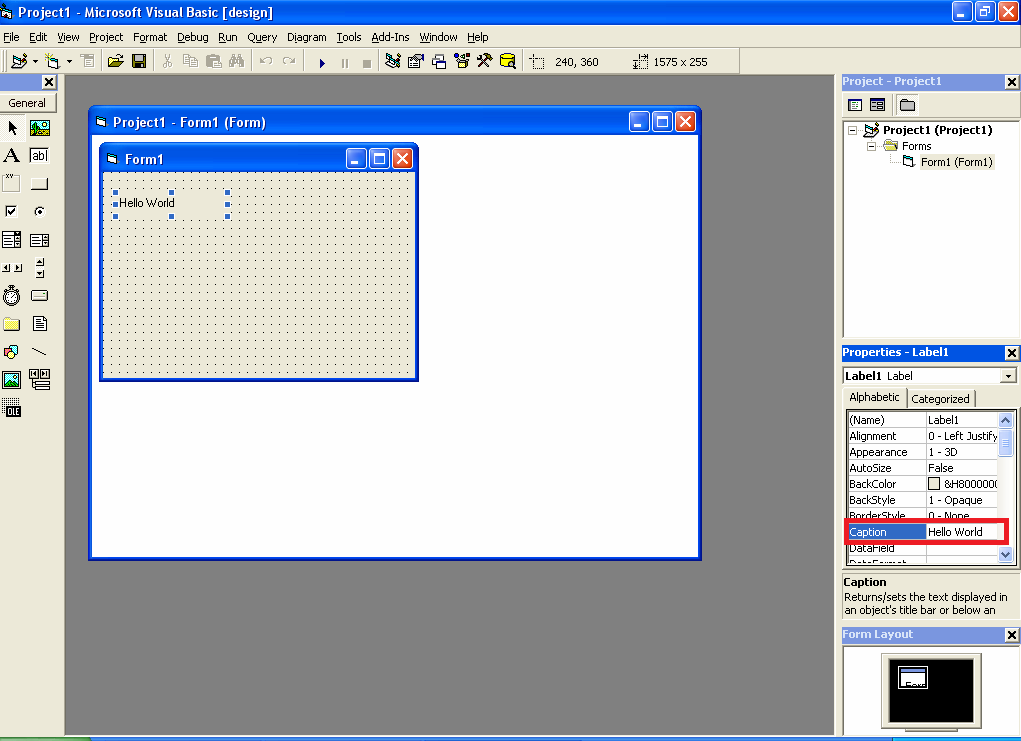
Figure 7 Layout on the Form
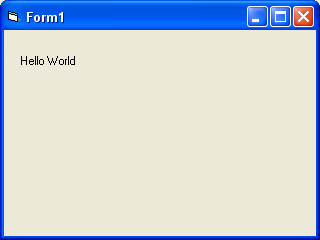
And to run the program, click the Run icon () on the toolbar or select the [Run] >> [Start] menu, or by pressing the [F5] key. So that the program results are:

Figure 8 Program Results
In Figure 9 is an example of a program that we made, namely the calculation of free space loss to calculate the loss of signal strength in the air. The method is the same as just adding formulas. Program is available at Github.
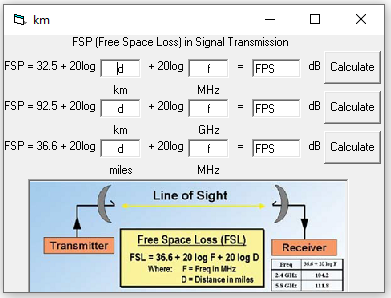
Figure 9 Free Space Loss Program
Tugas Kuliah 2011 Kami Mengenai Visual Basic 6
Catatan
Ini adalah tugas kuliah Pemrograman Visual saya selama studi S1 di Jurusan Teknik Elektro Universitas Udayana, 2011. Memang tugas ini jauh ketinggalan tetapi bisa menjadi hiburan jauh di masa depan dimana kecanggihan Visual Basic sudah sangat maju dan ketika melihat tugas ini, para programer tua akan merasa nostalgia dan para programer muda akan kaget mengenai bagaimana belum berkembangnya Visual Basic dulu. Tugas ini belum pernah dipublikasikan di mana pun dan saya dan Muhammad Audy Bazly, sebagai penulis dan pemegang hak cipta, melisensikan tugas ini dengan penyesuaian CC-BY-SA di mana siapa pun dapat membagikan, menyalin, menerbitkan ulang, dan menjual dengan syarat untuk menyatakan nama kami sebagai penulis dan memberi tahu bahwa versi asli dan terbuka tersedia di sini.
Mengenal Visual Basic 6.0
Bahasa Basic pada dasarnya adalah bahasa yang mudah dimengerti sehingga pemrograman di dalam bahasa Basic dapat dengan mudah dilakukan meskipun oleh orang yang baru belajar membuat program. Hal ini lebih mudah lagi setelah hadirnya Microsoft Visual Basic, yang dibangun dari ide untuk membuat bahasa yang sederhana dan mudah dalam pembuatan scriptnya (simple scripting language) untuk graphic user interface yang dikembangkan dalam sistem operasi Microsoft Windows.
Visual Basic merupakan bahasa pemrograman yang sangat mudah dipelajari, dengan teknik pemrograman visual yang memungkinkan penggunanya untuk berkreasi lebih baik dalam menghasilkan suatu program aplikasi. Ini terlihat dari dasar pembuatan dalam visual basic adalah FORM, dimana pengguna dapat mengatur tampilan form kemudian dijalankan dalam script yang sangat mudah. Ledakan pemakaian Visual Basic ditandai dengan kemampuan Visual Basic untuk dapat berinteraksi dengan aplikasi lain di dalam sistem operasi Windows dengan komponen ActiveX Control. Dengan komponen ini memungkinkan penguna untuk memanggil dan menggunakan semua model data yang ada di dalam sistem operasi windows. Hal ini juga ditunjang dengan teknik pemrograman di dalam Visual Basic yang mengadopsi dua macam jenis pemrograman yaitu Pemrograman Visual dan Object Oriented Programming (OOP). Visual Basic 6.0 sebetulnya perkembangan dari versi sebelumnya dengan beberapa penambahan komponen yang sedang tren saat ini, seperti kemampuan pemrograman internet dengan DHTML (Dynamic HyperText Mark Language), dan beberapa penambahan fitur database dan multimedia yang semakin baik. Sampai saat buku ini ditulis bisa dikatakan bahwa Visual Basic 6.0 masih merupakan pilih pertama di dalam membuat program aplikasi yang ada di pasar perangkat lunak nasional. Hal ini disebabkan oleh kemudahan dalam melakukan proses development dari aplikasi yang dibuat.
Interface Antar Muka Visual Basic 6.0
Interface antar muka Visual Basic 6.0, berisi menu, toolbar, toolbox, form, project explorer dan property seperti terlihat pada Gambar 1 berikut:
Gambar 1 interface antar muka Visual Basic 6.0
Pembuatan program aplikasi menggunakan Visual Basic dilakukan dengan membuat tampilan aplikasi pada form, kemudian diberi script program di dalam komponen-komponen yang diperlukan. Form disusun oleh komponen-komponen yang berada di [Toolbox], dan setiap komponen yang dipakai harus diatur propertinya lewat jendela [Property]. Menu pada dasarnya adalah operasional standar di dalam sistem operasi windows, seperti membuat form baru, membuat project baru, membuka project dan menyimpan project. Di samping itu terdapat fasilitas-fasilitas pemakaian visual basic pada menu. Untuk lebih jelasnya Visual Basic menyediakan bantuan yang sangat lengkap dan detail dalam MSDN.
Toolbox berisi komponen-komponen yang bisa digunakan oleh suatu project aktif, artinya isi komponen dalam toolbox sangat tergantung pada jenis project yang dibangun. Komponen standar dalam toolbox dapat dilihat pada Gambar 2 berikut ini.
Gambar 2 Komponen Standar dalam Toolbox
Adapun fungsi-fungsi komponen-komponen kontrol yang ada di ToolBox pada Visual Basic:
- Pointer: gunakan Pointer jika anda ingin memilih komponen kontrol yang sudah di pasang di form.
- Label: untuk membuat teks seperti judul, dan sebagainya. Label tidak bisa di ubah-ubah oleh user.
- Frame: untuk membuat sebuah bingkai.
- CheckBox: untuk membuat kontrol pilihan, dimana kontrol ini terpilih jika di klik user. CheckBox dapat di pilih 1 atau lebih.
- ComboBox: untuk membuat kontrol kombinasi antara TextBox dengan ListBox.
- HScrollBar: untuk membuat Scrollbar secara horizontal.
- Timer: untuk kontrol waktu.
- DirListBox: untuk menampilkan direktori atau folder.
- Shape: untuk membuat kotak, persegi panjang atau lingkaran.
- Image: untuk membuat gambar.
- OLE: untuk menghubungkan software lain ke form.
- PictureBox: untuk menampilkan gambar di form.
- TextBox: untuk membuat teks yang bisa di ubah-ubah oleh user.
- CommandButton: untuk membuat tombol, seperti tombol OK, cancel, dan sebagainya terserah anda.
- OptionButton: fungsinya sama seperti CheckBox, namun OptionButton hanya dapat di pilih 1 oleh user.
- ListBox: untuk membuat daftar pilihan.
- VScrollBar: untuk membuat Scrollbar secara vertikal.
- DriveListBox: untuk menampilkan drive yang ada di komputer.
- FileListBox: untuk menampilkan file-file.
- Line: untuk membuat garis.
- Data: untuk menghubungkan database ke form.
Konsep Dasar Pemrograman Dalam Visual Basic 6.0
Konsep dasar pemrograman Visual Basic 6.0, adalah pembuatan form dengan mengikuti aturan pemrograman Property, Metode dan Event. Hal ini berarti:
- Property: Setiap komponen di dalam pemrograman Visual Basic dapat diatur propertinya sesuai dengan kebutuhan aplikasi. Property yang tidak boleh dilupakan pada setiap komponen adalah “Name”, yang berarti nama variabel (komponen) yang akan digunakan dalam scripting. Properti “Name” ini hanya bisa diatur melalui jendela Property, sedangkan nilai peroperti yang lain bisa diatur melalui script.
- Metode: Bahwa jalannya program dapat diatur sesuai aplikasi dengan menggunakan metode pemrograman yang diatur sebagai aksi dari setiap komponen. Metode inilah tempat untuk mengekpresikan logika pemrograman dari pembuatan suatu prgram aplikasi.
- Event: Setiap komponen dapat beraksi melalui event, seperti event click pada command button yang tertulis dalam layar script Command1_Click, atau event Mouse Down pada picture yang tertulis dengan Picture1_MouseDown. Pengaturan event dalam setiap komponen yang akan menjalankan semua metode yang dibuat.
Membuat Project Baru
Untuk memulai pembuatan program aplikasi di dalam Visual Basic, yang dilakukan adalah membuat project baru. Project adalah sekumpulan form, modul, fungsi, data dan laporan yang digunakan dalam suatu aplikasi. Membuat projrct baru dapat dilakukan dengan memilih menu [File] >> [New Project] atau dengan menekan ikon [new project] pada Toolbar yang terletak di pojok kiri atas. Setelah itu akan muncul konfirmasi untuk jenis project dari program aplikasi yang akan dibuat seperti terlihat pada Gambar 3 berikut.

Gambar 3 Layar Pemilihan jenis project
Visual Basic 6.0 menyediakan 13 jenis project yang bisa dibuat seperti terlihat pada gambar 3 di atas. Ada beberapa project yang biasa digunakan oleh banyak pengguna Visual Basic, antara lain:
- Standard EXE: project standar dalam Visual Basic dengan komponen-komponen standar. Jenis project ini sangat sederhana, tetapi memiliki keunggulan bahwa semua komponennya dapat diakui oleh semua unit komputer dan semua user meskipun bukan administrator. Pada buku ini akan digunakan project Standard EXE ini, sebagai konsep pemrograman visualnya.
- ActiveX EXE: project ini adalah project ActiveX berisi komponen-komponen kemampuan intuk berinteraksi dengan semua aplikasi di sistem operasi windows.
- ActiveX DLL: project ini menghasilkan sebuah aplikasi library yang selanjutnya dapat digunakan oleh semua aplikasi di sistem operasi windows.
- ActiveX Control: project ini menghasilkan komponen-komponen baru untuk aplikasi Visual Basic yang lain
- VB Application Wizard: Project ini memandu pengguna untuk membuat aplikasi secara mudah tanpa harus pusing-pusing dengan perintah-perintah pemrograman.
- Addin: project seperti Standard EXE tetapi dengan berbagai macam komponen tambahan yang memungkinkan kebebasan kreasi dari pengguna.
- Data project: project ini melengkapi komponennya dengan komponen-komponen database. Sehingga bisa dikatakan project ini memang disediakan untuk keperluan pembuatan aplikasi database.
- DHTML Application: project ini digunakan untuk membuat aplikasi internet pada sisi client (client side) dengan fungsi-fungsi DHTML.
- IIS Application: project ini menghasilkan apliaksi internet pada sisi server (server side) dengan komponen-komponen CGI (Common Gateway Interface).
Selanjutnya pilih Standard EXE dan tekan [Ok]. Lalu muncul tampilan dari Standard Exe seperti pada gambar 1.1. Dengan demikian project sudah siap dibuat.Dalam pembuatan project sebelumnya double click pada form yang terbuat maka adak terlihat jendela tersembunyi (hidden windows) yang berupa jendela untuk pembuatan program atau jendela kode (code windows). Hal ini Dapat dilakukan dengan cara memilih ikon jendela form atau jendela kode yang ada di [Project Explorer]. Hal ini dapat dilihat pada Gambar 4 dan Gambar 5.
Gambar 4 Jendela Form
Gambar 5 Jendela Kode
Pada jendela form, pengguna dalam membangun tampilan dari program aplikasi yang akan dibuat dengan mengatur komponen-komponen baik letak, properti dan eventnya. Untuk mengambil suatu komponen dari [Toolbox] dapat dilakukan dengan click komponen tersebut, kemudian clik atau tarik pada posisi yang benar pada form. Sebagai contoh mengambil label dari Toolbox dapat dilakukan dengan cara seperti Gambar 6 di bawah ini.
Gambar 6 Mengambil label dari Toolbox
Langkah-langkah mengambil label dari toolbox untuk dipasangkan dalam form adalah sebagai berikut:
- Click ikon [Label] pada [ToolBox]
- Pindahkan ke posisi dimana label itu akan diletakkan
- Clik dan tarik sampai ukurannya benar lalu lepaskan
Catatan: jangan lupa untuk mengatur property name dari setiap komponen yang digunakan, karena name merupakan identitas obyek yang akan digunakan dalam menulis program. Langkah berikutnya adalah memberikan teks pada label, misalkan “Hello world”, maka piliha properti Caption, dan isi dengan Hello world. Hasil tampilan program adalah sebagai berikut:

Gambar 7 Layout pada Form
Dan untuk menjalankan program click ikon Run () pada toolbar atau pilih menu [Run] >> [Start], atau dengan tekan tombol [F5]. Sehingga hasil program adalah:
Gambar 8 Hasil Program
Pada Gambar 9 adalah contoh program yang kami buat yaitu perhitungan free space loss untuk menghitung hilang kuat sinyal di udara. Cara sama dengan hanya menambah rumus-rumus saja. Program tersedia di Github.

Gambar 9 Free Space Loss Program
Mirror
- https://www.publish0x.com/fajar-purnama-academics/our-2011-assignment-regarding-visual-basic-6-xvwrozk?a=4oeEw0Yb0B&tid=hive
- https://0fajarpurnama0.github.io/bachelor/2020/09/07/our-2011-assignment-regarding-visual-basic-6
- https://0fajarpurnama0.medium.com/our-2011-assignment-regarding-visual-basic-6-f0812913710b
- https://hicc.cs.kumamoto-u.ac.jp/~fajar/bachelor/our-2011-assignment-regarding-visual-basic-6
- https://0darkking0.blogspot.com/2020/12/our-2011-assignment-regarding-visual.html
- https://0fajarpurnama0.cloudaccess.host/index.php/9-fajar-purnama-academics/149-our-2011-assignment-regarding-visual-basic-6
- http://0fajarpurnama0.weebly.com/blog/our-2011-assignment-regarding-visual-basic-6
- https://0fajarpurnama0.wixsite.com/0fajarpurnama0/post/our-2011-assignment-regarding-visual-basic-6
- https://read.cash/@FajarPurnama/our-2011-assignment-regarding-visual-basic-6-6abeabae
- https://www.uptrennd.com/post-detail/our-2011-assignment-regarding-visual-basic-6~ODM0NTg4