AVO Meter College Assignment
Note
This is my undergraduate assignment that I translated to English myself (Bahasa Indonesia dibawah / Indonesian Below) in the Electrical Measurement course where the task is to write an essay on AVO Meters. This assignment has never been published anywhere and I, as the author and copyright holder, license this assignment customized CC-BY-SA where anyone can share, copy, republish, and sell on condition to state my name as the author and notify that the original and open version available here.
Chapter 1 Introduction
1.1 Background
In this day and age (2011), the name AVO meter is familiar. Almost all households have an AVO meter.
Now every household cannot be separated from the use of electricity. In this modern era, almost all activities require electric power. Pumping water with an electric pump, cooling food and preserving it using the refrigerator, watching television, moreover at night you have to turn on the lights, all of that needs electricity. If there are problems with power tools, first look at the damage visually. If it doesn't work, then you need an electricity measurement using an AVO meter.
Not necessarily everyone can use the AVO meter, maybe in a household, mostly only 1 person can use it and know what it is. Few also know how it works (only those who specifically learn about electricity).
1.2 Objective
The purpose of writing this paper is to explain to ordinary people about AVO meters and how to use them.
1.3 Scope of Material
- Definition of AVO meter.
- History of the AVO meter.
- How the AVO meter works.
- How to use the AVO meter.
- AVO meter development.
Chapter 2 Basic Theory
2.1 AVO Meter
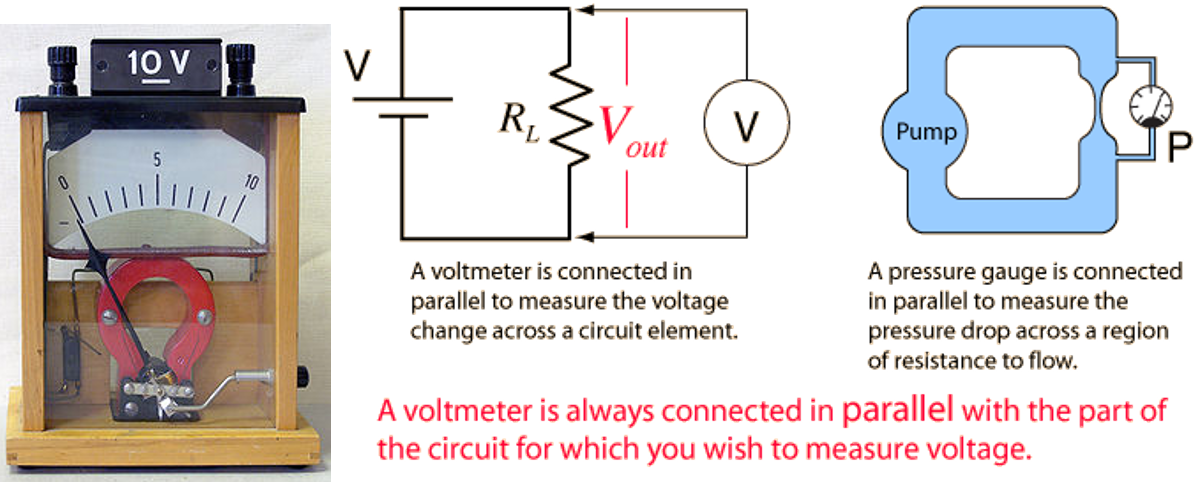
AVO stands for Ampere Volt Ohm. The meter here can be defined as a measuring instrument. AVO meter is a tool that can measure current (amperes), voltage (volts), resistance (ohms).
2.2 Charge (Coulumb)
In this world, there are 2 charges, namely positive and negative charges. There is also a neutral charge, where the molecule has the same positive and negative power. If the load is like (++, --) will reject reject. When the charges are different (+ -) will be of attraction. The force that occurs between charges is called the coulomb force.
Electricity can be generated by flowing charges. Take the salt bridge, for example. The electrons flowing into the protons are called electric currents.
2.3 Current (Ampere)
Current is defined as charge flowing in units of time.
I = dq/dt, dq = q2 - q1, dt = t2 - t1
I = Current (ampere)
q = Charge (coulomb)
t = Time (second)
To make it easy to understand the formula above, it can be said that the amount of coulomb that flows every second. The person who contributed to the discovery of currents was a mathematician and physicist from France, namely André-Marie Ampère.
2.4 Voltage (Volt)
The voltage in electricity can be said to be the amount of energy carried by each charge.
V = dw/dq
V = voltage (volt)
W = enegy (joule)
q = charge (coulomb)
For easy understanding this formula can be said of the energy contained per 1 coulumb. The name of the volt comes from the Italian physicist Count Alessandro Giuseppe Antonio Anastasio Volta.
2.5 Resistansi (Ohm)
German physicist George Simon Ohm found that the voltage applied to an object is directly proportional to the current flowing. Each object has a different resistance.
For example, for the first object, if given 2V it will flow 1A, if given 4V it will flow 2A. The first object has a resistance of 2Ω. For the second object if given 4V will flow 5A, if given 8V will flow 10A. The second object has a resistance of 4/5Ω.
V=IR, I=V/R, R=V/I
V = voltage (volt)
I = current (ampere)
R = resistance (ohm)
Resistance is an electrical resistance which can be said to be the amount of voltage required to flow a current.
2.6 AC and DC voltage
DC stands for direct current which means a straight flowing current. AC stands for alternating current, which means the current that flows up and down following a sine wave.
Chapter 3 Discussion
3.1 Question
- Before discussing the AVO meter, you should know about the Ammeter (Ammeter), Voltmeter and Ohmmeter. What is the definition of Ammeter, Voltmeter and Ohmmeter?
- What are the basic materials for making an AVO meter or Ammeter, Voltmeter and Ohmmeter?
- How is it organized?
- How does it work?
- How to use it?
3.2 Answer
- Ammeter is a tool for measuring electric current. The unit of electric current is in amperes. Voltmeter is a tool for measuring electric voltage or it can be called the electric potential difference. The unit of electric voltage is the unit of volts. Ohmeter is a tool for measuring resistance to electricity. The unit of resistance is ohms.
- The basic material for making Ammeter, Voltmeter and Ohmmeter is a Galvanometer. Galvanometer is a tool to detect the presence of electricity. Materials needed to make a simple Galvanometer:
- North Pole permanent magnet.
- South Pole permanent magnet.
- Iron core.
- Spiral springs.
- Wire Coils.
- Wire.
- Pointing Needle.Galvanometer itself is a type of ammeter, to make a simple ammeter the above materials are needed. To make the voltmeter, only needed to connect the resistors that are agreed upon internationally. For the ohmmeter, only a voltage generator (battery) is installed to be emitted to the instrument to be measured.
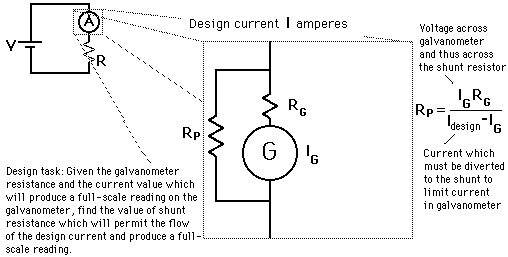
3. The arrangement of the galvanometer is as follows:

D'Arsonval/Weston galvanometer movement.
The ammeter arrangement is different from the explanation above.

Voltmeter arrangement.
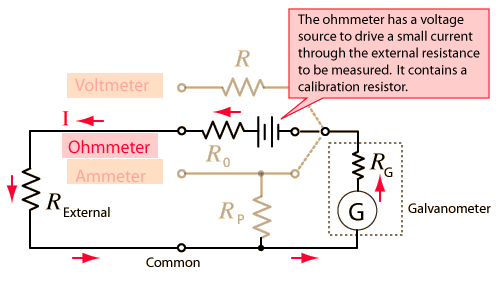
Ohmmeter arrangement.
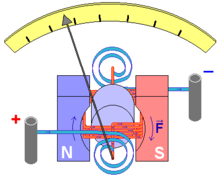
4. Galvanometer works by entering electricity into it. After the electricity flows, it will produce a magnetic field that attracts the wire and attracts the spiral spring as well. So that the needle will rotate, and the spring will return it to normal condition after usage.
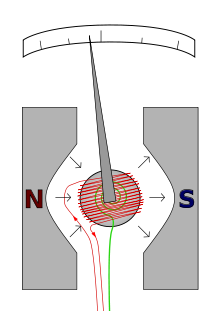
D'Arsonval type moving coil galvanometer.
- The red wire carries the current to be measured.
- The recovery spring is shown in green.
- N and S are the north and south poles of the magnet.
Ammeter works on the principle of water flow.
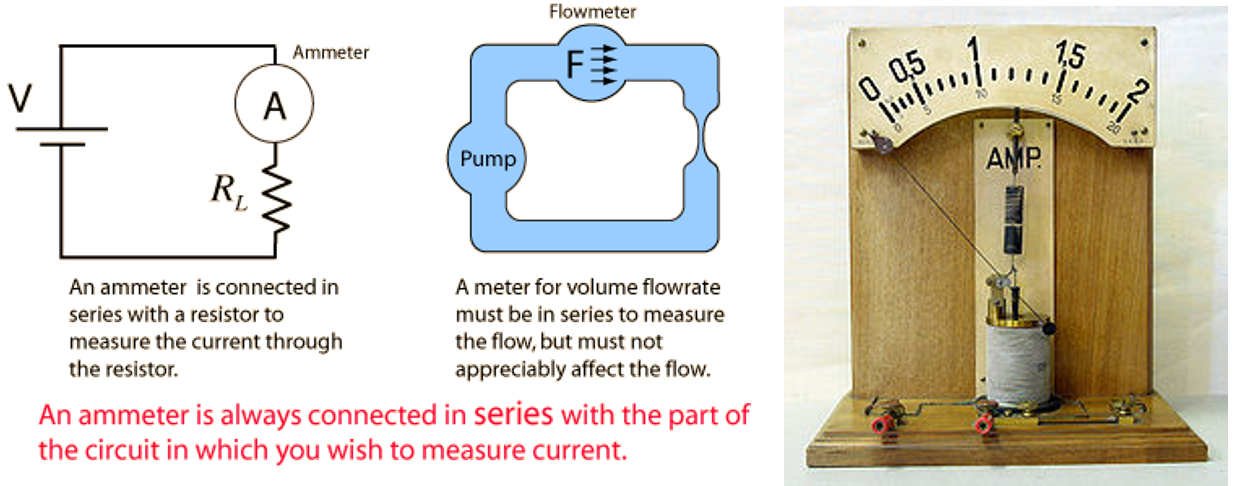
Demonstration model of a moving iron ammeter. As the current through the coil increases, the plunger is pulled further into the coil and the pointer turns right.
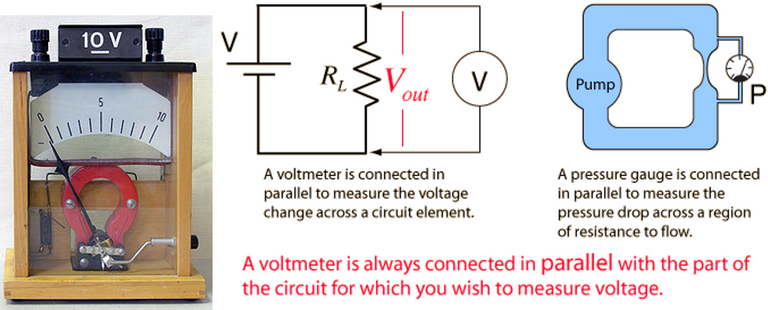
For the voltmeter, two poles are added to enter electricity. The goal is to measure the potential bed. Think of it like measuring water pressure.
For the ohmmeter the voltage will be given to the object to be measured its resistance. By applying stress, the resistance will be seen.
5. This section is taken from Putu Rusdi Ariawan's paper on AVO meters, Faculty of Engineering, Udayana University.
How to measure DC Voltage
- Place the selector switch in the DC voltage position (V=)
- Choose measurement limits (1.5, 5, 10, 50, 150, 500). Where a limit equal to or greater than the voltage to be measured must be selected. For example, the voltage to be measured is 6.5V, then the measuring limit that must be chosen is 10V. Should not choose a smaller limit, because the needle will move past the maximum limit and can damage the moving coil.
- Connect the probe cable to the power source, the red wire to the positive and the black wire to the negative. This method of installation is called parallel connection. If the wiring polarity is reversed, the meter will move left
- Read the scale board according to where the needle stops. The most appropriate way to read is perpendicularly where the needle must appear in line with the image of the needle on the reflecting mirror, so there is no reading error (parallax)

DC Volt Measurement
Measure AC Voltage
- Put the selector switch (selector switch) in the position of AC voltage (V˜)
- Choose a measurement limit (1, 3, 10, 30, 100 or 300). The selected measuring limit must be the same or greater than the voltage to be measured, for example the voltage to be measured is 220V, then the measuring limit that must be selected is 300 V. You cannot choose a smaller limit, because the needle will move beyond the limit maximum and can damage the moving coil.
- Connect the probe cable to the voltage source in parallel. For AC voltage the red wire and black wire can be freely connected to a positive or negative voltage source, because the AC voltage has no polarity.
- Read the scale board according to where the needle stops. The most appropriate way to read is perpendicular to where the needle must appear in line with the image of the needle on the reflecting mirror, so that there is no reading error (parallax).
How to Measure DC Current
The way to measure current is somewhat different from measuring voltage, where the circuit for measuring current is installed in series with the load. Loads can be resistors, lamps or others.
- Set the selector to the DC current position (A=)
- Set the position of the selector to the position of the measuring limit that is higher than the current to be measured, the measuring limit can be selected the highest so as not to damage the meter. The effect of selecting a measuring limit that is too far from the current to be measured is only the results showing inaccurate reading.
- Connect the cables in series with the load. The load can be supplied to the negative wire or to the positive wire (according to the picture). If the wiring polarity is reversed, the meter will move to the left.
- Read the current indication on the DC current scale board (A=) according to the needle position.
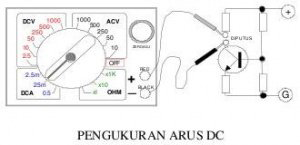
DC Current Measurement
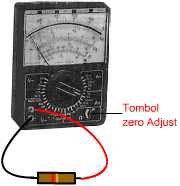
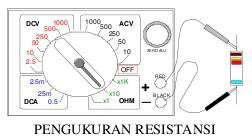
Measuring Resistance
The point of measuring resistance is to determine the condition of a component in a damaged or good state, and to determine how much the value of resistance is. Suppose a resistor has a color code: brown, black, red and gold tolerance means that the resistor has a resistance value of 1000 ohms with a tolerance of 5%, meaning that the resistor is still good if after measuring the value it is still between +/- 5% of 1000 ohms, or between 950 to 1050 ohms. How to measure it as follows:
Measuring Resistors
- Set the selector switch to the ohms position
- Select the measuring limit (range) whether: x1, x10, x100, or x1000 (adjust to the resistor value)
- Firstly, short circuit the probe so that the meter needle moves to the right and can be adjusted to show the maximum scale by turning the Zero Adjust knob, meaning that the meter reading is in accordance with the scale and range used.
- Start measuring the resistor by connecting the probe wires on the two legs of the resistor in parallel, regardless of the wire color
- Read the scale board according to where the meter needle stopped, and multiply the reading by the measuring limit. For example, the needle shows on a scale of 10 and the measurement limit uses x 100, then the resistor value is 1000 ohms

Resistance Measurement
Chapter 4 Closing
4.1 Conclusion
AVO meter is a combination of ammeter (ammeter), voltmeter, ohmmeter made into 1 tool. Tools that have varied functions, namely measuring current, voltage and resistance, are often termed a multitester. In fact, the author wants to explain in detail about the AVO meter. The real writer has the aim of explaining the definition, how to use it, how it works, so that the reader can make the AVO meter itself. By understanding how to make it the reader can repair it if it is damaged. However, it is unfortunate that limited time and knowledge prevent the writer from achieving this goal. Hopefully this assignment is useful for all who read and apologize if there are errors. In the end let me say thank you.
Tugas Kuliah AVO Meter
Catatan
Ini merupakan tugas S1 saya di mata kuliah Pengukuran Listrik dimana tugasnya adalah menulis essai mengenai AVO Meter. Tugas ini tidak pernah dipublikasi dimanapun dan saya sebagai penulis dan pemegang hak cipta melisensi tugas ini customized CC-BY-SA dimana siapa saja boleh membagi, menyalin, mempublikasi ulang, dan menjualnya dengan syarat mencatumkan nama saya sebagai penulis dan memberitahu bahwa versi asli dan terbuka tersedia disini.
BAB 1 Pendahuluan
1.1 Latar Belakang
Pada zaman sekarang (2011) yang namanya AVO meter tidak asing lagi. Hampir semua rumah tangga mempunyai yang namanya AVO meter.
Sekarang setiap rumah tangga tidak lepas dari penggunaan listrik. Era yang modern ini hampir semua kegiatan memerlukan tenaga listrik. Memompa air dengan pompa electric, mendinginkan makanan dan mangawetkan menggunakan kulkas, nonton televisi, apa lagi malam hari harus menghidupkan lampu, semua itu perlu listrik. Jika ada permasalahan dengan alat-alat listrik, pertama kali dilihat secara visual tentang kerusakannya. Jika tidak berhasil, maka dibutuhkan pengukuran listrik menggunakan AVO meter.
Belum tentu semua bisa menggunakan AVO meter, mungkin dalam rumah tangga, kebanyakan hanya 1 orang saja yang bisa menggunakannya dan tahu alat tersebut apa. Sedikit pula juga yang tahu cara kerjanya (kira-kira hanya yang khusus belajar tentang listrik).
1.2 Tujuan
Tujuan dari penulisan makalah ini adalah untuk menjelaskan kepada orang awam mengenai AVO meter dan cara-cara penggunaannya.
1.3 Ruang Lingkup Materi
- Definisi AVO meter.
- Sejarah AVO meter.
- Cara kerja AVO meter.
- Cara menggunakan AVO meter.
- Perkembangan AVO meter.
BAB 2 Dasar Teori
2.1 AVO Meter
AVO adalah singkatan dari Ampere Volt Ohm. Meter disini dapat didefinisikan sebagai alat ukur. AVO meter adalah suatu alat yang dapat mengukur arus (ampere), tegangan (volt), resistansi (ohm).
2.2 Muatan (Coulumb)
Dalam dunia ini terdapat 2 muatan, yaitu muatan positif dan negatif. Ada pula muatan netral yaitu dimana molekul tersebut kekuatan positif dan negatifnya sama. Bila muatan sejenis (++,--) akan tolak menolak. Bila muatan berbeda (+-) akan tarik-menarik. Gaya yang terjadi antara muatan disebut gaya coulomb.
Listrik dapat dihasilkan oleh muatan yang mengalir. Contohnya jembatan garam. Electron yang mengalir ke proton disebut aliran listrik.
2.3 Arus (Ampere)
Arus didefinisikan sebagai muatan yang mengalir dalam satuan waktu.
I = dq/dt, dq = q2 - q1, dt = t2 - t1
I = Arus (ampere)
q = Muatan (coulomb)
t = Waktu (detik)
Agar mudah dimengerti rumus diatas dapat dikatakan besarnya coulomb yang mengalir setiap detik. Orang yang berjasa dalam penemuan arus adalah seorang matemtika dan fisikawan asal Perancis, yaitu André-Marie Ampère.
2.4 Tegangan (Volt)
Tegangan dalam listrik dapat dikatakan sebagai besarnya energi yang dibawa setiap muatan.
V = dw/dq
V = tegangan (volt)
W = enegeri (joule)
q = muatan (coulomb)
Untuk mudah dimengerti rumus ini dapat dikatakan energi yang dikandung setiap 1 coulumb. Nama volt berasal dari fisikawan dari Itali Count Alessandro Giuseppe Antonio Anastasio Volta.
2.5 Resistansi (Ohm)
Fisikawan Jerman George Simon Ohm menemukan bahwa tegangan yang diberikan ke suatu benda berbanding lurus dengan arus yang mengalir. Setiap benda memiliki resistansi yang berbeda-beda.
Contoh, Untuk benda pertama, jika diberikan 2V maka akan mengalir 1A, jika deberikan 4V maka akan mengalir 2A. Benda pertama memiliki resistansi 2Ω. Untuk benda kedua jika diberikan 4V akan mengalir 5A, jika diberikan 8V akan mengalir 10A. Benda kedua memiliki resistansi 4/5Ω.
V=IR, I=V/R, R=V/I
V = tegangan (volt)
I = arus (ampere)
R = hambatan (ohm)
Resistansi adalah hambatan listrik dimana dapat dikatakan besar tegangan yang diperlukan untuk mengalirkan suatu arus.
2.6 Tegangan AC dan DC
DC adalah singkatan dari direct current yang artinya arus yang mengalir lurus. AC adalah singkatan dari alternating current yang artinya arus yang mengalir naik-turun mengikuti gelombang sinus.
BAB 3 Pembahasan
3.1 Rumusan Masalah
- Sebelum membahas AVO meter harus mengetahui tentang Ammeter (Amperemeter), Voltmeter dan Ohmmeter. Apa definisi Ammeter, Voltmeter dan Ohmmeter?
- Apa bahan dasar membuat AVO meter atau Ammeter, Voltmeter dan Ohmmeter?
- Bagaimana penyusunannya?
- Bagaimana cara kerjanya?
- Bagaimana cara menggunakannya?
3.2 Pembahasan
- Ammeter adalah suatu alat untuk mengukur arus listrik. Satuan arus listrik adalah satuan ampere. Voltmeter adalah suatu alat untuk mengukur tegangan listrik atau bisa disebut beda potensial listrik. Satuan tegangan listrik adalah satuan volt. Ohmeter adalah suatu alat untuk mengukur resistansi terhadap aliran listrik. Satuan resistansi adalah ohm.
- Bahan dasar untuk membuat Ammeter, Voltmeter dan Ohmmeter adalah Galvanometer. Galvanometer adalah suatu alat untuk mendeteksi keberadaan listrik. Bahan yang diperlukan untuk membuat Galvanometer sederhana:
- Magnet permanen kutub utara.
- Magnet permanen kutub selatan.
- Inti besi.
- Pegas spiral.
- Lilitan Kawat.
- Kawat.
- Jarum Penjuk.Galvanometer adalah salah satu dari ammeter, untuk membuat ammeter sederhana diperlukan bahan diatas. Untuk menjadikan voltmeter hanya disambungkan dengan resistor yang disepakati secara international. Untuk ohmmeter hanya dipasang sebuah penghasil tegangan (baterai) untuk dipancarkan ke alat yang akan diukur.
3. Penyusunan galvanometer adalah sebagai berikut:
D'Arsonval/Weston galvanometer movement.

Adapun penyusunan ammeter berbeda dengan penjelasan diatas.

Penyusunan voltmeter.

Penyusunan ohmmeter.
4. Galvanometer bekerja dengan memasukan aliran listrik kedalamnya. Setelah listrik mengalir, akan menghasilkan medan magnet yang membuat kawat tertarik dan menarik pegas spiral pula. Sehingga jarum akan berputar, pegas untuk mengembalikan keaadan seperti semula.

Galvanometer kumparan bergerak tipe d'Arsonval.
- Kabel merah membawa arus yang akan diukur.
- Pegas pemulihan ditampilkan dalam warna hijau.
- N dan S adalah kutub utara dan selatan magnet.
Ammeter bekerja dengan prinsip aliran air. (Dengan keterbatasan waktu dan pengetahuan sementara, penulis tidak dapat menjelaskannya.)

Model demonstrasi ammeter besi yang bergerak. Saat arus melalui kumparan meningkat, plunger ditarik lebih jauh ke dalam kumparan dan penunjuk membelokkan ke kanan.
Untuk voltmeter ditambahkan duat kutub untuk memasukan listrik. Tujuannya untuk mengukur bedapotensial. Anggap saja seperti mengukur tekanan air. (Dengan keterbatasan waktu dan pengetahuan sementara, penulis tidak dapat menjelaskannya.)
Untuk ohmmeter tegangan akan diberikan ke benda yang akan diukur resistansinya. Dengan memberikan tegangan akan terlihat hambatannya. (Dengan keterbatasan waktu dan pengetahuan sementara, penulis tidak dapat menjelaskannya.)
5. Bagian ini diambil dari makalah Putu Rusdi Ariawan tentang AVO meter Fakultas Teknik Universitas Udayana.
Cara mengukur Tegangan DC
- Letakkan selector switch (saklar pemilih) pada posisi tegangan DC (V=)
- Asas Pilihlah batas ukur (1.5, 5, 10, 50, 150, 500). Dimana harusdipilih batas yang sama atau lebih besar dari tegangan yang akan diukur. Misalkan tegangan yang akan diukur 6.5V, maka batas ukur yang harus dipilih adalah 10V. Tidak boleh memilih batas yang lebih kecil, karena jarum penunjuk akan bergerak melewati batas maksimum dan dapat merusak moving coil.
- Sambungkan kabel probe pada sumber tegangan, kabel merah disambungkan kepada bagian positif dan kabel hitan disambungkan pada bagian negative. Cara pemasangan seperti itu disebut hubungan pararel. Apabila pemasangan kabel polaritasnya terbalik, maka meter akan bergerak kekiri
- Bacalah papan skala sesuai dengan dimana jarum penunjuk berhenti. Cara yang paling tepat dalam membaca adalah secara tegak lurus dimana jarum harus tampak satu garis dengan bayangan jarum pada cermin pemantul, agar tidak terjadi kesalahan baca (parallax)

Pengukuran Volt DC
Mengukur Tegangan AC
- Letakkan selector switch (saklar pemilih) pada posisi tegangan AC (V˜)
- Pilihlah batas ukur (1, 3, 10, 30, 100 at au 300). Batas ukur yang dipilih harus yang sama atau lebih b esar dari tegangan yang akan diukur, Misalkan tegangan yang aka n diukur 220V, maka batas ukur yang harus dipilih adalah 300V.Tidak boleh memilih batas yang lebih kecil, karena jarum penu njuk akan bergerak melewati batas maksimum dan dapat merusak moving coil.
- Sambungkan kabel probe pada sumber tegangan secara Pararel. Untuk tegagan AC kabel merah dan hit an dapat bebas disambungkan kepada sumber tegangan positif atau negative, karena tegangan AC tidak mempunyai polaritas.
- Bacalah papan skala sesuai dengan dimana jarum penunjuk berhenti. Cara yang paling tepat dalam membaca adalah secara tegak lurus dimana jarum harus tampak satu garis dengan bayangan jarum pada cermin pemantul, agar tidak terjadi kesalahan baca (parallax).
Cara Mengukur Arus DC
Cara mengukur arus agak berbeda dengan mengukur tegangan, dimana rangkaian untuk mengukur arus dipasang dengan cara serie dengan beban. Beban dapat berupa resistor, lampu atau lainnya.
- Atur selector pada posisi Arus DC ( A=)
- Atur posisi selector pada posisi batas ukur yang lebih tinggi dari arus yang akan diukur, batas ukur dapat dipilih yang paling tinggi agar tidak merusak meter. Pengaruh pemilihan batas ukur yang terlalu jauh dari arus yang akan diukur hanya mengakibatkan pembacaan yang kurang akurat.
- Hubungkan kabel secara seri dengan beban. Beban dapat diserie pada kabel negative atau pada kabel positif (sesuai gambar). Apabila pemasangan kabel polaritasnya terbalik, maka meter akan bergerak kekiri.
- Baca penunjukan arus pada papan skala arus DC (A=) sesuai posisi jarum.

Pengukuran Arus DC
Mengukur Resistansi
Gunanya mengukur resistansi adalah untuk mengetahui kondisi suatu komponen dalam keadaan rusak atau baik, serta untuk menentukan berapakah besar nilai Resistansinya. Misalkan sebuah resistor mempunyai kode warna : coklat, hitam, merah dan toleransi emas artinya resistor tersebut mempunyai nilai resistansi sebesar 1000 ohm dengan toleransi 5%, maksudnya resistor tersebut masih dikatakan baik bila setelah diukur nilainya masih diantara +/- 5% dari 1000 ohm, atau antara 950 sampai 1050 ohm. Cara mengukurnya sebagai berikut:

Mengukur Resistor
- Atur selector switch pada posisi ohm
- Pilih batas ukur (range) apakah : x1, x10, x100, atau x1000 (sesuaikan dengan nilai resistor)
- Terlebih dahulu, hubung singkat kabel penyidik agar jarum meter bergerak kearah kekanan dan dapat diatur supaya menunjukkan pada skala maksimum dengan memutar tombol Zero Adjust, maksudnya agar pembacaan meter dapat / sesuai dengan skala dan range yang dipakai.
- Mulailah mengukur resistor dengan menghubungkan kabel penyidik pada ke dua kaki resistor secara pararel, dengan mengabaikan warna kabel
- Baca papan skala sesuai dimana jarum meter berhenti, dan kalikan pembacaan dengan batas ukur. Misalnya jarum menunjukkan pada skala 10 dan batas ukur menggunakan x 100, maka nilai resistor tersebut adalam 1000 ohm
Pengukuran Resistansi
BAB 4 Penutup
4.1 Kesimpulan
AVO meter adalah gabungan dari ammeter (amperemeter), voltmeter, ohmmeter dijadikan 1 alat. Alat yang mempunyai fungsi bervariasi yaitu pengukur arus, tegangan dan hambatan sering diistilahkan sebagai multitester. Sesungguhnya penulis ingin menjelaskan serinci-rincinya mengenai AVO meter. Penulis sesungguhnya mempunyai tujuan menjelaskan definsikinya, cara menggunakannya, cara kerjanya, sampai agar pembaca dapat membuat AVO meter itu sendiri. Dengan mengerti cara pembuatannya pembacapun dapat memberbaiki jika rusak. Namun sayang sekali karena keterbatasan waktu dan pengetahuan untuk sementara ini menghalang penulis untuk mencapai tujuan tersebut. Semogaa makalah ini bermanfaat untuk semua yang membaca dan mohon maaf bila ada kesalahan. Akhir kata saya ucapkan terima kasih.
Literature Review
- http://en.wikipedia.org/wiki/Amperemeter
- http://en.wikipedia.org/wiki/Voltmeter
- http://en.wikipedia.org/wiki/Ohmmeter
- http://en.wikipedia.org/wiki/Galvanometer
- http://hyperphysics.phy-astr.gsu.edu/hbase/magnetic/volmet.html#c1
- http://hyperphysics.phy-astr.gsu.edu/hbase/magnetic/ammet.html#c1
- http://hyperphysics.phy-astr.gsu.edu/hbase/magnetic/movcoil.html#c4
- Lingua Kata (flash fisika)
- Basic Engineering Circuit Analysis, 4th Edition, J. David Irwin, 1993
- Putu Rusdi Ariawan's paper on AVO meters, Faculty of Engineering, Udayana University.
Mirror
- https://www.publish0x.com/fajar-purnama-academics/avo-meter-college-assignment-xgppvgj?a=4oeEw0Yb0B&tid=hive
- https://0fajarpurnama0.github.io/bachelor/2020/08/02/avo-meter-assignment
- https://0fajarpurnama0.medium.com/avo-meter-college-assignment-f3e133302899
- https://hicc.cs.kumamoto-u.ac.jp/~fajar/bachelor/avo-meter-assignment
- https://0darkking0.blogspot.com/2020/12/avo-meter-college-assignment.html
- https://0fajarpurnama0.cloudaccess.host/index.php/9-fajar-purnama-academics/158-avo-meter-college-assignment
- http://0fajarpurnama0.weebly.com/blog/avo-meter-college-assignment
- https://0fajarpurnama0.wixsite.com/0fajarpurnama0/post/avo-meter-college-assignment
- https://read.cash/@FajarPurnama/avo-meter-college-assignment-a7ddd4f7
- https://www.uptrennd.com/post-detail/avo-meter-college-assignment~ODM5MDY2