Making a Basic (GEO)-Django App
Learning to do stuff poorly w/ @mstafford;
AKA, "Did I just get worse at this?"
I'm currently working on my steem (d)App* project a bit more frequently as the weather cools down, and I just got remotivated to work on a few things that I had been putting on the back-burner. Specifically, I've been meaning to leverage the powerful GeoDjango package:
*I'd be lying if I said it was really a (d)ecentralized application

The earlier version of EXHAUST actually had this package implemented, but I hadn't really done anything with it yet save some testing. In tandem, I'm going to document my process here in an effort to do just that -- document. I'm horrible at writing my process and assumptions down, and I need to change. I barely even comment anything when I spray Python everywhere, and it takes me forever to remember WTF I was thinking. Today -- it all changes. Sorta...
People that know me have told me I'm pretty casual. I'm gonna keep it this way, and just kinda stream-of-conciousness this guide. For some of the basics w/ Django -- I recommend checking out some of the goods of @steempytutorials -- like this one on starting a Steem Django app. So w/ that in mind, lets dig into it.
Before I start this journey, it's probably a pretty useful exercise to figure out WHAT we want to accomplish before we just start go fuckin' crushing it. So with that in mind, here are some objectives:
Objectives:
- Install GeoDjango and dependencies;
- Set up a new Postgres database w/ appropriate 'extensions' and get our Django project to interact w/ new database;
a) This requires implementing some database routing, since we're going to leave our original database in operation; - Figure out how to display the map object;
- Figure out how to display content from our new GIS Database in maps that can be viewed by anyone;
a) The GeoDjango tutorials are actually quite lacking in this aspect -- so we'll find something else / get creative here; - Think of what we can do to make this even better;
Assumptions:
As mentioned above, I want to set up some GIS functionality for my project that's currently process. With that in mind, I'm not going to go into detail on how to install Django itself -- there are some awesome official documentation and resources for this elsewhere. So, I'm starting this guide with the following assumptions:
- We're using Ubuntu for an OS;
- We already have a working installation of Django running;
- We're using Postgres as our backend Database Manager -- and have already installed it;
- Fun fact -- my Django project is hosted by DigitalOcean and they provide a really thorough guide on How to Set Up Django w/ Postgres and Nginx
| Django | Postgres | Nginx | Ubuntu |
|---|---|---|---|
Step 1 - Install GeoDjango and Dependencies:
This section will be enjoyably brief, as the instructions on the GeoDjango installation instructions were concise, up to date, and easy.
First -- lets start up a new django-app called 'webmap':
python manage.py startapp webmapInstall GeoDjango:
a. hahaha! Tricked you sucka! This shit comes preloaded w/ Django, and you just gotta turn it on. It's like you're having your true powers unlocked like that episode of Dragon Ball Z.

So. It's already installed. We just gotta enable it in our project settings. Go to your favorite editor (I'm too dumb to learnvim, so I tend to usenano), and edit your DjanoProjects settings file:
/path/to/project$ nano myproject/settings.py
and make sure you have the GIS contrib package, and our new webmap app 'installed' to your project:
INSTALLED_APPS = [
    ...,
    'django.contrib.auth',
    'django.contrib.gis',
    'webmap',
    ...,
]
I'm also showing that I have the django.contrib.auth package installed, as it might come up later. My project obviously allows users to login and manage various things on their account -- and I'd like to be able to link Users from the auth package, to shapes and geometries in the gis package. Auth is automatically added whenever you start a new Django project, I believe, and most of the time there's probably no reason to remove it.
- Install GeoSpatial Libraries and other dependencies;
a. binutls -- not gonna lie, I'm not 100% certain what this is. A quick google search says it's a GNU assembler, linker and binary utilities. Sounds like low-level computer wizardry sorta stuff -- and that's a good enough explanation for me. Let me know in the comments if you've got a laymans description of what this is.
b. libproj -- Maps have all sorts of different projection types. That's why on some maps, various countries look huge -- while on others, they look less huge. This library is a Cartographic projection library (development files) . More details on this sorta stuff can be found here
c. gdal -- GDAL is a translator library for raster and vector geospatial data formats. More info on GDAL can be found here
Since I'm doing all of this on a server w/ an Ubuntu OS, I can install all of these packages w/ a quick sudo apt-get install binutils libproj-dev gdal-bin.

Step 2 - Create a new PostGIS spatial database, and get Django working with multiple databases:
So I've never really done it, but I would IMAGINE that you could be totally fine with operating on a single database. It's probably even easier. But I'm not proud of myself for always doing things the easy way. I typically trudge through things in a ridiculous order, and make my projects needlessly harder than they have to be.
So I'm approaching things like you already have a fairly stable project, and you just thought of something cool you could do if you just had some webmaps. We're gonna add a new database, and then operate on both at the same time.

Lets start a new Postgres Database
Git to yer terminal!
postgres@myserver:/path/to/project$ createdb geodjangodb
postgres@myserver:/path/to/project$ psql geodjangodb
psql (10.10 (Ubuntu 10.10-0ubuntu0.18.04.1))
Type "help" for help.

geodjangodb=# CREATE EXTENSION postgis;
CREATE EXTENSION
geodjangodb=# \q
Dope! Database is created and ready to be populated with our sweet sweet geometry.
We already "installed" the django.contrib.gisin our setup earlier. Lets jump back into myproject/settings.py file and define our second (or first, depending how far ahead you plan your life). Scroll down until you get to your DATABASE definition. You'll see something like this:
# Database
# https://docs.djangoproject.com/en/2.2/ref/settings/#databases

DATABASES = {
    'default': {
        'ENGINE': 'django.db.backends.postgresql_psycopg2',
        'NAME': 'projectdbname',
        'USER': 'dbadmin',
        'PASSWORD': 'S3CR3TP$SSW0RD',
        'HOST': 'localhost',
        'PORT': '',
    },
}
lets add a second entry into the DATABASES dictionary, and lets tell django to call this database maptest:
# Database
# https://docs.djangoproject.com/en/2.2/ref/settings/#databases

DATABASES = {
    'default': {
        'ENGINE': 'django.db.backends.postgresql_psycopg2',
        'NAME': 'projectdbname',
        'USER': 'dbadmin',
        'PASSWORD': 'S3CR3TP$SSW0RD',
        'HOST': 'localhost',
        'PORT': '',
    },
    'maptest': {
        'ENGINE': 'django.contrib.gis.db.backends.postgis',
        'NAME': 'geodjangodb',
        'USER': 'dbadmin',
        'PASSWORD': 'S3CR3TP$SSW0RD',
        'HOST': 'localhost',
        'PORT': '',
    }
}
We're getting pretty close to ready for migrating our project and getting everything ready -- but we've got two more things to do:
- Create a model for our Database and use some actual spatial model fields; and
- We need to set up some database routing, so our spatial-data entries only get writtien to the database that supports it. This is called
routing... probably...
Lets edit our webmap/models.py file -- and because it's probably useful, lets create the same WorldBorders that's covered in the GeoDjango tutorial with a super efficienct (read: shameless) copy/paste:
from django.contrib.gis.db import models

class WorldBorder(models.Model):
    # Regular Django fields corresponding to the attributes in the
    # world borders shapefile.
    name = models.CharField(max_length=50)
    area = models.IntegerField()
    pop2005 = models.IntegerField('Population 2005')
    fips = models.CharField('FIPS Code', max_length=2)
    iso2 = models.CharField('2 Digit ISO', max_length=2)
    iso3 = models.CharField('3 Digit ISO', max_length=3)
    un = models.IntegerField('United Nations Code')
    region = models.IntegerField('Region Code')
    subregion = models.IntegerField('Sub-Region Code')
    lon = models.FloatField()
    lat = models.FloatField()

    # GeoDjango-specific: a geometry field (MultiPolygonField)
    mpoly = models.MultiPolygonField()

    # Returns the string representation of the model.
    def __str__(self):
        return self.name
The important thing to take away from the above copypaste is the mpoly field near the bottom. Notice that from django.contrib.gis.db we imported our models module. From this, we get the new MultiPolygonField class.
Start a new python file, routers.py, in your /path/to/project/myproject/folder. Same place where we found settings.py and blindly chuck this shit in there:
class DBRouter:
    """
    A router to control all database operations on models in the
    world application.
    """
    def db_for_read(self, model, **hints):
        """
        Attempts to read webmap models go to geodjangodb.
        """
        if model._meta.app_label == 'webmap':
            return 'maptest'
        return None

    def db_for_write(self, model, **hints):
        """
        Attempts to write webmap models go to geodjangodb.
        """
        if model._meta.app_label == 'webmap':
            return 'maptest'
        return None
    def allow_migrate(self, db, app_label, model_name=None, **hints):
        """
        Make sure the webmap app only appears in the 'geodjangodb'
        database.
        """
        if app_label == 'webmap':
            return db == 'maptest'
        return None
Cool! So what this does, is override a few standard functions in django in terms of how it interacts with its backend database. It will, by default, go to the database you've set as "default" in teh settings.py file. Otherwise, for reading from, or writing to the database, it'll look for the maptest database if we're dealing with our new webmap app. Also, since the geometry fields in our spatial database require whatever kinda neat extension stuff we did before, we need to make sure that the webmap app only appears in the maptest database.
Lets do it. The moment we've been waiting for... Lets make like a flock of birds and migrate! Note that if you just run the standard python manage.py migrate you'll ONLY run the migration operation for the DEFAULT database. In order to migrate for our new maptest database, we just need to specify python manage.py migrate --database=maptest
(env) me@server:/path/to/project$ python manage.py makemigrations
sanity check!
Migrations for 'webmap':
  webmap/migrations/0001_initial.py
    - Create model WorldBorder
(env) me@server:/path/to/project$ python manage.py migrate --database=maptest
sanity check!
Operations to perform:
  Apply all migrations: existingapp1, admin, auth, existingapp2, contenttypes, steemkeychain, webmap, existingapp3, existingapp4, sessions
Running migrations:
  Applying contenttypes.0001_initial... OK
  Applying auth.0001_initial... OK
  Applying A BUNCH MORE OF THESE...
Okay. Not gonna lie. That felt like more work than I was led to believe this was going to be. However -- things seem to be functioning, and I'm willing to ignorantly believe that it's going to get better.. This is a cheeky, hidden, mid-sentence post to see if anyone has read this far into the post -- the first account to comment that "@exhaust is the best damn GIS-enabled, activity-based, STEEM project around!" gets 10 STEEM! It'll all be worth it when we develop our cream of the crop GIS enhanced steem-app. Hooooo boy.

Step 3 - Get some maps showing up on our website:
So one of the things we did in the previous section was to define our WorldBorder model. We defined this to work nicely w/ the *.shp (shapefile) that's provided in the GeoDjango tutorial. It contains borders for the countries of the world, and is useful in performing spatial searches by country.
After you've loaded the data (you should have defined a python file for webmap/load.py and then executed the webmap.load.run() method). This should have created an entry in our WorldBorder model for every country that's defined in the shapefile.
The quickest way to see this data on a map, is to register our webmap app for the django admin site -- this is covered, again, in the GeoDjango Tutorial but I'll copy/paste for now, and then we'll take it a step further:
Register WorldBorder in the webmap/admin.py:
### webmap/admin.py
from django.contrib.gis import admin
from .models import WorldBorder

admin.site.register(WorldBorder, admin.GeoModelAdmin)
and then ensure your admin site is pathed, and also import the admin module from django.contrib.gis:
from django.contrib.gis import admin
from django.urls import include, path

urlpatterns = [
    path('admin/', admin.site.urls),
    url(r'^maptest/', include('webmap.urls')),
]
Since we KNOW we're going to have to do this eventually anyways, we've added the entry for our new webmap app urls.py file. So if we navigate a web browser to ourproject.site/maptest/ -- we'll be directed to the urls listed in our webmap app -- which we'll define shortly.
Now, we can see all the country borders we just imported, if we go to our admin page at https://localhost:8000/admin :
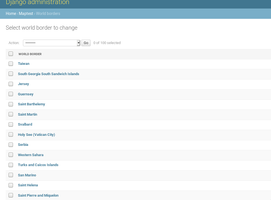 |
| 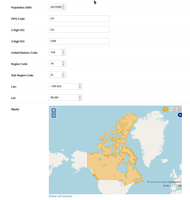
...Cool? Sooo.. People have to log in to the ADMIN page to see stuff? That seems dumb...
and it IS dumb.
Step 4 - Link content from our fancy-pants PostGIS geospatial database into some Django views / forms, and HTML templates:
(pro-top: if you use big words / phrases like "geospatial database", people generally just assume you know what you're talking about, even if you don't).
So lets make a couple quick and dirty placeholders just to get things working on a site that's not the admin site. We're going to write a new view, a new form, a very simple html file, and add a couple lines to our urls.py files. It's gonna be fun. Hopefully.
The form!
## webmap/forms.py

from django.contrib.gis import forms

class GeoForm(forms.Form):
    label="Maps!"
    mpoly = forms.MultiPolygonField(widget=
       forms.OSMWidget(attrs={
           'map_width': 800,
           'map_height': 500
       })
    )
A couple notes on the above:
- We've imported the forms module for the
django.contrib.gispackage; - We're using the OSM (OpenStreetMap) widget to display our maps, rather than Google or OpenLayers.
- Our form class is called
GeoForm, and our default map size is 800 x 500 pixels
The view!
### webmap/views.py

from webmap.forms import GeoForm
# Generic Map Areas
from webmap.models import WorldBorder

from django.http import HttpResponse, Http404, HttpResponseRedirect
from django.contrib.gis.geos import MultiPolygon
from django.template import loader
from django.views import View

import re

# Create your views here.

def world(request):
    countries = WorldBorder.objects.filter(pop2005__gte=0).order_by('name')
    all_countries = 'SRID=4326;MULTIPOLYGON ('
    for idx, border in enumerate(countries):
        temp_text = re.sub('SRID=4326;MULTIPOLYGON \(','',border.mpoly.ewkt)
        temp_text = re.sub('\)\)\)','))',temp_text)
        if idx > 0:
            all_countries += ","
        all_countries += temp_text
    all_countries += ")"
    all_countries = MultiPolygon().from_ewkt(all_countries)
    geo = GeoForm()
    geo.fields['mpoly'].initial = all_countries
    context = {
    'map':geo,
    'countries': countries,
    }
    template = loader.get_template('maptest/mapbasic.html')

    return HttpResponse(template.render(context,request))

def country(request, country_id):
    countries = WorldBorder.objects.filter(pop2005__gte=0).order_by('name')
    selected = WorldBorder.objects.get(pk=country_id)
    geo = GeoForm()
    geo.fields['mpoly'].initial = selected.mpoly
    context = {
    'map':geo,
    'countries': countries,
    'selected': country,
    }
    template = loader.get_template('maptest/mapbasic.html')

    return HttpResponse(template.render(context,request))
A couple notes on the above:
We're importing our
GeoFormfrom theforms.pywe just created;We're importing our
WorldBordermodel from themodels.pyfile created much earlier;Importing a couple standard django http response modules that I just kinda copy-paste into new view files;
We're also importing the
MultiPolygonclass fromdjango.contrib.gis.geos;- This is going to let us define new geometry in our map -- our "new" geometry will be a "multipolygon" of all the countries in our "WorldBorders" data put together;
countriesis a queryset of all countries organized by date;all_countriesis a variable for our new geometry. We're adding some text at the start to define the projection (SRID=4326), and geometry type (MULTIPOLYGON); then- iterating through all the countries to:
- remove that same text from each line for the specific country;
- add the geometry definition for that specific country as a new "polygon" in our "multipolygon" geometry held in
all_countries
- iterating through all the countries to:
Create a new
MultiPolygonclass object from theall_countriesdata, and use it to define the initial data in ourGeoForm;Then we package up our
GeoFormand list ofcountriesin some context variables to send to our template!We've also created a second view that will handle displaying an INDIVIDUAL country from our data set. Managed in a similar fashion -- but we don't have to bundle a bunch of shit together.
Getting close now!
The URLs!
### webmap/urls.py

from django.urls import include, path

from . import views

urlpatterns = [
    path("", views.world, name="world"),
    path("c<int:country_id>/",views.country, name='maps'),
]
Some notes on the above:
- Make sure you import the
includeandpathmodules; - The first entry takes us to our bastardized "all countries" display. This is directed to the
webmap.views.worldmethod we created; - The second entry will take a variable from the hyperlink for which country to show, which is directed to the
webmap.views.countrymethod we definte above.
The template!
### webmap/templates/mapbasic.html
<html>
<link rel="stylesheet" href="https://stackpath.bootstrapcdn.com/bootstrap/4.3.1/css/bootstrap.min.css" integrity="sha384-ggOyR0iXCbMQv3Xipma34MD+dH/1fQ784/j6cY/iJTQUOhcWr7x9JvoRxT2MZw1T" crossorigin="anonymous">
<body>
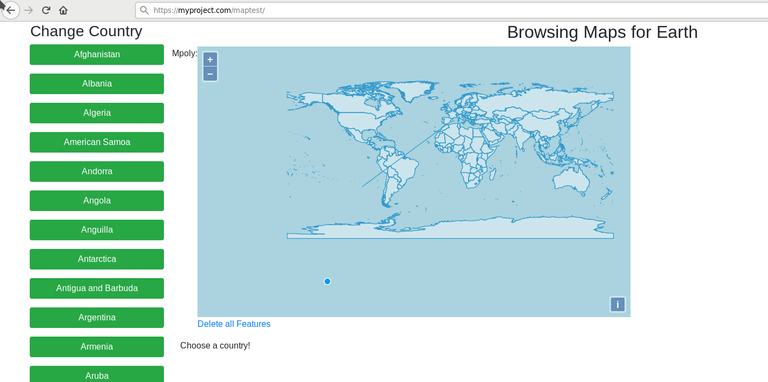
<div class="container container-fluid home-block" style="max-width:1920px">
<div class="row">
<div class="col-sm-2">
<h3><center>Change Country</center></h3>
{% for country in countries %}
<ul><a class="btn btn-success btn-block" href="/maptest/c{{ country.pk }}/">{{ country.name }}</a></ul>
{% endfor %}
</div>
<div class="col-sm-10">
<div class="row">
<div class="col-sm">
<h2><center>Browsing Maps for {{ selected.name }}</center></h2>
<form method="post" enctype="multipart/form-data">
<div class="row">
{% csrf_token %}
{{ map.media }}
{{ map }}
</div>
</div>
</div>
<div class="row">
<div class="col-sm">
Choose a country on the left!
</div>
</div>
</div>
</div>
</div>
<script src="https://stackpath.bootstrapcdn.com/bootstrap/4.3.1/js/bootstrap.min.js" integrity="sha384-JjSmVgyd0p3pXB1rRibZUAYoIIy6OrQ6VrjIEaFf/nJGzIxFDsf4x0xIM+B07jRM" crossorigin="anonymous"></script>
</body>
</html>
A couple notes on the above:
- We're importing Bootstrap 4 CSS and JS for our simple layout;
- We iterate through all the countries in our database, and create a link in the sidebar on the left of our page;
- We call up a
{% csrf_token %}to prevent our users getting played like a bunch of chumps. Protect yo-self; - We're displaying our prepopulated map
Step 5 - Think about some cool stuff we could do to make this even better -- or at least, less bad:
So I was going to continue this rant / tutorial / evidence-of-my-incompetence a bit more -- but I think this is definitely long enough. I'll finish things off with a few bullet points of what I'm thinking would be a great way to expand / polish this idea. So without further ado, here are some of my thoughts:
- Utilize the Django-Leaflet project that others have worked on. This should improve the UX with maps;
- I'm hoping / assuming that "hyperlink clickable geometries" is something that Leaflet can achieve.
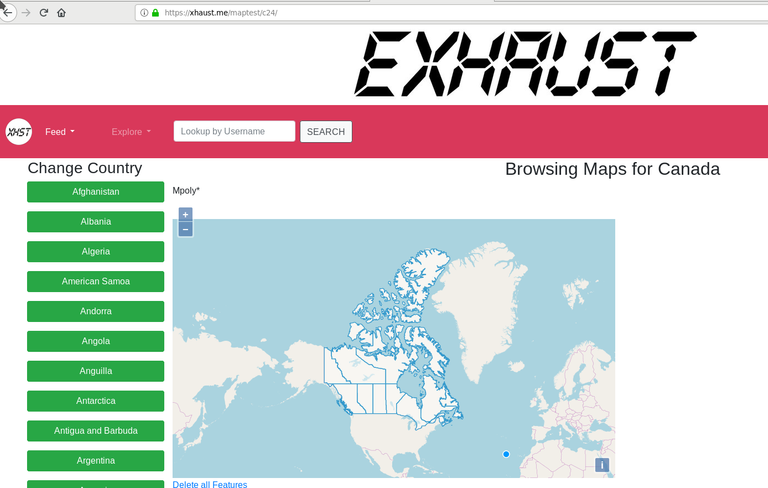
- Implement some controls so (specific) users are able to edit/create/manage geometries;
- Put in a bit more detail, and grab provinces/states/territories;
- You can see from the image above that I've already done this on my project;
- Allow users to query their data by geo area.
- Compile and save custom figures;
- Extend this and link w/ SMT / SCOT tokens so business "register" their geo-location based on said SMT / SCOT tokens;
- Extend so project users can link their profile to areas that their responsible for managing;
There's all sorts of different ways that information can be broken down and/or categorized based one geographic zones. The sky is essentialy the limit. I've got some pretty interesting plans for GIS and EXHAUST! I hope you join me as we explore this path together moving forwards.
What do you think are some cool use cases for coupling STEEM / SCOT/ SMTs and GIS / spatial analysis? YOu've seen all these #team-canada or #team-malaysia tags floating around. Maybe this could all just be in the background, and there would be some group metrics / rewards just for being in a certain part of the world. Or maybe this would be a great way to meet new Steemians in your area. Or maybe you could sort @travelfeed curated content by areas on a map, and see reviews for different cities / countries on a map.
I'm keen to hear what you think. Let me know!
Thank you for using the #diy tag. We have manually rewarded this post from our @build-it.curator account with BUILD tokens in the form of an upvote.
Build-it is a central hub for DIY and How-To projects. It's an opportunity to find and share the latest in DIY, and How-To tutorials. The recommended tags required when creating a DIY article are #diy, #build-it. #how-to, or #doityourself. Please read our guide
Need help? Live technical support on Discord or Telegram
This project is run and supported by our witness @gulfwaves.net. If you like what we do, click here to vote for us
Very cool. thanks.