Technical Diving
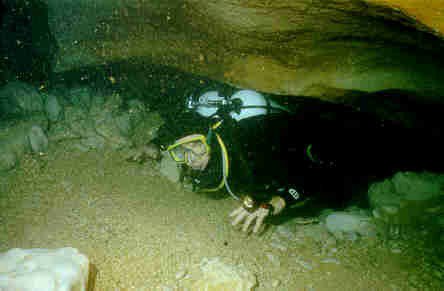
After reading The Last Dive by Bernie Chowdhury, I knew I wanted to take scuba diving to the next level. I was already an NAUI and SSI open water instructor, but I wanted to make the move toward technical diving so I could hit deeper wrecks like the Andrea Doria which were to this point, off limits.
What is Technical Diving?
According to the National Oceanic & Atmospheric Administration (NOAA), "Technical diving is a term used to describe all diving methods that exceed the limits imposed on either depth or time for recreational scuba diving. Technical diving often involves the use of special gas mixtures (other than compressed air) for breathing. The type of gas mixture used is determined by the maximum depth planned for the dive or the length of time the diver intends to spend underwater. While the recommended maximum depth for conventional scuba diving is 130 ft, technical divers may work in the range of 170 ft to 350 ft, sometimes even deeper. Technical diving also requires one or more mandatory decompression “stops” upon ascent, during which the diver may change breathing gas mixes at least once."
Other considerations not commented on by NOAA include deep wreck dives, penetration dives, cave dives or any another specialty dive where longer than normal exposure times or where recreational dive limits are exceeded in some way.
In the Beginning
It was at this point, I signed up for 2 technical diving courses; TDI's Advanced Nitrox and Decompression Procedures taught by a local TDI instructor. On my first night, my instructor explained how much physical and mental energy would be required to attain these certifications. He also explained it would be expensive to make this transition.
Just to reinforce the expense, he got online to show me what I would need. I was immediately shocked to learn there was almost nothing I could keep from my current rig. I was going to have to replace almost everything. My instructor wanted me to take a more holistic approach to diving and felt most of the gear I owned was not fit for technical diving. As I looked at the prices of the gear I would need, I could see just how expensive it was going to be. This was a hard decision, I already had a lot of gear, most of which was brand new. I could not understand how additional equipment or complete changes of equipment were going to make me a safer diver. To say the least, I was a little upset and almost didn't continue, but after rationalizing it over a weekend, I decided to push ahead.
Since I knew that piecing together a new rig would be outrageously expensive so I decided to examine the changes needed to comply with the Hogarthian gear configuration in an analytical way. I decided to record my transition to help determine the value of each component. This information would allow me to make educated decisions between equipment manufacturers, equipment styles, and diving techniques. I also decided that as part of my record, I would not only look at the equipment itself but also the pros and cons of setting it up according to Hogarthian principals.
Equipment
The gear I was required to purchase included:
- BC - Halcyon - Explorer Wings
- Backplate - Halcyon - Stainless Steel Backplate and adjustable harness
- Manifold - Thermo - Isolation Manifold
- Bands - Highland - Double Tank Bands
- Regulators - 2 - Apeks ATX 200 second stages with 2 DS4 300 bar DIN first stages
- Spool - Halcyon - 50 ft Dive Spool
- Tanks -2 - Luxfor - Aluminum 80s
- Primary Light - Diverite - HID Canister Light
- Backup Lights - 2 - Halcyon - Scouts
- Liftbag - Diverite - 50 lb
- Storage - Halcyon - MC Storage Pak
Other equipment I already owned which could still be used included:
- Mask - Wintech - Frameless Mask
- Fins - XS Turtle
- Wetsuit - Mares - 6.5 two piece
- Compass - Wrist Mount
- SPG - ScubaPro for the primary rig and my stage bottle.
Other equipment purchased included:
- Wing - Halcyon - Eclipse
- Stage tank - Luxfor - Aluminum 80
- Tank - Luxfor - Aluminum 80
- Dive Computer - Shearwater
Now, here is what I think about the gear I purchased as well as what I think about its value and usability for the diving that I do. Please understand, I am not saying what I have is what everyone needs. This is where I started. As you read the following details, please keep in mind I am different than you and what I like or dislike may not have any meaning for you as a diver or your safety in the water. Take it or leave it - Just be safe!
](https://images.hive.blog/768x0/https://steemitimages.com/DQmcboWX3Sj5wsZEDwqwwtRWaUwwm538dCgfty261qAMW2s/single_tank.jpg)
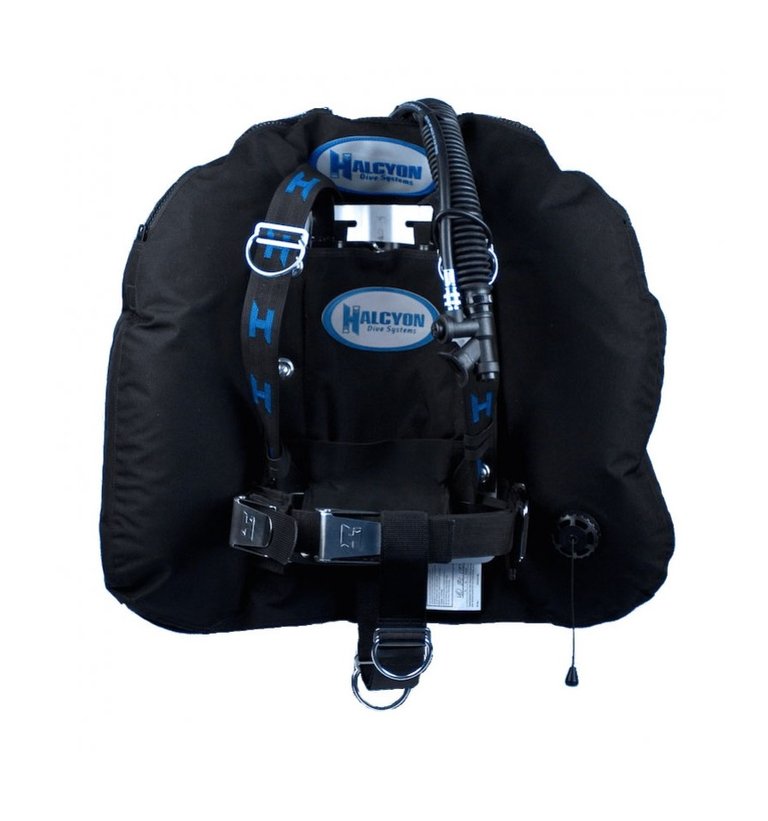
WINGS - HALCYON - EXPLORER
My Explorer wing is rated for 55 lb. of lift. I have been told they are ideal for double steel tanks, but unfortunately, until finances allow, I use them with my double AL 80s. What I really like about this wing is how it helps maintain my trim underwater. It is very thin, even when fully inflated. This effect allows the tanks to remain close to my back, reducing drag. Because of the design of the bladder, dumping air from any position is very easy, making maneuverability more efficient.
I have become very proficient in dumping air in the horizontal position which is much more efficient than turning slightly vertical to dump air from a normal jacket BCD. This practice saves time and energy, which allows me more control in the water. Now I am sure there are some out there who have no problem dumping air from their jacket style BCD, but I was never as comfortable doing so and keeping my trim perfectly horizontal as I am now.
My ability to keep my body horizontal has drastically increased, and my chances of getting entangled have decreased proportionally.
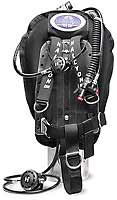
WINGS - HALCYON - PIONEER 36
After training with the Explorer for nearly a year, I decided to sell my Aqualung RDS Cousteau BCD and replace it with the Halcyon Pioneer 36. The Pioneer wing allows me to use the same harness and backplate as I do with my Explorer wing, which helps cut down on problems related to changes moving gear around.
The Pioneer is specifically designed for use with a single tank. Previously, the design required an adapter to hold the tank body to the wings. This adapter pushed the tank several inches away from your back which obviously increased drag. Now the adapter has been removed because you can use cam straps and buckles to secure your tanks. Two Cam straps run through an incorporated adapter that is welded into the "backbone" of the wings.
My biggest complaint, when I first started using the cam straps, was how frustrating it was to remove and replace the backplate from my Explorer wings to use with my Pioneer wings. With the Storage Pak covering the slots where the straps run, I had to continually remove the Pak to position the straps. It took some time to figure out the proper routing of the straps and their use with the 2 buckles. I have now used the Pioneer for over 8 months and it is growing on me each time I do. Again, the ability to utilize the same harness and backplate for both are benefits that cannot be ignored. I know that no matter which set of wings I use, my equipment is positioned in the same place. Not only is it more convenient, it is just safer.
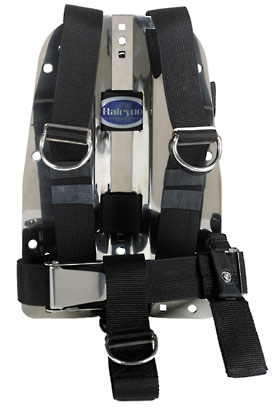
HARNESS - HALCYON - SECURE HARNESS
The harness and backplate allow for infinite adjustability. This system provides a perfect fit for both single and double tank setups. As mentioned, I really appreciate the ease at which my equipment can be positioned and repositioned along the harness. My accessories include a knife, 2 backup lights, my storage pocket and a canister light. I also have various D-rings for multiple attachment points for stages, regulators and other equipment.
BACKPLATE- HALCYON - STAINLESS STEEL
I use the Halcyon six-pound stainless steel backplate with both sets of my wings. Using the stainless steel backplate provides additional weight that I don't have to have on my weight belt.
MANIFOLD - HALCYON - ISOLATOR
I have the 300-bar DIN isolator with rubber hand wheels and 3/4" threads. The manifold uses a sealing system with double captured, barrel O-rings that can compensate for variations in tank diameter, and are less likely to leak if bumped. There is some argument that the extra valve, O-ring, associated with the isolator add additional failure points, but keep in mind this type of failure is rare and the isolator offers better redundancy in case of an emergency.
TANK BANDS - HALCYON - For AL80S
My bands accommodate my 2 aluminum 80 cu ft tanks. The complete hardware set consists of two shouldered stainless hex bolts, two wing nuts, two flat washers and stop nuts of 18-8 stainless steel. The bands are 7.5" in diameter and are 4" wide.
TANKS - LUXFOR - AL80
As I mentioned, I am using 2 AL80s, but will buy 2 pressed steel, low pressure, 95s or 104s when finances allow. I have been told my present setup is ideal for wreck diving with a wetsuit. In a cave, I will want to use steel 95s or 104s.
TANK - LUXFOR - AL80
I also have an additional AL 80. This is for single tank dives. It has been painted white for ease of identification underwater and has a working pressure of 3000 psi.
STAGE TANK - LUXFOR- AL80
Oxygen cleaned, painted yellow and labeled Nitrox. This tank is used for all stage decompression dives or single tank dives using Nitrox. The value has a yoke to DIN adapter so it easily switches from stage to back gas configurations.
APEKS ATX 200 First Stage
Originally, I had purchased 2 Poseidon Odin regulators. They worked great, but I wanted something that I could depend on in any condition or working environment. So, after a great deal of research, I opted for the Apeks ATX 200.
This reg is designed for use in all conditions and has no problem supplying air effortlessly to depths of 180. This is the deepest I have taken it but research indicates it will have the same performance up to 230 ft and beyond. The overbalanced first stage increases interstage pressure as you descend, compensating for the denser air; and the first stage comes with a "dry" environmental sealing system that completely eliminates the need for silicone oil or grease filling.
APEKS ATX 200 Second Stage (2x)
The ATX 200 has an improved exhaust gas flow which reduces exhalation resistance and allows you to breathe easier. The design gives me the ability to tune the breathing characteristics of the regulator to fit my needs.
I have 2 ATX 200 second stages; one is attached to a 7-foot hose and uses the Apeks DS4 DIN first stage. The other uses the ATX 200 first stage and has a bungee cord around the mouthpiece that is large enough to go over my head. During an out of air emergency, I would donate the reg in my mouth on the 7-foot hose and take my primary which is hung around my neck. This allows me to switch between regulators effortlessly.
](https://images.hive.blog/768x0/https://steemitimages.com/DQmW3Eshw4pFFrQqfPm9q94kPkEQafs8bLKGANpFjSmsNuE/backplate_harness.jpg)
APEKS DS4 DIN First Stage
This first stage has one high-pressure port and four low-pressure ports and is ideally located for use on a twin manifold or single tank setup. The first stage comes standard with a 300 bar DIN connector and is dry sealed keeping all internal components protected from the environment. This overbalanced first stage compensates for increasing gas density at depth provides me gas in any circumstance.
Wintech FRAMELESS MASK
Of all the masks I have used in the past, this is my favorite. The glass fits directly into the silicone skirt eliminating the need for a frame, which reduces the amount of weight of the mask. Because of its low volume, the mask is a breeze to clear and it allows for better than average peripheral vision. Overall it is very comfortable.
Scout (2x)- HALCYON
These lights use 3 C cell batteries and a 5 1/2 watt bulb and have a 4 1/2 to 5 hour burn time. They are 1 1/4" in outside diameter, 8" long, and weigh 13 ounces. The Scout has a 4 1/2 volt bulb combined with a 4 1/2 volt battery pack for optimal performance.
The Scout is fitted with a proper voltage bulb to reduce the risk of failure. Nearly all widely available reserve lights overdrive the bulb to create a brighter beam. While overdriving the bulb is effective for short-term use, it increases the stress on the filament, resulting in a greater frequency of bulb failure. The Scout has a machined attachment point at the rear of the light and is free from all the plastic clips and other assorted snags. I have attached a butterfly clip on each at their end so they can easily be attached to my D-rings on the right and left side of my harness.
SPOOL - 50 FT - HALCYON
The spool is much smaller than most reels and is much easier to operate. Its great advantage is due to its small size and less cumbersome nature making it jam-proof. It eliminates the problem of entangling the spool itself while deploying the line, making it easy to use during an emergency.
My biggest complaint with this spool is when attached to my lift bag when it is deployed, the spool can get away from you if you are not paying attention. The hole in the middle of the spool is a little too small and there is really not a good way to hold on to it. As my lift bag picks up momentum racing to the surface, I have lost it a couple of time. Luckily both times I was able to chase it down a few feet away.
Conclusion
It has been 10 years since I originally wrote this article and my how things have changed. I now dive exclusively with a sidemount rig and would never go back to most of the gear above. It weighs a ton and is a bitch to get on and off. I still do a lot of technical diving but the wings above are long gone. I have upgraded almost everything, but as the title mentioned, it was my transition into technical diving. I used this equipment for about 8 years making hundreds of deep dives. I will follow this post up soon with a part 2 explaining how I went from back mount diving to sidemount diving very soon.
All Content and first photo are Original.
Enjoying my content? Please help support my efforts by resteeming.
Thanks So Much - Liquidtravel