Showcase Sunday | IP Addresssing And Subnetting Deep Dive (Full Course)
Hello and welcome, I am currently working on a video course 'addressing' IP version 4, and I've decided to post my slides and scripts exclusively here on STEEM. This content was originally posted on STEEM as part of a 9-part series(Links: 1,2,3,4,5,6,7,8,9). I appreciate any feedback or suggestions, or if you are new to the world of computer networking, I hope you enjoy them!

Hello, welcome to my deep dive course on addressing and subnetting for IP Version 4. In this course, we will take a look at what an IP address is, how to determine your own IP address, as well as how the IP address functions as a basic building block of the Internet. IP version 4 is still the predominant addressing scheme used on the Internet, even though the use of IPv6 is growing. I will discuss IP version 6 in a future deep dive course.

IP addresses facilitate communication on the Internet, meaning two devices, such as computers, must have a unique public Internet address in order to communicate. These unique addresses are reachable on the public internet through the use of routing protocols.
IP version 4 is the most widely used scheme, but IP version 6 is emerging due to the depletion of IP version 4 address space. This course focuses on the legacy IP version, IP version 4.
IP is part of the larger TCP / IP suite of protocols, including TCP, and ICMP.

An IP address represents a single unique device on the Internet, such a computer, smart phone, or website. If you connect to the Internet, at some point your communication is being identified to the outside world using a unique Internet address.
An IP address contains two parts, a network address and a host address. In modern networks it is difficult to determine which part is which. A subnet mask is used to identify what the network address is, and what the host address is. More on that later.
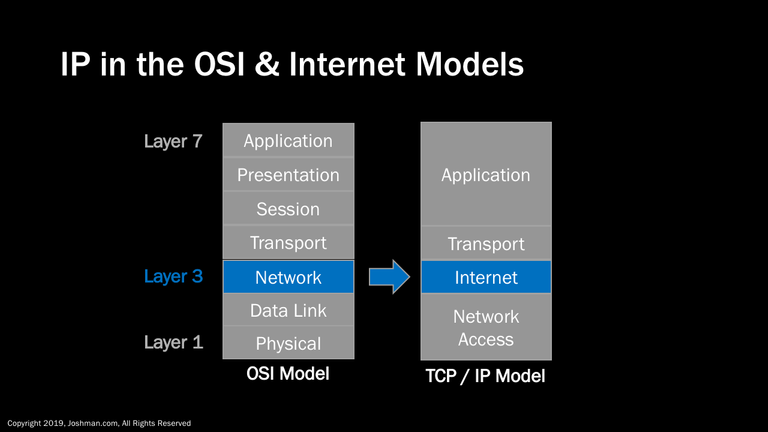
There are two primary conceptual models for how computer networks operate, these are the OSI model developed by the International Standards Organization (ISO), and the TCP/IP model that predates it. You may hear of an IP address, protocol, or device referred to as being Layer 3. This is because the IP protocol maps directly to the Network layer, or layer 3 of the OSI model. IP also maps directly to the Internet layer of the TCP/IP Model, which was developed as part of the TCP/IP protocol suite. The details of these models is not the focus of this course, but it’s important you know what is meant by a ‘Layer 3 Address, protocol, or device’ and where they fit into these models, as many documentation sources will refer to them.
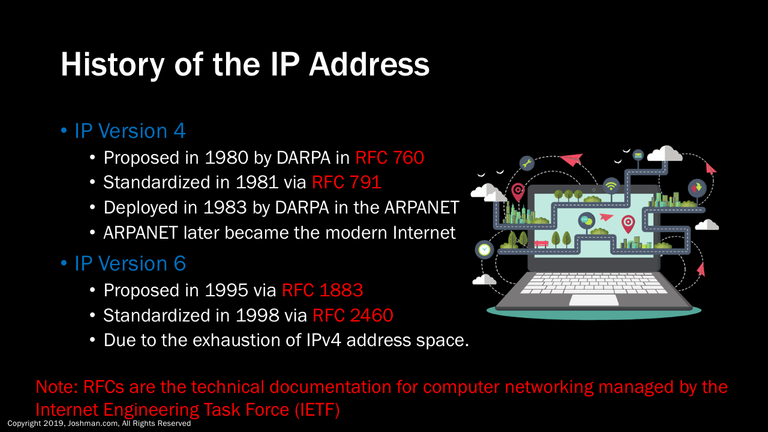
IP Version 4 was first proposed by the US Defense Advanced Research Projects agency, or DARPA in 1980 via Request for Comments (RFC) 760. It was standardized via RFC 791 in 1981. It was deployed in 1983 on the ARPANET, which later because the modern Internet.
IP Version 6 is the upgrade to IPv4. It was proposed in 1995 via RFC 1883, and standardized in 1998 via RFC 2460. It was created to address the issue of IPv4 address space exhaustion. Its deployment has been slow due to technologies such as Network Address Translation (NAT). More on NAT later.
RFCs are the technical documentation for computer networking managed by the Internet Engineering Task Force (IETF). If you are interested in learning more information about a subject, you can just enter RFC and the number into a search engine or the IETF website.
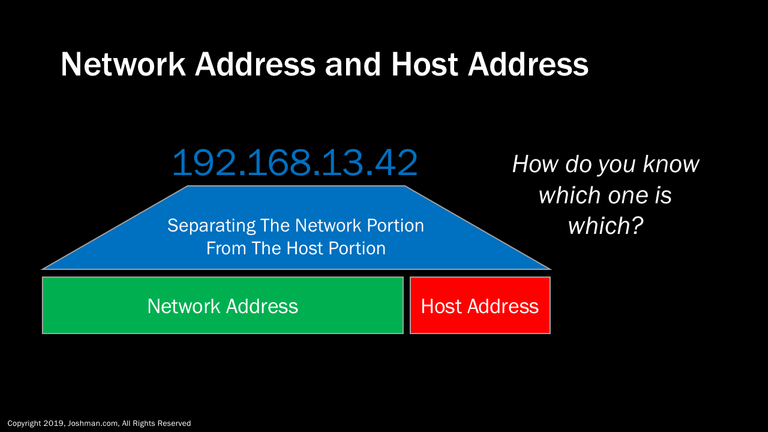
An IP address consists of two parts, these are the network address, and the host address.
In the old days you could simply look at the IP address and intuitively separate the network from the host address. This was due to fixed network classes. With the advent of subnetting, which we will talk about later, you need some mechanism to tell which is which. This mechanism is called the subnet mask.
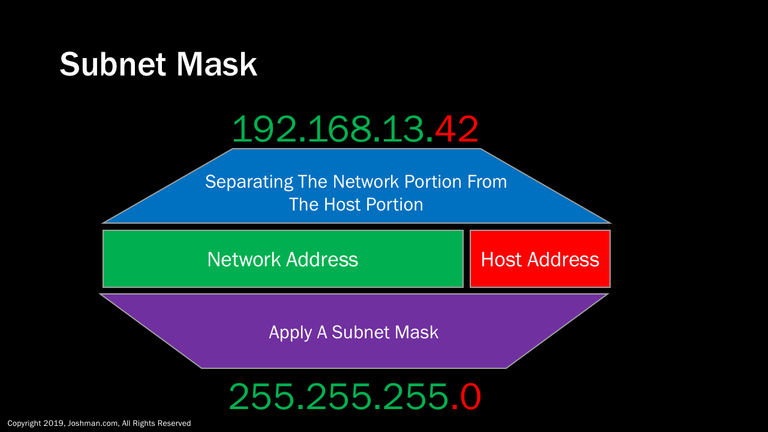
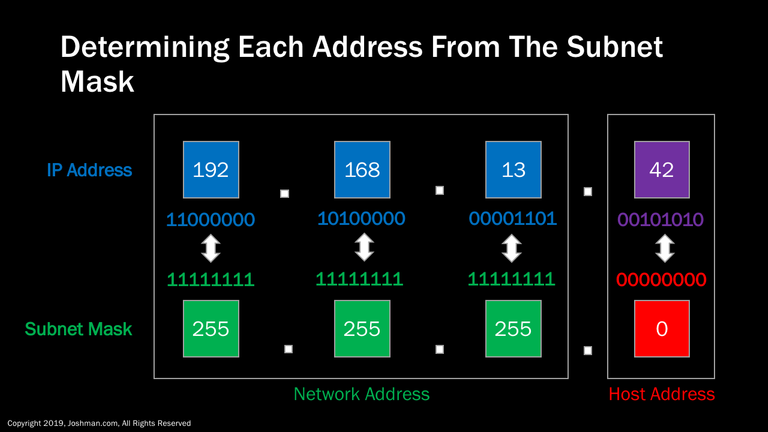
The subnet mask is a similarly looking number to an IP address. Here we have an example of the IP address 192.168.13.42, with a subnet mask of 255.255.255.0. The network portion of the subnet mask indicated in green corresponds to the network portion of the IP address also indicated in green. The host portion of the subnet mask indicated in red corresponds to the host portion indicated in red. Let’s take a closer look at how an IP address and subnet mask is built.
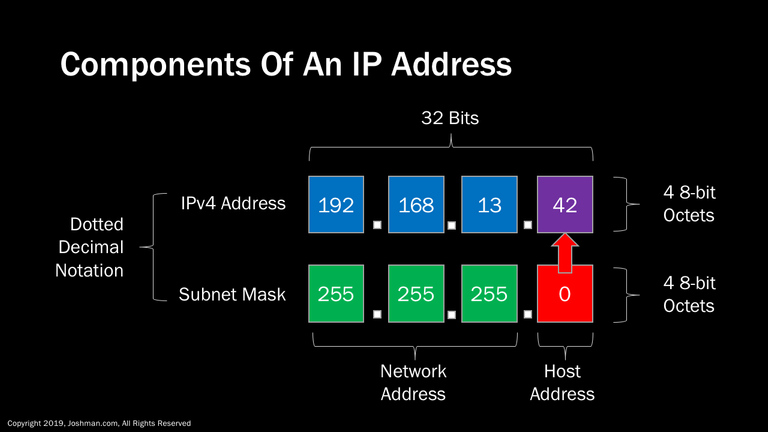
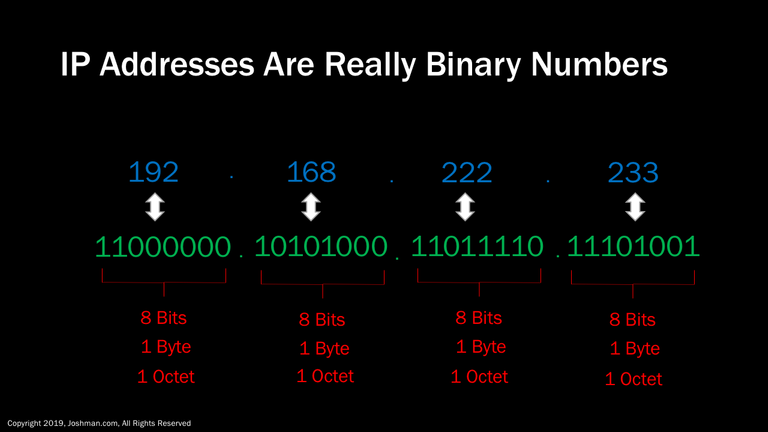
Here is that same IP address. An IP address and subnet mask are 32-bit numbers expressed in dotted decimal notation. This means that it is divided into 4 8-bit octets separated by a decimal point. To fully understand how an IP address is utilized, and how a subnet mask interacts to divide the network address from the host address, we need to learn some basic binary math, which we will cover in the next section.
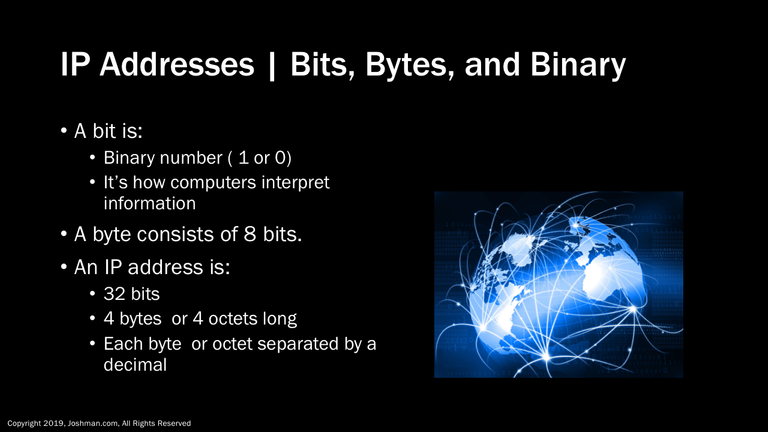
An IP address is 32 bits long. A bit within a computer or network device can be represented by a binary number and is how they interpret information. A binary number is simply represented by either a one or a zero. A byte consists of 8 bits.
An IP address is 4 bytes long, which is a total of 32 bits, In decimal form each address is separated in to sections called octets. Each octet is 8 bits or one byte long.
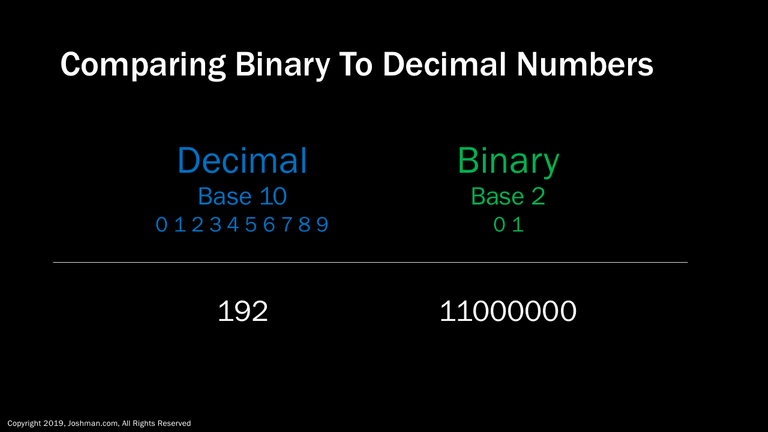
An IP address uses decimal or base 10 numbering when it’s assigned to an interface. At the hardware level these base 10 numbers are converted to binary or base 2. Here is an example of a decimal or base 10 number, 192, converted to binary or base 2.
An IP address is actually a decimal representation of a binary number. This decimal representation is for making the address more human friendly. Which one of these two addresses would be easier to remember? The first one consisting of 12 digits, or the last one consisting of 32 digits.
When a device on the network is processing an IP address, it does so in binary. There are certain operations that we perform on IP addresses that require a basic understanding of binary. This includes subnetting, summarization, verification, determining bit boundaries. and creating wildcard masks.
In this example we break down an IP address into binary, let’s take a look at the technique for accomplishing this.
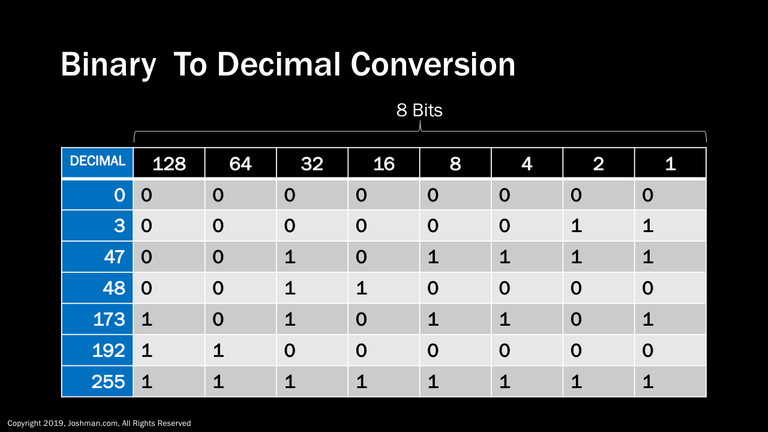
Each bit within a binary number represents a value that starts at one and keeps doubling.
When converting from decimal to binary for an 8 bit number, you can simply choose the largest bit that can fit within the decimal number, and work your way down while adding the values together.
Here are some examples:
For the decimal number zero, all corresponding binary bits are also zero.
For the decimal number 3, the two right most bits (1 & 2)
For the decimal number 47, we set 5 bits (32, 8, 4, 2, & 1)
For the decimal number 48, we set bit 32 and bit 16 to 1, because 32 + 16 = 48
See if you can work out the next two examples yourself
For the decimal number 255, all 8 bits are set to 1, because all 8 values add up to 255. Including zero, this represents a possible 256 binary values.
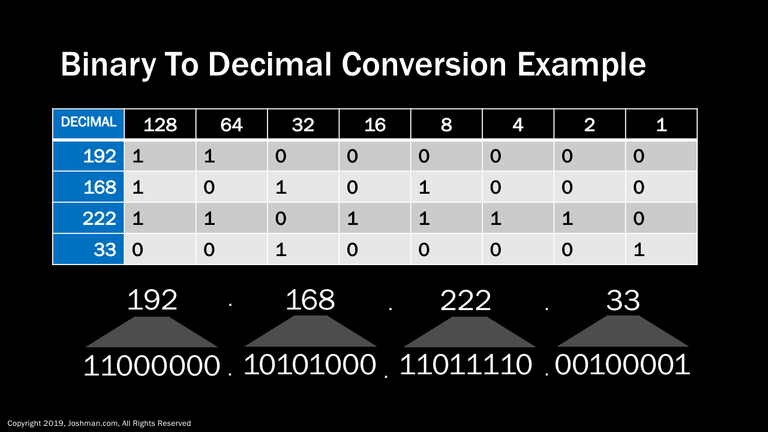
Here an example of an entire IP address conversion from decimal to binary. Each octet is listed in decimal in the first column, and then converted into binary in each corresponding row.
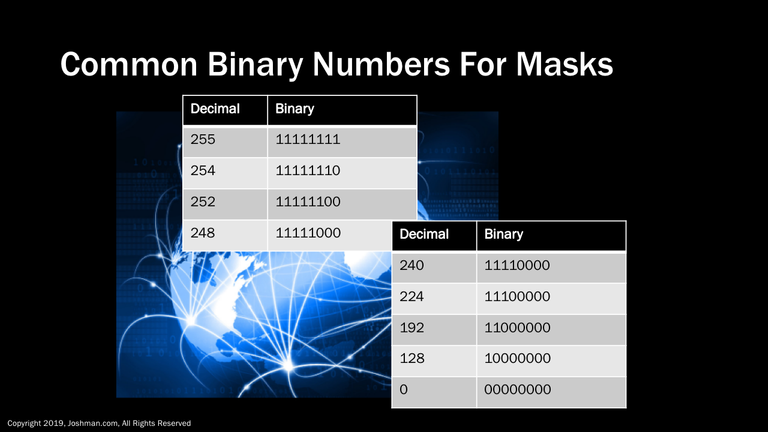
If you plan to do a lot of subnetting work, you should attempt to commit these binary numbers to memory so you can easily recognize them. A subnet mask is comprised of them, and the ones and zeros are always contiguous. You will see why in the upcoming slides.
The subnet mask is a 32-bit number that can accompany an IP address. It is combined with the IP address to determine the point at which the network address ends and the host address begins. This is often referred to as the bit boundary.
It is called a subnet mask, because when you line it up with a corresponding IP address, the ones mask network part of the address, and the zeros mask the host part of the address. It’s easy to tell when the bit boundary falls at the 8, 16, or 24th bit prior to the decimal point. It becomes harder to identify from the subnet mask when the bit boundary falls anywhere else. The act of moving the bit boundary around to manipulate the network size is called variable length subnet masks, which we will address later. In subsequent slides you will see more applications of basic binary math, and learn why it is essential for mastery of IP.
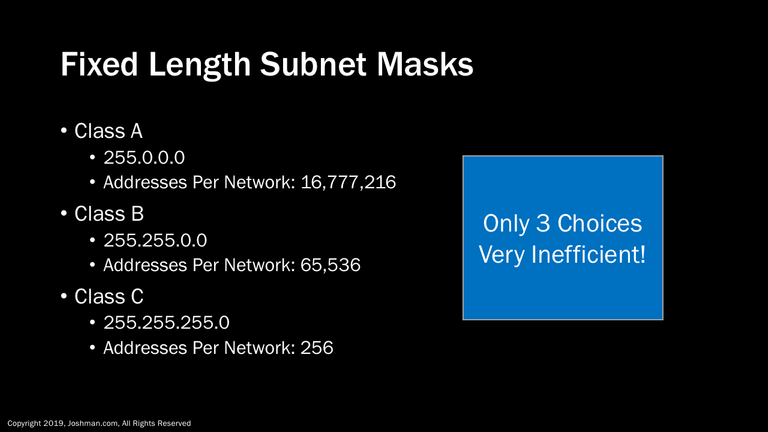
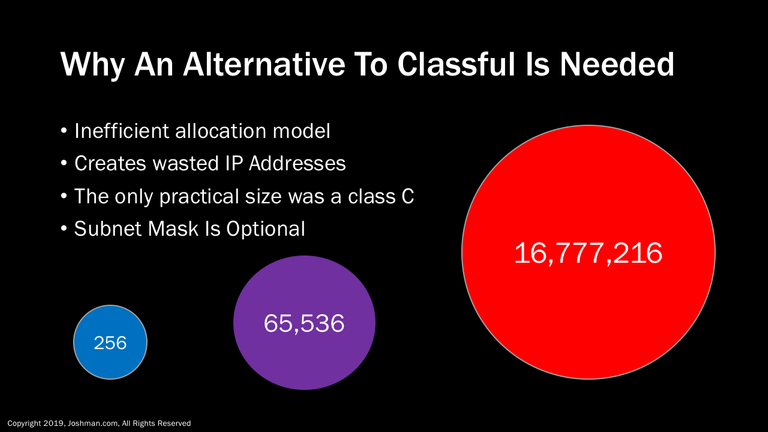
In the beginning, IP used a selection of fixed length subnet masks. These allowed a fixed number of addresses per network. Each class fell on an 8 bit bit boundary. These include:
- Class A, which has a subnet mask of 255.0.0.0, and allowed 16,777,216 addresses
- Class B, which has a subnet mask of 255.255.0.0 and allows for 65,536 addresses
- Class C, which has a subnet mask of 255.255.255.0 and allows for 256 addresses
Having only 3 choices with such a large difference between them was a very inefficient allocation model!
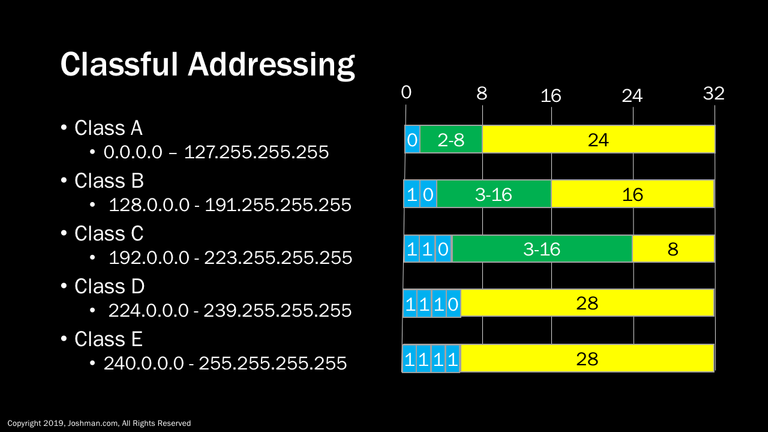
With classful addressing, you can divine the network address simply by looking at the IP address. The address classes were neatly distributed by setting the initial bits of the address indicated in blue..
- 0 for Class A
- 10 for Class B
- 110 for Class C
- 1110 for Class D
- 1111 for Class E
You are already be familiar with Class A – C, which has the network bits colored green, and the host bits colored yellow. Class D is used for multicast addressing, and Class E is considered experimental. Both are outside of the scope of this course.
It didn’t take long to realize that the classful model would not work long term.
It was inefficient, and wasted IP addresses. The Class C was the only practical size If you had a network with 300 hosts, at 256 addresses, a Class C wouldn’t work. Your next best choice was to choose a network allowing 65,536 hosts. I can say confidently that no LAN network ever would need over 16 million addresses. With classful, the subnet mask was optional, so there was no way to break the classes up. This is why classless addressing was developed.
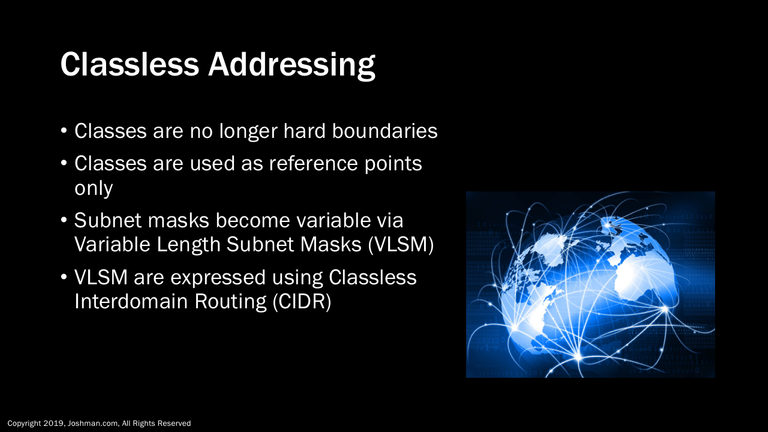
With classless addressing, we set aside classful addressing as a hard boundary to assign addresses. The classes themselves are only used as reference points only. You might still here of an organization being assigned a Class C, or a Class B, but these still exist within the modern classless system.
Classless addressing is accomplished utilizing Variable Length Subnet Masks (VLSM), and Classless Interdomain Routing (CIDR)
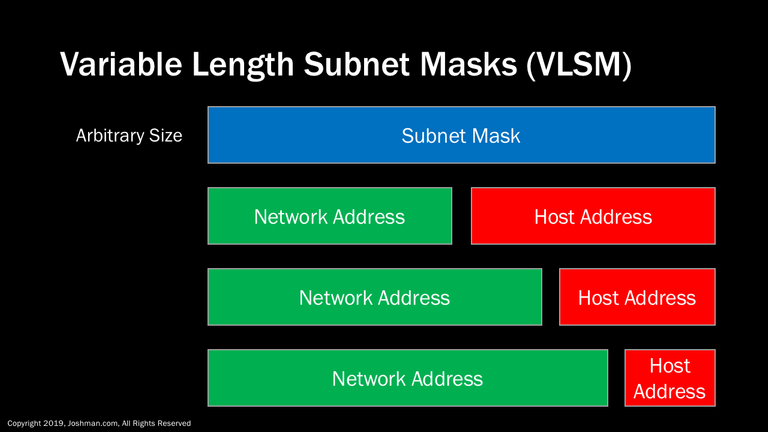
Variable length subnet masks or VLSM, removes the hard boundaries of classful address. The subnet mask can be an arbitrary size of zero to thirty two bits. Though the majority used are /16 or longer. This technique allows us to route everything from a single IP address, to the size of a Class A.
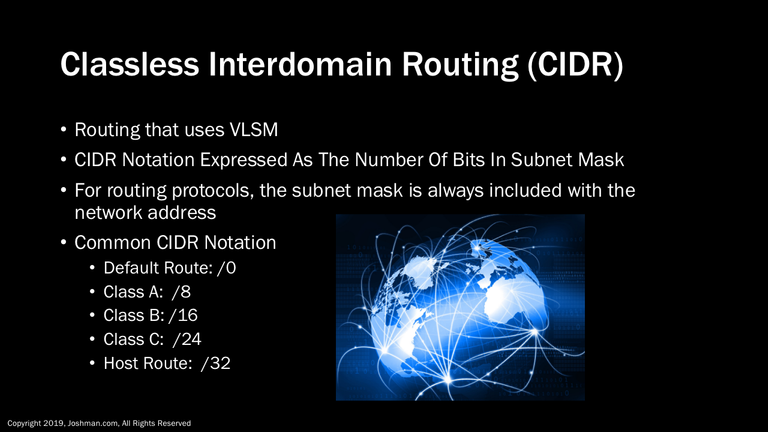
Classless Interdomain Routing(CIDR—also pronounced cider), is taking the concept of variable length subnet masks and applying it to IP routing, that is how the various network addresses get announced to one another on the internet. With CIDR, variable length subnet masks are expressed using CIDR notation. This is simply the number of bits in the subnet mask from zero to thirty two. Unlike with classful addressing, CIDR always includes the subnet mask along with the IP address when routing.
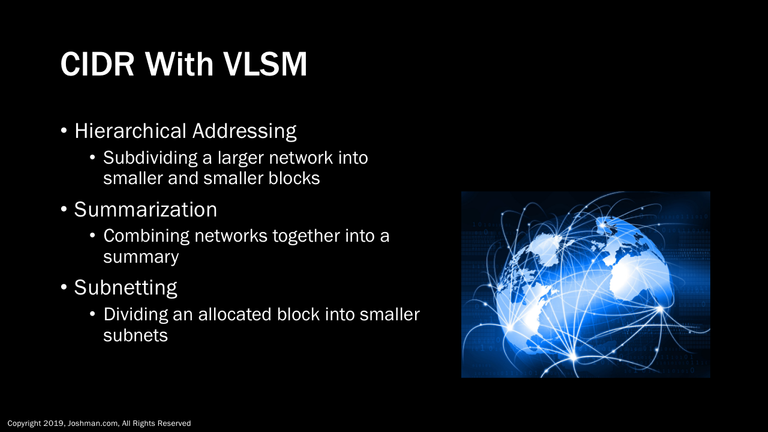
The combination of CIDR with VLSM allows a lot of flexibility in how IP addresses are allocated and advertised. It allows for hierarchical addressing, where a larger block of IPs is subdivided into smaller and smaller blocks. Summarization, which is the act of advertising the top of the address hierarchy while suppressing smaller routes. Also subnetting, which is the method by which you take a larger block of IPs and divide it up into smaller blocks. All of these concepts will be discussed in greater detail later on.
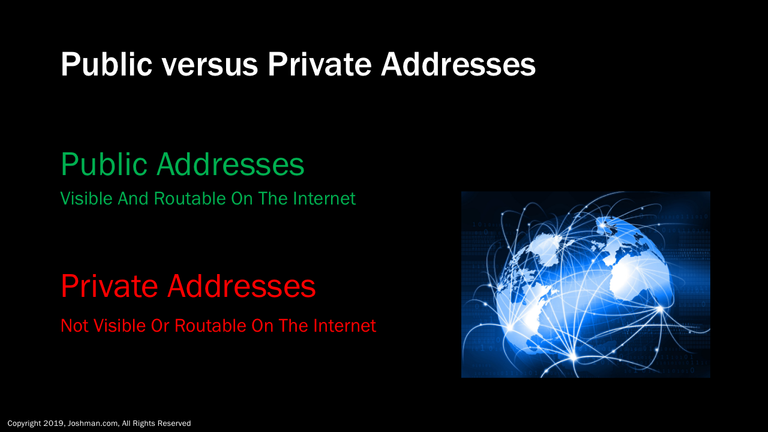
When connecting to the public Internet, you will be assigned a public IP address or range of addresses. These addresses will be both visible and routable on the public Internet.
In some cases you might want to create a network isolated from the public Internet. For this purpose, you can allocate a private IP address or range. These IP addresses ARE NOT visible or routable on the public Internet. Which IP addresses are considered private are defined by RFC. More on that later.
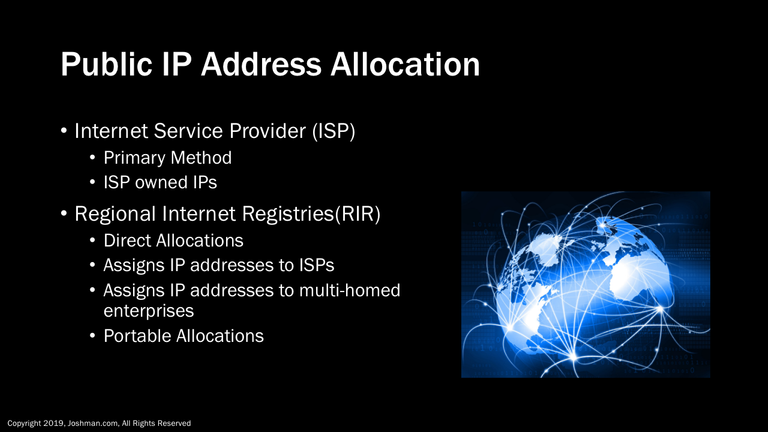
If you require a public IP address or range of addresses, the primary method is to obtain an allocation from your Internet Service Provider (ISP). The ISP itself receives a large block from a Regional Internet Registries (RIR), they can in turn allocate to their customers. The ISP owns these IPs so you cannot take them with you if you decide to move to a different service.
If you are an enterprise that must connect to multiple Internet service providers, also called being multi-homed, you must request a direct allocation from an RIR. This is because advertising the IP addresses owned by one ISP to another ISP can cause routing problems. Allocations made by RIRs are considered portable, meaning you can change ISPs without having to change your IP addresses.
 )
)
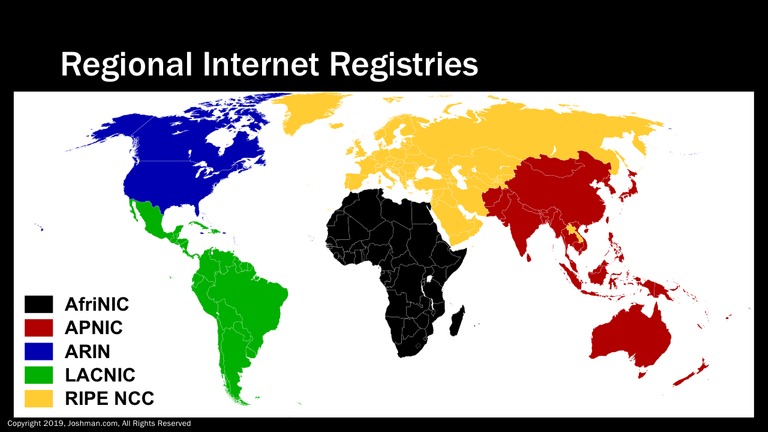
Here is a map of the Regional Internet Registries across the globe. We have:
- AfriNIC serving the African continent
- APNIC serving the Asia-Pacific region
- ARIN serving the US and Canada
- LACNIC serving Latin America
- RIP NCC serving Europe and the Middle East
img src
Rir.gif: Dork BlankMap-World6,_compact.svg: Canuckguy et al. derivative work: Sémhur
Private IP address ranges can be allocated by anyone to any network. They are non-routable over the public Internet, and it is a standard practice to block them. Because the IPs are private, duplicate or overlapping addresses can be allocated by different networks. If you have a private network address and require access to the Internet, some form of network translation or proxy must be used. Private addressing is defined by two RFCs, 1918, and 3297 for which will will go into more detail.
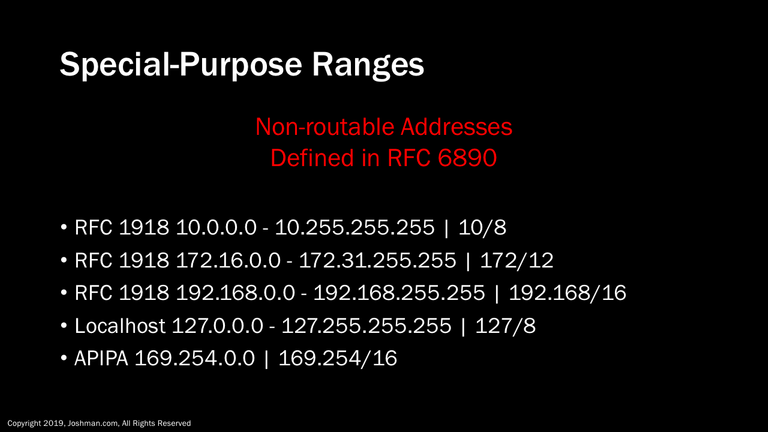
Private IP addresses fall into a category of IP addresses referred to as special-purpose ranges. These include the RFC 1918 address space, used for private networks, the local host range used for network testing, and the APIPA address space, used for automatic and dynamic IP addressing of interfaces.
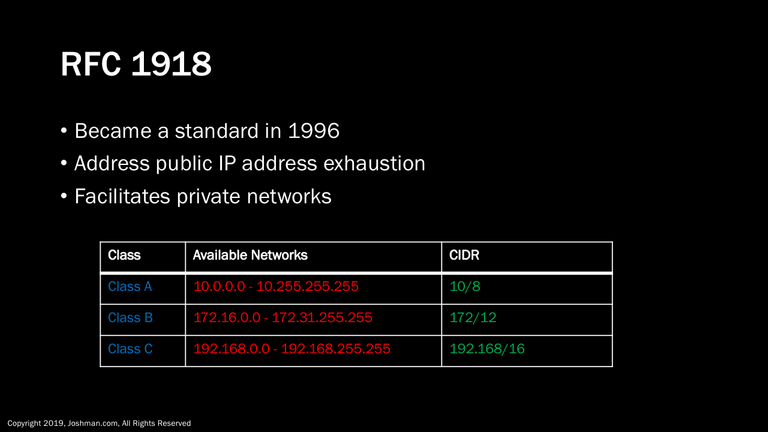
RFC 1918 private addressing became a published standard in 1996. It was in part created to address the problem of public IP address exhaustion, and also to provide a range of private IP addresses that wouldn’t interfere with the public Internet.
For this purpose, a full class A, 16 class B, and 256 class C networks were dedicated for private addressing.
The included table lists each class, the available networks for that class, along with the CIDR notation for the available networks. A network administrator is free to choose any of these networks, and divide them up using variable length subnet masks.
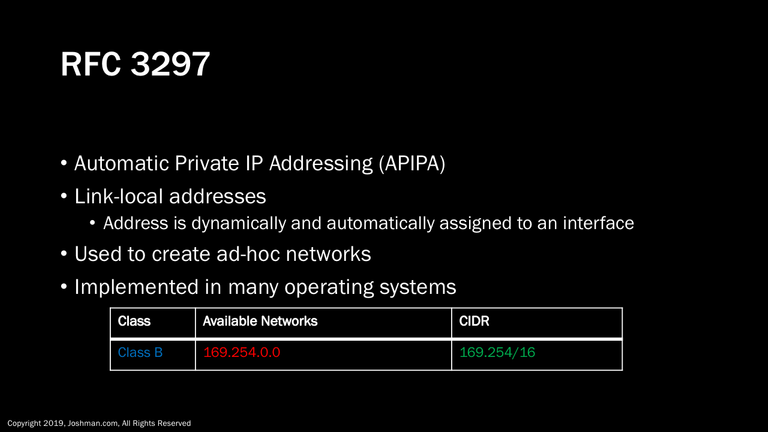
Another for of private addressing is defined in RFC 3297, also referred to as Automatic Private IP Addressing (APIPA) . This method creates what is referred to as link-local addresses. This means an interface will dynamically and automatically assign an IP address using an IP address from the APIPA range of 169.254/16. APIPA can be used to create ad-hoc networks by simply plugging unconfigured devices into the local area network.
This feature is implemented in many operating systems, such as Microsoft Windows, Mac OS, and some versions of Linux by default. If you’ve ever experienced network connectivity problems, you may have seen one of these addresses.
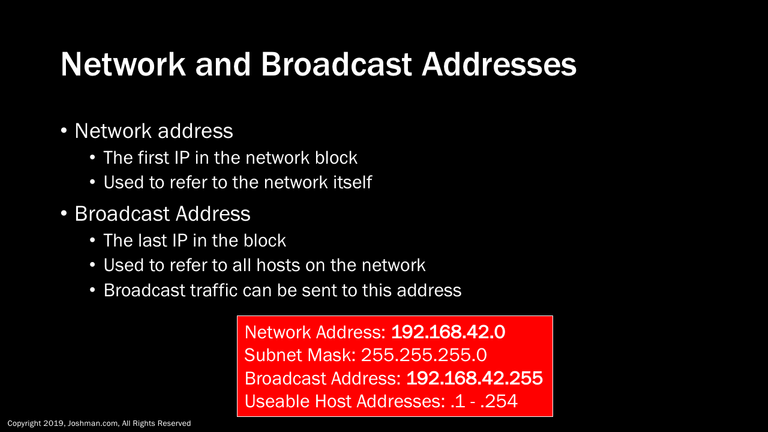
Every allocated network has a two addresses that are not useable by the network administrator. These are the network address, and the broadcast address. The network address is always the first IP address within the block. This address is used to refer to the network itself. Then we have the broadcast address, which is always the last address in the block. It is used to refer to all hosts within the network. Applications can send broadcast traffic to this address and reach all hosts on the network.
In our example we have a /24 or Class C private block of 192.168.42.0. The first address, the .0 is the network address, and the last address, the .255 is the broadcast. The leaves .1 to .254 as useable addresses.
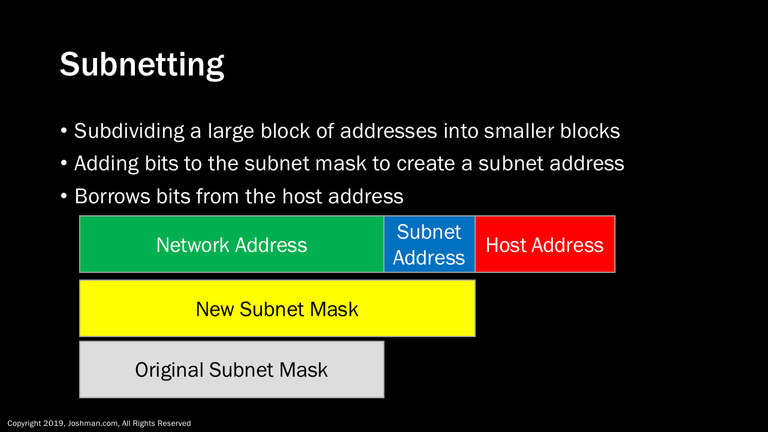
Now that we understand the addressing limitations within a single network block, we can move on to subnetting.
Let’s say we are allocated a full Class C network address, also referred to as a /24 in CIDR notation. That /24 has 24 bits in the subnet mask and network portion of the address, and 8 bits in the host portion. Using subnetting, we can subdivide this network into two or more smaller blocks called subnets. We do this by adding bits to the subnet mask to create a subnet address. This borrows bits from the original host address, and dedicates them to subnetting. This lowers the number of available host address while creating subnetworks.
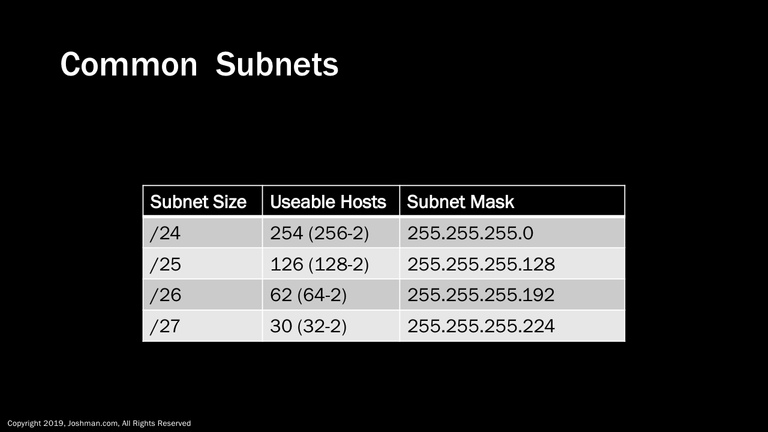
The most common scenario in modern day networks is to receive a /24 or smaller and to then be required to subnet that down into appropriately sized chunks. For that reason we will use the /24 as a reference point to start. A /24 is a full Class C network address that contains 256 host addresses, Subtracting for the network and broadcast address, this creates 254 useable addresses. The /24 has a normal classful subnet mask. As we add a bit to the network address, you can see that the number of hosts is cut in half and another network and broadcast address are subtracted from the available hosts on that subnetwork. We will see this phenomena from a mathematical perspective a bit later.
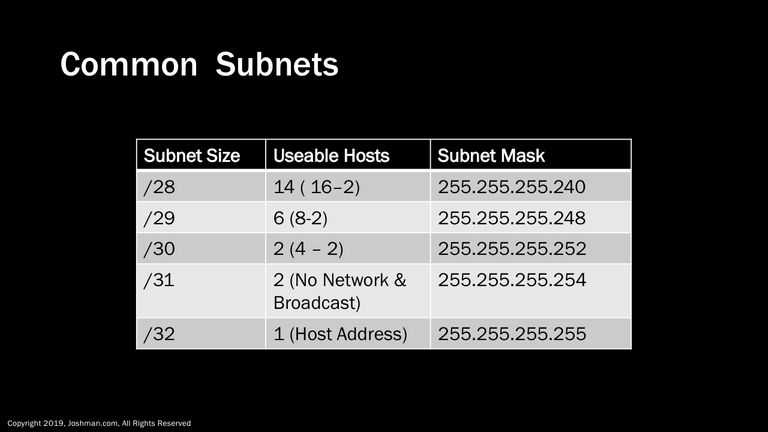
Continuing on down the line, we subtract a bit and the available hosts is reduced in half again and again until we get past the /30 range. /31 address is unique application of subnetting, as there are no network or broadcast addresses. The /32 address is considered a host address, or host route, because it represents just a single IP address. We will discuss the application of both of these address types later on.
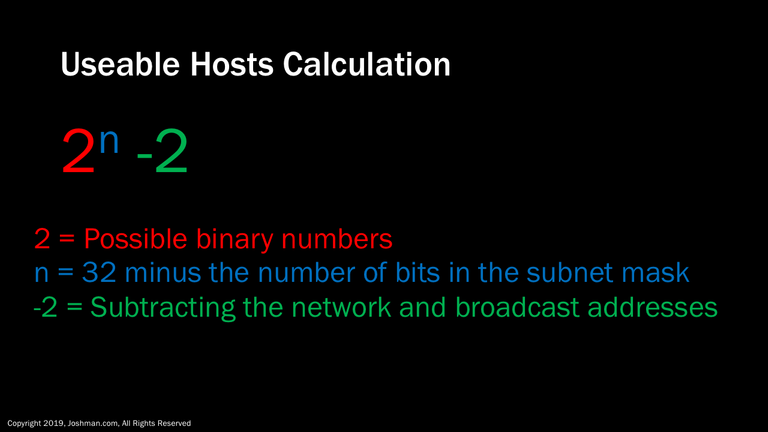
As promised, let’s take a look at the equation for finding the number of available hosts on a subnet.
It is simply 2 to the power of n minus 2, where:
- 2 represents the possible binary numbers of one and zero
- n represents number of host bits or 32 minus the number of bits in the subnet mask
- -2 represents the subtraction of the network and broadcast addresses
Let’s take a look of some examples in the next slide
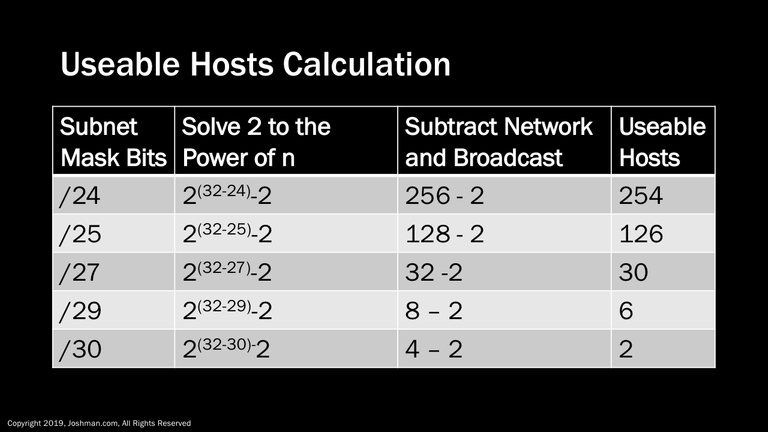
Here are some examples of calculating the useable hosts on a subnet. These are not exhaustive of the examples we covered so far, but it should be enough to see the pattern of what is going on when you manipulate the subnet mask. See if you can plug in the /26 and /28 on your own.
From here I’m going to go through each of the /24 and longer subnet lengths and show you how they break down into subnets. It can be repetitive, but I think it’s essential to picking up the pattern and easily picturing subnets in your head.
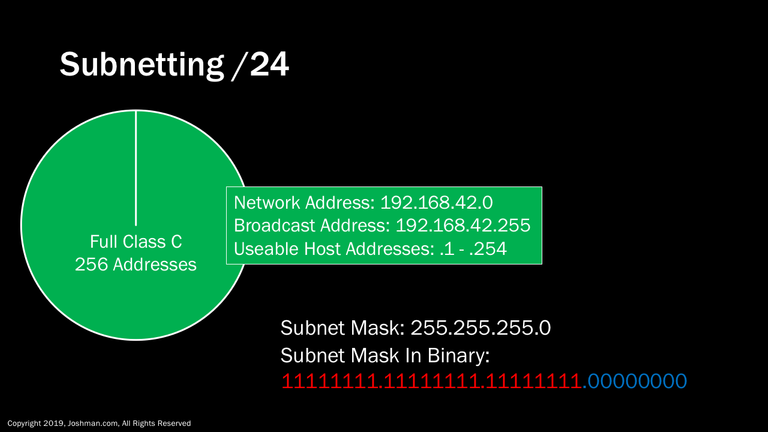
First we have the ubiquitous /24 or Class C subnet. This is most common subnet to deploy from my experience. When you have plenty of addresses to work with, such as when you are using private addresses, you can worry less about being conservative with IP addresses. When you have a decent sized enterprise, and all you have to work with is a /24, subnetting is essential.
As we’ve covered previously, we the network address, subnet mask, broadcast and host address, and usable hosts for a /24. I’ve also broken the subnet mask down to binary, so you can see how it changes as we ad bits for subnetting. There are 254 useable addresses in a /24 because 2^8-2 is 254. At this point, we have an entire /24 pie, so let’s start slicing it up!
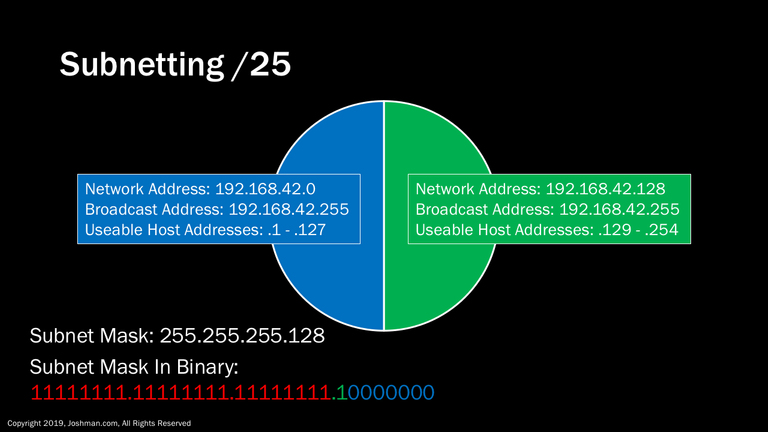
For a /25 we claim the first bit of the host address to be used for subnetting. This bit is indicated in green on the binary subnet mask. We know that the first bit represents 128 in decimal, so it creates a network address of either 0 or 128. This splits the /24 into two parts. Each part has 126 useable addresses because 2^7-2 = 128.
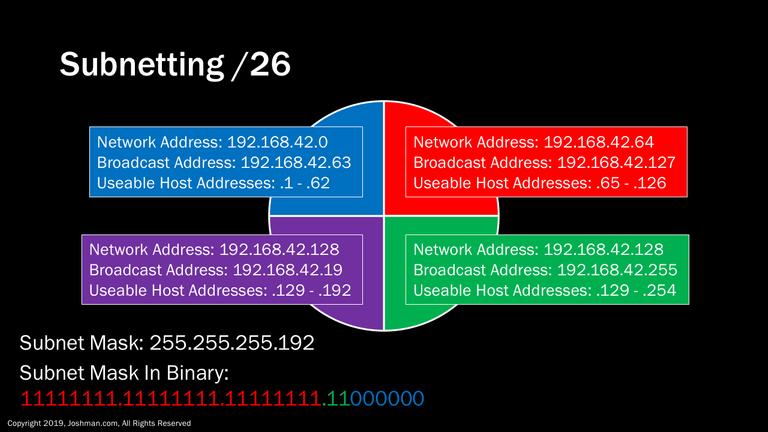
For a /26, we add another subnet bit (indicated in green). This splits the /24 into four parts. Each has 62 addresses, because 2^6-2 = 62. Do you see a pattern yet?

For a /27, we add yet another subnet bit (indicated in green). This splits the /24 into eight parts. Each has 30 addresses, because 2^5-2 = 30. Now the slide is starting to get crowded.
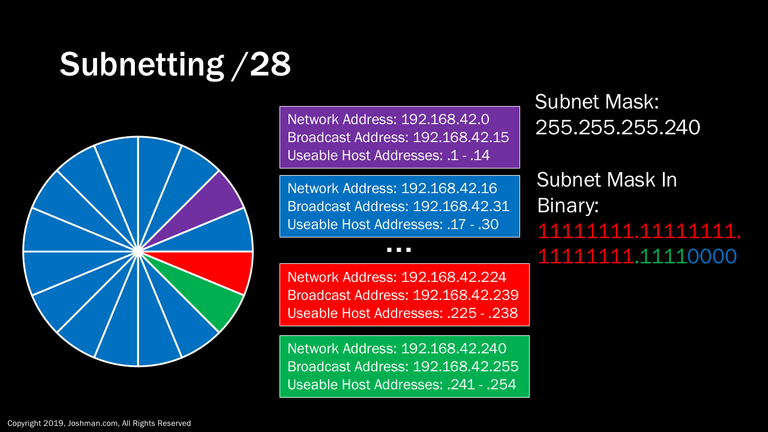
For a /28, we add yet another subnet bit (indicated in green). This splits the /24 into sixteen parts. Each has 14 addresses, because 2^4-2 = 14. I can’t fit them all here, you’re going to have to take my word for it.

For a /29, we add still another subnet bit (indicated in green). This splits the /24 into thirty-two parts. Each has 6 addresses, because 2^3-2 = 6. I can’t fit them all here, you’re really going to have to take my word for it.
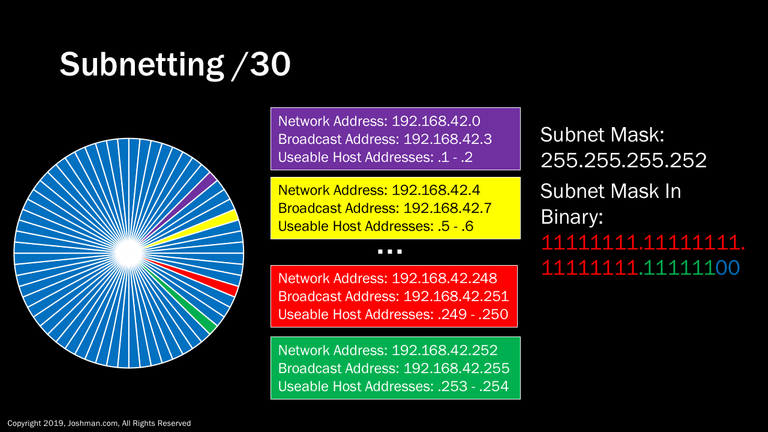
For a /30, you know the deal. This splits the /24 into sixty-four parts. Each has 2 addresses, because 2^2-2 = 2. That’s a lot of slicing, but you are also wasting half of your IP addresses when they are transformed to network and broadcast addresses. A /30 is typically used for point-to-point links, or the extremely rare occasion where you need to have a network with a single IP address. Why do I say a single IP address when there are clearly 2 available? This is because that single device will need a default gateway to reach any other network. I normally recommend not to place a device such as a server onto a /30 network, because it leaves you no room for expansion. You will learn about default gateways a bit later.

Then we arrive at the /31. The /31 was standardized in 2000 in RFC 3021. It creates a subnet type the previously did not exist. The /31 slices a Class C network into 128 parts. The kicker is, there is no network or broadcast address. It is just two addresses. This subnet type is meant specifically for point-to-point Wide Area Network (WAN) links used for routing protocols to exchange information.
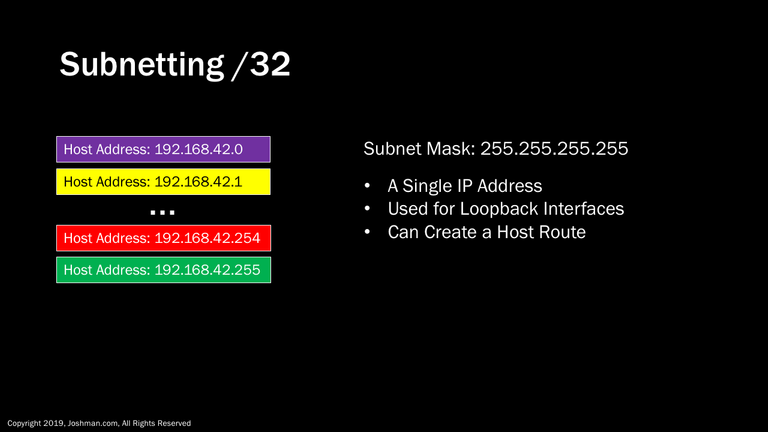
Finally we have a /32. A /32 really isn’t a subnet. It’s how we reference a single IP address, so a /24 or Class C can contain 256 of them. You can also use the .0 or .255 as host address when using a /32. A /32 is often used for adding an IP address to a loopback interface. A loopback interface is simply a logical interface on a device used exclusively for management and monitoring. In routing a /32 address and subnet mask is referred to as a host route, meaning you can create a network route pointing to a single IP address. IP routing is beyond the scope of this course.
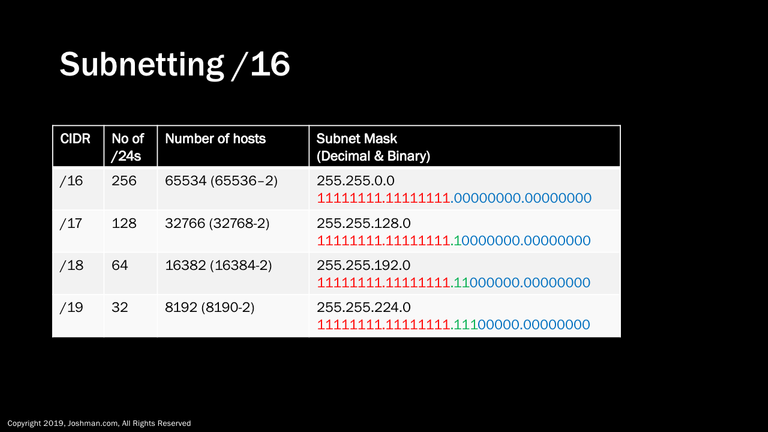
From here we are going to work with a /16 as our reference point, this is a full Class B worth of addresses. Rather than dealing with fractions of a /24 as we did in the previous section, we will be working with multiples of /24s. To do this, we simply add a bit to the subnet mask.
Note: A few times in my career I’ve seen a a single LAN network with a /23 or /22, but it’s not really something I recommend because the more IPs you have on a LAN, the less efficient it becomes. If you did decide to use a large block such as this, you would still need to account for the network and broadcast address, so 2^n-2 would still apply there. You can see in the table the number of possible hosts is excessive for anything larger than a /24.
More than likely if you are dealing with a network larger than a /24, your intent will be to divide it up again as part of a hierarchical addressing scheme. More on hierarchical addressing later.
As you scan through the table, you can see what happens to the number of possible /24 subnets and number of possible hosts. As with the /24 subnetting, we are adding a bit to the subnet mask dedicated to the subnet address, which cuts the number of hosts and networks in half. The change in subnet mask can be seen in both decimal and binary.
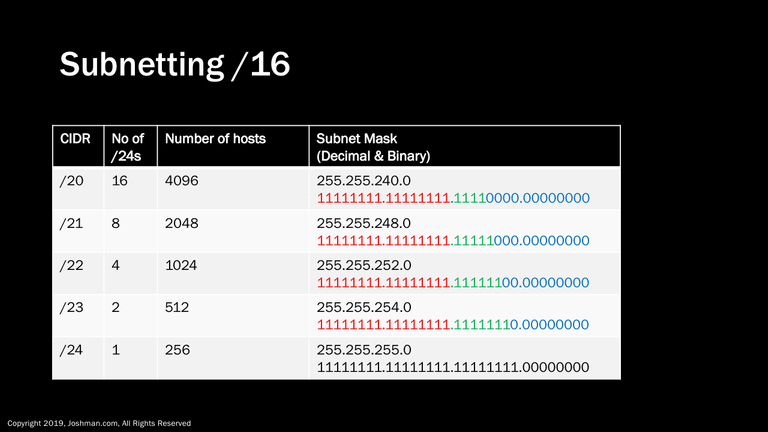
As we continue down the line, we keep adding a bit, and halving the possible number of hosts and /24 networks, until ultimately we’ve added 8 bits and have created a single /24.
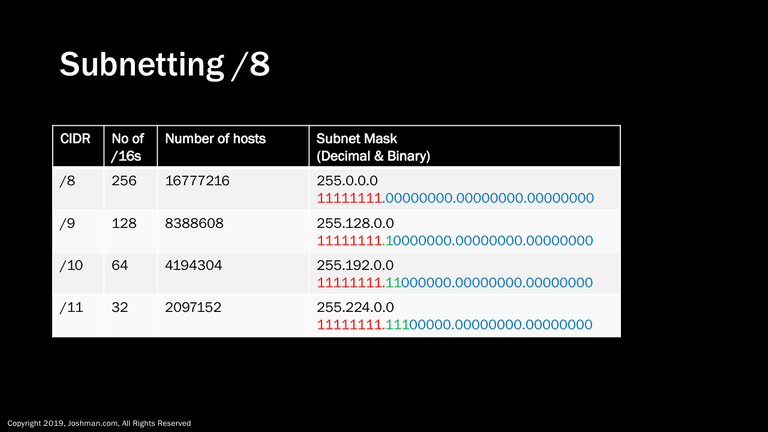
Unless you are dealing with a a 10.0.0.0/8 RFC 1918 private network, it is unlikely you will ever need to perform subnetting on anything larger than a /16, unless you work for a regional Internet registry, Internet service provider, or government entity. Since there are plenty of enterprises that use hierarchical addressing to break up a private 10.0.0.0/8 network, you should be familiar with how to do it. There are also applications for creating summary addresses and default routes, which we will get into later.
Using a /8 as a reference, we can measure its size in terms of how many /16 networks it can be divided up in, which will also divide the possible /16 networks and hosts by half as we add bits.
Note: In this case, I’m not going to bother subtracting a possible network and broadcast, because you should never see a single network of this size.
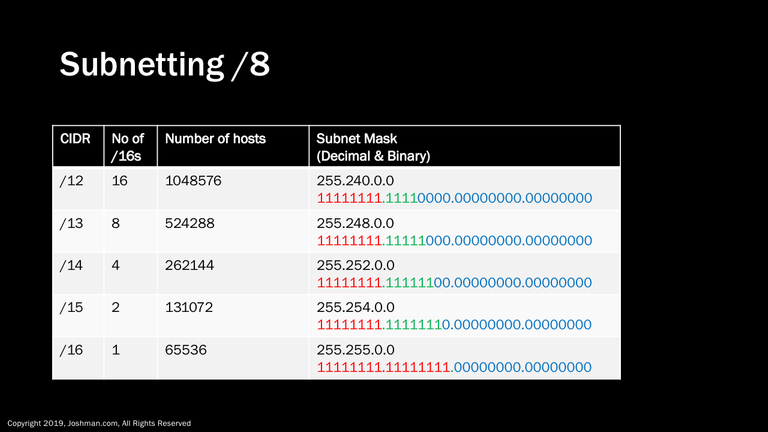
Continuing on, we get the same result. We add a bit to the subnet mask and the number of /16s and possible hosts addresses are cut in half, until we reach a standard 16-bit class B address.
You could also subnet with less bits than a /8, but it is extremely unlikely you will ever encounter this. If you do, the principles are the same, you are merely dealing with multiples of /8 networks.

Now that we’ve got subnetting down dividing a larger network down into equal parts, we can look at a more realistic scenario. This involves taking a larger network and subnetting it down to heterogeneous, or different sized subnets. For our example, let’s say a small enterprise division has been allocated 192.168.42.0/24. The division requires different IP addresses for different purposes. For example, you could say the /25 could be used for computers, the /26 could be used for IP phones, the /27 could be used for printers, and so on. This is all accomplished by manipulating the number of bits in the subnet mask.
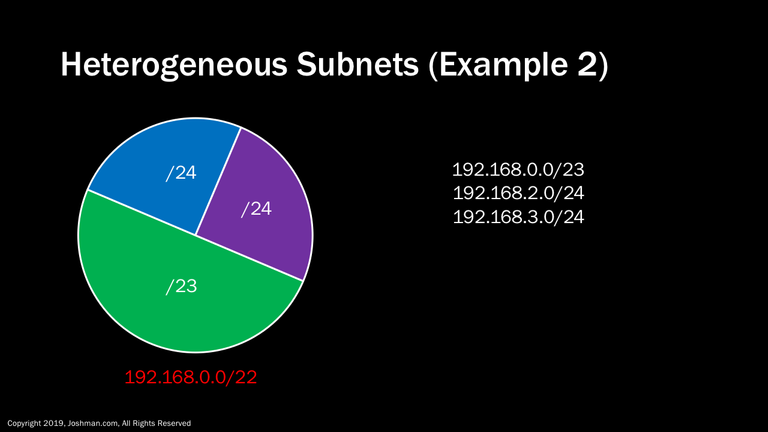
Another example is we are assigned a /22, which can be divided into a single /23, and two /24s to start. The /23 could represent a headquarters office, and each of the /24s could represent a branch office. From there these allocations could be subnetted down an additional time to form additional hierarchy.
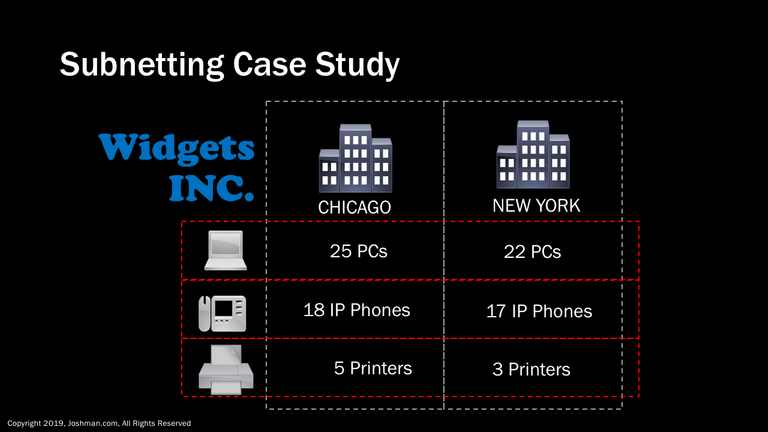
Widgets INC has two locations, Chicago and New York City. You have been tasked with assigning IP addresses to the PCs, IP Phones, and Printers at each location. You do not have to worry about any other addressing requirements such infrastructure or management.
- Chicago has 25PCs, 18 IP Phones, and 5 Printers
- New York has 22 PCs, 17 IP Phones, and 3 printers
- Neither location anticipates more than 10% growth.
What is the minimum contiguous IP address block that you must request from your Internet Service Provider? Let’s take a look.
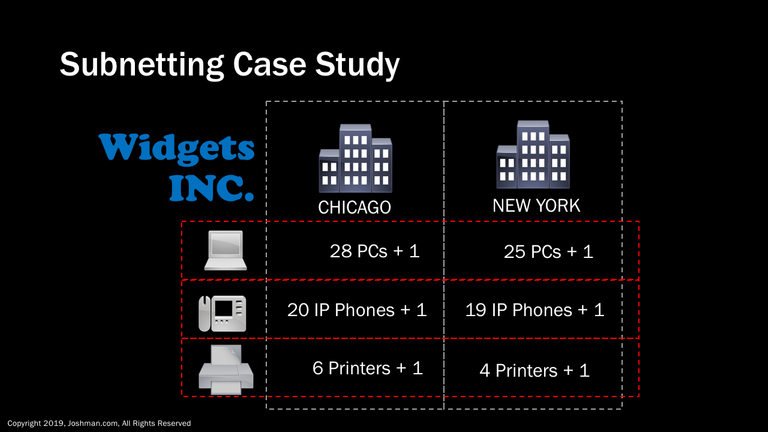
To begin with, let’s account for possible growth, which will never be more than 10%. Just calculate 10% of the immediate requirement and add it to the total. Always round up and add an additional IP address for the default gateway!
You can see after we account for future growth, the two site’s requirements are very close. This means that we can standardize the subnet allocation for each one. At this point you can determine the smallest possible subnet that will account for the requirements. For both PCs and Phones that is a /27, which can accommodate 30 IP addresses. So we will require a total of 4 /27s. For the printers, we will require /28s, because the a /29 cannot accommodate the 6 printers along with the default gateway. If you’re still not clear on what a default gateway is, that’s okay.
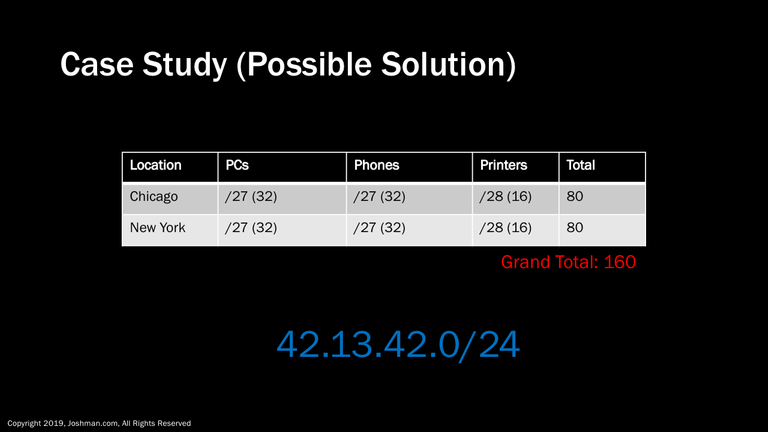
We know that a /27 represents 32 IP addresses, and a /28 represents 16 IP address. If we add up the total requirements for each site, we get 80. This represents a grand total of 160 IP addresses that we need.
Given what we know about subnet sizes, at 128 IP addresses, a /25 is the smallest possible subnet we could use for each site. At 64 addresses, a /26 clearly would not suffice.
We can combine two /25 networks into a /24, so we decide to request a /24 network range from the ISP. The ISP provides us with the network address 42.13.42.0/24. Let’s break that down into subnets.

Here we have the subnet breakdown. Each site has their own /25, and we have broken those down into appropriately sized subnets. This leaves us with the spare IPs 42.13.42.80-127 for Chicago, and 42.13.42.208 - 255 for New York. We have over a /27 worth of IP addresses left over. We could either decide to hold those in reserve, or we could adjust our subnets and expand their size. For our purposes, we will hold these extra IPs in reserve. You never know when a new technical requirement might come up.
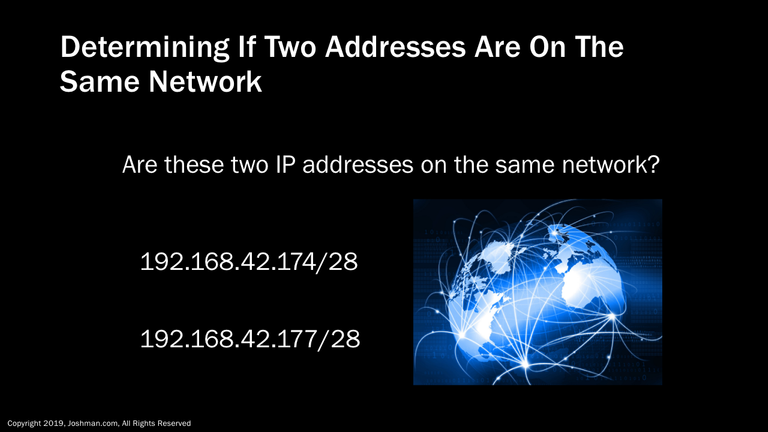
At some point you may look at two addresses and assume they are on the same network. Take these two. They look pretty close right? But are they on the same network? Let’s find out!
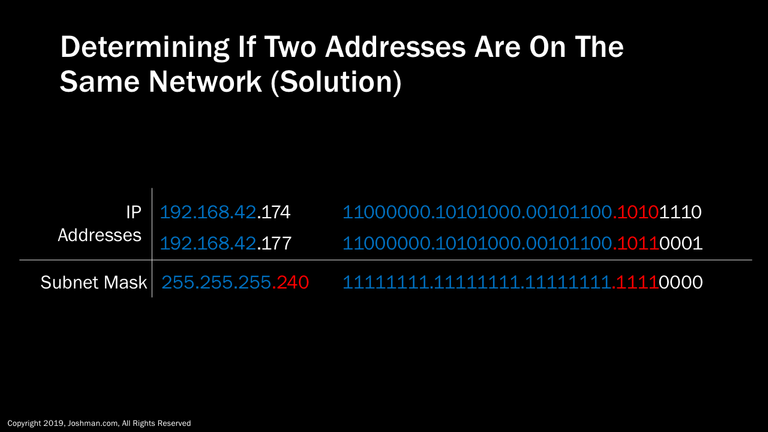
If we line up both addresses an subnet mask and covert them to binary, we can see the first 3 octets match exactly (in blue), and the last octet is where the subnetting is taking place. We can then determine the subnet ID (in red) and the host ID (in white). You can immediately see that the subnet IDs do not match! This means these two hosts do not exist on the same network! They could not communicate without using a router.
If you ever experience two smaller similarly looking subnets that cannot communicate with each other, this could be the reason. Let’s take a look at some more examples.
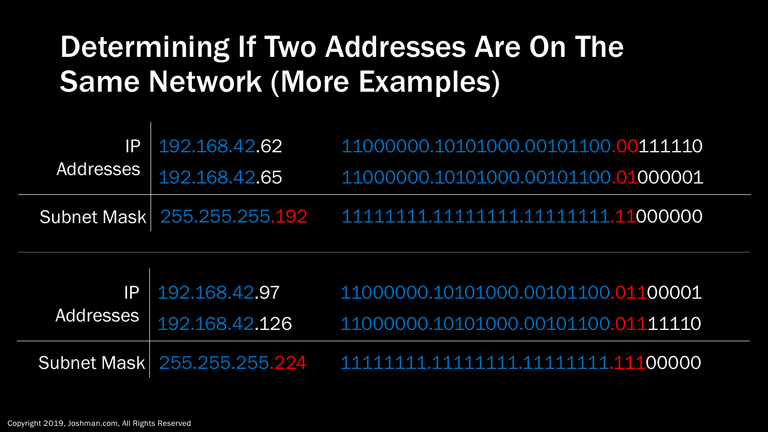
In the first example, we have a two /26 addresses. You can see from the subnet mask and subnet ID, they are on different networks.
In the second example we have two /27 addresses. We can see that the subnet IDs match, therefore they are on the same network and can communicate directly
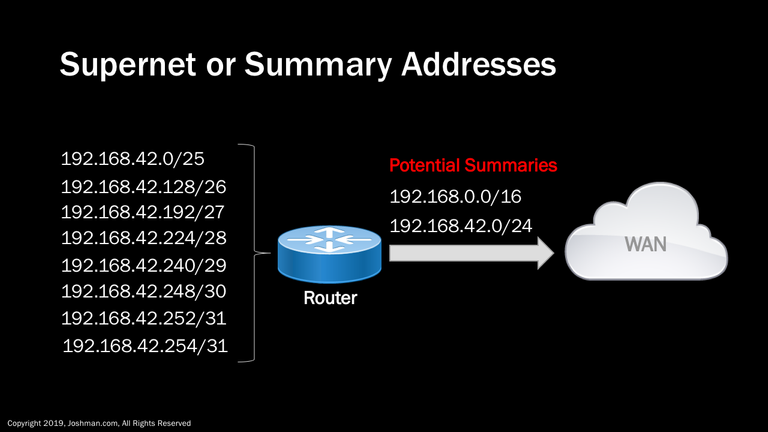
A supernet, or summary is simply the combination of two or more addresses into a single address. They are commonly used by routing protocols to simplify routing information, and also hide the internal addressing scheme of a network. In our example we have 8 distinct IP subnets behind a router. The router only needs to advertise a single summary or supernet to the Wide Area Network (WAN). Depending on the requirements, the summary can be more or less specific. Here we have two potential summaries, the /24 one is more specific. The /16 summary is less specific and encompasses the actual /24 behind the router, and an additional 255 /24 addresses that are members of the 192.168.0.0/16. In most cases having a more specific summary is better. A deeper understanding of summarization is needed for IP routing, but is beyond the scope of this course
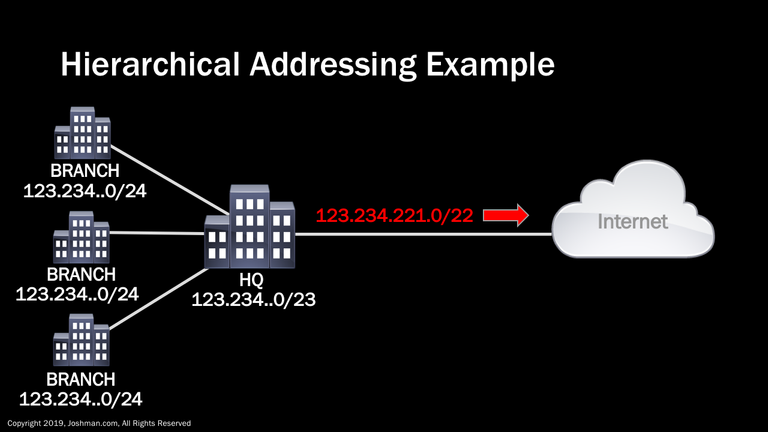
We’ve already touched on the concept of hierarchical addressing. Let’s take a look at a real world example that also ties in the concept of summarization. An internet service provider (ISP) has allocated a /22 network to an enterprise. The enterprise advertises a /22 summary to the ISP, but breaks up the allocation into 4 distinct networks. These include a /23 for the headquarters locations, and a /24 for each branch office. On the public Internet, outside networks are only aware of the /22 summary, and do not have any visibility of the hierarchical network design of the enterprise. This hierarchical design allows the enterprise to logically allocate their IP addresses and simplify their IP routing.
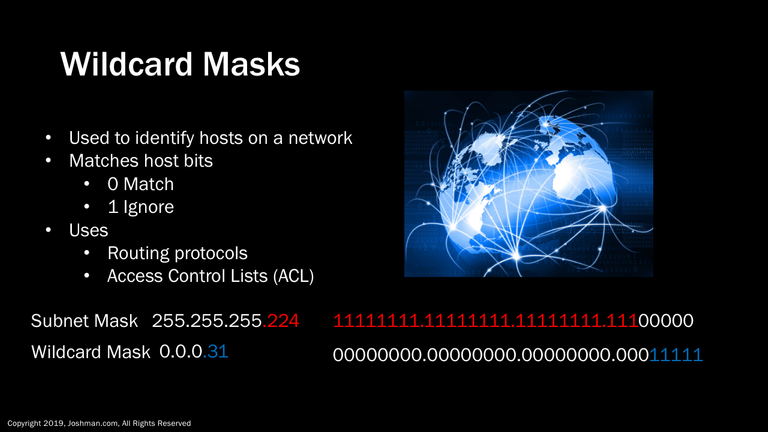
A wildcard mask, also called a hostmask, is a method to identify a range of host addresses on a network. Zeros in the wildcard mask need to be an exact match, while the ones can be any value. Wildcard masks are typically used in routing protocols, and also access control lists (ACLs). The most popular wildcard mask is simply an inversion of the subnet mask. You can see in this example, we have a /27, which leaves five bits for the wildcard mask. Both are broken down into binary.
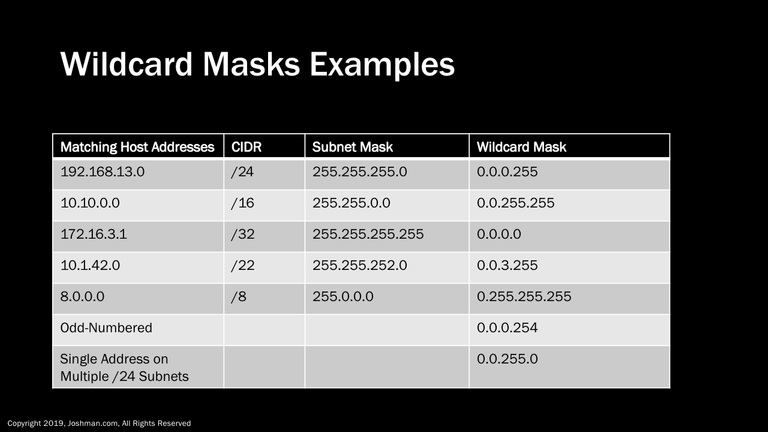
Here are some examples of using a wildcard mask to identify all hosts on a particular network. You can see from the table we are just taking all the zeros from the subnet mask, and setting them to one. We in turn take all of the ones from the subnet mask and setting them to zero. You can also identify a single host by setting a wildcard mask of all zeros.
You can also get creative with wildcard masks. For example, you can use them to match even or odd networks, or different networks that share a bit in common, such as a single host address on multiple subnets. This could be used to reduce the number of entries in an access control list.
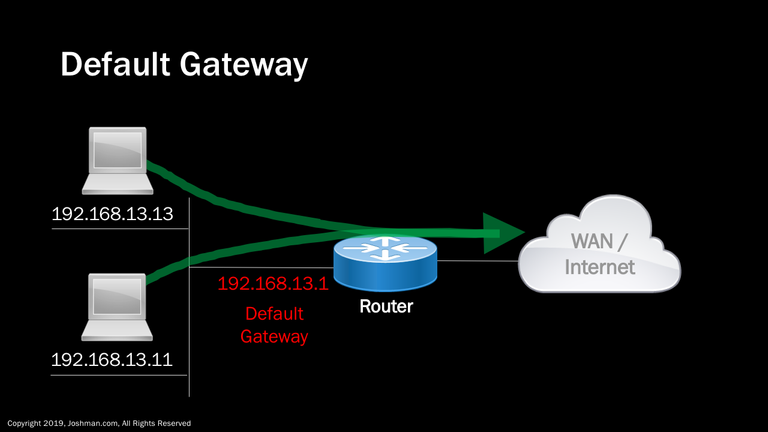
As promised, let’s describe the concept of a default gateway. If you are on a device trying to connect to a wide are network, or the Internet, you will need to hit a default gateway first. A default gateway is a device, such as a router, that provides an exit point from the local LAN. In our example, we have a pair of PCs on the same LAN. These PCs are able to reach each other directly, however if they need to get to the WAN or Internet, they will need send their traffic via the Default Gateway. Although a default gateway can be any IP address, it’s typically assigned from either the first IP address in the network, or the last one.
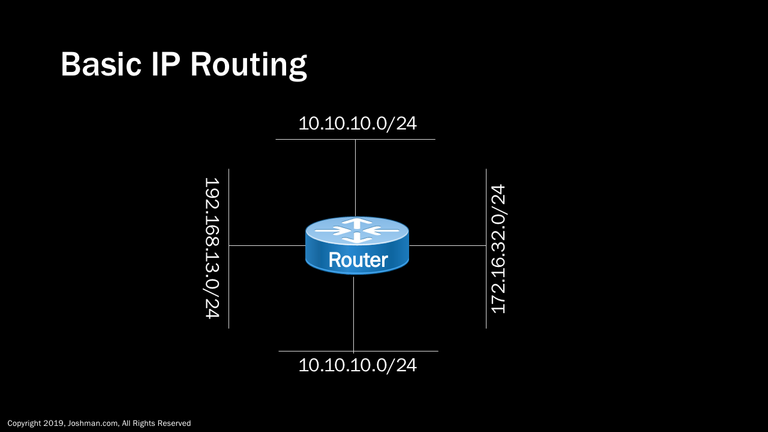
The concept of a default gateway leads us into the world of IP routing. Routing is beyond the scope of this course, but warrants a quick explanation. A router is simply a device that allows different networks to communicate. In the example we have 4 different networks connected to a router. The devices on each LAN can reach other devices on their respective networks, however they will require a router in order to communicate with devices on other networks. To communicate with other networks, these devices must do so via their local default gateway. Without the router in the middle, these individual networks would have no way to communicate with one another.
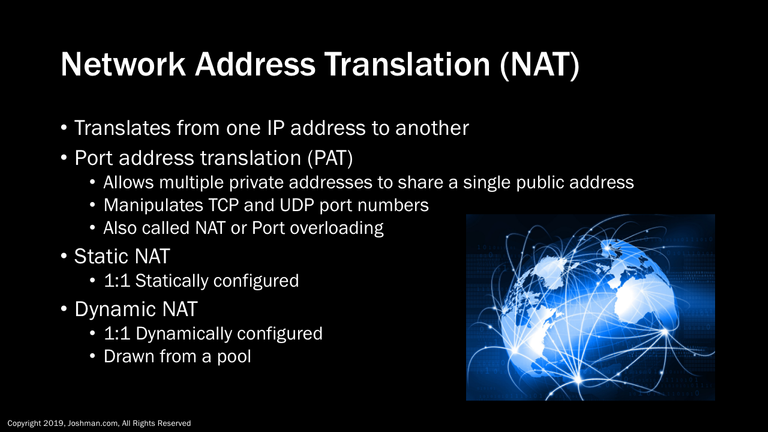
I want to quickly mention Network Address Translation (NAT) so you fully understand why private IP addresses can be used. NAT is the method by which a private RFC 1918 address can communicate to the public Internet, and has other uses as well. It simply translates from one address to another. There are multiple flavors of NAT. The most popular form is Port Address Translation (PAT), also called NAT overloading or Port overloading. It shares a single public IP address among multiple private IP addresses. It accomplishes this through manipulating TCP and UDP port numbers. This is the technology your home router uses.
Another form of NAT is static NAT. Static NAT creates a 1:1 relationship between a statically configured private IP address and the public IP address. The final form of NAT we will discuss is Dynamic NAT, dynamic NAT also creates a 1:1 relationship, but draws from a pool of available IP addresses.
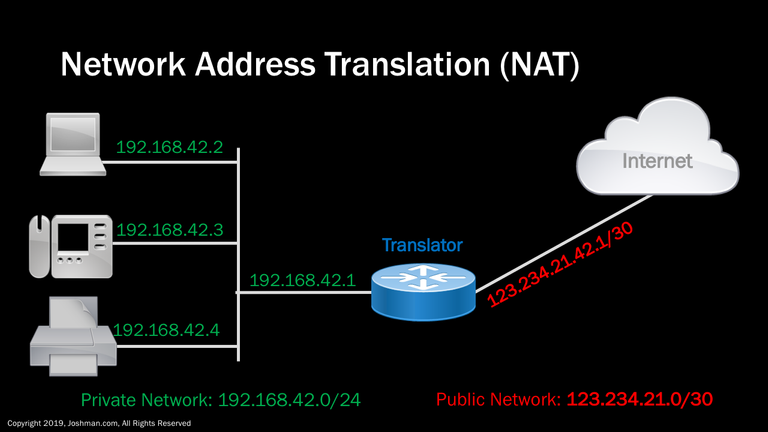
Just a quick example of NAT in action. On the left, we have a small office network with a PC, IP phone, and printer. The network has a router acting as a default gateway. All traffic destined for the Internet will hit this gateway. The router is configured for NAT, specifically Port Address Translation (PAT). The router receives a request for a service from the internal network destined for the Internet. It will automatically translate the IP address to the public address indicated in red. All devices on the internet network will share this single IP address. Each time a translation occurs, the router or translator will give the internet bound traffic a unique TCP or UDP port number. This lets multiple internal hosts use the same service with no conflicts.

Here are a few useful websites to help you explore the world of IP:
The first one is the CIDR Table from sans.org. It is a quick way to look at CIDR networks from a /1 to a /30 to figure out what hosts exist on what network, along with subnet mask and wildcard mask.
The next one is What Is My IP. It allows you to view what your public IP address is, even if you are behind a private network translated through NAT.
Then we have Whois which allows you to look up an IP address and learn about who its registrar is, and who owns it.
Finally we have Subnet Calculator, where you can quickly calculate subnets and hosts based upon classful and classless networks.
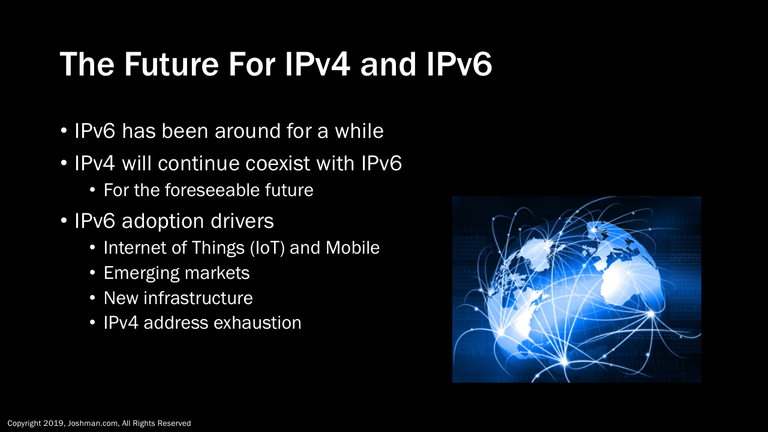
Nobody really knows when or if we will completely transition from IPv4 to the latest version of IP, which is IPv6. IPv6 has actually been a standard for several years. The good news is, the two versions can coexist and interoperate, and will most likely do so for the foreseeable future.
Although private IP addresses, NAT, and more efficient allocation of IPv4 addresses has slowed the adoption process, IPv6 is slowly being adopted, some of the drivers for adoption include:
- The Internet of Things (IoT) and rapid expansion of Mobile networks is creating a healthy demand for public IP addresses.
- Emerging markets with rapidly growing user bases are hungry for IP addresses.
- Some organizations are deciding to use IPv6 when they roll out new network infrastructure.
- Some Internet Service Providers are turning to IPv6 when they exhaust their IPv4 address space, because it is cheaper and easier to obtain IPv6 addresses.
If you’re interested, APNIC has a great blog on this very subject
https://blog.apnic.net/2018/05/21/what-drives-ipv6-deployment/
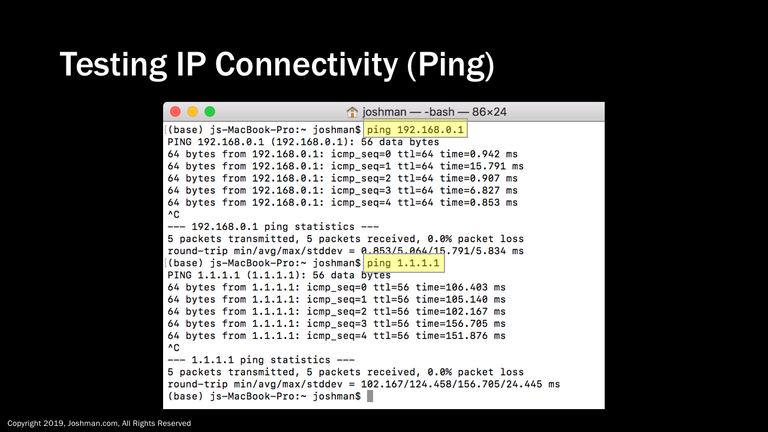
Ping is a great tool to determine the reachability of a single IP address. In the first example I ping the default gateway to test local connectivity. In the second example, I am pinging a known good DNS server address out on the public Internet. If you step through in this way, you can test local connectivity versus remote connectivity. You could also ping the DNS address of a website you are trying to get to, provided they have not blocked pings. For example, you should be able to successfully ping www.google.com.
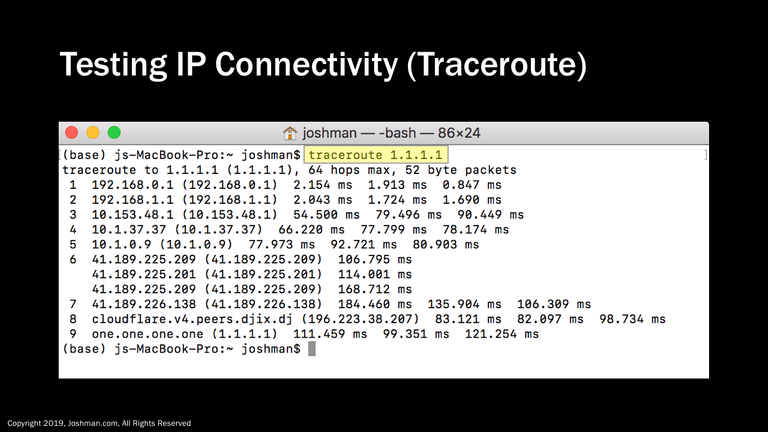
Traceroute is a useful command to check the path you are taking to a destination. In this example, we are checking the path to the public DNS server 1.1.1.1. You can see from this example, the path traverses several private addresses before finally being translated through NAT on the 41.189.x.x network, before finally reaching the destination. Each time your traceroute hits a network hop, you will get a corresponding message indicating how many milliseconds it took to reach that hop.
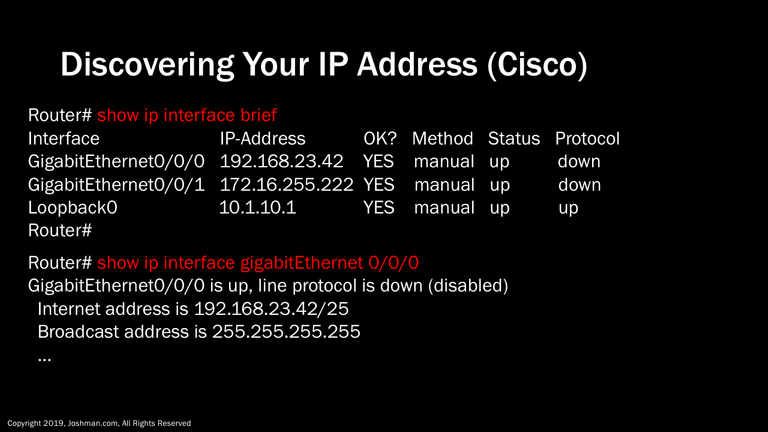
Because I am a network guy, it wouldn’t be right if I didn’t show you how to look at IP addresses on a Cisco router. Because a router will have more than a single IP address, I like to list them using the 'show ip interface brief' command. From there you can drill down deeper to to get the CIDR notation and more using ‘show ip interface’ followed by the interface name.
As an added bonus I’m going to show you on several operating systems how to determine your IP address, just in case you've never seen one configured out in the wild or have never paid attention. If you are interested in how networks operate, knowing your IP is essential in gaining insight of where you are on the network, and how you communicate with the outside world.
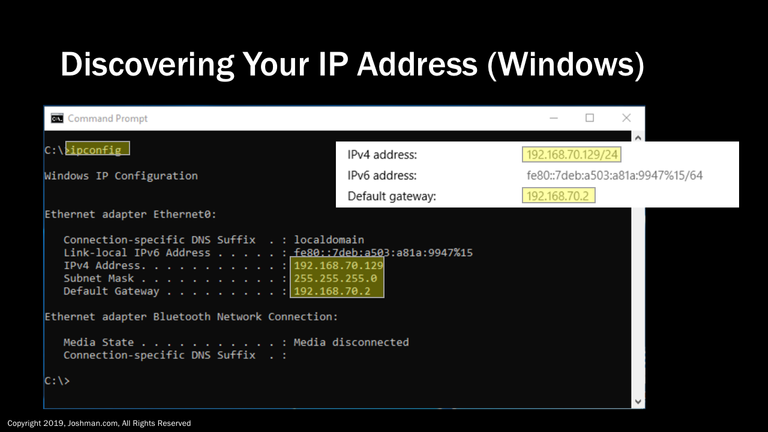
If you are on a Windows machine and need detailed information, open a command prompt and type ‘ipconfig’. It will return your IP address, subnet mask, and default gateway.
Alternatively, you can view your network connection properties by going to ‘Settings’, ‘Network & Internet’, and ‘View Your Network Properties’
Note: This is private address information, you will also have a public address if using NAT and connected to the Internet. This goes for all consumer-based operating systems connected to a typical home Wi-Fi router.
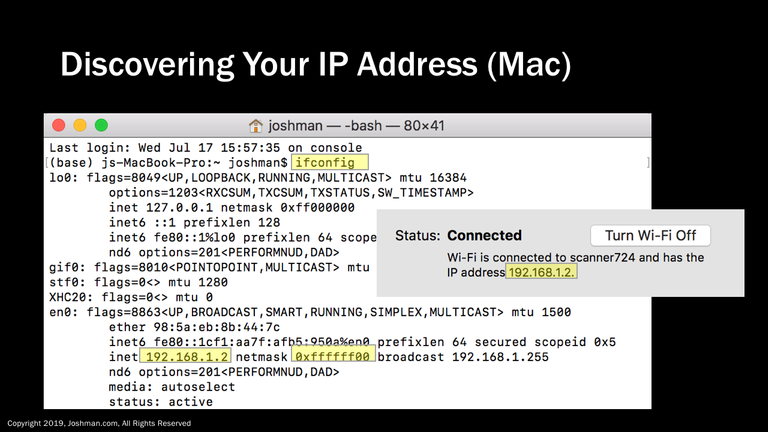
If you are on a Mac and need detailed information about your IP address, open a terminal window and type ‘ifconfig’. It will return your IP address, netmask (subnet mask) in hexadecimal, and broadcast address. If it isn’t obvious to you what the subnet mask translates to in decimal, you can convert it using the scientific calculator that comes with MacOS. If you are looking for what your default gateway is, you can simply type ‘route get default’ in the same terminal window.
Another easy way to determine your IP address using a Mac is to open your network preferences, and it will be right under the status of your network connection. You can also go to your ‘About This Mac’, ‘System Report’, followed by ‘Network’ to get detailed IP information for each network device on your Mac.
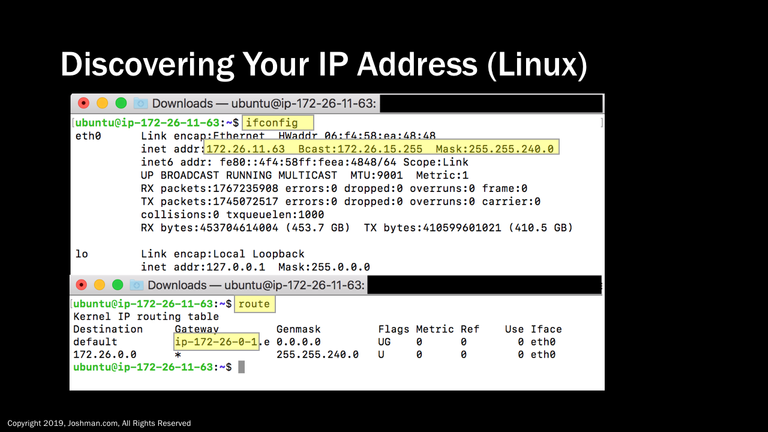
Linux is very similar to MacOS, though the process may be different depending on which flavor you have. In Ubuntu, ‘ifconfig’ will display your ip, broadcast, and subnet mask on a single line. To find your default gateway, you use the ‘route’ command.
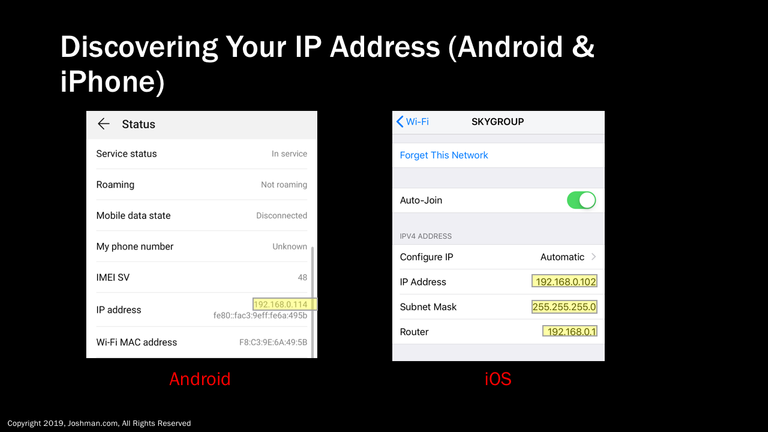
To find your IP address on an Android Phone, go to ‘System’, ‘About Phone’, ‘Status’, ‘IP Address’. This process may vary depending on you hardware manufacturer.
For Apple iOS, you go to ‘Settings’, ‘Wi-Fi’, and click the little blue (i). In contrast to Android, iOS provides you the IP, subnet mask, and default gateway (router).

You made it to the end! Thanks for viewing this course. This just a small piece of a very large puzzle that is computer networking. If you have any suggestions or errata to submit, it would be much appreciated and rewarded in the form of big(ish) upvotes!
nice! :)
I was shooting for 8000 words, but fell short.
Hello,
Your post has been manually curated by a @stem.curate curator.
We are dedicated to supporting great content, like yours on the STEMGeeks tribe.
If you like what we are doing, please show your support as well by following our Steem Auto curation trail.
Please join us on discord.
Congratulations @joshman! You have completed the following achievement on the Steem blockchain and have been rewarded with new badge(s) :
You can view your badges on your Steem Board and compare to others on the Steem Ranking
If you no longer want to receive notifications, reply to this comment with the word
STOPohhhhh this is too long. Interesting content although I could understand little
Thanks for dropping by in any case. If you have any questions I'd be happy to answer them!
Hi, thanks for the post! I have included it in my daily Science and technology digest, and you'll receive a 10% share of that post's rewards.
Hi @joshman!
Your post was upvoted by @steem-ua, new Steem dApp, using UserAuthority for algorithmic post curation!
Your UA account score is currently 3.728 which ranks you at #5509 across all Steem accounts.
Your rank has not changed in the last three days.
In our last Algorithmic Curation Round, consisting of 91 contributions, your post is ranked at #20.
Evaluation of your UA score:
Feel free to join our @steem-ua Discord server
Shame, shame, shame on you...

December 16, 2019... 10.5 Hollywood Time...