Programming the Amiga with AMOS BASIC: Screens and Loading Images
AMOS BASIC is designed first and foremost for game programming, so it was one of the first truly "multimedia" programming environments.
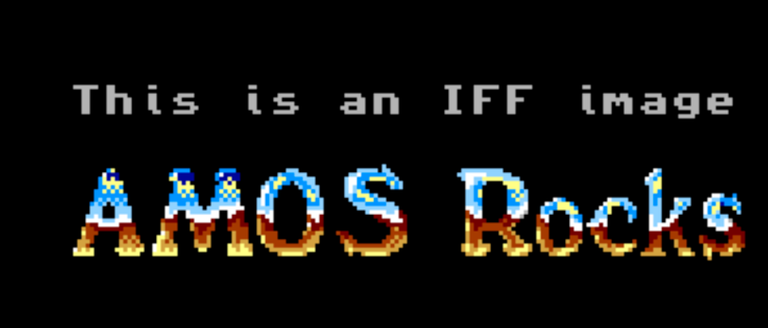
The first thing I always want to do on a computer in any language, right after "Hello World", is to display my own images (even if that "image" is made up of the computer character set).
That is where we will start with this AMOS BASIC programming tutorial series.
Before we begin ...
First, you will need your Amiga and AMOS already set up.
Check the previous post or my videos for setting up Amiga emulators for Windows, Raspberry Pi, Linux/MacosX, and MiSTer/MiniMig.
Hello World!
Next, it would be remiss of me to not cover "Hello World", as is tradition!
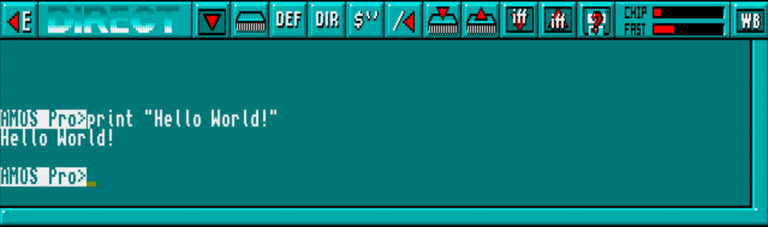
AMOS has a Direct Mode that allows you to enter AMOS BASIC statements directly and have them executed right away. This mode is accessed via the D icon.
Once in Direct Mode, enter
print "Hello World!"
and press the enter/return key. You should see the response as above.
Congratulations, your first AMOS code!
We will revisit Hello World when we get into "loops and variables". Something to look forward to ;)
Loading AMIGA Bitmap Images in AMOS BASIC
As AMOS was built for programming games, it has a lot of native support for "bitmap images".
For our purposes, Bitmap images are pictures made up of pixels, and each of those pixels has a colour chosen from a specific palette.
We can create a picture on the Amiga, using Deluxe Paint, Personal Paint, etc, and save it out as a file, then load that picture file into our AMOS program and display it. Personal Paint comes with Amiga Forever, and is more modern in some ways, but I am more familiar with Deluxe Paint.
The ability to load images in various ways is going to be a pretty important thing in our programs, for title screens, demos, slideshows, and maybe even game backgrounds.
Once you have an image saved on your disk, next you need to load it in:
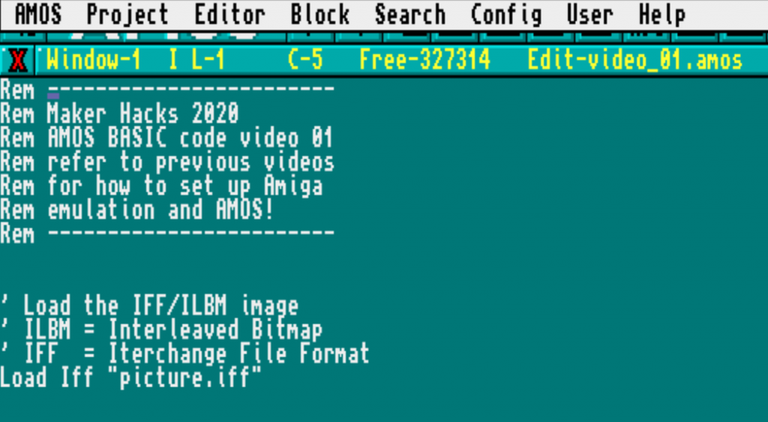
Lines that start with "Rem" or ' are a "remark" and are simply notes to ourselves or future programmers, they are ignored at program run time.
There is actually only one line of executable code in this first example program, and that is the very last line! As it is no doubt obvious, this statement means literally "load the iff called picture.iff".
For now, to make things easier, just save your AMOS program in the same place where you saved your picture file.
What happens when you save and run (right-click, click the Project menu, Save As, then click the ▶️ button.

There is a chance now that you have your picture displaying beautifully on screen, but in my case, and probably yours, we get this error message.
Can't fit picture in current screen at line 13.
Though maybe the line number is different, depending on where the statement sits in your program listing.
What is that AMOS error and how do we fix it?
AMOS BASIC Screens
Simply we have a mismatch between our picture and our screen mode.
The Amiga can display a certain number of colours in a certain number of horizontal and vertical pixels.
In my case I was trying to load a 32 colour, 320x200 pixel image.
We kind of got used to having super high resolution, full-colour displays, but back in the day we had to conserve memory, without even getting into the capability of the monitors and TV that Amiga computers were plugged into.
While later Amiga versions had a much more powerful graphics ability, the Amiga 500 is far more restrictive than a modern computer user would be used to today. That said, at the time it lead the pack in terms of value for money!
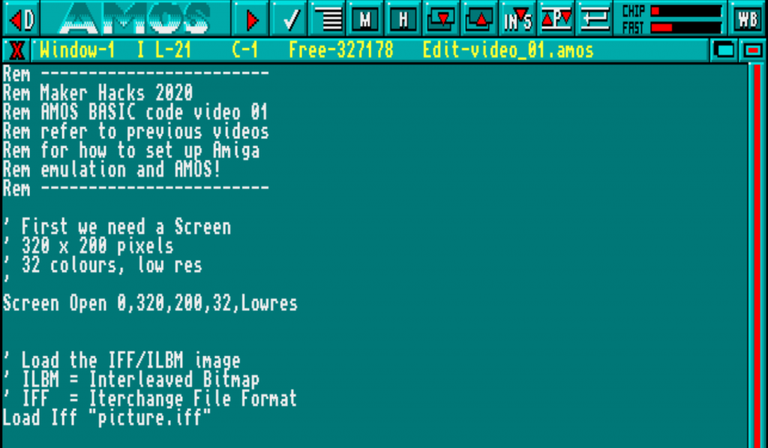
So we have the choice of changing our picture to match the display mode, or we can set up our Screen to be correct for what we want to achieve. Let's do the latter:
When you hit the run button you should now see your picture:
As you can see above, in my case I have stumbled into an AMOS issue. Notice that weird flashing happening with some of my pixels? Eww!
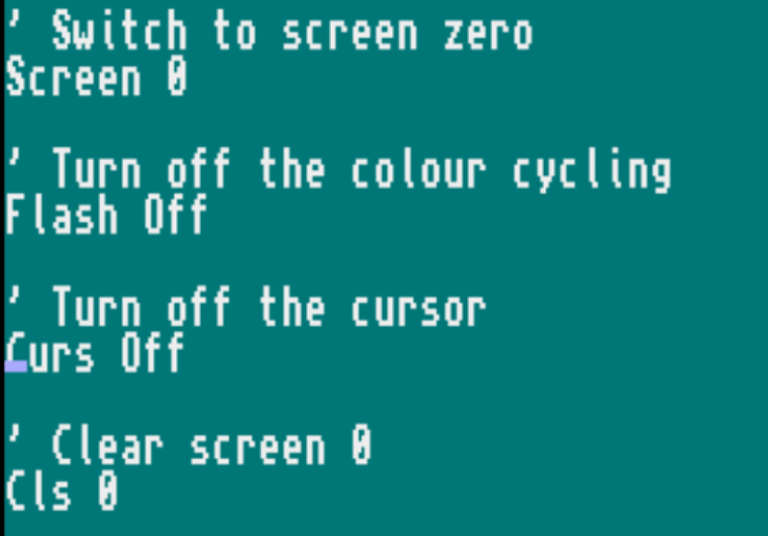
This is by default AMOS has Flash on to enable the text cursor to flash. We will get into that later, for now we can just turn a bunch of stuff off and clear the screen, so we get just our nice pretty picture:
Now try again and things should look better!
Fade to Black for a Graceful Exit
A nice touch with any program that changes the screen and displays a picture is to exit gracefully.
First we want to see the picture as it should be seen, so we can wait for the user to press a key. We do that with ... wait for it ...
Wait Key
Next, let's fade the screen to black. That's a classy move, right?
Fade 5
This gradually fades with an increment delay in 50ths/second, and because we didn't specify, it will choose the default to fade to of black.
Before we let the program end, however, we still need a small delay because otherwise the fade will not have finished.
Wait 60
Instead of waiting for a key press, this waits for 60 x 50ths/second
Once you can load an image, then you can load two images, or more, and that allows you to create a slideshow.
Full Code
Here is the full code listing for lesson 1:
Rem ------------------------ Rem Maker Hacks 2020 Rem AMOS BASIC code lesson 01 Rem refer to previous post Rem for how to set up Amiga Rem emulation and AMOS! Rem ------------------------' First we need a Screen
' 320 x 200 pixels
' 32 colours, low res
'
Screen Open 0,320,200,32,Lowres' Switch to screen zero
Screen 0' Turn off the colour cycling
Flash Off' Turn off the cursor
Curs Off' Clear screen 0
Cls 0' Load the IFF/ILBM image
' ILBM = Interleaved Bitmap
' IFF = Iterchange File Format
Load Iff "picture.iff"' Wait for a keypress
Wait Key' Fade the screen to black
Fade 5' Wait before ending
' wait is in 50ths/second
Wait 60Next Steps ...
Another reason to load multiple images is for you to have a foreground and background.
AMOS has a feature where you can have a "Dual Playfield" and each screen can be scrolled individually by setting its offset.
Look out for the next entry when we will get into variables, colour palettes, arrays, loops and scrolling!
Posted from my blog with SteemPress : https://makerhacks.com/amos-basic-screens-images/