TMR0 INTERRUPTION EN/ES
After having seen the theoretical bases that describe the operation of TMR0, it is a good time to complement the information with a practical example and at the same time learn how to use the internal interrupt caused by this register (TMR0 Overflow Interrupt).
In this article we will see how to configure the TMR0 taking advantage of the interrupt to measure times, monitor events in a process without altering or pausing the main process and generate the occurrence of events in case a variable presents a critical value. We will describe the instructions that allow us to handle the TMR0 in C language, we will create our program code and finally we will create a circuit in Proteus that allows us to test and evaluate the results.
Luego de haber visto las bases teoricas que describen el funcionamiento del TMR0, es un buen momento para complementar la información con un ejemplo práctico y al mismo tiempo aprender a usar la interrupción interna provocada por este registro (Interrupción por desbordamiento de TMR0).
En este artículo veremos como configurar el TMR0 aprovechando la interrupción para medir tiempos, supervisar eventos en un proceso sin alterar o pausar el proceso principal y generar la ocurrencia de eventos en caso de que una variable presente un valor crítico. Describiremos las instrucciones que nos permiten manejar el TMR0 en lenguaje C, crearemos nuestro código de programa y finalmente crearemos un circuito en Proteus que nos permita probar y evaluar los resultados.

Setting the Interrupt by TMR0 |
|---|
As we saw in our theoretical article about TMR0 it is an 8bit register to which you can load a value between 0 and 255 and once the program starts this value increases in a time that depends on the oscillator frequency and the value loaded in the prescaler more details here. When the register counts 255 for the next value it produces an overflow and sets a flag indicating the end of the count.
This overflow is the one used to measure the time that has elapsed from the data we have loaded in the prescaler and the clock frequency, but you can also configure that when the overflow occurs an Interruption is produced, which in this case is of the internal type.
To configure this interrupt in our CCS PIC C COMPILER we must use the code RTCC_INTERNAL to indicate that the TMR0 will use the internal clock and will work as a timer (as it can also be used as an external pulse counter), and we will always load the maximum value in the prescaler (256) with RTCC_DIV_256, both parameters are set with the instruction setup_timer_0() while to load the value of the TMR0 we use set_timer0(value).
Como vimos en nuestro artículo teorico sobre TMR0 se trata de un registro de 8bits al cual se le puede cargar un valor entre 0 y 255 y una vez el programa incia este valor aumenta en un tiempo que depende de la frecuencia del oscilador y el valor cargado en el preescaler más detalles aquí. Cuando el registro cuenta 255 para el siguiente valor produce un desbordamiento y activa una bandera que indica el final de la cuenta.
Este desbordamiento es el que se usa para medir el tiempo que a transcurrido a partir de los datos que hemos cargado en el preescaler y la frecuencia del reloj, pero además se puede configurar que al ocurrir el desbordamiento se produzca una Interrupción que para este caso es del tipo interno.
Para configurar esta interrupción en nuestro compilador CCS PIC C COMPILER debemos usar el codigo RTCC_INTERNAL para indicar que el TMR0 usara el reloj interno y funcionará como temporizador (ya que también puede usarse como contador de pulsos externos, y cargaremos siempre el valor máximo en el preescaler (256) con RTCC_DIV_256, ambos parametros se ajustan con la instrucción setup_timer_0() mientras que para cargar el valor del TMR0 usamos set_timer0(valor).
Application example |
|---|
For our illustrative example we will assume a process that runs at all times, this will display a message on the screen constantly but in turn there is a secondary process that must be monitored, in this case we will be checking the value of a variable. This variable can have a value between 0 and 5, when its value is 5 the main process must be stopped and an attention task must be executed, but if 5 seconds pass, the task is executed in a preventive way.
The first thing we will do is to create an interruption by TMR0 that occurs every 1ms which means that every ms the variable is monitored and it is a relatively short time for the main program to be affected, but in turn each interruption will increase a variable interruption until it reaches a value of 1000 which indicates that a second has passed (1000ms) and at that moment a second variable timer is increased, as the task is executed preventively every 5 seconds this should be done when timer=5.
Para nuestro ejemplo ilustrativo vamos a suponer un proceso que se ejecuta en todo momento, este mostrará un mensaje en pantalla de forma constante pero a su vez hay un proceso secundario que debe ser monitoreado, en este caso estaremos verificando el valor de una variable. Esta variable puede tener un valor entre 0 y 5, cuando su valor sea 5 debe detenerse el proceso principal y ejecutarse una tarea de atención pero si pasan 5 segundos igual se ejecuta la tarea de forma preventiva.
Lo primero que haremos será crear una interrupción por TMR0 que ocurra cada 1ms lo que implica que cada ms se monitorea la variable y es un tiempo relativamente corto como para que el programa principal se vea afectado, pero a su vez cada interrupción incrementará una variable interruption hasta que alcance un valor de 1000 lo cual indica que ha transcurrido un segundo (1000ms) y en ese instante se incrementa una segunda variable timer, como la labor se ejecuta de forma preventiva cada 5 segundos esto debe hacerse cuando timer=5.
Programming |
|---|
During the program we must know the value we are going to load in TMR0 to generate 1ms, we do this in the formula by replacing Fosc by 20000000 because we are using 20MHz in our clock, Prescaler by 256 because we will load the maximum value and T by 0.001 because that is the value of 1ms expressed in seconds.
Durante el programa debemos conocer el valor que vamos a cargar en TMR0 para generar 1ms, esto lo hacemos en la formula reemplazando Fosc por 20000000 porque estamos usando 20MHz en nuestro reloj, Preescaler por 256 porque cargaremos el valor máximo y T por 0.001 porque ese es el valor de 1ms expresado en segundos.

If we replace the data in the formula we get a value of 236.46875, but we are working with a bit value and only integers are supported, so we must approximate to 236 accepting a small error in our application. Now we proceed with our code by writing the first configuration lines.
Si reemplazamos los datos en la fórmula obtenemos un valor de 236.46875, pero estamos trabajando con un valor en bit y solo se admiten números enteros, así que debemos aproximar a 236 aceptando un pequeño error en nuestra aplicación. Ahora procedemos con nuestro código escribiendo las primeras líneas de configuración.
#include <16f877a.h>

#fuses HS,NOWDT,NOPROTECT,NOPUT,NOLVP,BROWNOUT

#use delay(clock=20M)

#use standard_io(D)

#define LCD_DB4  PIN_D4

#define LCD_DB5  PIN_D5

#define LCD_DB6  PIN_D6

#define LCD_DB7  PIN_D7

#define LCD_RS   PIN_D2

#define LCD_E    PIN_D3

#include <LCD_20X4.c>

int timer = 0;

int t=0;

long interruption = 0;
To enable the TMR0 interrupt we use the #INT_TIMER0 directive and under it we create the code that will be executed every time the interrupt occurs.
Para habilitar la interrupción por TMR0 usamos la directiva #INT_TIMER0 y debajo de ella creamos el código que se ejecutará cada vez que ocurra la interrupción (el que ya hemos descrito anteriormente).
int timer = 0;

int t=0;

long interruption = 0;

#INT_TIMER0

void timer0_interrupcion()

{

   interruption++;

   if(interruption == 1000)

     {

      timer++;

      if(timer > 4)

      {

         for(int t=0; t<5; t++)

            {

               lcd_clear();

               output_high(PIN_D0);

               delay_ms(200);

               lcd_gotoxy(2,1);

               printf(lcd_putc,"TMR0 COUNTED 5s!");

               lcd_gotoxy(2,2);

               printf(lcd_putc,"Test successful!");

               lcd_gotoxy(1,3);

               printf(lcd_putc,"@electronico - HIVE");

               lcd_gotoxy(1,4);

               printf(lcd_putc,"Original Content");

               output_low(PIN_D0);

               delay_ms(500);

            }

            timer = 0;

            lcd_clear();

            output_high(PIN_D0);

         }

       interruption=0;

    }

   set_timer0(236);

}
It is very important to note that when an interrupt occurs is because the TMR0 reached the value of 255 from the one we had loaded (236 in our case) and it is necessary to reload the value so that it can count again, so we do it at the end of each interrupt with set_timer0(236).
In the main program we initialize the LCD and configure our TMR0 with the parameters that we already indicated, we activate the interrupt by TMR0 and the global interrupts, we also enable the D0 pin to turn on a series of leds as part of the special task we activate the output because a logic 1 will turn off the leds and a 0 will turn them on.
Es de suma importancia resaltar que cuando ocurre una interrupción es porque el TMR0 alcanzó el valor de 255 partiendo del que habíamos cargado (236 para nuestro caso) y se hace necesario volver a cargar el valor para que pueda volver a contar, por eso lo hacemos al final de cada interrupción con set_timer0(236).
En el programa principal inicializamos la LCD y configuramos nuestro TMR0 con los parametros que ya indicamos, activamos la interrupción por TMR0 y las interrupciones globales, además habilitamos el pin D0 para encender una serie de leds como parte de la tarea especial activamos la salida porque un 1 lógico apagara los leds y un 0 los encenderá.
void main()

{

   lcd_init();

   setup_timer_0(RTCC_INTERNAL | RTCC_DIV_256);

   enable_interrupts(INT_TIMER0);

   enable_interrupts(GLOBAL);

   set_timer0(236);

   output_high(PIN_D0);
Now we create a while loop in which we will display a greeting message and the value of the variable we are monitoring (timer), the last interruption that brings the timer value to 5 produces the secondary task event in which the leds are turned on and a message is displayed on the screen that the test has been completed when the 5 seconds are reached.
Ahora creamos un bucle while en el que mostraremos un mensaje de saludo y el valor de la variable que estamos monitoreando (timer), la última interrupción que lleva el valor de timer a 5 produce el evento de la tarea secundaria en la cual se encienden los leds y se muestra en pantalla un mensaje que se ha finalizado la prueba al alcanzar los 5 segundos.
  while(true)

  {

    lcd_clear();

    lcd_gotoxy(2,1);

    printf(lcd_putc,"WELCOME TO MY BLOG");

    lcd_gotoxy(2,2);

    printf(lcd_putc,"TMR0 INTERRUPTION");

    lcd_gotoxy(1,3);

    printf(lcd_putc,"@electronico - HIVE");

    lcd_gotoxy(1,4);

    printf(lcd_putc,"Timer: %i", timer);

    delay_ms(100);

  }

}
Simulation |
|---|
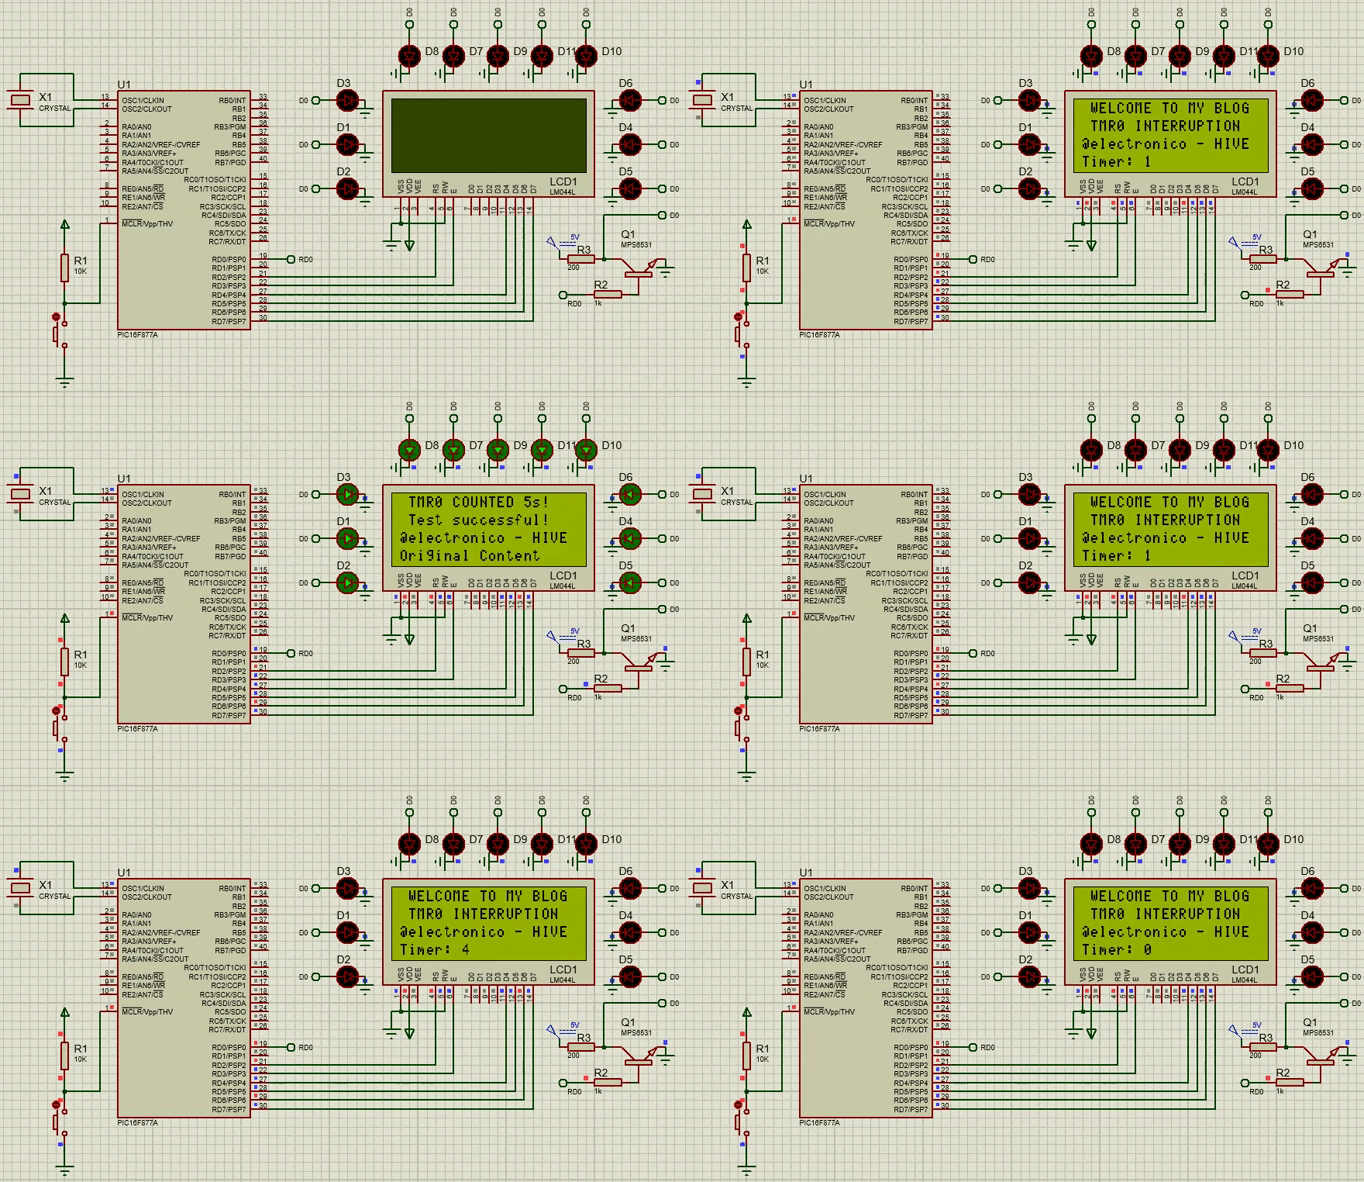
To simulate our circuit we will use together with the microcontroller PIC16F877A a LCD20x4 in which the messages will be shown, but in addition we have added 8 Leds in parallel that are activated by the pin D0 of the microcontroller by means of a NPN transistor.
When the circuit is energized the program displays the main message on the screen and starts counting, after 5 seconds the secondary task is executed and the cycle is restarted.
Para simular nuestro circuito usaremos junto al microcontrolador PIC16F877A una LCD20x4 en la que se mostraran los mensajes, pero ademas se han añadido 8 Leds en paralelo que son activados por el pin D0 del microcontrolador mediante un transistor NPN.
Al energizar el circuito el programa muestra el mensaje principal en pantalla e inicia la cuenta, al producirse los 5 segundos se ejecuta la tarea secundaria y se reinicia el ciclo.


Congratulations @electronico! You have completed the following achievement on the Hive blockchain And have been rewarded with New badge(s)
Your next target is to reach 15000 upvotes.
You can view your badges on your board and compare yourself to others in the Ranking
If you no longer want to receive notifications, reply to this comment with the word
STOPCheck out our last posts:
Oh my God 10000 upvotes!
You're welcome @electronico! Have a nice day 😊👍
Yay! 🤗
Your content has been boosted with Ecency Points, by @electronico.
Use Ecency daily to boost your growth on platform!
Support Ecency
Vote for new Proposal
Delegate HP and earn more
Thank you so much!!