LabView: Customized signal simulator EN/ES
In the previous article we learned how to configure and use an Express SubVI, we selected the signal simulator for convenience because it is very necessary for our field of electronic engineering and systems analysis in the same field.
However we also discovered some shortcomings of the Express SubVI we use, one of them and the most important is that you must stop the process to switch from one type of signal to another, there are also parameters that can be used but that the Express SubVI does not show us in the default dialog box.
Today we will learn how to modify an Express SubVI to create a custom SubVI that suits our needs, of course we will do it with the Express SubVI signal simulator but the procedure is similar for all Express SubVI.
To enter the edit mode of the Express SubVI the first thing we do is select it and place it in the block diagram panel as if we were going to use it, no need to set any parameters, then we right click and choose Open Front Panel, this will open the Express SubVI in edit mode in a separate program and we can see its block diagram and front panel (Ctrl + T) and of course edit them.
En el artículo anterior aprendimos a configurar y usar un Express SubVI, seleccionamos el simulador de señales por conveniencia porque es muy necesario para nuestro campo de ingenieria electronica y el analisis de sistemas en el mismo campo.
Sin embargo también descubrimos algunas deficiencias que presenta el Express SubVI que utilizamos, una de ellas y la más importante es que se debe detener el proceso para cambiar de un tipo de señal a otra, además existen parametros que se pueden usar pero que el Express SubVI no nos muestra en el cuadro de diálogo por defecto.
Hoy aprenderemos a modificar un Express SubVI para crear un SubVI personalizado que se adapte a nuestras necesidades, por supuesto lo haremos con el Express SubVI simulador de señales pero el procedimiento es similar para todos los Express SubVI.
Para entrar en el modo edición del Express SubVI lo primero que hacemos es seleccionarlo y colocarlo en el panel de diagramas de bloques como si lo fuésemos a usar, no hace falta configurar ningun parametro, luego le damos click derecho y elegimos Open Front Panel, esto abrirá el express SubVI en modo edición en un programa aparte y podremos ver su diagrama de bloques y panel frontal (Ctrl + T) y por supuesto editarlos.

Here what we want to do is to hide some controls, change some constants to controls and arrange everything in our front panel in a customized way.
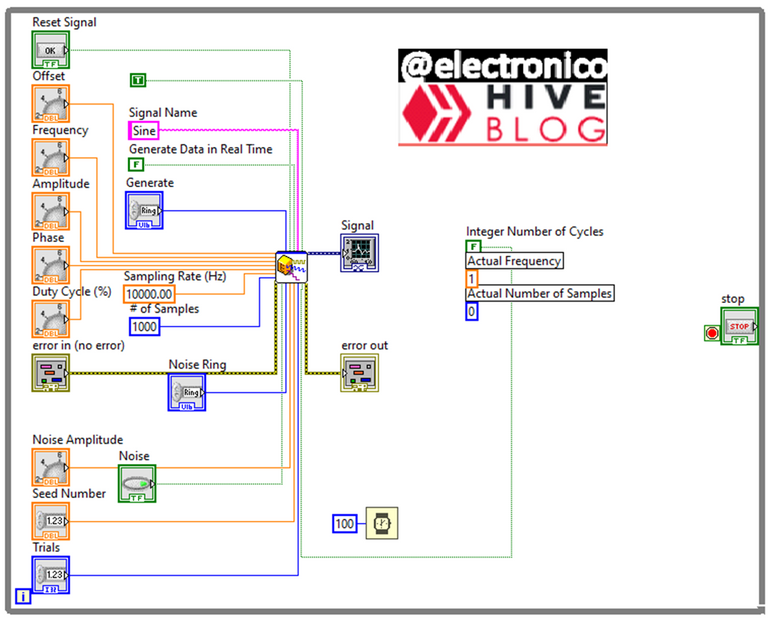
When we enter in edit mode our front panel will appear as shown in the following image.
Aquí lo que queremos hacer es ocultar algunos controles, cambiar algunas constantes a controles y ordenar todo en nuestro panel frontal de forma personalizada.
Al entrar en modo edición nuestro panel frontal aparecerá como se muestra en la siguiente imagen.
The things I don't want to be seen in the front panel are: Seed Number, Trials and the error clusters, but we are not going to remove them but use the diagram panel to hide them.
In addition, the generate block (in charge of selecting the type of signal to generate) is in the block diagram as a constant, we are going to convert it into a control to be able to choose the type of signal without stopping the execution of the program.
Additionally we are going to include the noise simulation in our signals, so we will also convert the Noise block into a control that allows us to activate a noise signal that is added to our generated signal, we will also convert Noise Ring into a control so that we can select the type of noise.
Las cosas que no quiero que se vean en el panel frontal son: Seed Number, Trials y los clusters de error, pero no los vamos a eliminar sino que usaremos el panel de diagramas para ocultarlos.
Además, el bloque generate (encargado de seleccionar el tipo de señal a generar) esta en el diagrama de bloques como una constante, lo vamos a convertir en control para poder elegir el tipo de señal sin detener la ejecución del programa.
Adicionalmente vamos a incluir la simulación de ruido en nuestras señales, por ello también convertiremos en control el bloque Noise que nos permite activar una señal de ruido que se suma a nuestra señal generada, también convertiremos Noise Ring en control para que se pueda seleccionar el tipo de ruido.
At this point we change the Sampling Rate (Hz) from 1K to 10K and enclose everything inside a While structure, with that everything will be ready in the diagram panel and we will only have to customize the front panel.
En este punto cambiamos el Sampling Rate (Hz) de 1K a 10K y encerramos todo dentro de una estructura While, con eso ya todo estará listo en el panel de diagramas y solo quedara personalizar el panel frontal.
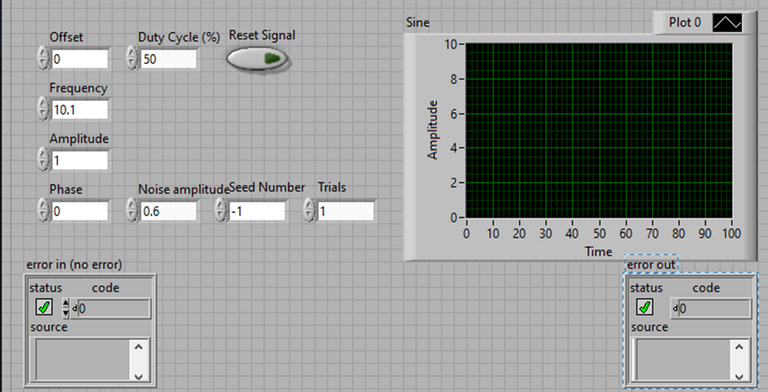
The customization of the front panel is up to each designer and there are many ways to do it, you can even use custom controls and indicators to give it a more unique touch.
What I do (it is not a law and each one chooses how to do it) is to modify the controls to be knobs so that they can be moved with the mouse and at the same time have an access for keyboard input in case you want to enter a precise data.
La personalización del panel frontal es a gusto de cada diseñador y hay muchas formas de hacerlo, incluso se pueden usar controles e indicadores personalizados para darle un toque más unico.
Lo que yo hago (no es una ley y cada uno elige cómo hacerlo) es modificar los controles para que sean perillas de manera que se puedan mover con el mouse y a la vez tengan una acceso para entrada por teclado por si se quiere colocar un dato preciso.
Using the same method I am customizing all the controls trying to make them as nice as possible, for the indicators there is only the graphic panel, the adjustments I make there are to remove the auto scaling in the y axis placing a fixed range from -20 to 20, ignore timestamp to avoid the horizontal movement of the signal and modify the color and thickness of the line that represents the signal.
After making all the changes, tidy up and make up the front panel looks like this:
Usando el mismo método voy personalizando todos los controles intentando que sean lo más agradables posibles, para los indicadores solo existe el panel gráfico, los ajustes que hago ahi son quitar el auto escalado en el eje de las y colocando un rango fijo desde -20 a 20, marco ignore timestamp para evitar el movimiento horizontal de la señal y modificar el color y grosor de la línea que representa la señal.
Luego de hacer todos los cambios, ordenar y maquillar el panel frontal queda con la siguiente presentación:
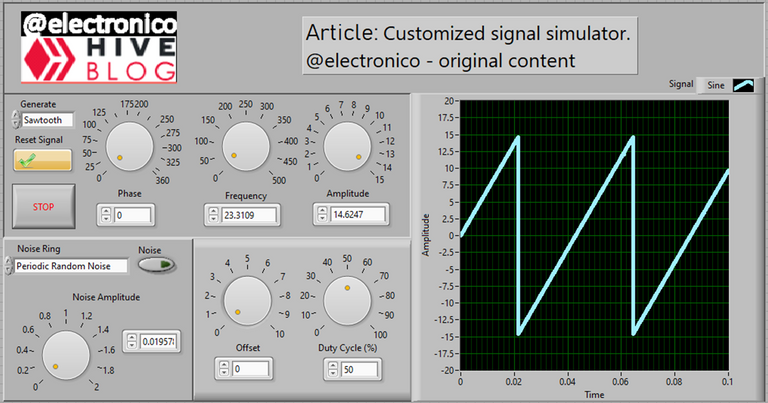
Well, let's stop talking and test the contraption, the simulation will be activated and will start with a sinusoidal signal, we will use this signal to test the variation of the phase angle, then choose a DC and vary the level with the offset, then change to sawtooth, then to triangular and finally to square.
We will stop on the square signal to vary the duty cycle, add offset and noise and quickly switch to all. We will do all this without stopping the execution and if it works without problems we can say that we already have our custom signal simulator.
Bien, dejémonos de palabras y pongamos a prueba el artilugio, se activará la simulación y se iniciará con una señal sinusoidal, aprovecharemos esta señal para probar la variación del ángulo de fase, posteriormente escogeremos una DC y variaremos el nivel con el offset, luego cambiaremos a diente de sierra, luego a triangular y finalmente a cuadrada.
Nos detendremos en la señal cuadrada para variar el ciclo de trabajo, añadiremos offset y ruido y cambiaremos rápidamente a todas. Haremos todo esto sin necesidad de detener la ejecución y si funciona sin problemas podemos decir que ya tenemos nuestro simulador de señales personalizado.
It seems to work excellent, just save it as a SubVI adding inputs and outputs to the resulting block, the way to do it has already been explained.
After adding an interesting SubVI to my collection I say goodbye hoping that the topic has been useful to you, thanking you for taking the time to read and being attentive to the comments section.
Parece que funciona excelente, solo hay que guardarlo como un SubVI añadiendo entradas y salidas al bloque resultante, la forma de hacerlo ya ha sido explicada.
Luego de añadir un interesante SubVI a mi colección me despido esperando que el tema te haya sido útil, agradeciendote por tomarte el tiempo de leer y quedando atento a la sección de comentarios.

Thanks for your contribution to the STEMsocial community. Feel free to join us on discord to get to know the rest of us!
Please consider delegating to the @stemsocial account (85% of the curation rewards are returned).
You may also include @stemsocial as a beneficiary of the rewards of this post to get a stronger support.
Congratulations @electronico! You have completed the following achievement on the Hive blockchain And have been rewarded with New badge(s)
Your next target is to reach 13000 upvotes.
You can view your badges on your board and compare yourself to others in the Ranking
If you no longer want to receive notifications, reply to this comment with the word
STOPTo support your work, I also upvoted your post!
Check out our last posts: