The Crosley Halloween Radio
Crosley radios - these old "stand up" radios - were manufactured by Crosley Corporation from the 1920's through the 1950's. Ultimately Crosley's parent company, AVCO, quit manufacturing radios due to declining sales. In their heyday, however, these radios were incredible machines and were a part of life far different from how we use radio today.

In the 1930's and 1940's radio's were a widespread, family oriented piece of entertainment. Unlike small radios of today that fit into cars, these radios were large pieces of furniture that the entire family would huddle around to listen to their favourite shows of the day, whether those shows were musical in nature or episodic shows such as The Lone Ranger or The Shadow.
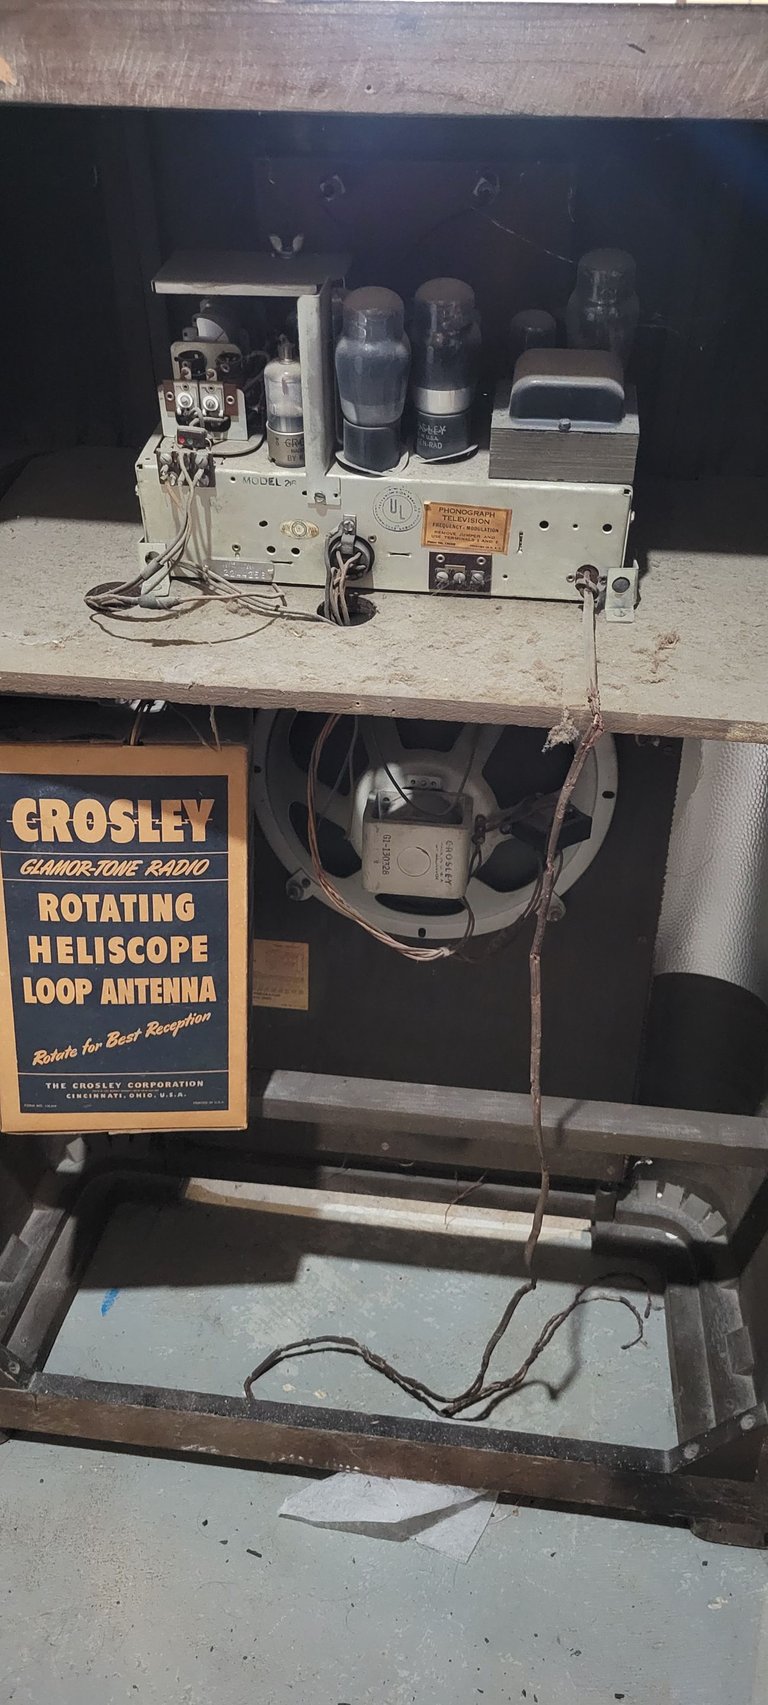
The inside of these radios was mostly empty space, but they were required to be large to account for the vacuum tubes and large antennas that made them up. And they were heavy. Those vacuum tube contraptions were not light, but any stretch of the imagination.
Of course, as technology improved, radios were able to become smaller and smaller to save precious room in the house and, ultimately, to become portable. And as television became more popular as a source of family entertainment, the need for family-sized radio's declined.
Regardless of the technological changes that impacted both the form and manufacture of old radios, the simple fact is that these radios were - and are - magnificient pieces of engineering and construction, easily identified by how many are still in existence today. These radios were not just radios; they were also pieces of furniture, and they were built to last.
This particular Crosley came into my position awhile back. It was mostly in really good shape, though the wiring was all sorts of frayed and the buttons on the control panel on the front had been removed. Now, I'm the first to admit that I do not know much about vacuum tubes, but I do know enough to know that simply splicing a new power cord onto the frayed one would probably not be the best thing to do. I really like this radio, want it to be useful, and must keep it looking the way it was intended. So, depending on your point of view, what I ended up doing was either a healthy and interesting retrofit, or it was an excercise in pure evil that will see me burn in hell for an eternity.
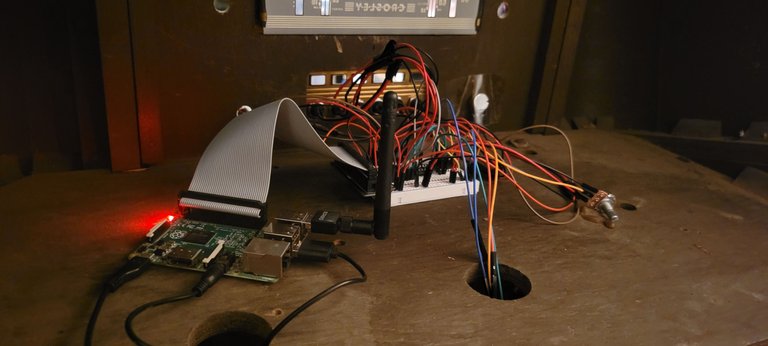
I ripped the guts out and replaced it with a Raspberry Pi.
Putting the Raspberry Pi into the radio meant that the radio had to actually do something, and only should it do something, but it should do something while keeping the radio... well... as a radio. I want to use as much of the radio's facade as possible and keep the same look and feel, which meant I wanted to replace the broken buttons, knobs, and have a relevant sounding speaker.
Requirements
- Volume control.
- On/off button/knob.
- Pre-programmed buttons to listen to internet radio.
- Play old radio shows; in particular, The Shadow
Nice to Haves
It's Halloween, and the Radio looks nicely Halloweenish, so it'd be nice to have the radio do something to celebrate the season.
- Playing haunted sounds with the use of an IR motion detector
The Results
Hardware
From a hardware standpoint my immediate goals were rather easy to fulfill:
- One PIR Motion Sensor
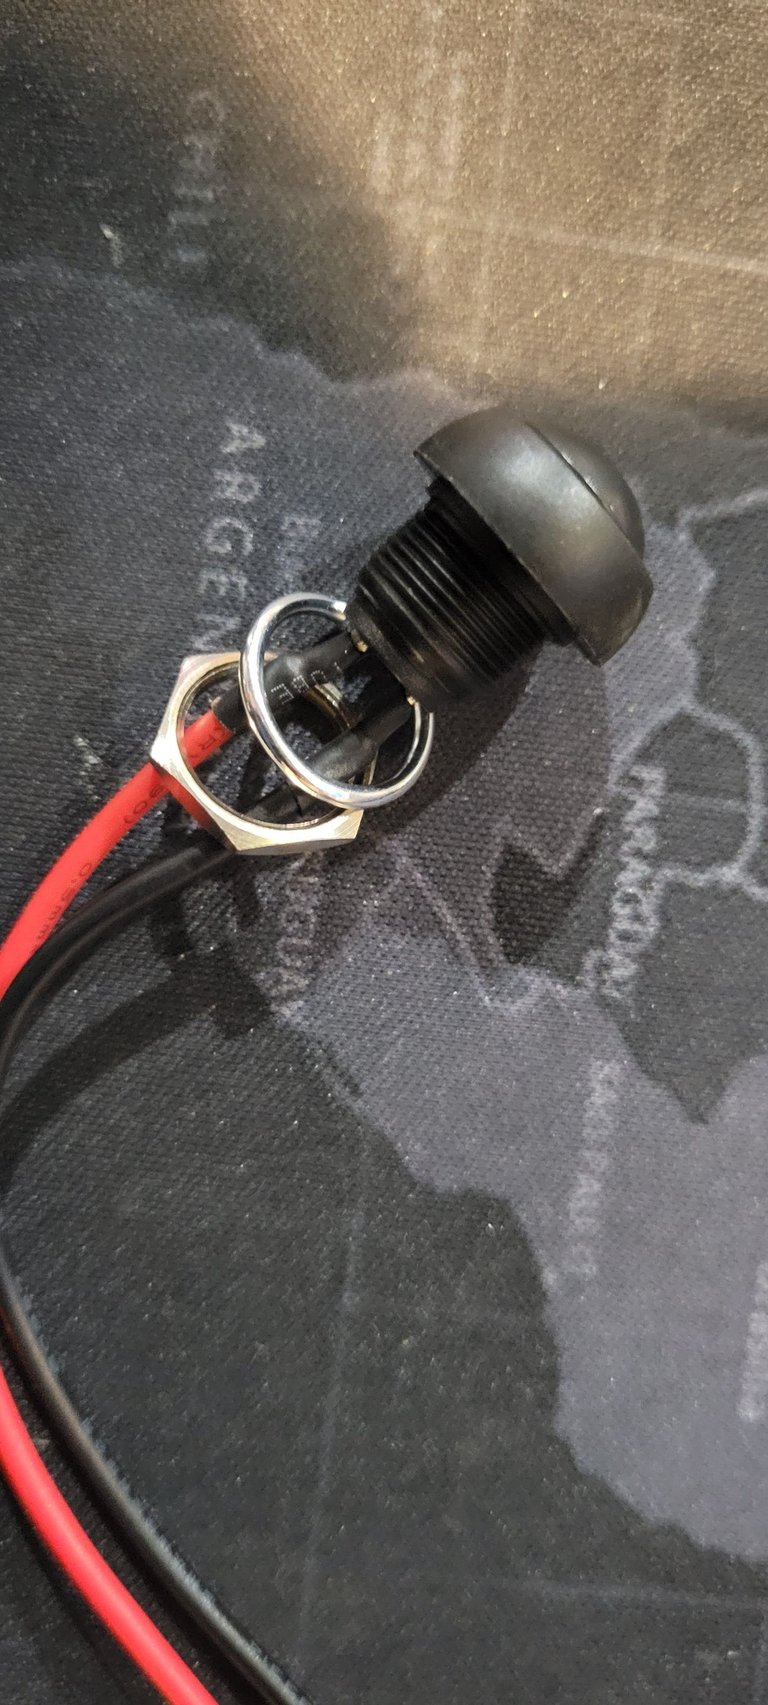
- 6 1/2inch push buttons
- One potentiometer
The round push buttons I obtained are attached with a nut and fit perfectly, as if they were designed to do just this. They're black in colour (I would have preferred brown, but black works just as well) and look like they belong.
The PIR motion sensor also fits one of the holes that was originally used for a knob really well, also like it was designed to do so. This sensor does not attach with a nut or bolt and is currently loose in place. I'm not entirely sure I want to leave the PIR sensor in place anyway, so as long as it stays put for Halloween I'm happy.
The potentiometer also fits really well; in fact, the original knob for the volume control fits right on it, also like it was designed to do so. Unfortunately there is no mechanism to attach the potentiometer itself to the radio, so it's also currently "loose." This will be an easy fix once I put my mind to it.
The control panel currently looks like this:
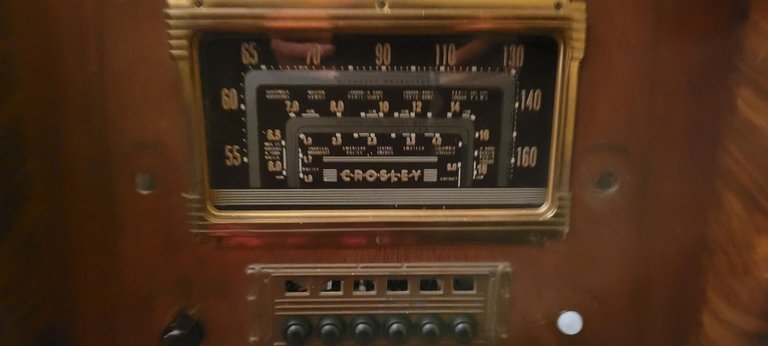
There are holes for two more knobs and rectangular holes for six more buttons, all of which are currently free. I've also left the radio display console; it's too beautiful to remove, but I'm not yet sure precisely what I'm going to do with it. I might just put an LED behind it which lights up to show the power is on.
Software
I've put all the logic together in two python scripts, one to control the motion detector, and the other to control everything else. When Halloween is all said and done I just want to remove the script and be done with it.
The second script runs the entire brains of the radio; it monitors the GPIO ports for activity from the buttons as well as the volume knob. There was a lot to do with this but most of the hard, heavy lifting had already been done by others in various python modules, leaving me with just needing to put it all together.
Volume Control
The Raspberry Pi does not read analogue in, so to use the potentiometer for volume control I had to use an mcp3008 chip. There is an adafruit python module already completed to do this, so my work really only consisted of about a dozen lines of code, most of which were loading the module and reading the values coming from the mcp3008.
Internet Radio
This was actually a little tricky to do. From a software standpoint loading an internet feed is rather straightforward with python-vlc; the issue was finding the correct feed to use, as they are usually embedded in web pages. I had to do some digging with the browsers Developers Tools to find the actual stream which was loaded upon hitting the play button, but once I found it the code worked like a charm. Currently I have three buttons which feed three different GPIO ports; depending on which is pressed, the script will load one of three pre-defined internet radio stations to stream.
Radio Shows
Probably the part that excited me the most was getting the radio to play old time radio shows. I have downloaded a number of The Shadow and The Lone Ranger episodes and loaded them onto the pi directly. The first button plays a random The Shadow and the second button plays a random Lone Ranger. This also uses the vlc module and it works well.
After I put all this together I got to thinking about how neat it would be to put together my own internet streaming radio station to play these old shows and, perhaps, do a weekly live one, too. I might do that.
The sixth button on the console is a "stop all" button.
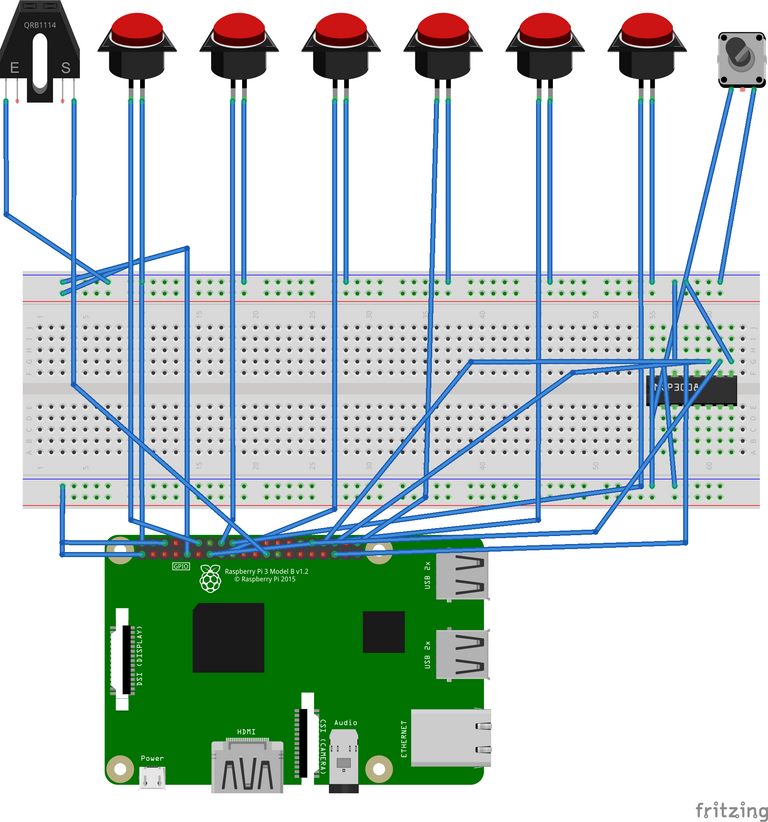
All of the buttons, sensors, and knobs are ultimately connected to GPIO ports on the Pi. You can see in one of the pictures above that I'm using a breadboard and extender cable; this saves a lot of grief when sharing power or ground connections. Here is what the pinout looks like. It's busy, and is really only going to get busier.
For anyone interested, the script itself is located on github:
https://github.com/wiebevictor/pyradio
Here are two videos showing the radio in work. The first is 30 seconds of The Shadow. The second is about a minute showing the various controls.
Still to do: Want to Haves
- User-programmable buttons.
- Actual FM radio reception.
- Knob for tuning FM/internet radio
- Knob to switch between FM/Internet Radio/Radio Shows
- Use the console for user output
- Power switch
The radio is not yet complete. The more I work with it, the more I want it to do. Some of it requires more hardware, some of it requires better scripting on my part. I also have not completed an on/off power switch. I would like to use a knob to do this, probably replacing the PIR motion sensor with it. I'd also like to add another knob to change the function among FM Radio/Internet Radio/Radio Shows. Having another potentiometer to act as a tuner would also be really fun.
As time goes on I will likely also make the script more robust. It certainly works, but I like to build such things to be consumer friendly and, right now, if a consumer were to use this they would not be able to easily configure it, so a backend configuration gui might be nice, at the least.
This entire contraption is running on a Raspberry Pi 3. I think a 3 is an absolute minimum because it has a large number of free GPIO ports; I'm not sure that a Pi 2 with it's 26 pins will be enough. I do have some Pi 2's kicking around, though, so if I find a smaller radio, they just might be what I need.
(c) All images and photographs, unless otherwise specified, are created and owned by me.
(c) Victor Wiebe
About Me
Amateur photographer. Wannabe author. Game designer. Nerd.
General all around problem-solver and creative type.
My Favourite Tags
| #spaceforce3 | #altphoto | #crappycameraphotos |
| #digitalpinhole | #pinhole | #firehydrant |

Oh, my!! I took your radio home with me. Super cool, Victor! @wwwiebe There are a few people on here that fool around with the Raspberry Pi3
Who knew you were super uber nerdy? I love it! ;) Okay, actually, I did know, but, I usually try to ignore that part. Until you do this and then... there is no denying it.
This is pretty awesome!
Hahaha. Thank you. :) Remember, the geeks shall inherit the earth 😁
Appreciate the thought! I have two more radios to retrofit now, too, both of which will likely be even nerdier than this one. I'm finally putting my small armada of Raspberry Pi's to good use!
Thank God! They have been useless for a while! :) Now, I want to do something with mine! It has been standing in the tasting room, pretending it is real - for a couple of years now. It needs to earn its keep! It cost me $2.00 - I will be getting my pound of flesh out of it.
You can get nerdier?? Truly great job! I look forward to seeing it.
I do get nerdier! It's a trait. :)
You told me, but I have forgotten (because my nerdiness has its limits), does your radio have all the tubes in it?
Omg! Ignore that dust. It still has the dust from the ignored summer house! Ok.. the picture is from when I got it at the auction, but, it looks the same. Maybe less dust, but, no guarantees.
Very good
That's a really interesting idea for that nice old cabinet. Fixing the old tube powered radio chassis is not too difficult if you like fixing tube equipment, but the proper parts can be hard to find for those old radios. I've seen one of those cabinets made into a guitar amplifier...
If you want an on/off switch, you can buy a combination volume potentiometer and switch. The switch is at the low end of the pot, you turn the volume knob up from zero and it turns on the power. A lot of old radios used a switch/ volume combination pot.
I really was torn between repairing the radio and replacing it, but the nerd in me won out. I do have another radio where the tubes look to be in fantastic condition and all it needs to new wiring; that'll be a different project for a different day.
That's a good idea for a power switch; I'll certainly need to look that up. Thanks for the pointer!
Part sourcing on vintage radios is an art itself. I think it's still easier to do all the work you've done already than deal with restoration.
Crazy to think how much functionality is built into these small sbcs these days. There seems to be a part someone has made that will be of use in any project. The only limitation is your imagination and I see you've got it all setup on a breadboard and working. The real tough part is limiting your project scope or maybe never. The tinkering is hard to stop with so many ideas and I see you have plenty 🙂
Fascinating read and good luck.