[ESP/ENG] #DiyElectronicWorks: Repairing a Charging port & PCB trace repairing for a Generic Bluetooth Speaker [Easy] ~ by @alejandrop


Buenas tardes a toda la comunidad de @OCD, es un placer para mí saludarles en este maravilloso día.
Algunos de ustedes sabrán que llevo tiempo trayendo diversos tutoriales sobre reparaciones electrónicas que realizo en mi casa, no por profesionalismo sino por hobby, pues la Electrónica es un pasatiempo para mí y día a día voy a aprendiendo cosas nuevas, y aunque me falte muchísimo por mejorar, siempre intento hacer un buen trabajo, a pesar de no tener las herramientas adecuadas.
Y menciono lo de las herramientas porque el trabajo que presento a continuación se requiere del uso de una estación de calor con soplador graduable, artefacto que aún no poseo por cuestiones económicas y más que todo porque el uso que le daría iba a ser tan poco que probablemente se me iba a dañar "sin usarlo".
Yo imagino que todos aquí conocen lo que son las parlantes Bluetooth, especialmente los genéricos de dudosa procedencia, pero que igual hacen un excelente trabajo, cumplen su función, el problema es que no sabes qué tan bueno sean los componentes y su fabricación. Este post trata de la reparación del pin de carga que fue literalmente desprendido de la placa madre del mismo, ya sea por golpe o simplemente mal uso del mismo, a continuación detalles del mismo. Espero no se aburran en el proceso, este post es corto.
Good afternoon to the entire @OCD community, it is a pleasure for me to greet you on this wonderful day.
Some of you may know that I have been bringing various tutorials on electronic repairs that I do at home for some time, not out of professionalism but as a hobby, since Electronics is a hobby for me and day by day I am learning new things, and although I still have a lot to improve, I always try to do a good job, despite not having the right tools.
And i mention the tools because the work that I present below requires the use of a heat station with an adjustable blower, an artifact that I still do not have for economic reasons and more than all because the use that I would give it would be so little that it was probably going to be damaged "without using it".
I imagine that everyone here knows what Bluetooth speakers are, especially the generic ones of dubious origin, but they still do an excellent job, they fulfill their function, the problem is that you don't know how good the components and their manufacturing are. This post deals with the repair of the charging pin that was literally detached from its motherboard, either by impact or simply misuse of it, details of it below. I hope you don't get bored in the process, this post is short.
Segmento #1 - Teoría y diagnóstico
Segment #1 - Theory and diagnostic
Segmento #1 - Teoría y diagnóstico
Segment #1 - Theory and diagnostic
El secreto de los parlantes Bluetooth es que poseen una muy buena batería para sostener tanto tiempo el consumo que genera la bocina, sin mencionar que indefinidamente debe alimentar al circuito Bluetooth para mantener la conectividad. Ésto último podríamos decir que consume la mitad de la carga, ya que fácilmente podemos deducir que en tiempos anteriores a la tecnología actual, recomendaban encarecidamente que: Si no estás usando el Bluetooth, desactívalo, porque aunque tú no lo estés usando, él está ahí activado esperando algún "mensaje" de entrada (Entiéndase como 'mensaje' al protocolo de comunicación que utilizan ambos dispositivos parar iniciar una conexión paralela), pero ese no es el caso, pues el problema que tenemos con este parlante es que simplemente no carga, entonces procedemos a revisar, desarmando el dispositivo, y aunque no tomé fotografías de esto, muestro directamente el problema:
The secret of Bluetooth speakers is that they have a very good battery to sustain the consumption generated by the speaker for so long, not to mention that it must feed the Bluetooth circuit indefinitely to maintain connectivity. We could say that the latter consumes half the load, since we can easily deduce that in times before current technology, they strongly recommended that: If you are not using Bluetooth, deactivate it, because even if you are not using it, it is there activated waiting for some input "message" (Understand as 'message' to the communication protocol used by both devices to start a parallel connection), but that is not the case, because the problem we have with this speaker is that it simply does not load, then we proceed to check, disarming the device, and although I did not take pictures of this, I directly show the problem:
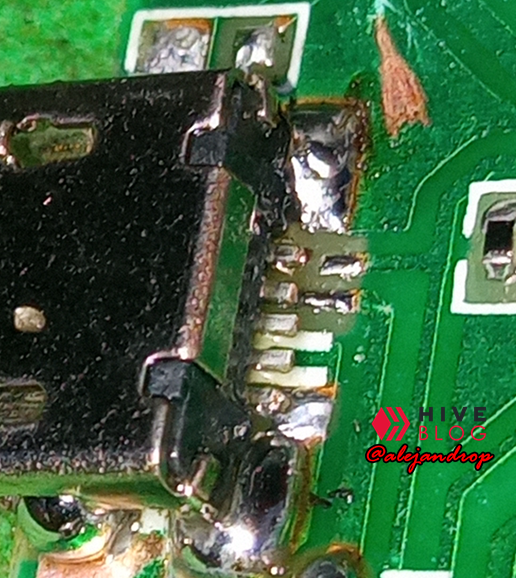
Y es que efectivamente, a primera vista, podemos denotar que falta el pin de carga, componente que simplemente se encarga de recibir la corriente del cable para transportarlo mediante líneas de conductividad hasta el IC de carga, que a su vez envía la corriente 'regulada' a la batería.
And it is that indeed, at first glance, we can denote that the charging pin is missing, a component that is simply responsible for receiving the current from the cable to transport it through conductivity lines to the charging IC, which in turn sends the current 'regulated ' to the battery.
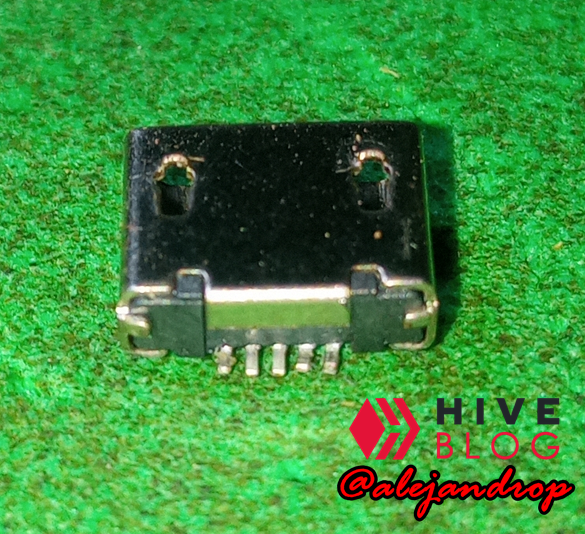
Como el componente está en perfecto estado, procedemos a resoldarlo. Esto nos lleva al siguiente segmento del post.
As the component is in perfect condition, we proceed to resolder it. This brings us to the next segment of the post.
Segmento #2 - Montaje y reparación
Segment #2 - Mounting and repairing
Segmento #2 - Montaje y reparación
Segment #2 - Mounting and repairing
El proceso de soldar es tan complicado, y más con sólo cauting, que no pude tomar fotos en ello, pero al final luego de conectar tus cuatro terminales GND del chasis del componente, nos queda algo así:
The soldering process is so complicated, and more so with just cauting, that I couldn't take photos of it, but in the end, after connecting your four GND terminals of the component's chassis, we are left with something like this:
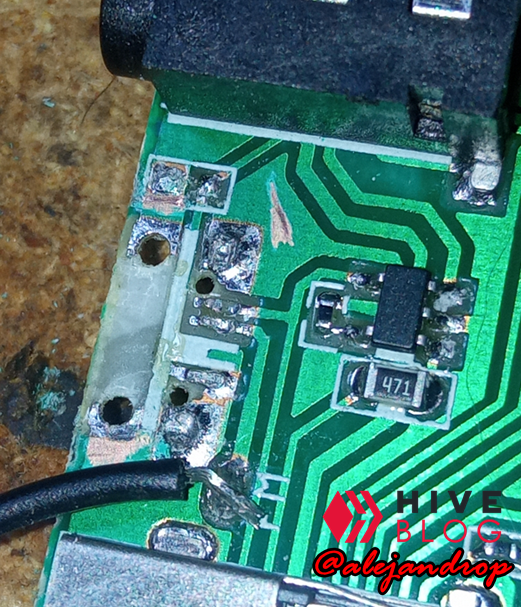
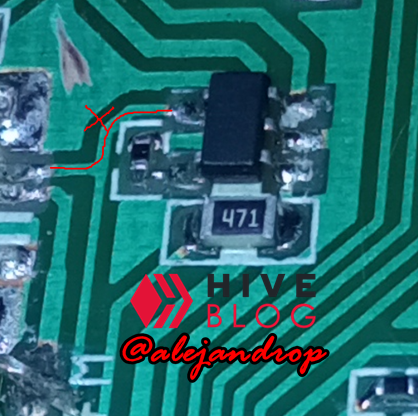
Y enseguida podemos detectar que no solamente ocurrió el despegue del componente, sino, lo que me temía: fractura o rotura de una línea de corriente. Esto es muy común que pase, y normalmente haya problemas con la línea rota también, es decir, que aunque se vea rota en la punta, puede que esté rota en otro punto del PCB, por lo que luego de unas mediciones pude determinar que tampoco había conexión entre el contacto positivo del IC de carga y el contacto positivo del conector:
And immediately we can detect that not only did the detachment of the component occur, but what I feared: fracture or breakage of a current line. This is very common to happen, and normally there are problems with the broken line as well, that is, although it looks broken at the tip, it may be broken at another point on the PCB, so after some measurements I was able to determine that neither there was connection between the positive contact of the charging IC and the positive contact of the connector:
Por lo que luego de soldar el negativo (el chasis), procedí a hacer un pequeño puente entre el terminal positivo del componente y el positivo del IC de carga, quedando de la siguiente manera:
So after soldering the negative (the chassis), I proceeded to make a small bridge between the positive terminal of the component and the positive of the charging IC, being as follows:
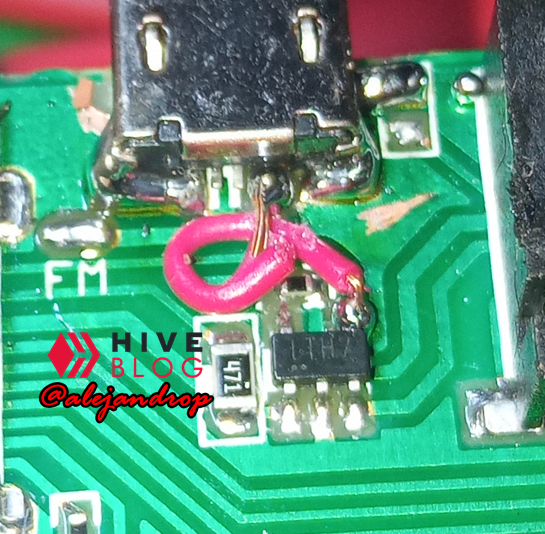
Y sí, ya sé que el cable es muy grueso para estar allí pero les repito: Era lo único que tenía para solucionar el problema, no cuento con herramientas profesionales ni mucho menos: Solo mi cautín, estaño de 0.8mm y flux barato. Una vez finalizada, nos dirigimos al siguiente y último segmento de este post.
And yes, I know that the cable is too thick to be there but I repeat: It was the only thing I had to solve the problem, I don't have professional tools, far from it: Just my soldering iron, 0.8mm solder and cheap flux. Once finished, we go to the next and last segment of this post.
Segmento #3 - Prueba y ensamblaje
Segment #3 - Test and assembly
Segmento #3 - Prueba y ensamblaje
Segment #3 - Test and assembly
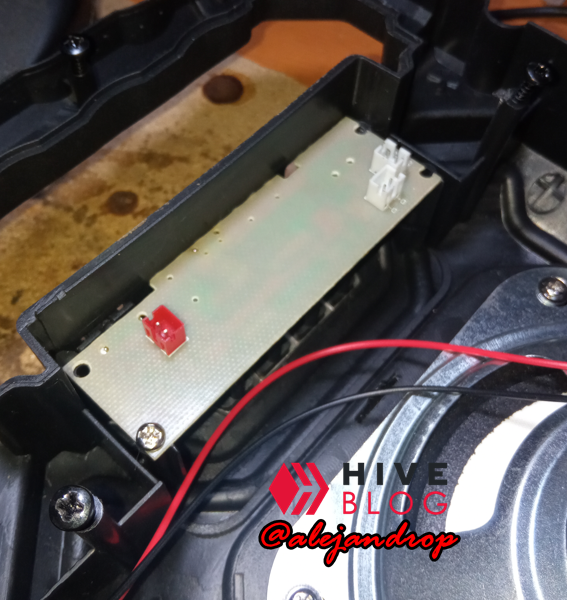
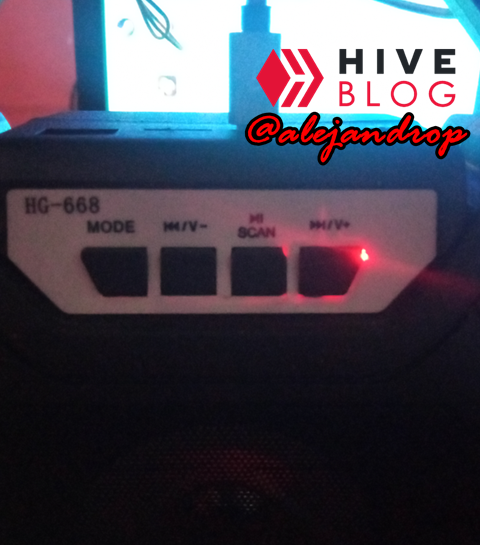
La prueba es tan sencilla como conectar un cable de corriente, tipo Micro-USB, y verificar que al menos encienda la luz de carga, que indica que la corriente está pasando hacia la batería (aunque no esté presente):
The test is as simple as connecting a power cable, type Micro-USB, and verifying that at least the charge light turns on, indicating that current is flowing to the battery (even it is not present):
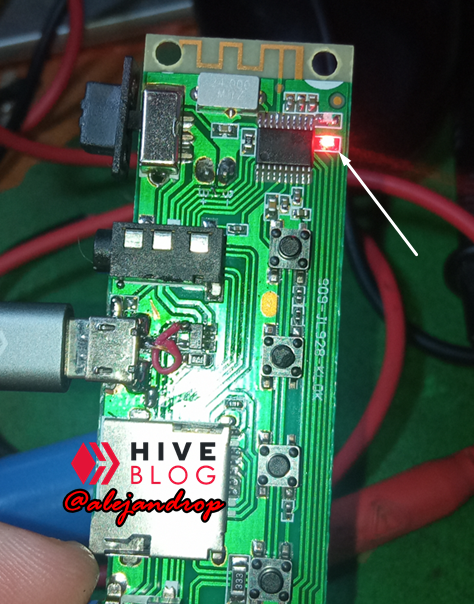
Y como pueden ver, el LED rojo enciende, lo que nos indica que nuestra reparación es un total éxito, por lo que ahora procedemos con el ensamblaje.
And as you can see, the red LED lights up, which indicates that our repair is a complete success, so now we proceed with the assembly.
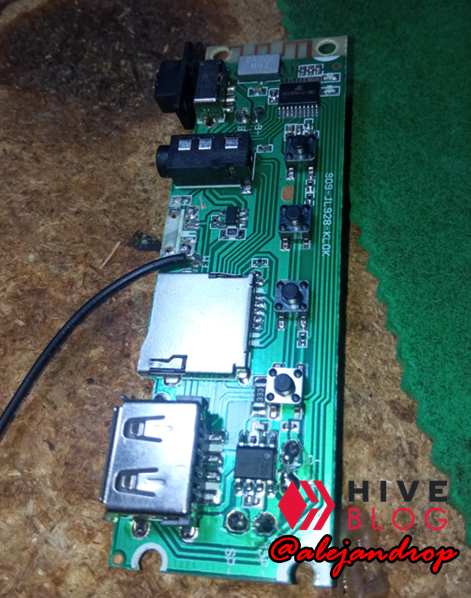
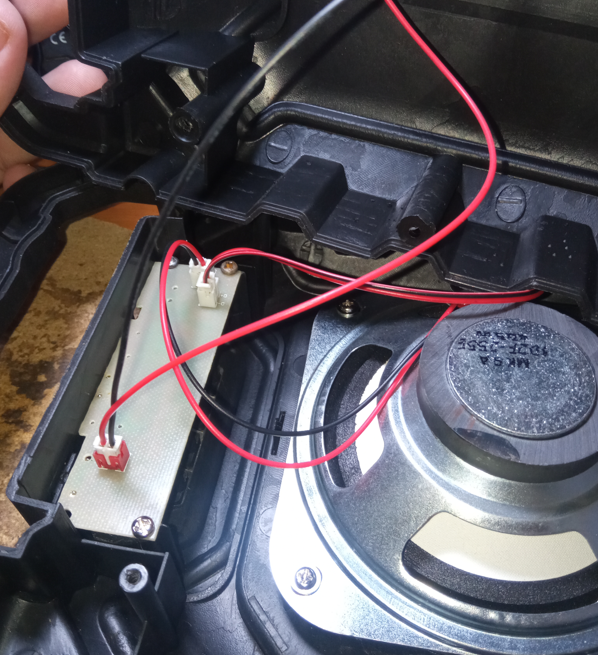
Primeramente, atornillamos nuevamente el PCB de la corneta en su respectivo lugar de la siguiente manera:
First, we screw the horn PCB back into its respective place as follows:
Luego, las diversas conexiones de cada uno. En total son 3 conexiones que lleva el PCB: Corneta, puerto de batería (o batería, según el modelo si ésta es integrada, en este caso, es reemplazable desde afuera) y luces LED de uso cosmético únicamente.
Then the various connections of each. In total there are 3 connections on the PCB: Horn, battery port (or battery, depending on the model if it is integrated, in this case, it is replaceable from the outside) and LED lights for cosmetic use only.
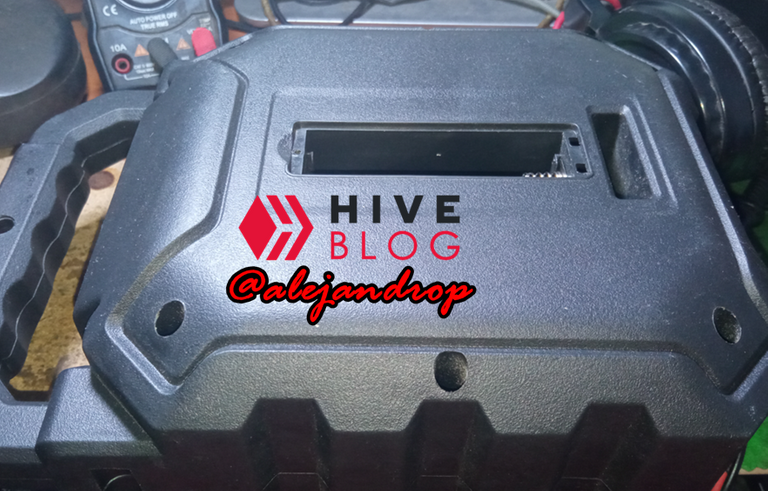
Luego simplemente sellamos la cubierta y colocamos los respectivos tornillos:
Then we simply seal the cover and place the respective screws:
Colocamos la batería:
We put the battery:
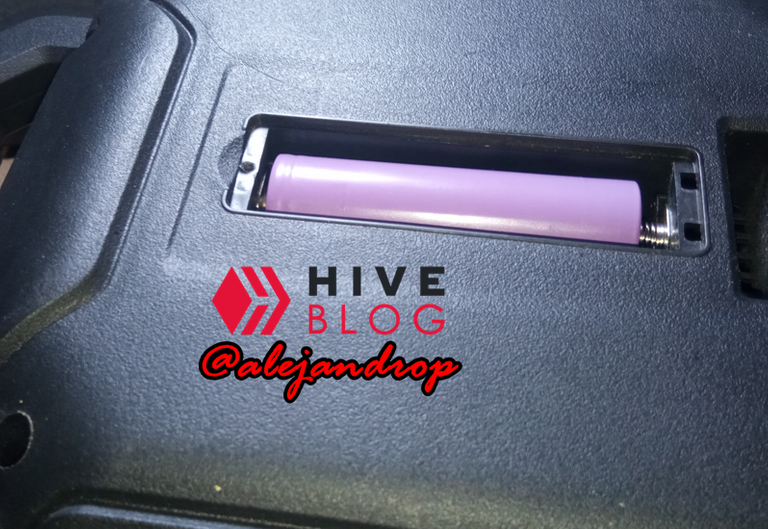
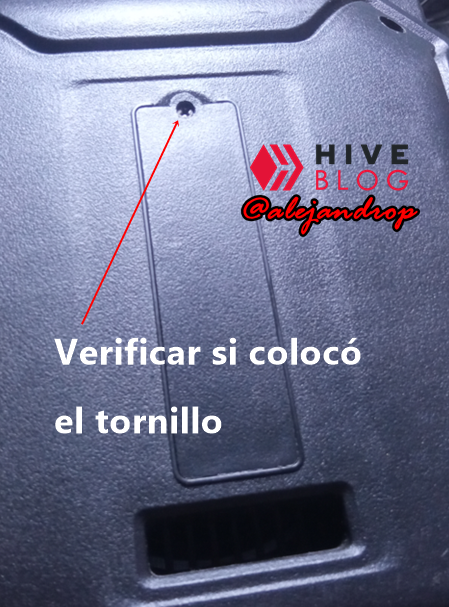
Y por último, revisar si mientras armábamos el speaker no dañamos el trabajo:
And finally, check if while we put together the speaker we did not damage the work:
¡Perfecto!, ahora una vista un poco más lejos:
**Perfect!** Now a little further afield:
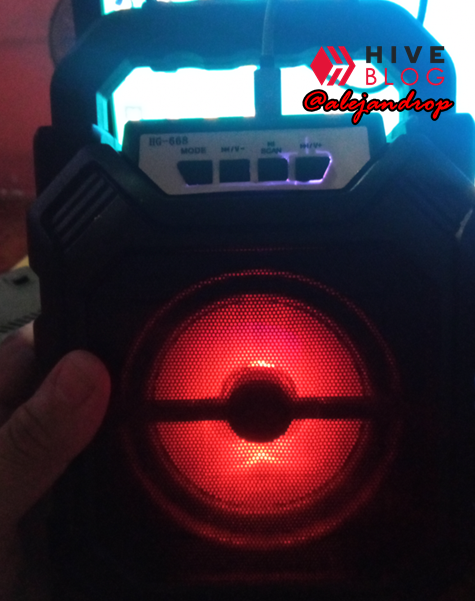
Nuestro Speaker está listo para seguir haciendo su trabajo.
Our Speaker **is ready to continue doing his job**.
Muchas gracias a todos por quedarse hasta el final, por favor si tienes alguna duda respecto a la publicación que acabas de ver o tienes alguna otra duda respecto al campo de electrónica que pienses que yo pueda resolverte, no dudes en dejarme un comentario. Esto ha sido todo por hoy, y nos vemos en la próxima reparación, que creo yo, será la típica reparación de reemplazo de capacitadores a un monitor LCD de 17", el cual se puede determinar la falla porque enciende pero no manda video y simplemente el sistema queda en "Stand-by", sólo estoy esperando por el dueño del mismo a que me traiga los repuestos para proceder con la reparación y como siempre mostrarlo para ustedes con mucho cariño, siempre con toda la intención de enseñar y despejar dudas. Un abrazo para todos y se me cuidan, gracias por el apoyo recibido. Saludos.
Thank you all very much for staying until the end, please if you have any questions regarding the publication you just saw or you have any other questions regarding the field of electronics that you think I can solve for you, do not hesitate to leave me a comment. That's all for today, and see you at the next repair, which I think will be the typical capacitors replacement repair to a 17" LCD monitor, which can be determine the fault because it turns on but does not send video and the system simply remains in "Stand-by", I am only waiting for the owner of the same to bring me the spare parts to proceed with the repair and as always show it to you with great affection, always with the full intention of teaching and clearing doubts. A hug for everyone and take care of me, thanks for the support received. Greetings.
Aditional information
Aditional information
| Photography author | @alejandrop |
| Location | Cumaná, Sucre; Venezuela |
| Photography date | July 17, 2021 |
| Camera | Xiaomi: Redmi 9 ~ 13 MPX (Main camera) |


Your content has been voted as a part of Encouragement program. Keep up the good work!
Use Ecency daily to boost your growth on platform!
Support Ecency
Vote for new Proposal
Delegate HP and earn more
Estas recibiendo un voto por parte del proyecto "Sound Music" (@music1sound) y este post fue seleccionado para el reporte de curación diaria. Contáctenos para saber más del proyecto a nuestro servidor de Discord. Si desea delegar HP al proyecto: Delegue 5 HP - Delegue 10 HP - Delegue 20 HP - Delegue 30 HP - Delegue 50 HP - Delegue 100 HP.