DETAILED EXPLANATION ON HOW TO MAKE A LIQUID LEVEL SENSOR, INDICATOR AND AUDIO NOTIFIER USING ARDUINO NANO, ULTRASONIC SENSOR AND BUZZER
The need for adequate water or liquid levels monitoring system is very essential in other to prevent waste of water or liquid and also for certain decision making. During the period where water is to be effectively managed, the device would help in monitoring and notification of the level of water or amount of water present or left in the water tank or reservoir or bottles, and with that effective precautions or decisions can be taken. It is also highly utilized in food and drinks manufacturing industries to measure the level of liquid in bottles.
The following components are used in developing the hardware part of the device:
- Arduino Nano
- Ultrasonic Sensor
- Buzzer
- Resistor
- LED (Light Emitting Diode)
- Control Switch
- 5v Power Jack
- Connecting Wires
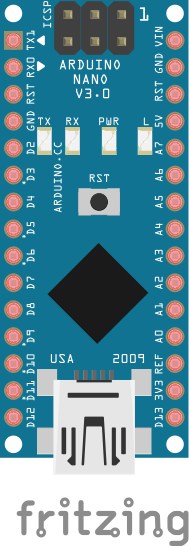
Arduino Nano is a microcontroller which works almost exactly as the Arduino Uno or Arduino Mega but has lesser memory and appears to be very much smaller in size compared to Arduino Uno and Arduino Mega.
It is used in this project as the brain where all other components attached to it receives and send instruction from and to it respectively. And it is where the codes written to control the device is been uploaded to.
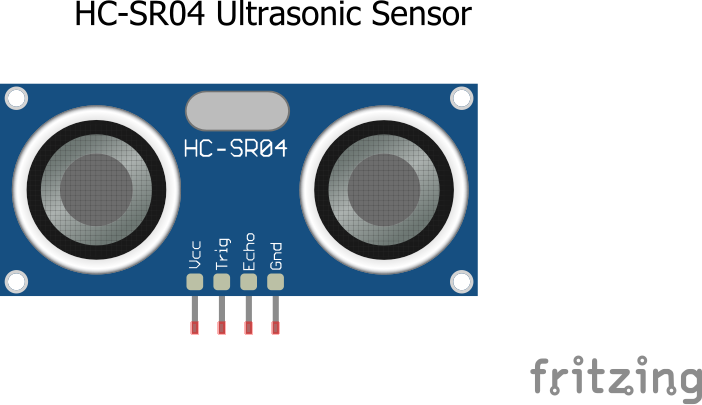
The ultrasonic sensor is a tranducers, that is it converts from one energy form to another, an ideal ultrasonic sensor converts ultrasonic sound waves into electrical signals.
It radiates sound waves and measures the distance at which the transmitted ultrasonic sound wave is be reflected then converts the reflected sound waves into electrical signal.
It is used where the need for measuring distances or proximity of objects or substances is required.
In this device it helps in measuring the different levels of liquid or water in the reservior, tank or bottle then sends the measured distance to the arduino nano microcontroller.
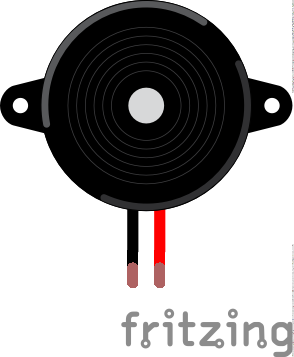
The Buzzer is an electronic component that converts electrical signal into sound signal. It is highly utilized in alarms, printers, and other electronic devices where the need for beep sounds is required or needed.
The buzzer help in giving beep sounds outputs as the water gets to different levels in the tank, bottle or reservior.
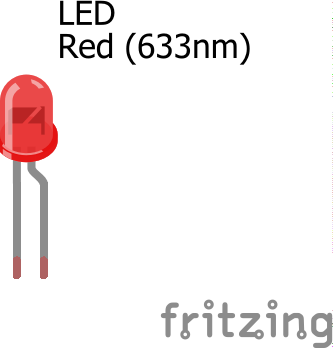
The LED (Light Emitting Diode) is a polarized two terminal electronic component that converts electrical energy into light energy, that is, it emitts light when an electrical energy is been applied to it terminals or when been biased.
The LED bulb helps in indicating the different levels the liquid or water is in the bottle, tank or reservoirs.

As it is known, a resistor is an electronic component that helps to reduce or limit the flow of electric current in an electric circuit or the amount of electric current that would flow to a certain electronic component in an electric circuit.
The resistor helps in limiting or reducing the about of electric current that flows into the LED (light emitting diode) the LED only requires 3.3v to power on but since that output from the Arduino Nano is 5v, then their is a need to reduce this voltage so that is doesn't go straight to the LED and cause it to damage.
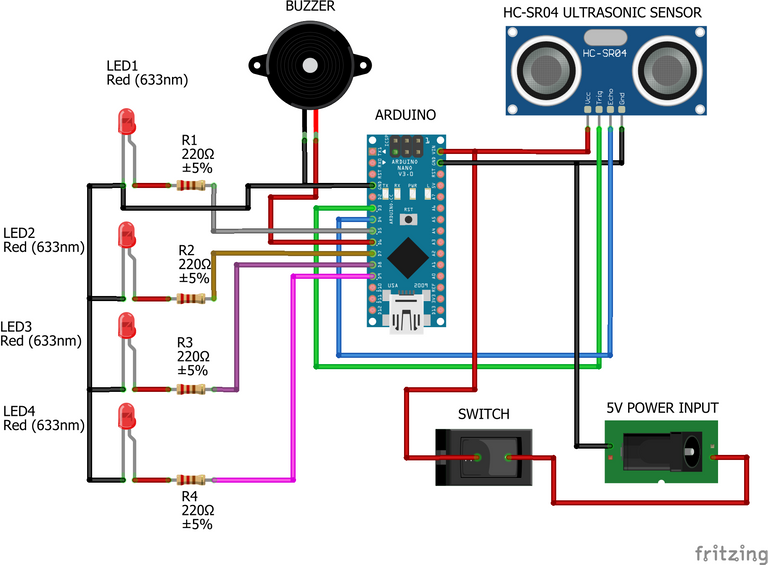
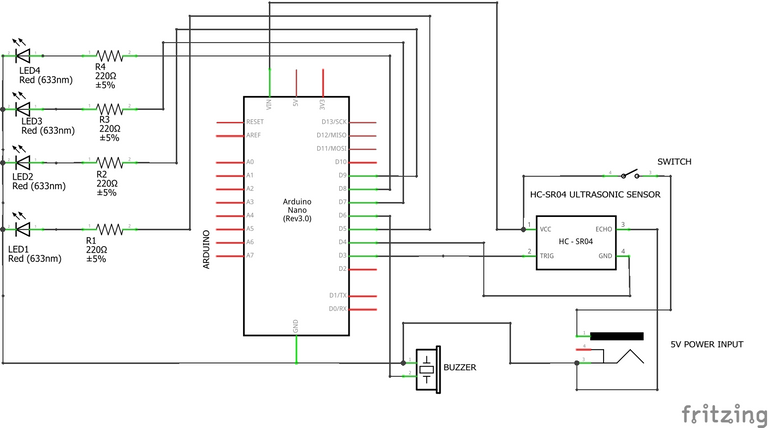
Connecting the Arduino Nano with the Ultrasonic Sensor
| Arduino Nano | Ultrasonic Sensor |
|---|---|
| Vcc | Vcc |
| GND | GND |
| D7 | Echo |
| D8 | Trig |
Connecting the Arduino Nano with the Buzzer
| Arduino Nano | Buzzer |
|---|---|
| GND | GND |
| D6 | +VE |
Connecting the Arduino Nano with the LEDs
| LEDS | Arduino Nano |
|---|---|
| LED1 | D2 |
| LED2 | D3 |
| LED3 | D4 |
| LED4 | D5 |
| GND | GND |
The following components are used in developing the software part of the device:
- Arduino IDE (Integrated Development Environment)
- Embedded C/C++ Programming Language
- Frizting
After successfully making the connections of the hardward components together following the instructions above, to program the devie the code below should be uploaded to the Arduino Nano microcontroller.
int trigger_pin = 8;
int echo_pin = 7;
int buzzer_pin = 6;
int led1 = 2;
int led2 = 3;
int led3 = 4;
int led4 = 5;
int time;
int distance;

void setup ( ) {
        Serial.begin (9600);
        pinMode (trigger_pin, OUTPUT);
        pinMode (echo_pin, INPUT);
        pinMode (buzzer_pin, OUTPUT);
        pinMode (led1, OUTPUT);
        pinMode (led2, OUTPUT);
        pinMode (led3, OUTPUT);
        pinMode (led4, OUTPUT);
}

void loop ( ) {
    digitalWrite (trigger_pin, HIGH);
    delayMicroseconds (10);
    digitalWrite (trigger_pin, LOW);
    time = pulseIn (echo_pin, HIGH);
    distance = (time * 0.034) / 2;
    if ((distance >= 15) && (distance <= 17))
        {
        Serial.println ("25% WATER LEVEL REACHED");
        Serial.print (" Water Height = ");
        Serial.println (distance);
        digitalWrite (led1, HIGH);
        digitalWrite (led2, LOW);
        digitalWrite (led3, LOW);
        digitalWrite (led4, LOW);
        digitalWrite (buzzer_pin, HIGH);
        delay(500);
        digitalWrite (buzzer_pin, LOW);
        delay(500);
        digitalWrite (buzzer_pin, HIGH);
        delay(500);
        digitalWrite (buzzer_pin, LOW);
        delay (500);
        digitalWrite (buzzer_pin, HIGH);
        delay(500);
        digitalWrite (buzzer_pin, LOW);
        delay (500);
        }

     else if ((distance >= 10) && (distance < 15))
        {
        Serial.println ("50% WATER LEVEL REACHED");
        Serial.print (" Water Height = ");
        Serial.println (distance);
        digitalWrite (buzzer_pin, HIGH);
        digitalWrite (led2, HIGH);
        digitalWrite (led1, HIGH);
        digitalWrite (led3, LOW);
        digitalWrite (led4, LOW);
        digitalWrite (buzzer_pin, HIGH);
        delay(350);
        digitalWrite (buzzer_pin, LOW);
        delay(350);
        digitalWrite (buzzer_pin, HIGH);
        delay(350);
        digitalWrite (buzzer_pin, LOW);
        delay (350);
        digitalWrite (buzzer_pin, HIGH);
        delay(350);
        digitalWrite (buzzer_pin, LOW);
        delay (350);
        digitalWrite (buzzer_pin, HIGH);
        delay(350);
        digitalWrite (buzzer_pin, LOW);
        delay (350);
        }

       else if ((distance >= 5) && (distance < 10))
        {
        Serial.println ("75% WATER LEVEL REACHED");
        Serial.print (" Water Height = ");
        Serial.println (distance);
        digitalWrite (buzzer_pin, HIGH);
        digitalWrite (led3, HIGH);
        digitalWrite (led2, HIGH);
        digitalWrite (led1, HIGH);
        digitalWrite (led4, LOW);
        digitalWrite (buzzer_pin, HIGH);
        delay(200);
        digitalWrite (buzzer_pin, LOW);
        delay(200);
        digitalWrite (buzzer_pin, HIGH);
        delay(200);
        digitalWrite (buzzer_pin, LOW);
        delay(200);
        digitalWrite (buzzer_pin, HIGH);
        delay(200);
        digitalWrite (buzzer_pin, LOW);
        delay(200);
        digitalWrite (buzzer_pin, HIGH);
        delay(200);
        digitalWrite (buzzer_pin, LOW);
        delay(200);
        digitalWrite (buzzer_pin, HIGH);
        delay(200);
        digitalWrite (buzzer_pin, LOW);
        delay(200);
        digitalWrite (buzzer_pin, HIGH);
        delay(200);
        digitalWrite (buzzer_pin, LOW);
        delay(200);
        }

        else if (distance < 5)
        {
        Serial.println ("10% WATER LEVEL REACHED");
        Serial.print (" Water Height = ");
        Serial.println (distance);
        digitalWrite (buzzer_pin, HIGH);
        digitalWrite (led4, HIGH);
        digitalWrite (led2, HIGH);
        digitalWrite (led3, HIGH);
        digitalWrite (led1, HIGH);
        digitalWrite (buzzer_pin, HIGH);
        delay(100);
        digitalWrite (buzzer_pin, LOW);
        delay(100);
        digitalWrite (buzzer_pin, HIGH);
        delay(100);
        digitalWrite (buzzer_pin, LOW);
        delay(100);
        digitalWrite (buzzer_pin, HIGH);
        delay(100);
        digitalWrite (buzzer_pin, LOW);
        delay(100);
        digitalWrite (buzzer_pin, HIGH);
        delay(100);
        digitalWrite (buzzer_pin, LOW);
        delay(100);
        digitalWrite (buzzer_pin, HIGH);
        delay(100);
        digitalWrite (buzzer_pin, LOW);
        delay(100);
        digitalWrite (buzzer_pin, HIGH);
        delay(100);
        digitalWrite (buzzer_pin, LOW);
        delay(100);
        }

    else {
        Serial.println ("WATER LEVEL IS CRITICALLY LOW");
        Serial.print (" Water Height = ");
        Serial.println (distance);
        digitalWrite (buzzer_pin, LOW);
        digitalWrite (led4, LOW);
        digitalWrite (led2, LOW);
        digitalWrite (led3, LOW);
        digitalWrite (led1, LOW);
        delay (500);
    } }
Thanks for reading and visiting my blog 🤝. Kindly support this post by reblogging, upvoting, and commenting, it would be highly appreciated.
Images used in this post were all designed by me using frizting, a circuit design and simulation software.
Posted with STEMGeeks
Voted on behalf of the Neoxian city paper.
Thanks for the upvote @sayee highly appreciate it 🤝.
A good read with a very detailed explanation!!
Well done boss🙌🏻🙌🏻
Thanks for the comments @writermaximus 🤝.
My boss...nice and detailed information on using sensors, Arduino for water level indication
I enjoyed reading through especially the practical approach given
Kudos man. Much love😍
Thanks @chosenfingers for the nice comment. I just love going in details 😊.
Pretty incredible stuff there.
!discovery 47
Thanks for the nice comment @enforcer48 🤝.
This post was shared and voted inside the discord by the curators team of discovery-it
Join our community! hive-193212
Discovery-it is also a Witness, vote for us here
Delegate to us for passive income. Check our 80% fee-back Program
Your content has been voted as a part of Encouragement program. Keep up the good work!
Use Ecency daily to boost your growth on platform!
Support Ecency
Vote for new Proposal
Delegate HP and earn more
Congratulations @techlhab! You have completed the following achievement on the Hive blockchain and have been rewarded with new badge(s):
Your next target is to reach 3000 upvotes.
You can view your badges on your board and compare yourself to others in the Ranking
If you no longer want to receive notifications, reply to this comment with the word
STOPCheck out the last post from @hivebuzz:
Support the HiveBuzz project. Vote for our proposal!
Great instructions about how to make sensor like this. I see that you put in distance 0.034 it is because of sound speed in air?
!1UP
Thanks @kwskicky for the nice comments 🤝.
By default, the speed of sound is 340m/s (Meters per second).
Our time is in microseconds and to calculate distance,
since Speed = Distance / Time
Therefore, Distance = Speed * Time
i.e, D = s * t
converting Microseconds to seconds = 1x10^6
Distance per second equals,
The distance calculated above is the distance the sound wave takes to hit an object and also the distance it takes to return back.
To get distance it uses to return back or reflect back. we divide the distance by 2.
d = D/2
Which is the exact distance at which the ultrasonic sensor senses the water level.
You have received a 1UP from @kwskicky!
@ctp-curator, @stem-curator, @vyb-curator, @pob-curator, @neoxag-curatorAnd they will bring !PIZZA 🍕
Learn more about our delegation service to earn daily rewards. Join the family on Discord.
Nice tutorial! Keep bringing quality contents to STEMGeeks