Detailed Explanation of How To Make a DIY Digital Voltmeter Using Arduino | Voltage Sensor | OLED Display Screen
The need for accurate measurement and use of digital meters in measuring electrical quantities such as voltage, current, resistance, etc is very essential and crucial, especially in any engineering related field. I'm @techlhab and today I would be sharing with us how to make is DIY Digital Voltage Measuring Meter (Voltmeter) using Arduino Nano microcontroller, Voltage Sensor, and OLED Display Screen as the major hardware components. While the software components are; the Arduino IDE, Embedded C/C++ programming language, and fritzing for circuit design and simulation.
- Arduino Nano
- Voltage Sensor
- OLED Display Screen
- Arduino IDE (Integrated Development Environment)
- Embedded C/C++
- Fritzing
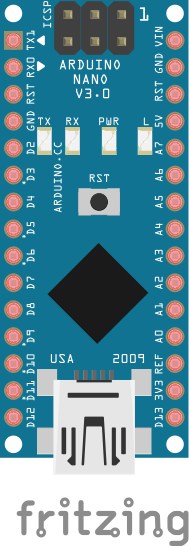
Arduino Nano is a microcontroller which works almost exactly as the Arduino Uno or Arduino Mega but has lesser memory and appears to be very much smaller in size compared to Arduino Uno and Arduino Mega.
It is used in this project as the brain where all other components attached to it receives and send instruction from and to it respectively. And it is where the codes written to control the device is been uploaded to.
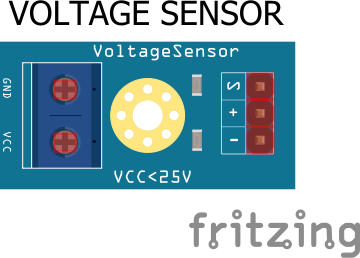
The voltage sensor is a sensor used in this tutorial is a DC voltage sensor, which makes the device to be able to sense and measure DC voltages. Voltage sensors are used widely in measuring and communicating electric voltage in components, equipment, devices, batteries or other sensors.
It has 5 pins which are:
- Vcc
- Gnd
- Signal
- Input Vcc
- Input Gnd
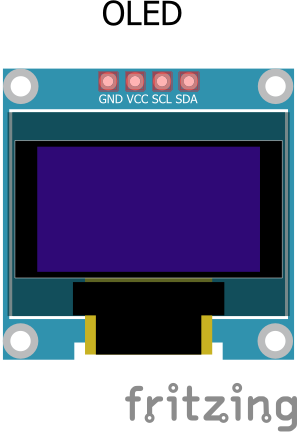
The OLED display screen helps in displaying relevant information to the users for interactions. And also serve a major purpose of displaying voltage measurement values, that is the voltage of the component or material it is been used to measure.
It also has 4 pins which are:
- Vcc
- Gnd
- SDA
- SCL
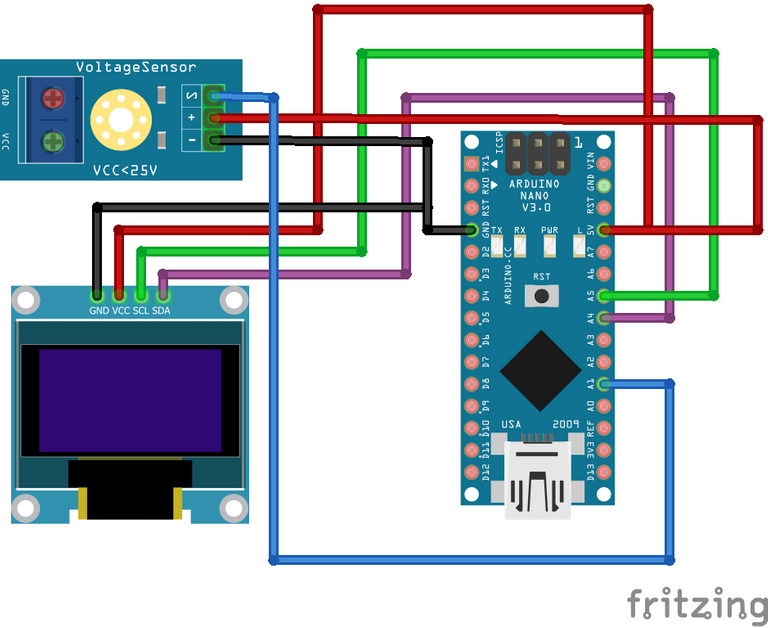
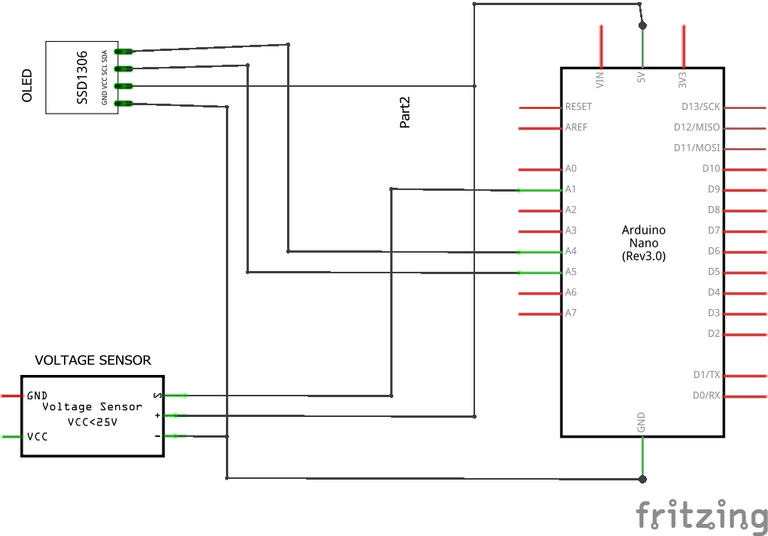
- Conneting the Voltage Sensor to the Arduino Nano
| Arduino Nano | Voltage Sensor | |
|---|---|---|
| 1 | 5v | Vcc |
| 2 | Gnd | Gnd |
| 3 | A1 | Signal |
- Conneting the OLED Display Screen to the Arduino Nano
| Arduino Nano | OLED Display Screen | |
|---|---|---|
| 1 | 5v | Vcc |
| 2 | Gnd | Gnd |
| 3 | A4 | SDA |
| 4 | A5 | SCL |
// Arduino OLED Voltmeter

#include <SPI.h>
#include <Wire.h>
#include <Adafruit_GFX.h>
#include <Adafruit_SSD1306.h>

#define OLED_RESET          A4

#define SSD1306_WHITE 1
#define SSD1306_BLACK 0
#define SSD1306_INVERSE 2

Adafruit_SSD1306 display(OLED_RESET);

int analogInput = A1;  //Sensor Input

void setup() {
  pinMode(analogInput, INPUT);

  Serial.begin(9600);
  Serial.println("VOLTMETER");

  display.begin(SSD1306_SWITCHCAPVCC, 0x3C);

  display.display();
  display.clearDisplay();

  display.display();

  display.drawRect(0, 0,  128 , 12, SSD1306_WHITE);
  display.setTextColor(SSD1306_WHITE, SSD1306_BLACK);
  display.setTextSize(1);
  display.setCursor(18, 3);
  display.println("    VOLTMETER   ");
  display.display();
}

float vout = 0.0;
float vin = 0.0;

float R1 = 30000.0;
float R2 = 7500.0;

int value = 0;

void loop() {

  value = analogRead(analogInput);
  vout = (value * 5.0) / 1024.0;
  vin = vout / (R2 / (R1 + R2));

  Serial.print("INPUT Voltage= ");
  Serial.println(vin, 2);

  display.setTextSize(2);
  display.setCursor(20, 15);
  display.println(vin, 2);
  display.setCursor(80, 15);
  display.println("V");
  display.display();

  delay(1000);


}
Thanks for reading and visiting my blog 🤝. Kindly support this post by reblogging, upvoting, and commenting, it would be highly appreciated.
Images used in this post were all designed by me using frizting, a circuit design and simulation software.
Posted with STEMGeeks
Vaya! esto es un estupendo proyecto para practicar electrónica.
!1UP
Gracias por los buenos comentarios @latino.romano. Estoy agradecido 🤝.
You have received a 1UP from @latino.romano!
@oneup-curator, @stem-curator, @vyb-curator, @pob-curator, @neoxag-curatorAnd they will bring !PIZZA 🍕
Learn more about our delegation service to earn daily rewards. Join the family on Discord.
Woah.
It's amazing to come across a fellow Arduino enthusiast. 🙂
Keep it up.
!PIZZA
Thanks for the nice comment @thecuriousfool 🤝. It's a pleasure coming across you too.
PIZZA Holders sent $PIZZA tips in this post's comments:
@thecuriousfool(2/10) tipped @techlhab (x1)
Join us in Discord!
I can say that I have never thought about making my own voltmeter before.
!discovery 41
This post was shared and voted inside the discord by the curators team of discovery-it
Join our community! hive-193212
Discovery-it is also a Witness, vote for us here
Delegate to us for passive income. Check our 80% fee-back Program