SOLAR POWERED INCUBATOR
INTRODUCTION
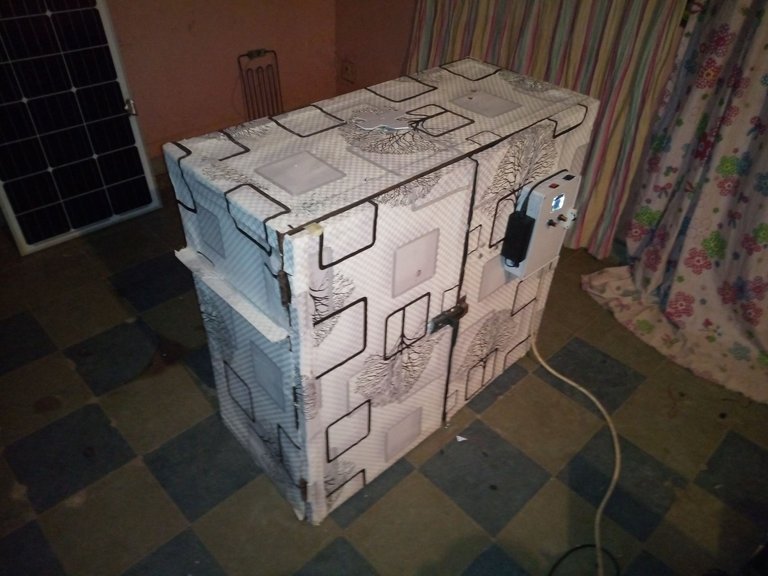
The hatchery is a very important part of the poultry business. the hatchery stands as s point of multiplication. The challenge every hatchery has is power supply as the incubator has to be powered constantly for 21 days for chicken and 28 days for turkey, but due to the epileptic power supply in Nigeria, this becomes difficult. My solution is a low-powered incubator powered by a solar system that makes use of solar to keep the incubator run constantly. the system is controlled by Arduino.
As a hobbyist creating a project for the benefit of humankind is my passion in the last 365 days I have built not less than four hundred (400) projects in which one of them is sixty egg capacity incubator for the hatching of a fertilized egg
SYSTEM FEATURES
📌60 Eggs capacity
📌Low powered
📌Low cost
📌Solar powered
📌Compact and Lightweight
📌Easy control
📌Low maintenance cost
📌Display system
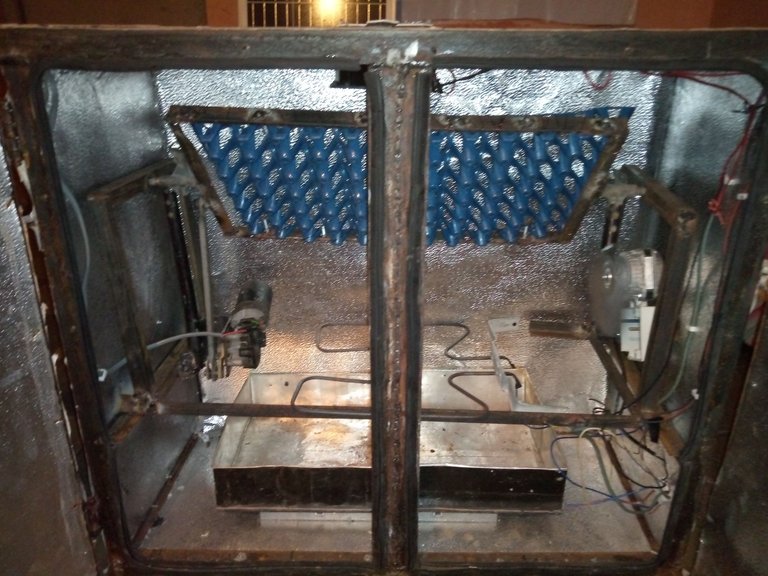
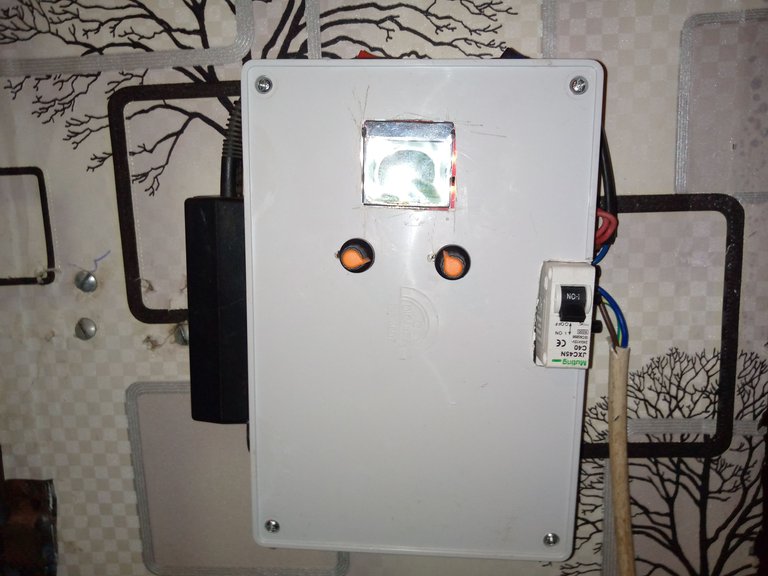
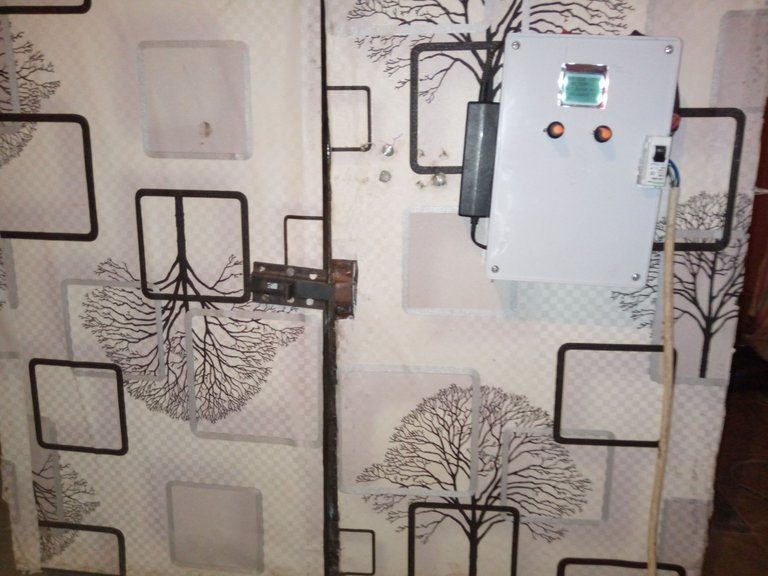
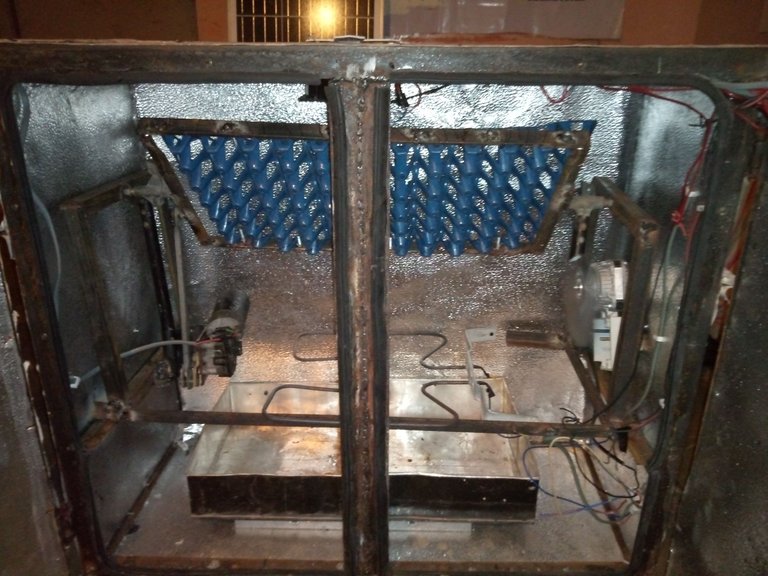
The incubator involves total control of temperature, relative humidity, egg turning, and exposure to light. In this post, I will be explaining how I was able to control all these parameters and also be given the actual dimension of this project here provided you want to fabricate it.
TEMPERATURE CONTROL
The temperature has been defined as the degree of hotness or coldness of the body, With the aid of AM2303 popularly known as DHT22, the temperature of the compartment is measured and the users can set the required temperature based on the given documentation for the egg to be hatched. Arduino compared the set and measured the temperature. If the set temperature is greater than the measured temperature the system will switch ON two 200W in descant bulbs to heat up the chamber and if the measured temperature is greater the bulb is quickly switched OFF and the vent is opened. For the purpose of referencing during incubation required temperature is around 36 degrees Celcius while hatching is around 38-degree celsius for chicken you can consult the internet for any other breed you wish to hatch. The temperature of the internal environment is kept approximately constant with the aid of a distribution fan.
HUMIDITY CONTROL
Controlling humidity is a bit more technical than temperature and what's humidity. Humidity is the amount of water the air hold at a given temperature. This is a very important parameter in building and designing incubators. The relative humidity is the ratio of humidity at a given temperature to the maximum humidity possible at that given temperature, this is just simply saying there is always a corresponding temperature for a given pressure.
With the aid of DHT 22 set humidity and measured humidity are compared if the set humidity is higher than the measured humidity we will ON the humidifier. The humidifier is an aluminum pot filled with water by boiling this water steam will be produced and this will be added to the aid in the compartment. Once you approached the set humidity the humidifier will be off and this will lead to a critical problem as the temperature of the internal environment will rise above the set temperature. At this junction, a vent controlled by a servo will be open and air will be put out of the incubator with the aid of an external fan.
EGG TURNING MECHANISM
The mother hen constantly turns her egg during the incubation process once is six hours this prevent is embryo from sticking to the wall of the shell. With the aid of a slider crank mechanism in a car wiper. I convert this system to move a tray to which the egg crate is been attached to. This egg turning mechanism utilizes an external switch which makes it possible for the users to turn it ON and OFF at their wishes.
COMPONENT USED
📌Arduino Uno
📌Nokia 5110
📌Heaters
📌DC motor
📌DHT 22 ( temperature and humidity sensor)
📌Two Potentiometer
📌Four channel relay module
📌Water can
📌DC Fan
📌Servo motor
📌Two 5A switches
ARDUINO CODE
#include <Adafruit_PWMServoDriver.h>
#include <Servo.h>
Servo myservo;
#include <SPI.h>
#include <Adafruit_GFX.h>
#include <Adafruit_PCD8544.h>
// Software SPI (slower updates, more flexible pin options):
// pin 7 - Serial clock out (SCLK)
// pin 6 - Serial data out (DIN)
// pin 5 - Data/Command select (D/C)
// pin 4 - LCD chip select (CS)
// pin 3 - LCD reset (RST)
Adafruit_PCD8544 display = Adafruit_PCD8544(7, 6, 5, 4, 3);
#include "DHT.h"
#define DHTPIN 2
//#define DHTTYPE DHT11 // DHT 11
#define DHTTYPE DHT22 // DHT 22 (AM2302), AM2321
//#define DHTTYPE DHT21 // DHT 21 (AM2301)
DHT dht(DHTPIN, DHTTYPE);
int setTemp;
int setHumdity;
int HUMIDIFIER=12;
int HEATER=10;
int FAN=11;
void setup() {
// put your setup code here, to run once:
myservo.attach(9);
Serial.begin(9600);
Serial.println("PCD test");
display.begin();
dht.begin();
display.setContrast(70);
pinMode(HEATER, OUTPUT);
pinMode(HUMIDIFIER, OUTPUT);
pinMode(FAN, OUTPUT);
display.display(); // show splashscreen
delay(2000);
display.clearDisplay(); // clears the screen and buffer
display.setTextSize(1);
display.setTextColor(BLACK);
display.setCursor(0,0);
display.println("Solar powered");
display.setTextSize(1);
display.setTextColor(BLACK);
display.setCursor(0,20);
display.print(" INCUBATOR ");
display.display();
delay(5000);
}
void loop() {
int setHumdity= analogRead(A0);
setHumdity=map(setHumdity,1023,0,0,100);
int setTemp= analogRead(A3);
setTemp=map(setTemp,1023,0,0,100);
float h = dht.readHumidity();
// Read temperature as Celsius (the default)
float t = dht.readTemperature();
// put your main code here, to run repeatedly:
display.clearDisplay(); // clears the screen and buffer
display.setTextSize(1);
display.setTextColor(BLACK);
display.setCursor(0,0);
display.println("SET TEMP : ");
display.setCursor(60,0);
display.println(setTemp);
display.println();
display.setTextSize(1);
display.setTextColor(BLACK);
display.setCursor(0,10);
display.println("CURR_TEMP: ");
display.setCursor(60,10);
display.println(t);
display.println();
display.setTextSize(1);
display.setTextColor(BLACK);
display.setCursor(0,20);
display.println("SET_ReHUM : ");
display.setCursor(60,20);
display.println(setHumdity);
display.println();
display.setTextSize(1);
display.setTextColor(BLACK);
display.setCursor(0,30);
display.print("CURR_ReHUM: ");
display.setCursor(65,30);
display.println(h);
display.display();
myservo.write(0);
delay(2000);
if (setTemp>t){
digitalWrite(HEATER, HIGH); // turn the LED off by making the voltage LOW
digitalWrite(FAN, HIGH);
myservo.write(0);
delay(1000);
Serial.println("temp ON: FAN OFF");
}
else if (setHumdity<h && setTemp>t){
digitalWrite(HUMIDIFIER, LOW);   // turn the LED on (HIGH is the voltage level)
                  // wait for a second
digitalWrite(HEATER, LOW); // turn the LED off by making the voltage LOW
digitalWrite(FAN, HIGH);
myservo.write(0);
delay(1000);
Serial.println("temp ON:Hum ON");
}
else if (setHumdity<h && setTemp<t){
digitalWrite(HUMIDIFIER, LOW); // turn the LED on (HIGH is the voltage level)
digitalWrite(HEATER, HIGH); // turn the LED off by making the voltage LOW
digitalWrite(FAN, LOW);
myservo.write(45);
delay(1000);
Serial.println("temp OFF Hum ON");
}
else {
digitalWrite(HUMIDIFIER, HIGH); // turn the LED on (HIGH is the voltage level)
digitalWrite(FAN, LOW);
myservo.write(val);
digitalWrite(HEATER, HIGH); // turn the LED off by making the voltage LOW
delay(1000);
Serial.println("temp OFF Hum OFF");
}
}
Great job!
Btw, there is one thing I would like to see. If you could add a video of how your project works, I or we would definitely love it. 😍
I also see that you use the
delay()function in your main loop. It works on short codes like you presented here but it may become problematic if you add more features in the future. It's very difficult to do multitasking with it. It may not make a big difference in here, but personally for me, it is good to make it a habit. 🙂Thank you for taking the time to share you project with us. 🙂
!1UP !PIZZA
It works fine because I was candling every 7 days to observe the behavior of the chick as the incubation proceeds. I'm still very new here on a very sincere note I don't know how to add a video to a post yet. I have talked to my mentor (@starstrigs01) here if he can guild me through.
It is also possible to write a code without delay using Millis in order to multitask easily on a microcontroller but this project did not require such complexity
No worries, I just made a suggestion to further improve your content. Anyways, you can upload your videos on YouTube or 3Speak and paste the link on your post. I will leave the details to your mentor. 🙂
Yup. I know. I just wanna connect with you that's why I shared my personal preference. And it worked. 🙂
I can't wait to see more projects that you're gonna share in the future.
And thank you for taking your time replying to my comment.
You rock, man.
!PIZZA
PIZZA Holders sent $PIZZA tips in this post's comments:
curation-cartel tipped sisapower (x1)
@thecuriousfool(2/10) tipped @sisapower (x2)
Please vote for pizza.witness!
You have received a 1UP from @thecuriousfool!
@stem-curator, @vyb-curator, @pob-curatorAnd they will bring !PIZZA 🍕
Learn more about our delegation service to earn daily rewards. Join the family on Discord.
Congratulations @sisapower! You have completed the following achievement on the Hive blockchain and have been rewarded with new badge(s):
Your next target is to reach 700 upvotes.
You can view your badges on your board and compare yourself to others in the Ranking
If you no longer want to receive notifications, reply to this comment with the word
STOPSupport the HiveBuzz project. Vote for our proposal!
Congratulations @sisapower. This article is an excellent illustration of how agriculture and technology can work well together. How much do those components cost? Is there a way farmers could buy the finished product? Do you have an estimate on how much additional production farmers can expect with this device? I am Canadian but have a few acquaintances who live in Nigeria, and we correspond on these cryptocurrency platforms. In some cases, these acquaintances have family in farming villages, while others are students in a university.
I am always on the lookout for opportunities they might use.
I have build a prototype the good thing about this product is that is powered via solar since electricity is the Major challenge here. The average cost of the complete unit is around $800 bit can be lowered for Mass production
As you are working on your projects, there is an experimenter "Lasersaber.org" who used to work with crystal/battery power sources and is now focusing on atmospheric electrical motors.
I saw in an earlier post that you hope that the youth in your country can find a better path forward. Learning an alternative way to generate electricity might inspire them. If nothing else, they might learn how to charge their cell phones if the power is out.
Thank you so much I'm indeed grateful for this.