Adding Debian 10 Isos to repositories (sources) / Agregar Isos Debian 10 a repositorios (Linux MX)

Download ISOs / Descargar ISOs
Of course, before starting we must download the Debian ISO images. These contain a great number of packages, libraries and very useful applications. We can acquire them from their official page, and download the version you want (i386, amd64, etc), I will use the amd64 version. There are 3 .iso files in total, with approximately 4GB of information each.
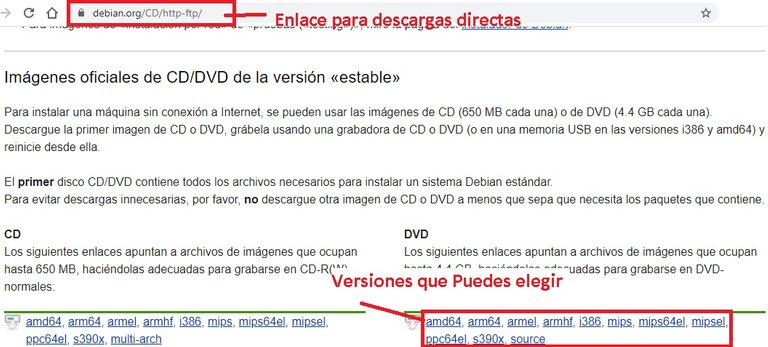
You can make a direct download, selecting the version you want in this link:
Por supuesto, antes de comenzar debemos descargar las imágenes ISO de Debian. Estas contienen un gran número de paquetes, librerías y aplicaciones muy útiles. Podemos adquirirlas desde su página oficial, y descargar la versión que desees (i386, amd64, etc), yo usaré la versión amd64. Son 3 archivos .iso en total, con un aproximado de 4GB de información cada una.
Puedes hacer una descarga directa, seleccionando la versión que desees en este enlace:
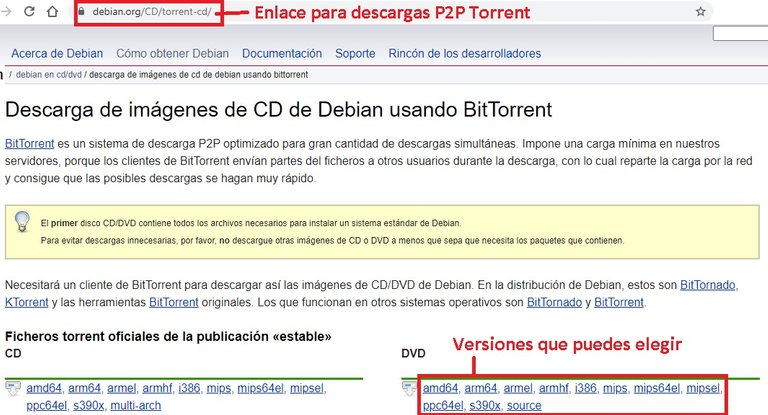
Or you can also make a P2P download through a Torrent file, at this link:
O también puedes hacer una descarga P2P a través de un archivo Torrent, en este enlace:
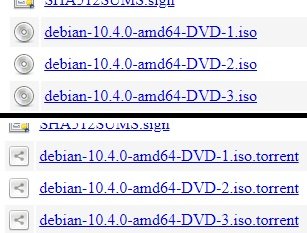
After selecting the version you want, you will see the corresponding files to download, either .iso or .torrent files (depending on the case you choose).
Luego de seleccionar la versión que desees te aparecerán los archivos correspondientes a descargar, sean los archivos .iso ó .torrent (según sea el caso que elijas).

1° Create directories / Crear directorios
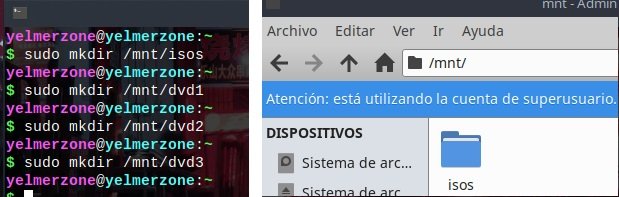
You can place the ISOs in any directory you want, but in my case I will leave them inside the /mnt directory. I will create a folder called isos with the following command:
Puedes ubicar las imágenes ISOs en el directorio que desees, pero en mi caso las dejaré dentro del directorio /mnt. Crearé una carpeta llamada isos con el siguiente comando:
Additionally I will create three folders, where the 3 iso images will be mounted later, for example:
Adicionalmente creare tres carpetas, donde van a ser montadas posteriormente las 3 imágenes iso, por ejemplo:
sudo mkdir /mnt/dvd1
sudo mkdir /mnt/dvd2
sudo mkdir /mnt/dvd3
You can also create it from the file browser (thunar, nautilus, or whatever you use) by opening it as a super user.
También la pudieses crear desde el navegador de archivos (thunar, nautilus, o el que uses) abriéndolo como súper usuario.

2° Copy or Move isos to the folder/ Copiar o Mover isos al directorio
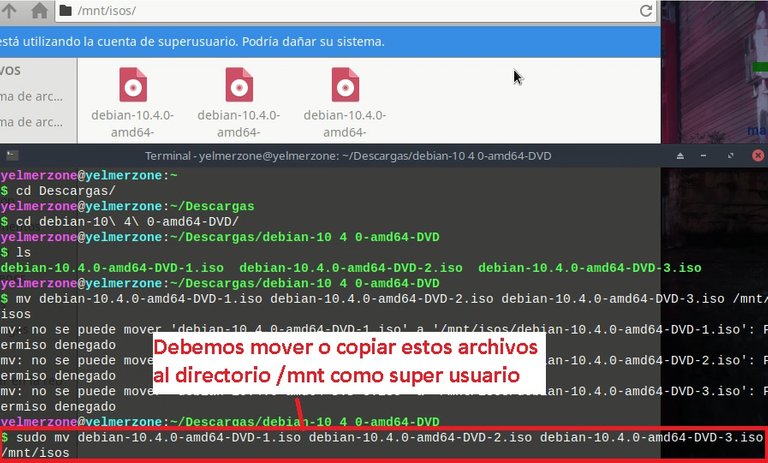
Now we are going to copy (with the cp command) or move (with the mv command) the iso images to the directory we have created. We can do this from the file browser. Or from the console located in the directory where the images are with the command:
Ahora vamos a copiar (con el comando cp) o mover (con el comando mv) las imágenes iso al directorio que hemos creado. Podemos hacerlo desde el navegador de archivos. O desde consola ubicados en el directorio donde están las imágenes con el comando:

3° Edit the "fstab" file / Editar el archivo “fstab”
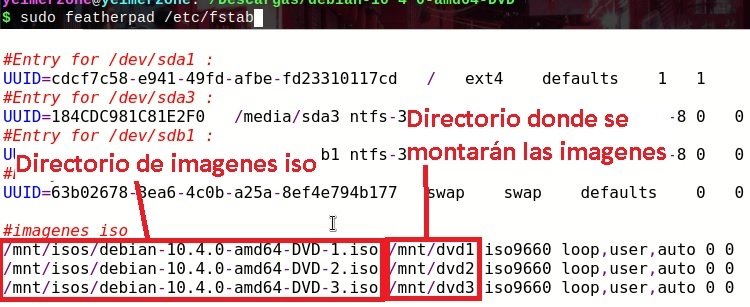
We must open the fstab file with a text editor as super user. We can do it with featherpad, mousepad, gedit, nano, or whatever you want.
In my case I will use featherpad, and I will open the fstab file in the following way:
Debemos abrir el archivo fstab con un editor de texto como super usuario. Podemos hacerlo con featherpad, mousepad, gedit, nano, o el que desees.
En mi caso usaré feathearpad, y abriré el archivo fstab de la siguiente forma:
Then there we will add the following lines, where at the beginning it refers to the location of the image (this must be written correctly), and followed by a space refers to the directory where the image will be mounted iso.
Luego allí vamos a Agregar las siguientes líneas, donde al principio se refiere a la ubicación de la imagen (esta debe estar escrita correctamente), y seguido separado de un espacio se refiere al directorio donde se van a montar la imágen iso.
/mnt/isos/debian-10.4.0-amd64-DVD-1.iso /mnt/dvd1 iso9660 loop,user,auto 0 0
/mnt/isos/debian-10.4.0-amd64-DVD-2.iso /mnt/dvd2 iso9660 loop,user,auto 0 0
/mnt/isos/debian-10.4.0-amd64-DVD-3.iso /mnt/dvd3 iso9660 loop,user,auto 0 0
This will help us to mount the iso images automatically every time you start the system.
Esto nos servirá para montar las imágenes iso automáticamente cada vez que inicie el sistema.

4° Modify Repositories / Modificar Repositorios
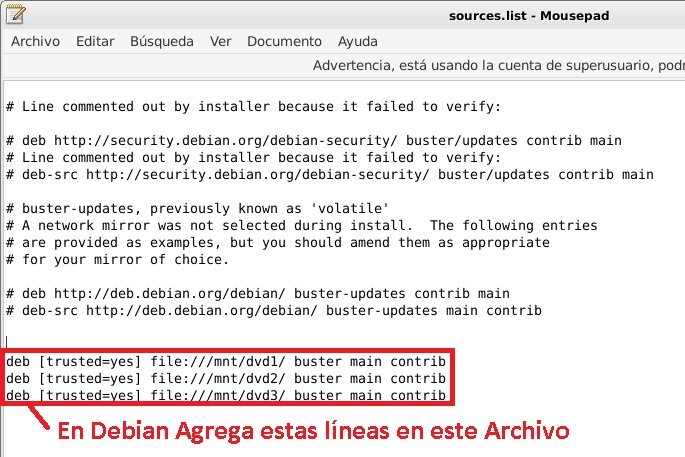
Now let's attach the repositories corresponding to the mounted iso images. In the file located in /etc/apt/sources.list. We open it with a text editor:
Ahora vamos a anexar los repositorios correspondientes a las imágenes iso montadas. En el archivo ubicado en /etc/apt/sources.list. Lo abrimos con un editor de texto:
And we'll attach the following lines:
Y anexaremos las siguientes líneas:
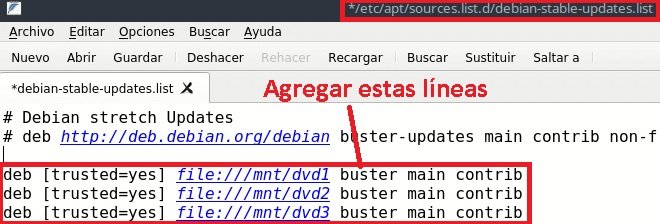
deb [trusted=yes] file:///mnt/dvd1 buster main contrib
deb [trusted=yes] file:///mnt/dvd2 buster main contrib
deb [trusted=yes] file:///mnt/dvd3 buster main contrib
Put a comentary to the web repositories (add # at the beginning of the line), it should look like this (this is the case for Debian, Ubuntu and other derivatives):
Dejando comentado los repositorios web (agregar # al principio de la línea), debería quedar de esta forma (este es el caso para Debian, Ubuntu y otras derivadas):
But in the case of Linux MX, which is the distribution I'm using in this case, the sources.list file, appears this way:
Pero en el caso de Linux MX, que es la distribución que estoy usando en este caso, el archivo sources.list, aparece de esta manera:

Where it indicates that the sources are contained in the directory /etc/apt/sources.list.d; if we enter to this directory we will be able to see several files of sources:
Donde indica que las fuentes están contenidas en el directorio /etc/apt/sources.list.d; sí ingresamos a este directorio lograremos ver varios archivos de fuentes:

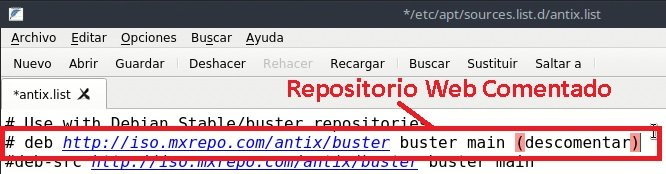
As they are several files ".list", I will comment all the active web fonts in them, for example:
Como son varios archivos “.list”, comentare todas las fuentes web activas en ellos, por ejemplo:
After commenting all of them, we can select any of those files to add the corresponding lines to the mounted iso images. In this case I have selected the file "debian-stable-updates.list", to add the previously commented lines.
Después de comentarlos todos, podemos seleccionar cualquiera de esos archivos para agregar las líneas correspondientes a las imágenes iso montadas. En este caso he seleccionado el archivo “debian-stable-updates.list”, para agregar las líneas comentadas anteriormente.

5° Mount Images / Montar Imágenes
In this step we will simply mount the .iso images with the command:
En este paso simplemente vamos a montar las imágenes .iso con el comando:
This practically means setting up everything.
Prácticamente esto quiere decir, montar todo.


6° Update Repositories and Test / Actualizar Repositorios y realizar pruebas
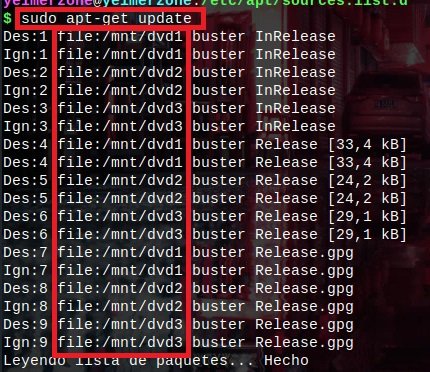
Before using the repository let's update it, with the following command:
Antes de utilizar el repositorio vamos a actualizarlo, con el siguiente comando:
We will be able to see that the repositories have been taken from the directories we have created, where the iso images are mounted.
Podremos notar que los repositorios los ha tomado desde los directorios que hemos creado, donde están montadas las imágenes iso.
Now we can make use of the repositories, such as doing a library update, and applications with the command (I don't recommend using the dist-upgrade command):
Ahora podemos hacer uso de los repositorios, como por ejemplo hacer una actualización de librerías, y aplicaciones con el comando (no recomiendo usar el comando dist-upgrade):
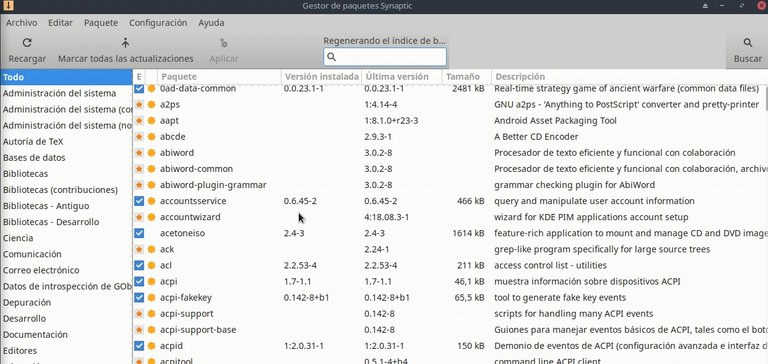
We can also install any application we want. If we open Synaptic, we will be able to see all the packages available to use or install:
También podemos instalar cualquier aplicación que queramos. Sí abrimos Synaptic, lograremos ver toda la paquetería disponible para usar o instalar:

Fonts / Fuentes:
I took the screenshots from Linux MX, and one in Debian.
QuoteLas capturas de pantalla las he tomado desde Linux MX, y una en Debian.
https://geofenix.wordpress.com/2010/10/10/como-anadir-un-cd-o-una-imagen-iso-a-los-repositorios/
https://rinconinformatico.net/usando-una-imagen-iso-como-repositorio-en-debian/
http://armandopaul.blogspot.com/2016/02/agregar-una-imagen-iso-image-al.html

I hope this information will help you a lot.
See you next time.
Espero esta información te sirva de mucha ayuda.
Hasta la próxima.

Congratulations @gerzon! You have completed the following achievement on the Hive blockchain and have been rewarded with new badge(s) :
You can view your badges on your board And compare to others on the Ranking
If you no longer want to receive notifications, reply to this comment with the word
STOPTo support your work, I also upvoted your post!
Do not miss the last post from @hivebuzz:
Support the HiveBuzz project. Vote for our proposal!