Steps to use .env files in your Quasar framework project
Vue has always been very comfortable for me and the Quasar framework is a nice wrapper on top of Vue giving us all the necessary things to build a website from scratch. If you already know Vue, then using Quasar and getting your first project up and running is quite simple. I'm not going to go into details of that in this article. Let's stick to the context of using .env files to store your environment variables in this article.

Before we start with the steps, I would like to brief a little on the need for .env files. Most of the time we will have some need to keep a secret key or an API key in the front end code to use them and pass them to the API to get our data. Hardcoding those key values directly can be one option but it is always good to not hardcode sensitive information for security reasons. If we are working on a firebase project, we don't have to worry about keeping the API keys visible in the front end because that's how they recommend it saying that we don't have any vulnerabilities. There are other ways to handle the security aspects when it comes to firebase especially with the help of database rules.
Even if we are using Vue with firebase, we might have a need to use .env files. Coming back to the topic, .env files help us store the variables and the variables get loaded during the run time. Let's go step by step.
Creating .env files
When I say creating .env files, these are temporary files that stay offline and will not be added to the git. We have to make sure that the .env files are added to the .gitignore file. We can create multiple .env files and have an envparser to choose the specific variables based on the environment we are using. That is what we are going to see in this article. I usually have two .env files.
.env
.env.dev
Some people also use a different structure where they can keep it in the below structure.
.env
.env.dev
.env.staging
.env.prod
The above structure can work well for enterprise products and I believe that it is all how we use them inside our config file.
Creating envparser file
Forget about these names. You can have your own names in these files. The content of the file is what really matters. The content of this envparser is quite simple. I use a library called dotenv that copies the variables from .env files and loads them during runtime. This will keep the variables in a secure place where the web application can access. Below is the code snippet of my envparser.js file.
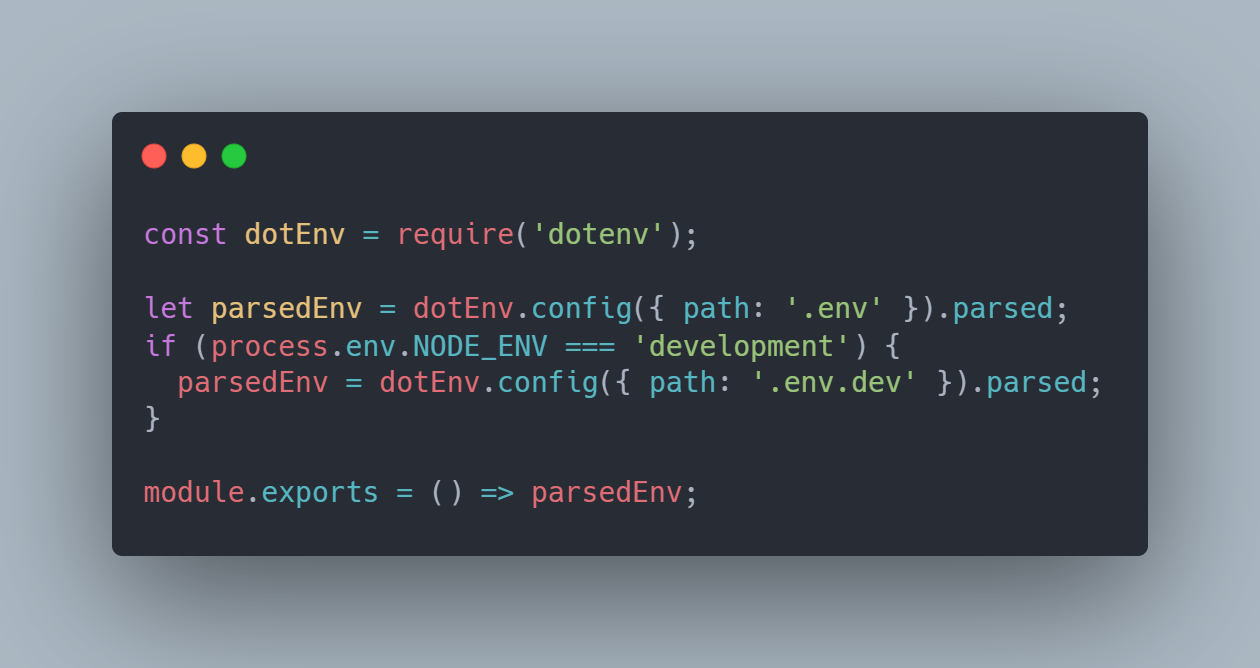
The above code identifies in which mode the execution happens and based on that it uses the respective .env file. In my case, I have used only two .env files. So, I will be keeping my development-related environment variables in .env.dev file and it will get loaded when I do the command quasar dev and the other common .env file will be loaded for other modes.
Configuring Quasar.config file
Next and the final step is to just use the above envparser.js file in the quasar.config file. We have to first require this file and then add it inside the build portion of the module.exports.
const envparser = require('./envparser.js');
env: envparser(),
While trying to do all these things I learned a few things. I noticed that we will not be able to read the env variables directly in the config file. I tried a few steps to get the values and I got undefined status. The above tutorial is not only specific to the quasar framework but even for people using direct Vue, this should be a good solution for them to use the environment variables in different modes.
 |
 |
 |
 |
 |
 |
Posted with STEMGeeks
https://twitter.com/jlufer/status/1423677674501857285
The rewards earned on this comment will go directly to the person sharing the post on Twitter as long as they are registered with @poshtoken. Sign up at https://hiveposh.com.
beyond my understanding level :P XD
Lol it's okay. Some things are always like that. 😀
This is too technical for me and even after trying to understand for some time, I got nothing. Wish someday I can learn more about technology.
Lol yeah sorry about that. Cheers! !
😀🙏