Microsoft Word Macros (Visual Basic) — Formateo de imágenes en Hive || Image formatting on Hive
Anteriormente, compartí algunas publicaciones donde se mostraba como aprovechar Microsoft Word para realizar el formateo de nuestros textos, dándoles determinado aspecto visual (letra negrita, cursiva, roja, tachada, texto centrado, justificado, etc) utilizando macros de Word.
Previously, I shared some publications where it was shown how to take advantage of Microsoft Word to format our texts, giving them a certain visual aspect (bold, italic, red, crossed out, centered text, justified, etc) using Word macros.
Microsoft Word es una herramienta bastante sofisticada, que podemos aprovechar si deseamos realizar el formateo de nuestro post de manera más rápida o efectiva. En esta ocasión, veremos cómo introducir imágenes en nuestro post de manera satisfactoria. No se trata de introducir las imágenes en sí, sino de introducir una estructura de código en la cual la imagen está centrada y también los subtítulos debajo de ella, con todos los detalles que queramos agregar.
El objetivo es introducir lo siguiente mediante un solo botón:
El objetivo es introducir lo siguiente mediante un solo botón:
Microsoft Word is a pretty sophisticated tool, which we can take advantage of if we want to format our post more quickly or effectively. This time, we will see how to insert images in our post in a satisfactory way. It is not a matter of introducing the images themselves, but of introducing a code structure in which the image is centered and also the subtitles below it, with all the details we want to add.
The goal is to enter the following using a single button:
The goal is to enter the following using a single button:
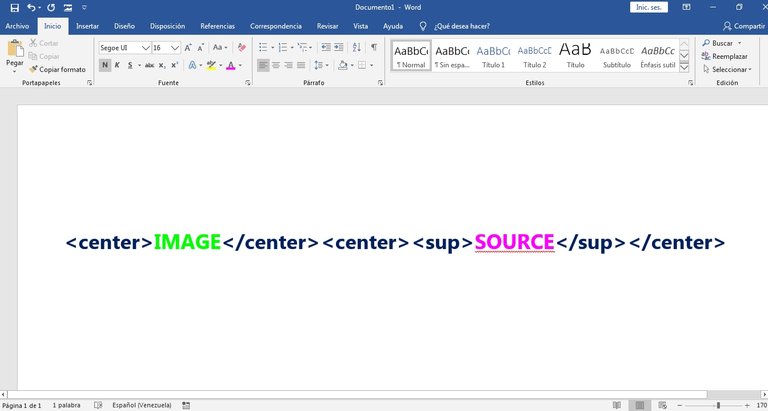
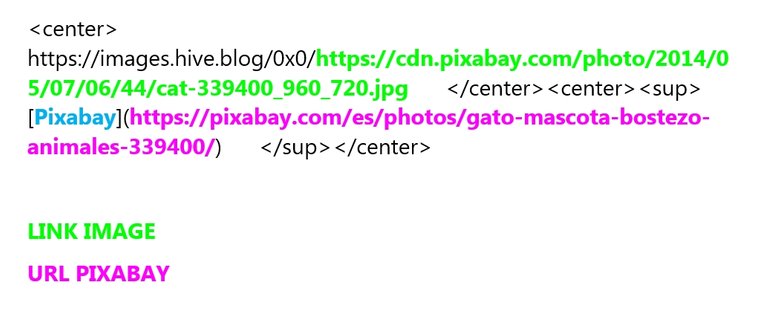
<center> </center><center><sup> []() </sup></center>
El primer espacio es donde podemos introducir el enlace de la imagen, ya sea de un sitio web o la que hayamos subido mediante el editor. El segundo espacio, sirve para colocar la fuente o una descripción de la imagen, en caso de requerirse. Podemos notar que he añadido el código
Podemos realizar distintas variaciones de este código, dependiendo de lo que queramos. Si queremos que los subtítulos de la imagen sean con letra cursiva, podemos agregar lo siguiente
< sup >, esto hará que las palabras de la descri´pción de la imagen se vean un poco mas pequeñas que el texto normal.Podemos realizar distintas variaciones de este código, dependiendo de lo que queramos. Si queremos que los subtítulos de la imagen sean con letra cursiva, podemos agregar lo siguiente
< i >:The first space is where we can enter the image link, either from a website or the one we have uploaded via the editor. The second space, serves to place the source or a description of the image, if required. We can notice that I have added the code
We can make different variations of this code, depending on what we want. If we want the captions in the image to be cursive, we can add the following
< sup >, this will make the words of the image description look a little smaller than the normal text.We can make different variations of this code, depending on what we want. If we want the captions in the image to be cursive, we can add the following
< i >:<center> </center><center><sup><i> []() </i></sup></center>
Algo que puede ser de mucha utilidad, es la posibilidad de controlar el tamaño de la imagen. Eso se puede lograr agregando lo siguiente justo antes del enlace de la imagen:
https://images.hive.blog/0x0/. Podemos modificar el 0x0 para así obtener diferentes tamaños de la imagen en nuestro post: Something that can be very useful is the possibility to control the size of the image. This can be achieved by adding the following just before the image link:
https://images.hive.blog/0x0/. We can modify the 0x0 to obtain different image sizes in our post:<center> https://images.hive.blog/0x0/ </center><center><sup> []() </sup></center>
Ahora, vamos a introducir esto en Microsoft Word mediante una macro. Le damos clic en el botón abajo a la izquierda para dar paso a la grabación de macros. Vamos a escribir cualquier cosa, para luego introducir en Visual Basic lo descrito arriba.
Now, let's enter this in Microsoft Word using a macro. We click on the button at the bottom left to make way for the recording of macros. We will write anything, and then enter in Visual Basic what is described above.
Ahora nos dirigimos a Visual Basic dando clic simultáneamente a las teclas ALT+F11. Vamos a buscar la macro creada (macro1), la cual debe ser la única si no tienes más macros guardadas. Esta macro describe el proceso para introducir la palabra "code" en el documento:
Now we go to Visual Basic by clicking simultaneously on the keys ALT+F11. We are going to look for the created macro (macro1), which must be the only one if you have no more macros saved. This macro describes the process to enter the word "code" in the document:
Sub Macro1()
'
' Macro1 Macro
'
'
    Selection.TypeText Text:="code"
End Sub
Vamos a sustituir la palabra "code" por el código descrito más arriba:
We will replace the word "code" with the code described above:

De esta manera obtenemos el siguiente código (eliminando las partes innecesarias):
In this way we obtain the following code (eliminating unnecessary parts):
Sub Macro1()

Selection.TypeText Text:="<center>   https://images.hive.blog/0x0/      </center><center><sup>      []()      </sup></center>"

End Sub
Solamente nos queda agregar esto a un botón al que podamos hacer clic en la barra de herramientas de acceso rápido. Esto se realiza de la siguiente forma:
All that remains is to add this to a button that we can click on the quick access toolbar. This is done in the following way:
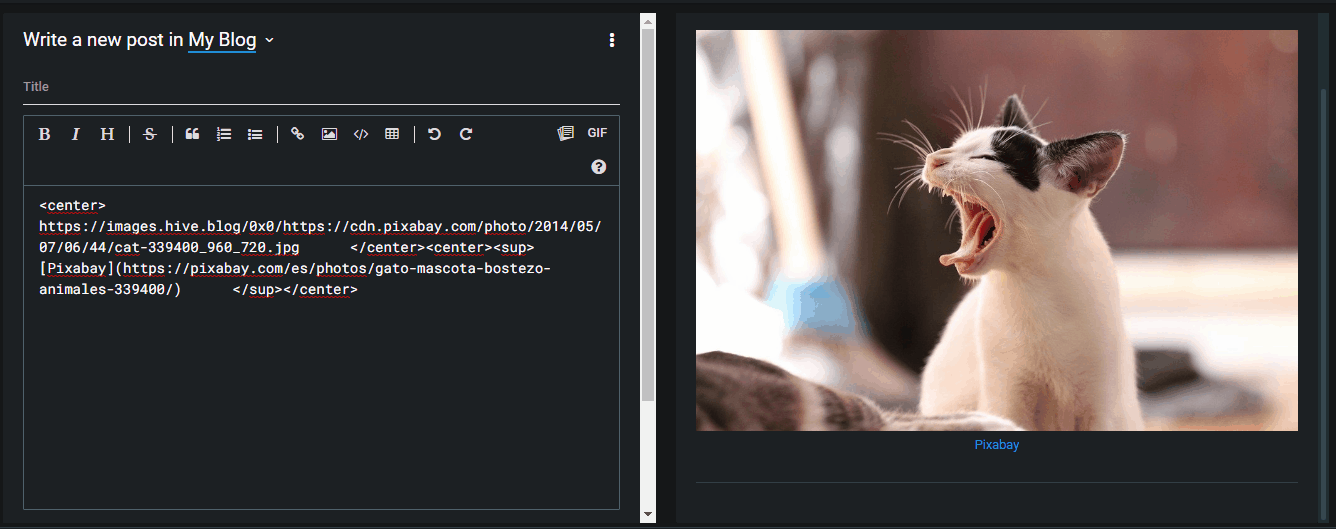
Ahora vamos a realizar una prueba mediante una imagen de Pixabay.
Now let's perform a test using a Pixabay image.
Este proceso se hace colocando los enlaces correspondientes en su lugar, como se señala en la siguiente imagen:
This process is done by putting the corresponding links in place, as shown in the image below:
Podemos cambiar el tamaño de la imagen al cambiar las dimensión horizontal de la misma. En la siguiente animación, se cambia el tamaño por defecto de la imagen (0x0) por un tamaño de (300x0), es decir, se reduce la dimensión en horizontal.
We can change the size of the image by changing the horizontal dimension of the image. In the following animation, the default image size (0x0) is changed to a size of (300x0), that is, the horizontal dimension is reduced.
De esta manera se introduce la estructura de código para centrar una imagen y su subtítulo mediante las macros de Visual Basic en Microsfot Word. Gracias por su atención, espero que te sea útil.
In this way, the code structure for centering an image and its subtitle is introduced using the Visual Basic macros in Microsfot Word. Thank you for your attention, I hope it is useful for you.
También te recomiendo visitar/ I also recommend you to visit:
Powerful tip: automatic formatting to image credits (Wikimedia Commons) (Formateo automático de los créditos de las imágenes de Wikimedia Commons).
Translated to English languaje with the help of DeepL.com
| ¡Gracias por visitar!..¡Thanks for visiting!  |
Posted with STEMGeeks
0
0
0.000
¡Felicidades! Esta publicación obtuvo upvote y fue compartido por @la-colmena, un proyecto de Curación Manual para la comunidad hispana de Hive que cuenta con el respaldo de @curie.
Si te gusta el trabajo que hacemos, te invitamos a darle tu voto a este comentario y a votar como testigo por Curie.
Si quieres saber más sobre nuestro proyecto, acompáñanos en Discord: La Colmena.
Muchas gracias al equipo de @la-colmena saludos!
I used macros only in excel but never with MS word. I will try to use it with the word as well and this post is helpful. nice post @acont
Yeah, Word macros are not often used. Thank you for your comment.