Android App Development | Lecture#31 | Hive Learners
𝓖𝓻𝓮𝓮𝓽𝓲𝓷𝓰𝓼
Hello sear Hive Learners, Welcome to the 31st lecture on the Android App Development series. We are moving toward professional app development. Slow and steady win the race. We are covering modules in each lecture. In the final stage, we will use all the code in a project to make it useful. Maybe we will start a school/college/university management system soon. Today we will learn how to create a custom dialog. In the last lecture, we learn to use the built-in dialog option that is provided by a built-in library.
GitHub Link
Use this GitHub project to clone into your directory. The following lecture will constantly update it so you will never miss the latest code. Happy Coding!.
What Should I Learn
- How to show a custom dialog
- How to set Custom style
- How to implement the listeners
Assignment
- Show a custom dialog
Procedure
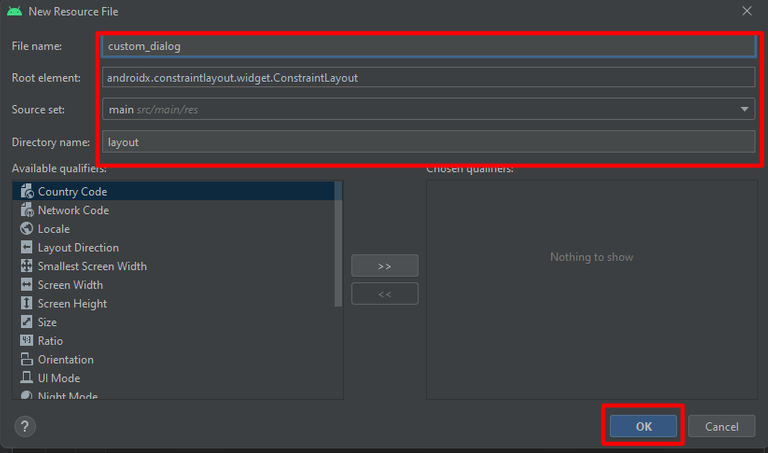
To show a custom dialog we need a custom design. So we need to create e a layout file and name it custom_dialog. You can change the name but it will be good if you follow the file names that we are using in our lectures.

Set the file name and click on ok. Make sure your settings are the same as shown here.
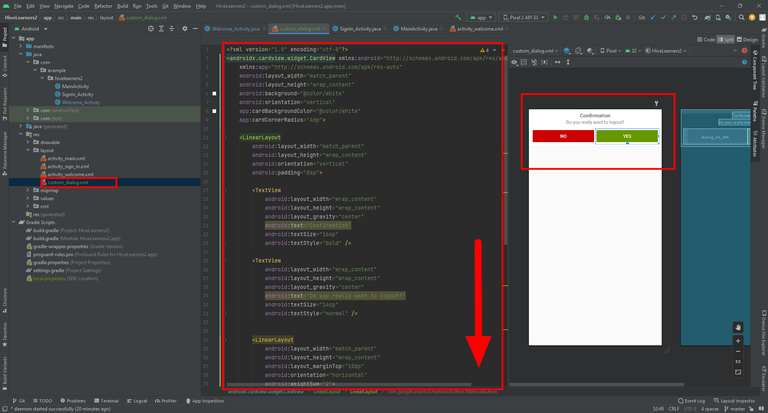
Now Click on the split button a get the code activity with the live design as shown in this mockup.

I create this custom design. Also give a unique id to the Yes, No Buttons. I set dialog_no_btn, dialog_yes_btn. Here is the full code.
<?xml version="1.0" encoding="utf-8"?>
<androidx.cardview.widget.CardView xmlns:android="http://schemas.android.com/apk/res/android"
    xmlns:app="http://schemas.android.com/apk/res-auto"
    android:layout_width="match_parent"
    android:layout_height="wrap_content"
    android:background="@color/white"
    android:orientation="vertical"
    app:cardBackgroundColor="@color/white"
    app:cardCornerRadius="4dp">

    <LinearLayout
        android:layout_width="match_parent"
        android:layout_height="wrap_content"
        android:orientation="vertical"
        android:padding="8sp">

        <TextView
            android:layout_width="wrap_content"
            android:layout_height="wrap_content"
            android:layout_gravity="center"
            android:text="Confirmation"
            android:textSize="16sp"
            android:textStyle="bold" />

        <TextView
            android:layout_width="wrap_content"
            android:layout_height="wrap_content"
            android:layout_gravity="center"
            android:text="Do you really want to logout?"
            android:textSize="14sp"
            android:textStyle="normal" />


        <LinearLayout
            android:layout_width="match_parent"
            android:layout_height="wrap_content"
            android:layout_marginTop="10dp"
            android:orientation="horizontal"
            android:weightSum="2">

            <com.google.android.material.button.MaterialButton
                android:id="@+id/dialog_no_btn"

                android:layout_width="0dp"
                android:layout_height="wrap_content"
                android:layout_weight="1"
                android:backgroundTint="@android:color/holo_red_dark"
                android:text="NO"
                android:textColor="@color/white" />

            <com.google.android.material.button.MaterialButton
                android:id="@+id/dialog_yes_btn"
                android:layout_width="0dp"
                android:layout_height="wrap_content"
                android:layout_weight="1"
                android:backgroundTint="@android:color/holo_green_dark"
                android:text="YES"
                android:textColor="@color/white" />

        </LinearLayout>
    </LinearLayout>
</androidx.cardview.widget.CardView>
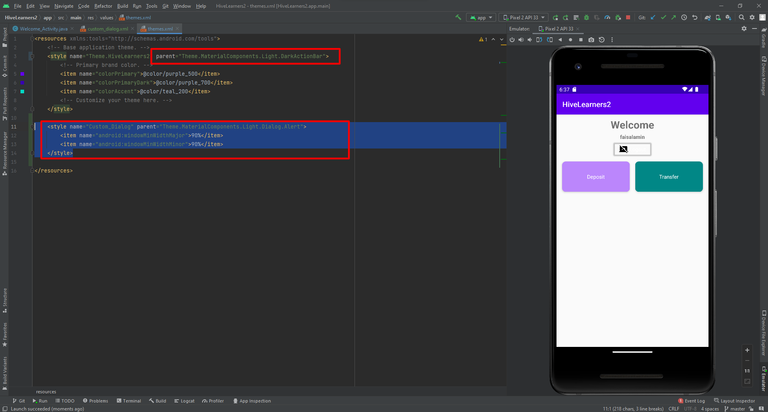
Now we need to add the style code in the following file.
res>values>themes>theme.xml, Paste this code under the first style tag as shown here. Also, change the parent in the first style tag.
    <style name="Custom_Dialog" parent="Theme.MaterialComponents.Light.Dialog.Alert">
        <item name="android:windowMinWidthMajor">90%</item>
        <item name="android:windowMinWidthMinor">90%</item>
    </style>
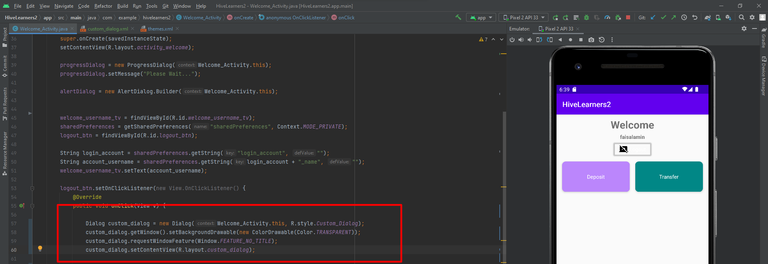
Now we need to write the code in the Welcome Activity on the logout button click listener.
Dialog custom_dialog = new Dialog(Welcome_Activity.this, R.style.Custom_Dialog);
custom_dialog.getWindow().setBackgroundDrawable(new ColorDrawable(Color.TRANSPARENT));
custom_dialog.requestWindowFeature(Window.FEATURE_NO_TITLE);
custom_dialog.setContentView(R.layout.custom_dialog);
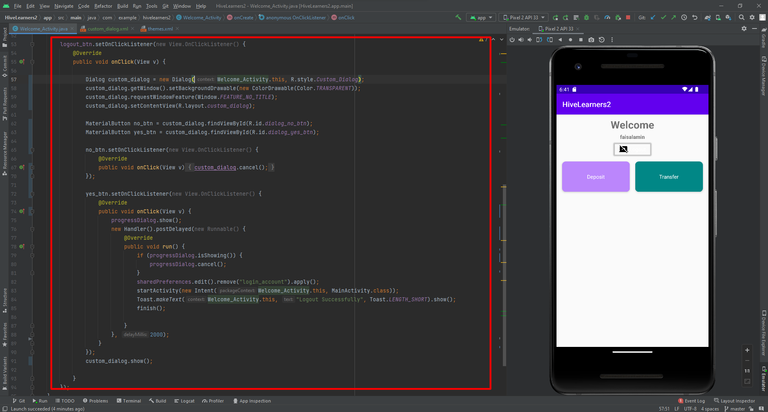
Now we will add the buttons here and implement the listener and show() function. Move the logout code in the custom_dialog YES button and also moves the no button code in the NO button of custom_dialog. Remove the AlertDialog code and use the custom_dialog.
 logout_btn.setOnClickListener(new View.OnClickListener() {
            @Override
            public void onClick(View v) {

                Dialog custom_dialog = new Dialog(Welcome_Activity.this, R.style.Custom_Dialog);
                custom_dialog.getWindow().setBackgroundDrawable(new ColorDrawable(Color.TRANSPARENT));
                custom_dialog.requestWindowFeature(Window.FEATURE_NO_TITLE);
                custom_dialog.setContentView(R.layout.custom_dialog);

                MaterialButton no_btn = custom_dialog.findViewById(R.id.dialog_no_btn);
                MaterialButton yes_btn = custom_dialog.findViewById(R.id.dialog_yes_btn);

                no_btn.setOnClickListener(new View.OnClickListener() {
                    @Override
                    public void onClick(View v) {
                        custom_dialog.cancel();
                    }
                });

                yes_btn.setOnClickListener(new View.OnClickListener() {
                    @Override
                    public void onClick(View v) {
                        progressDialog.show();
                        new Handler().postDelayed(new Runnable() {
                            @Override
                            public void run() {
                                if (progressDialog.isShowing()) {
                                    progressDialog.cancel();
                                }
                                sharedPreferences.edit().remove("login_account").apply();
                                startActivity(new Intent(Welcome_Activity.this, MainActivity.class));
                                Toast.makeText(Welcome_Activity.this, "Logout Successfully", Toast.LENGTH_SHORT).show();
                                finish();

                            }
                        }, 2000);
                    }
                });
                custom_dialog.show();

            }
        });
Now run the app and check if it is working or not.


Thank You
Thanks for another step
!1UP
You have received a 1UP from @gwajnberg!
@stem-curator
And they will bring !PIZZA 🍕.
Learn more about our delegation service to earn daily rewards. Join the Cartel on Discord.
Thanks for your contribution to the STEMsocial community. Feel free to join us on discord to get to know the rest of us!
Please consider delegating to the @stemsocial account (85% of the curation rewards are returned).
You may also include @stemsocial as a beneficiary of the rewards of this post to get a stronger support.