IOT And Robotics: Lecture 2 configure Oled Display with ESP32
In my previous post, I described the process for connecting an esp 32 to a character LCD. This lecture will detail the process of interfacing OLED screens with ESP 32. Simple character LCDs restrict us to showing simple text. Pictures will not show up on them. An OLED screen is the answer to this problem. These OLED LCDs are more cost-effective and consume less energy.
About OLED Display
The OLED stands for organic light-emitting diode. as the name the image that is shown on an OLED screen is created by toggling the power on and off of millions of very small LEDs, which together comprise the display's individual pixels. Below picture is a comparison of OLED and LCD display structure
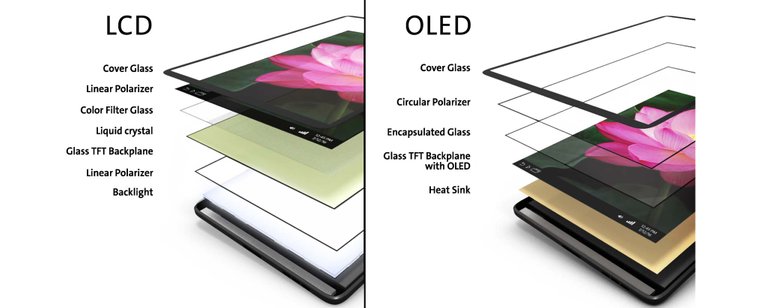
Image Sources
before practical this, Make sure you have these pre-Require things
- Basic C/C++ programming Knowledge
- Basic Electronics Knowledge
- Arduino Nightly IDE usage
- Laptop and PC
Components
| Component | Qty | Purchase Link |
|---|---|---|
| ESP32 Microcontroller | 1 | Aliexpress |
| OLED LCD | 1 | Aliexpress |
| Jumper Wire | 4 | Aliexpress |
| USB cable | 1 |
About ESP32
ESP32 is a low-cost, low-power system-on-a-chip microcontroller family featuring built-in Wi-Fi Bluetooth. it's a very popular MCU nowadays. ESP32 has 512KB ram and a dual-core processor. with all these features its cost is only about 4 to 5$. this microcontroller is very flexible and has the ability to communicate with almost all sensor devices. here is the pinout of this microcontroller
From previous Post Link
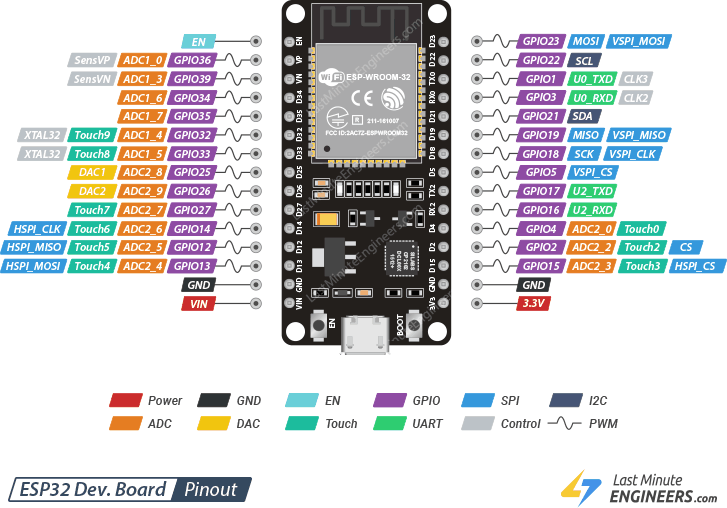
Image Sources
we will talk later about esp32.
Working Steps
we are going to connect our LCD to ESP32 with the IIC protocol
IIC Protocol
I2C stands for the inter-integrated controller. This is a serial communication protocol that allows low-speed devices to be connected. It is a master-slave communication method in which several slaves may be connected and controlled by a single master. Each slave device has its own address in this case.
From previous Post Link
so let's start today's Work.
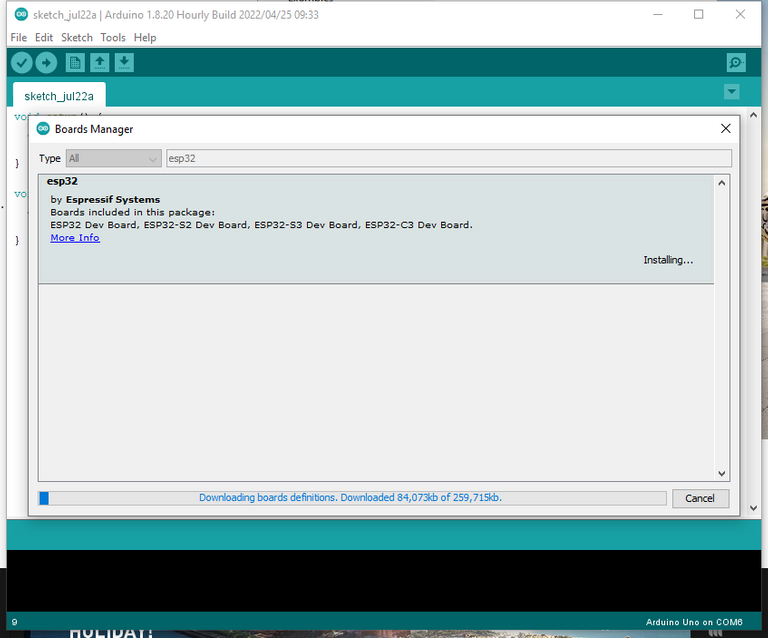
Initially, we have to install Arduino nightly IDE for programming below I mentioned the link to download Arduino nightly
Arduino IDE download
after downloading open the Arduino nightly and install ESP32 Board
here is an easy tutorial link for board installation
After installing Board we are ready to program our microcontroller. connect microcontroller with PC and make sure driver is installed from device manager. if driver is missing you can download it from here
download Driver
After checking the driver make sure you are working on the same COM Port.
Here is our code
#include "Wire. h"
#include "Adafruit_GFX.h"
#include "Adafruit_SSD1306.h"
Adafruit_SSD1306 OLED(128, 64, &Wire, -1);
const unsigned char hive_icon [] PROGMEM = {0xff, 0xff, 0xff, 0xff, 0xff, 0xff, 0xff, 0xff, 0xff, 0xff, 0xff, 0xff, 0xff, 0xff, 0xff, 0xff,
0xff, 0xff, 0xff, 0xff, 0xff, 0xff, 0xff, 0xff, 0xff, 0xff, 0xff, 0xff, 0xff, 0xff, 0xff, 0xff,
0xff, 0xff, 0xff, 0xff, 0xff, 0xff, 0xff, 0xff, 0xff, 0xff, 0xff, 0xff, 0xff, 0xff, 0xff, 0xff,
0xff, 0xff, 0xff, 0xff, 0xff, 0xff, 0xff, 0xff, 0xff, 0xff, 0xff, 0xff, 0xff, 0xff, 0xff, 0xff,
0xff, 0xff, 0xff, 0xff, 0xff, 0xff, 0xff, 0xff, 0xff, 0xff, 0xff, 0xff, 0xff, 0xff, 0xff, 0xff,
0xff, 0xff, 0x7f, 0x80, 0x7f, 0x00, 0xff, 0xff, 0xff, 0xff, 0xff, 0xff, 0xff, 0xff, 0xff, 0xff,
0xff, 0xff, 0x7f, 0x80, 0x7f, 0x80, 0x7f, 0xff, 0xff, 0xff, 0xff, 0xff, 0xff, 0xff, 0xff, 0xff,
0xff, 0xfe, 0x3f, 0xc0, 0x3f, 0xc0, 0x7f, 0xff, 0xff, 0xff, 0xff, 0xff, 0xff, 0xff, 0xff, 0xff,
0xff, 0xfe, 0x3f, 0xe0, 0x3f, 0xc0, 0x3f, 0xff, 0xff, 0xff, 0xff, 0xff, 0xff, 0xff, 0xff, 0xff,
0xff, 0xfc, 0x1f, 0xe0, 0x1f, 0xe0, 0x1f, 0xff, 0xff, 0xff, 0xff, 0xff, 0xff, 0xff, 0xff, 0xff,
0xff, 0xf8, 0x1f, 0xf0, 0x0f, 0xe0, 0x1f, 0xff, 0xff, 0xff, 0xff, 0xff, 0xff, 0xff, 0xff, 0xff,
0xff, 0xf8, 0x0f, 0xf0, 0x0f, 0xf0, 0x0f, 0xff, 0xff, 0xff, 0xff, 0xff, 0xff, 0xff, 0xff, 0xff,
0xff, 0xf0, 0x07, 0xf8, 0x07, 0xf8, 0x0f, 0xff, 0xff, 0xff, 0xff, 0xff, 0xff, 0xff, 0xff, 0xff,
0xff, 0xe0, 0x07, 0xf8, 0x07, 0xf8, 0x07, 0xff, 0xff, 0xff, 0xff, 0xff, 0xff, 0xff, 0xff, 0xff,
0xff, 0xe0, 0x03, 0xfc, 0x03, 0xfc, 0x07, 0xff, 0xff, 0xff, 0xff, 0xff, 0xff, 0xff, 0xff, 0xff,
0xff, 0xc0, 0x03, 0xfe, 0x03, 0xfc, 0x03, 0xff, 0xff, 0xff, 0xff, 0xff, 0xff, 0xff, 0xff, 0xff,
0xff, 0xc0, 0x01, 0xfe, 0x01, 0xfe, 0x01, 0xff, 0xff, 0xff, 0xff, 0xff, 0xff, 0xff, 0xff, 0xff,
0xff, 0x80, 0x00, 0xff, 0x00, 0xfe, 0x01, 0xff, 0xff, 0xff, 0xff, 0xff, 0xff, 0xff, 0xff, 0xff,
0xff, 0x80, 0x00, 0xff, 0x00, 0xff, 0x00, 0xff, 0xff, 0xff, 0xff, 0xff, 0xff, 0xff, 0xff, 0xff,
0xff, 0x00, 0x00, 0x7f, 0x80, 0x7f, 0x80, 0xff, 0xff, 0xff, 0xff, 0xff, 0xff, 0xff, 0xff, 0xff,
0xff, 0x00, 0x00, 0x7f, 0xc0, 0x7f, 0x80, 0x7f, 0xff, 0xff, 0xff, 0xff, 0xff, 0xff, 0xff, 0xff,
0xfe, 0x00, 0x00, 0x3f, 0xc0, 0x3f, 0xc0, 0x3f, 0xff, 0xff, 0xff, 0xff, 0xff, 0xff, 0xff, 0xff,
0xfc, 0x00, 0x00, 0x3f, 0xe0, 0x3f, 0xc0, 0x3f, 0xff, 0xff, 0xff, 0xff, 0xff, 0xff, 0xff, 0xff,
0xfc, 0x00, 0x00, 0x1f, 0xe0, 0x1f, 0xe0, 0x1f, 0xff, 0xff, 0xff, 0xff, 0xff, 0xff, 0xff, 0xff,
0xf8, 0x00, 0x00, 0x0f, 0xf0, 0x1f, 0xe0, 0x1f, 0xff, 0xff, 0xff, 0xff, 0xff, 0xff, 0xff, 0xff,
0xf8, 0x00, 0x00, 0x0f, 0xf0, 0x0f, 0xf0, 0x0f, 0xff, 0xff, 0xff, 0xff, 0xff, 0xff, 0xff, 0xff,
0xf0, 0x00, 0x00, 0x07, 0xf8, 0x07, 0xf8, 0x0f, 0xff, 0xff, 0xff, 0xff, 0xff, 0xff, 0xff, 0xff,
0xf0, 0x00, 0x00, 0x03, 0xfc, 0x07, 0xf8, 0x07, 0xff, 0xff, 0xff, 0xff, 0xff, 0xff, 0xff, 0xff,
0xe0, 0x00, 0x00, 0x03, 0xff, 0xff, 0xfc, 0x07, 0xff, 0xff, 0xff, 0xff, 0xff, 0xff, 0xff, 0xff,
0xc0, 0x00, 0x00, 0x01, 0xff, 0xff, 0xfc, 0x03, 0xff, 0xff, 0xff, 0xff, 0xff, 0xff, 0xff, 0xff,
0xc0, 0x00, 0x00, 0x01, 0xff, 0xff, 0xfe, 0x01, 0xff, 0xff, 0xff, 0xff, 0xff, 0xff, 0xff, 0xff,
0x80, 0x00, 0x00, 0x00, 0xff, 0xff, 0xff, 0x01, 0xff, 0xff, 0xff, 0xff, 0xff, 0xff, 0xff, 0xff,
0x80, 0x00, 0x00, 0x00, 0xff, 0xff, 0xfe, 0x01, 0xff, 0xff, 0xff, 0xff, 0xff, 0xff, 0xff, 0xff,
0xc0, 0x00, 0x00, 0x01, 0xff, 0xff, 0xfe, 0x03, 0xff, 0xff, 0xff, 0xff, 0xff, 0xff, 0xff, 0xff,
0xc0, 0x00, 0x00, 0x01, 0xff, 0xff, 0xfc, 0x03, 0xff, 0xff, 0xff, 0xff, 0xff, 0xff, 0xff, 0xff,
0xe0, 0x00, 0x00, 0x03, 0xff, 0xff, 0xfc, 0x07, 0xff, 0xff, 0xff, 0xff, 0xff, 0xff, 0xff, 0xff,
0xf0, 0x00, 0x00, 0x07, 0xf8, 0x07, 0xf8, 0x07, 0xff, 0xff, 0xff, 0xff, 0xff, 0xff, 0xff, 0xff,
0xf0, 0x00, 0x00, 0x07, 0xf8, 0x0f, 0xf0, 0x0f, 0xff, 0xff, 0xff, 0xff, 0xff, 0xff, 0xff, 0xff,
0xf8, 0x00, 0x00, 0x0f, 0xf0, 0x0f, 0xf0, 0x0f, 0xff, 0xff, 0xff, 0xff, 0xff, 0xff, 0xff, 0xff,
0xf8, 0x00, 0x00, 0x0f, 0xf0, 0x1f, 0xe0, 0x1f, 0xff, 0xff, 0xff, 0xff, 0xff, 0xff, 0xff, 0xff,
0xfc, 0x00, 0x00, 0x1f, 0xe0, 0x1f, 0xe0, 0x1f, 0xff, 0xff, 0xff, 0xff, 0xff, 0xff, 0xff, 0xff,
0xfc, 0x00, 0x00, 0x3f, 0xc0, 0x3f, 0xc0, 0x3f, 0xff, 0xff, 0xff, 0xff, 0xff, 0xff, 0xff, 0xff,
0xfe, 0x00, 0x00, 0x3f, 0xc0, 0x3f, 0xc0, 0x7f, 0xff, 0xff, 0xff, 0xff, 0xff, 0xff, 0xff, 0xff,
0xff, 0x00, 0x00, 0x7f, 0x80, 0x7f, 0x80, 0x7f, 0xff, 0xff, 0xff, 0xff, 0xff, 0xff, 0xff, 0xff,
0xff, 0x00, 0x00, 0x7f, 0x80, 0x7f, 0x00, 0xff, 0xff, 0xff, 0xff, 0xff, 0xff, 0xff, 0xff, 0xff,
0xff, 0x80, 0x00, 0xff, 0x00, 0xff, 0x01, 0xff, 0xff, 0xff, 0xff, 0xff, 0xff, 0xff, 0xff, 0xff,
0xff, 0x80, 0x00, 0xff, 0x01, 0xfe, 0x01, 0xff, 0xff, 0xff, 0xff, 0xff, 0xff, 0xff, 0xff, 0xff,
0xff, 0xc0, 0x01, 0xfe, 0x01, 0xfe, 0x03, 0xff, 0xff, 0xff, 0xff, 0xff, 0xff, 0xff, 0xff, 0xff,
0xff, 0xe0, 0x01, 0xfc, 0x03, 0xfc, 0x03, 0xff, 0xff, 0xff, 0xff, 0xff, 0xff, 0xff, 0xff, 0xff,
0xff, 0xe0, 0x03, 0xfc, 0x07, 0xf8, 0x07, 0xff, 0xff, 0xff, 0xff, 0xff, 0xff, 0xff, 0xff, 0xff,
0xff, 0xf0, 0x07, 0xf8, 0x07, 0xf8, 0x07, 0xff, 0xff, 0xff, 0xff, 0xff, 0xff, 0xff, 0xff, 0xff,
0xff, 0xf0, 0x07, 0xf8, 0x0f, 0xf0, 0x0f, 0xff, 0xff, 0xff, 0xff, 0xff, 0xff, 0xff, 0xff, 0xff,
0xff, 0xf8, 0x0f, 0xf0, 0x0f, 0xf0, 0x0f, 0xff, 0xff, 0xff, 0xff, 0xff, 0xff, 0xff, 0xff, 0xff,
0xff, 0xfc, 0x1f, 0xf0, 0x1f, 0xe0, 0x1f, 0xff, 0xff, 0xff, 0xff, 0xff, 0xff, 0xff, 0xff, 0xff,
0xff, 0xfc, 0x1f, 0xe0, 0x1f, 0xe0, 0x3f, 0xff, 0xff, 0xff, 0xff, 0xff, 0xff, 0xff, 0xff, 0xff,
0xff, 0xfe, 0x3f, 0xe0, 0x3f, 0xc0, 0x3f, 0xff, 0xff, 0xff, 0xff, 0xff, 0xff, 0xff, 0xff, 0xff,
0xff, 0xfe, 0x3f, 0xc0, 0x7f, 0x80, 0x7f, 0xff, 0xff, 0xff, 0xff, 0xff, 0xff, 0xff, 0xff, 0xff,
0xff, 0xff, 0x7f, 0x80, 0x7f, 0x80, 0x7f, 0xff, 0xff, 0xff, 0xff, 0xff, 0xff, 0xff, 0xff, 0xff,
0xff, 0xff, 0x7f, 0x80, 0xff, 0x00, 0xff, 0xff, 0xff, 0xff, 0xff, 0xff, 0xff, 0xff, 0xff, 0xff,
0xff, 0xff, 0xff, 0xff, 0xff, 0xff, 0xff, 0xff, 0xff, 0xff, 0xff, 0xff, 0xff, 0xff, 0xff, 0xff,
0xff, 0xff, 0xff, 0xff, 0xff, 0xff, 0xff, 0xff, 0xff, 0xff, 0xff, 0xff, 0xff, 0xff, 0xff, 0xff,
0xff, 0xff, 0xff, 0xff, 0xff, 0xff, 0xff, 0xff, 0xff, 0xff, 0xff, 0xff, 0xff, 0xff, 0xff, 0xff,
0xff, 0xff, 0xff, 0xff, 0xff, 0xff, 0xff, 0xff, 0xff, 0xff, 0xff, 0xff, 0xff, 0xff, 0xff, 0xff,
0xff, 0xff, 0xff, 0xff, 0xff, 0xff, 0xff, 0xff, 0xff, 0xff, 0xff, 0xff, 0xff, 0xff, 0xff, 0xff
};
void setup() {
Serial.begin(9600);
if (!oled.begin(SSD1306_SWITCHCAPVCC, 0x3C)) {
Serial.println(F("failed to start SSD1306 OLED"));
while (1);
}
delay(2000);
oled.setCursor(0, 0);
}
void loop() {
oled.clearDisplay();
oled.drawBitmap(0, 0, hive_icon, 128, 64, WHITE);
oled.display();
delay(1000);
oled.setTextSize(2); // set text size
oled.setTextColor(BLACK); // set text color
oled.setCursor(70, 10); // set position to display
oled.println("Hive"); // set text
oled.display();
oled.setTextSize(1); // set text size
oled.setTextColor(BLACK); // set text color
oled.setCursor(70, 30); // set position to display
oled.println("learners"); // set text
oled.display();
oled.setTextSize(1); // set text size
oled.setTextColor(BLACK); // set text color
oled.setCursor(70, 45); // set position to display
oled.println("@ammar79"); // set text
oled.display();
delay(1000);
}
This code looks tricky but its really simple
let's explore it
#include "Wire. h"
#include "Adafruit_GFX.h"
#include "Adafruit_SSD1306.h"
This is the basic library section of c program. here we declare all required libraries. you cannot download all these libraries from GitHub or Arduino library manager. for this, you just need to search the library name like
Adafruit_SSD1306 OLED(128, 64, &Wire, -1);
In this line, I declared the LCD parameters like height 128,width 64 and -1 is landscape parameters Adafruit_SSD1306 defined in library.
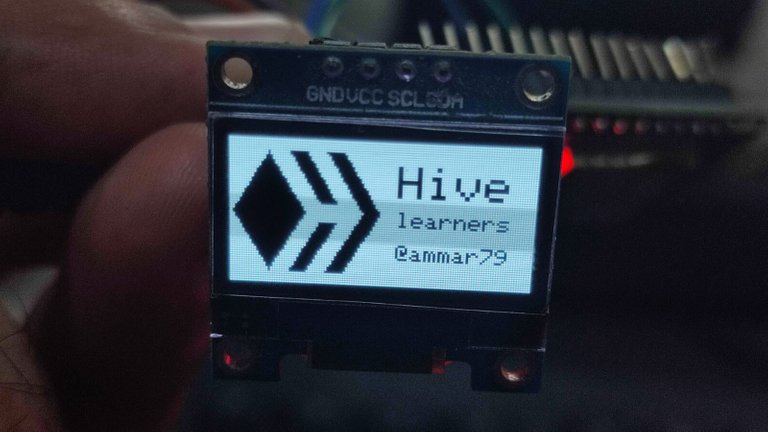
After that, I take a very long array. it is basically a bitmap array code of Hive Logo. Because I am using a very basic type of OLED display that's why I cannot add graphics directly. its only support Bitmap array for graphic.
you can generate a bit map code of any image from this
Online tool
void setup(){
Serial.begin(9600);
if (!OLED.begin(SSD1306_SWITCHCAPVCC, 0x3C)) {
Serial.println(F("failed to start SSD1306 OLED"));
while (1);
}
delay(2000);
oled.setCursor(0, 0);
}
this is the setup part of the code, setup is the function in Arduino that execute only when we start the microcontroller.
Now, this code is a little bit tricky.
in the second line we are just starting the serial port (we will cover about serial port in the upcoming lecture Now it's just a piece of code to get a response from MCU)
after that, I am checking whether the OLED is properly initialized or not in the loop. then I set the delay to wait until the LCD starts properly.
void loop() {
OLED.clearDisplay();
OLED.drawBitmap(0, 0, hive_icon, 128, 64, WHITE);
OLED.display();
delay(1000);
Now here, we have started the Loop. which always repeats its execution.
I want to display the Hive logo first I cleared the display then. i called oled.drawBitmap function and pass the bitmap array with height and width. next, I sent the command to display the bitmap graphic. Then I set the 1-second delay.
oled.setTextSize(2); // set text size
oled.setTextColor(BLACK); // set text color
oled.setCursor(70, 10); // set position to display
oled.println("Hive"); // set text
oled.display();
oled.setTextSize(1); // set text size
oled.setTextColor(BLACK); // set text color
oled.setCursor(70, 30); // set position to display
oled.println("learners"); // set text
oled.display();
oled.setTextSize(1); // set text size
oled.setTextColor(BLACK); // set text color
oled.setCursor(70, 45); // set position to display
oled.println("@ammar79"); // set text
oled.display();
delay(1000);
}
Now, this code is to display text on OLED LCD. first I set the text size and color.
in next we need to move our cursor where we want to print the text. So I set the cursor position by oled.setCursor(70, 10); function. then i just print the hard-coded character with the help of oled.println("Hive");
OLED.display()
functions
The same code is written for other texts.
Connecting Diagram
Here is the graphic schematic diagram. You have to connect the same diagram with jumper wires.
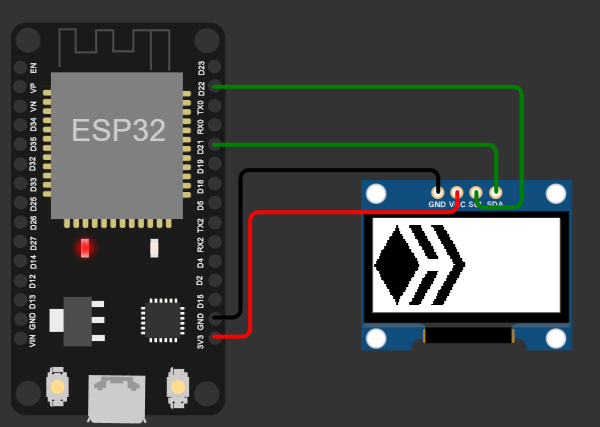
Here is the pinout
| ESP32 PIN | LCD PIN |
|---|---|
| 3.3 | VCC |
| GND | GND |
| SDA | 21 |
| SCL | 22 |
here I Connected
After Proper Connection Just Upload the code to the microcontroller with Arduino IDE
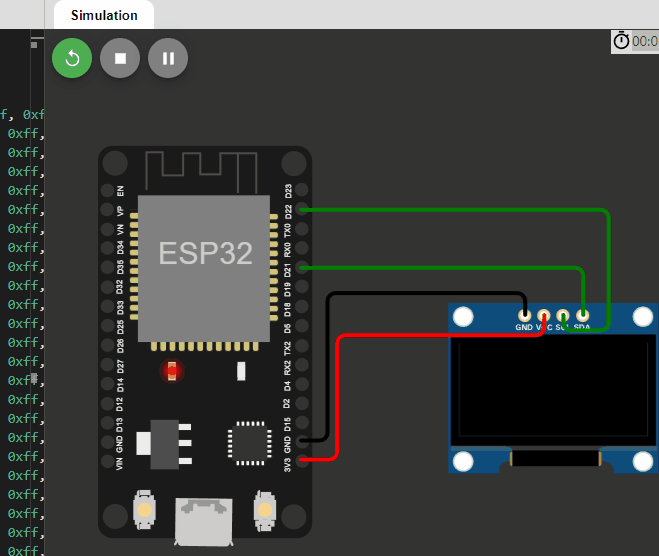
Test this online without any Equipment
A free, web-based simulator that performs similarly to the real thing can be used in place of actual tools or equipment. An excellent educational resource. Follow this link to access a virtual environment.
Online Simulator
If you have any questions or concerns, please leave a comment below.
Thanks for your time Goodbye.
Yay! 🤗
Your content has been boosted with Ecency Points, by @ammar79.
Use Ecency daily to boost your growth on platform!
Support Ecency
Vote for new Proposal
Delegate HP and earn more
!1UP Wow. It's bizarre to see content like this and realize that there are a multitude of subjects I don't know about. The only prerequisite I met was owning a computer 🤣 but know that your work was appreciated!

Click this banner to join "The Cartel" discord server to know more.
You have received a 1UP from @underlock!
@stem-curator
And they will bring !PIZZA 🍕.
Learn more about our delegation service to earn daily rewards. Join the Cartel on Discord.
Thanks for your contribution to the STEMsocial community. Feel free to join us on discord to get to know the rest of us!
Please consider delegating to the @stemsocial account (85% of the curation rewards are returned).
You may also include @stemsocial as a beneficiary of the rewards of this post to get a stronger support.
Congratulations @ammar79! You have completed the following achievement on the Hive blockchain and have been rewarded with new badge(s):
Your next target is to reach 2250 upvotes.
You can view your badges on your board and compare yourself to others in the Ranking
If you no longer want to receive notifications, reply to this comment with the word
STOPCheck out the last post from @hivebuzz:
Support the HiveBuzz project. Vote for our proposal!
Nice project! Previously I "made" an ISA on Arduino nano. It might be exciting to run a display just to visualize how it works inside when running a custom program 😅
Nice to see some C code after all of this time.
Dear @ammar79, we need your help!
The Hivebuzz proposal already got important support from the community. However, it lost its funding a few days ago and only needs a bit more support to get funded again.
May we ask you to support it so our team can continue its work?
You can do it on Peakd, ecency, Hive.blog or using HiveSigner.
https://peakd.com/me/proposals/199
Your support will be really appreciated.
Thank you!