[ EN | PT ] Gambas3 - developing a calculator
I was reviewing some old posts and I found one where I show you how to develop something with the BASIC language and Gambas3 and I decided to recreate one of the tutorials in this handout. Of course I don't encourage anyone to create new commercial projects in Gambas3, but it's interesting out of curiosity to develop something with the language from time to time.
Why didn't I follow the tutorial in the workbook?
As you read this tutorial, you will see that it is noticeably different from the tutorial in the workbook. This has a few reasons:
- The tutorial in the workbook is difficult to understand
- The tutorial in the workbook is only valid for older versions of Gambas, which is not our case
- The tutorial in the workbook follows a logic much closer to the logic of Delphi programs rather than more current programs
If you feel more comfortable following the workbook tutorial, feel free to do so, but I felt more comfortable reading the written project in my own way, rather than the workbook's original author.
Project Setup
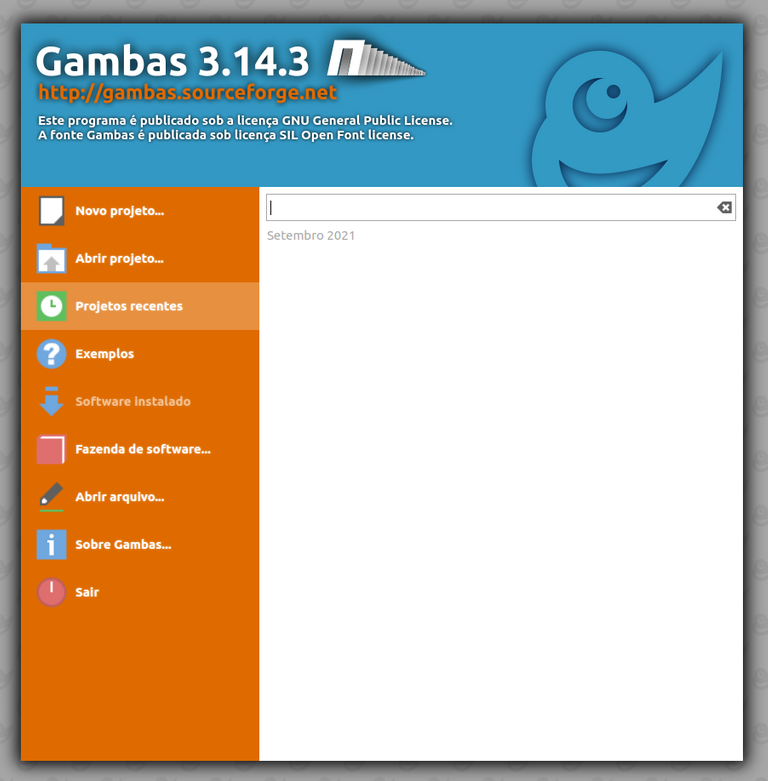
When you open Gambas3 you will see a screen similar to this one:
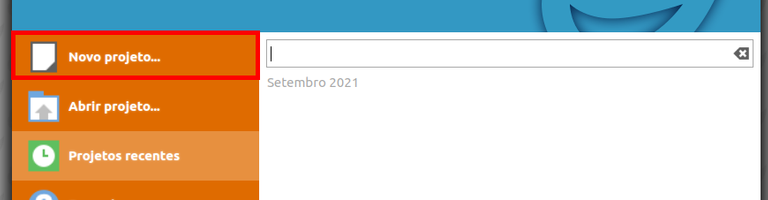
Click on "New project":
From the project type menu, which will come next, select "graphic application":

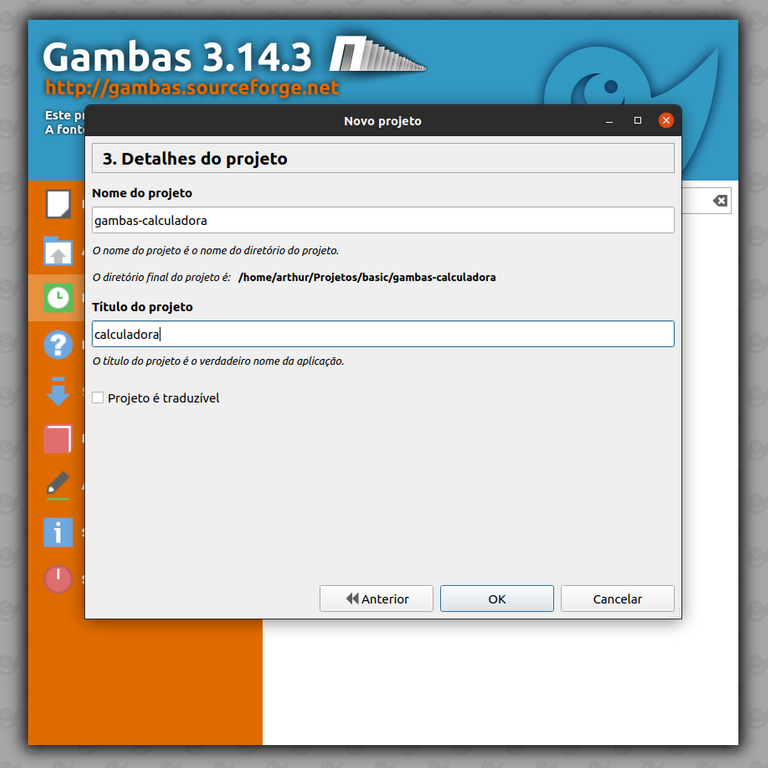
And select the folder, the project name and the project title:
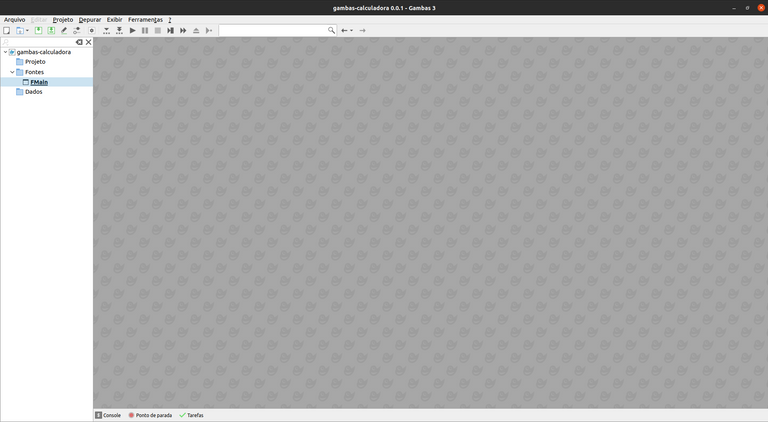
When creating the project you will see a screen similar to this one (if the left dock doesn't appear, press F10):
Data Types
One concept we have to understand in programming is data types. There are different types of information in real life, such as words, phrases, letters, numbers, dates, among others. To be able to represent the types of data, the computer classifies them and assembles categories. Data types that have similarities belong to the same or a close category. But other data belong to different categories, as they have completely different characteristics. Most programming languages implement the types of data that the computer can represent, however, each language represents the same types of data differently. Note the data types supported by Gambas:
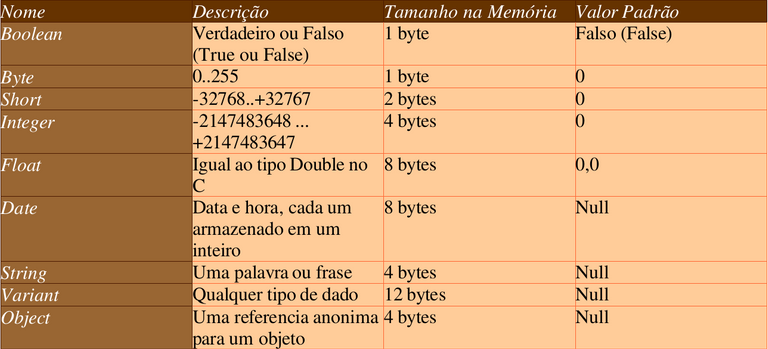
The Boolean type represents a logical type, which can be false (0) or true (1). Gambas3 also has
The types Byte, Short and Integer represent whole numbers, but with different minimum and maximum sizes.
The Float type represents floating point numbers, that is, which have fractional values. It is analogous to the double type of the C language and represents a huge range of numbers, even larger than integer. This type also takes up twice as much memory space.
The Date type is a special type of Float, where the left part represents the date and the right part represents the time.
The String type represents a letter, a word or a phrase.
The Variant type is a special type that can represent any other Gambas data type. That's why it's the most "expensive", which takes up the most memory: the computer gets ready to represent anything on it.
The Object type usually represents a visual component, a control or a class in the computer's memory. It is used so that we can manipulate components at runtime.
Drawing the canvas
Click on the FMain file on the left side dock. You will see something like this:
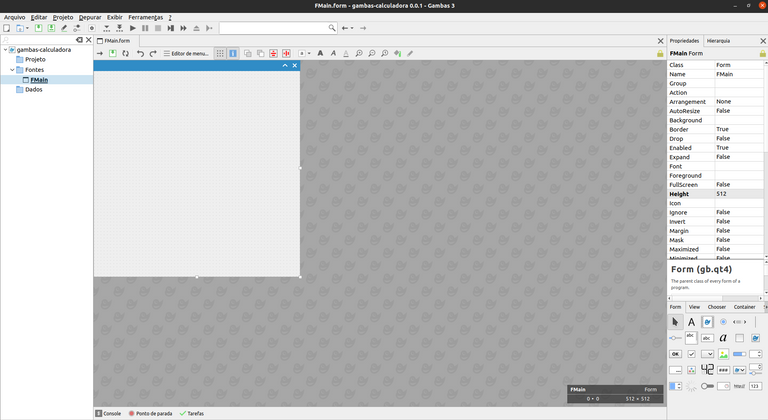
This "screen" that we can draw is called "form", or just "Form". In this case, we have the initial form there, the FMain. If FMain closes, the entire application closes. Perfect, time to create the design.
To create the design of our calculator, I customized the design using a conventional calculator as a template:
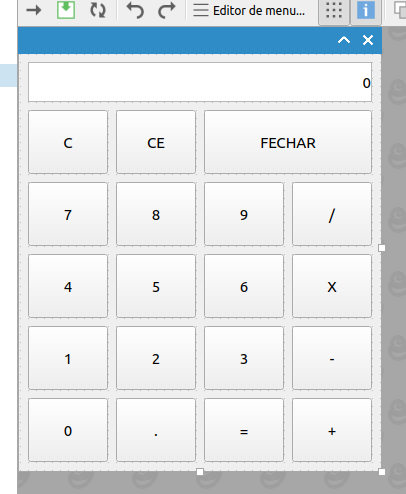
The buttons were made using the Button component and the result field with the Label component. For the buttons, with the exception of the font, I used the same parameters as the workbook project:
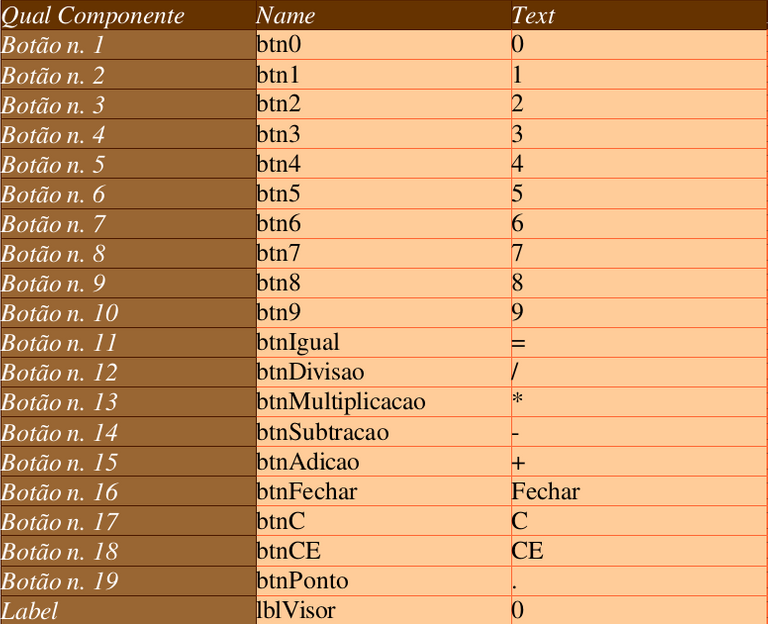
For the font, I preferred to use the default font, while for the Text field of btnMultiplication I preferred to use the letter "X", but you can use whatever you prefer. For lblVisor, I used the following values:
| Field | Value |
|---|---|
| Alignment | Right |
| Background | Right |
| Border | Sunken |
| Foreground | Black |
Of course, you can customize all these values to your preferences, but personally, they were the values I liked the most. This step is very important, because in the other steps the components will be referenced by name. It's good practice to name each component you'll be using in code, so that it's easier to understand what each component is after. If you have a component that won't do anything special, you don't need to name it, but if you want, there's no problem.
Starting programming
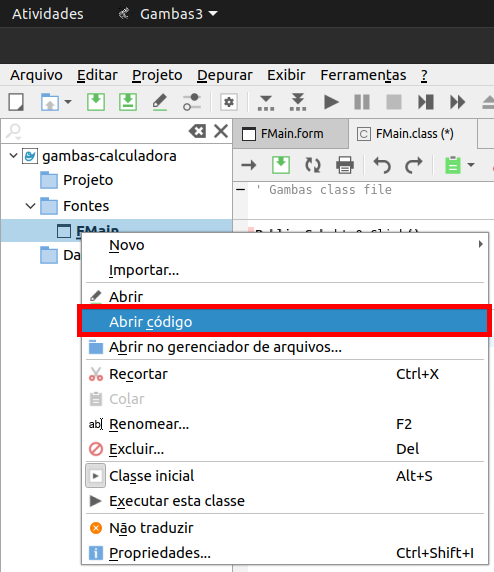
Go to the left dock and right click on FMain. You will see a menu with several options. Click on the "Open code" option:
You will see an empty text file like this:

Let's start by creating some variables:
Private NumeroAnterior As Float ' This variable will store the first operand
Private operacao As String ' This variable stores the chosen math operation
Private numeroIsFracionado As Boolean ' This variable shows whether the display number is fractional
The Private directive says that property cannot be accessed by other forms, only the current one.
The first thing we're going to create is a function to initialize the default values of these variables. The Form_Open function does just that, so let's override it:
Public Sub Form_Open()

  operacao = ""
  NumeroAnterior = 0
  numeroIsFracionado = False
  LimparLabel = True
  btnFechar.SetFocus()
  lblVisor.Text = "0"

End
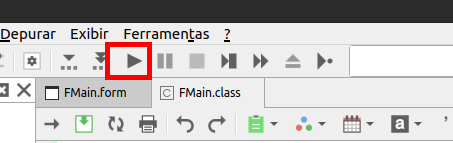
Agora você pode executar o seu projeto para testar clicando nesse botão:
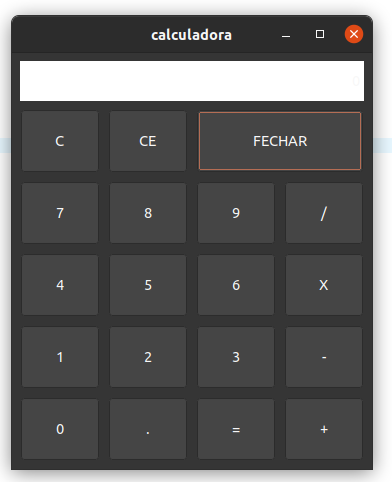
O projeto aberto vai ser parecido com isso:
Você pode notar que o seu programa ainda não faz nada, não se preocupe com isso agora...
Adicionando dígitos à tela
Para fazer o evento de clique do mouse sobre os botões, temos que entender como é a sintaxe das funções dos eventos de objetos no Gambas:
Public Sub element_Event()
    ' código
End
So first let's create the function that will add the digits to the label. The function below checks if the screen text is equal to zero, and, if so, replaces the text with the digit value, but if not, it only concatenates the original string:
Private Sub btnNumeroClick(digito As String)

  If CFloat(lblVisor.Text) == 0 Then
    lblVisor.Text = digito
  Else
    lblVisor.Text = lblVisor.Text & digito
  Endif

End
And let's now add this function to each of the number buttons (this code is kind of repetitive, but very easy to understand):
Public Sub btn1_Click()

  btnNumeroClick("1")

End

Public Sub btn2_Click()

  btnNumeroClick("2")

End

Public Sub btn3_Click()

  btnNumeroClick("3")

End

Public Sub btn4_Click()

  btnNumeroClick("4")

End

Public Sub btn5_Click()

  btnNumeroClick("5")

End

Public Sub btn6_Click()

  btnNumeroClick("6")

End

Public Sub btn7_Click()

  btnNumeroClick("7")

End

Public Sub btn8_Click()

  btnNumeroClick("8")

End

Public Sub btn9_Click()

  btnNumeroClick("9")

End

Public Sub btn0_Click()

  btnNumeroClick("0")

End
Let's now add the point button operation. First we have to define its behavior: a button that makes a number fractional might not be able to add the dot character twice, right? So let's check if the button has been clicked before:
Public Sub btnPonto_Click()

  If numeroIsFracionado == False Then
    numeroIsFracionado = True
    lblVisor.Text = lblVisor.Text & "."
  Endif

End
Time to add operations
Now let's add the operation of the math operations buttons. These buttons should:
- Define which button will be the current math operation
- Register the value on the screen as the previous number
- Allow the software to completely clean the screen when liming.
Start by adapting the btnNumeroClick function:
Private Sub btnNumeroClick(digito As String)

  If CFloat(lblVisor.Text) == 0 Or LimparLabel == True Then
    lblVisor.Text = digito
    LimparLabel = False
  Else
    lblVisor.Text = lblVisor.Text & digito
  Endif

End
And let's create a function that abstracts the operation of the operation buttons:
Private Sub btnOperacoes(operacaoSelecionada As String)

  NumeroAnterior = CFloat(lblVisor.Text)
  operacao = operacaoSelecionada
  LimparLabel = True

End
Now add this function to the math operations buttons:
Public Sub btnAdicao_Click()

  btnOperacoes("+")

End

Public Sub btnSubtracao_Click()

  btnOperacoes("-")

End

Public Sub btnMultiplicacao_Click()

  btnOperacoes("*")

End

Public Sub btnDivisao_Click()

  btnOperacoes("/")

End
Totaling result
Time to add the operation of the calculation summation button. There are five possible outcomes for this action:
- The result is the same (no defined operation)
- Perform the sum
- Perform subtraction
- Perform the multiplication
- Perform the division
So the function for the total button might be something like:
Public Sub btnIgual_Click()

  If operacao == "+" Then
    lblVisor.Text = CFloat(lblVisor.Text) + NumeroAnterior
  Else If operacao == "-" Then
    lblVisor.Text = CFloat(lblVisor.Text) - NumeroAnterior
  Else If operacao == "*" Then
    lblVisor.Text = CFloat(lblVisor.Text) * NumeroAnterior
  Else If operacao == "/" Then
    lblVisor.Text = CFloat(lblVisor.Text) / NumeroAnterior
  Endif
  operacao = ""

End
And presto, the calculator is already functional. Time for secondary functions...
"C" button
The C button stands for "Clear", and should clear the current operation (like turning the calculator off and then on again). Let's start by creating the clear function:
Private Sub clear()

  operacao = ""
  NumeroAnterior = 0
  numeroIsFracionado = False
  LimparLabel = True
  lblVisor.Text = "0"

End
As you can see, the clear function behaves similarly to the Form_Open function, so let's modify it:
Public Sub Form_Open()

  clear()
  btnFechar.SetFocus()

End
And let's also add the btnC button operation:
Public Sub btnC_Click()

  clear()

End
And that's it, that's it.
"CE" button
The CE button serves to "cancel entry", that is, it removes the last operation performed, which allows the user to cancel the last record without having to restart the calculation from zero. If this register is the math operation, this operation is canceled. If it is a number that has been entered, the number is erased.
We can summarize this functionality in the following function:
Public Sub btnCE_Click()

  If UltimaOperacao == "AdicionadoNumero" Then
    LimparLabel = True
    numeroIsFracionado = False
    lblVisor.Text = "0"
  Else If UltimaOperacao == "OperacaoMatematica"
    operacao = ""
  Endif

  UltimaOperacao = ""

End
"Close" button
It can be summarized in the function:
Public Sub btnFechar_Click()

  Quit

End
Fixing bugs
When using our calculator, we may notice that there are some bugs. Are we going to solve them?
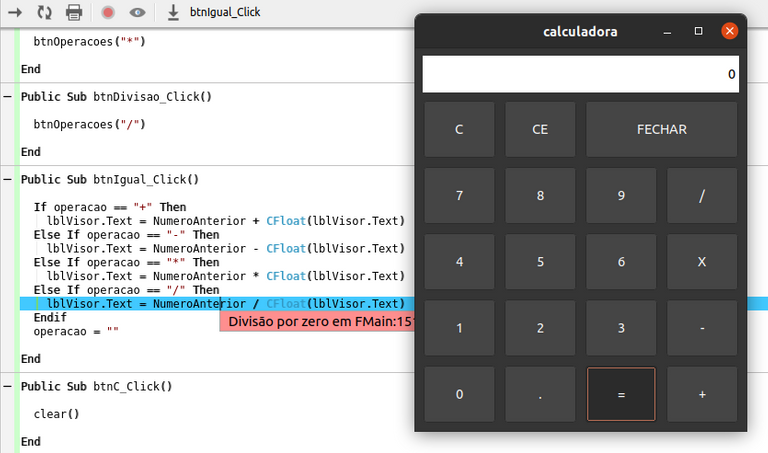
Division by zero
The first bug that will happen is when we try to divide a number by zero:
How to solve this? Simply add the following code to the split operation:
If CFloat(lblVisor.Text) == 0 Then
  Message.Warning("Error: cannot do division by zero")
  Return
Endif
This code will alert the user that the selected operation is illegal and prevent it from continuing. The totalization function will then look something like this:
Public Sub btnIgual_Click()

  If operacao == "+" Then
    lblVisor.Text = NumeroAnterior + CFloat(lblVisor.Text)
  Else If operacao == "-" Then
    lblVisor.Text = NumeroAnterior - CFloat(lblVisor.Text)
  Else If operacao == "*" Then
    lblVisor.Text = NumeroAnterior * CFloat(lblVisor.Text)
  Else If operacao == "/" Then
    If CFloat(lblVisor.Text) == 0 Then
      Message.Warning("Error: cannot do division by zero")
      Return
    Endif
    lblVisor.Text = NumeroAnterior / CFloat(lblVisor.Text)
  Endif
  operacao = ""

End
First and second floating point number
If the first number is a floating point (fractional) number, the second number cannot be in the current system form. To solve this, we just need to add the code below to the end of the btnOperacoes and btnIgual_Click functions:
numeroIsFracionado = False
And that's it, resolved.
Adding successive operations
When you are using an ordinary calculator, add a number, press the sum button, add another number and press the sum button previously, the calculator performs the previous sum, shows the result and allows you to do the next operation. Let's implement this function.
First let's abstract how btnIgual_Click works to a separate function:
Private Sub TotalizarCalculo()

  If operacao == "+" Then
    lblVisor.Text = NumeroAnterior + CFloat(lblVisor.Text)
  Else If operacao == "-" Then
    lblVisor.Text = NumeroAnterior - CFloat(lblVisor.Text)
  Else If operacao == "*" Then
    lblVisor.Text = NumeroAnterior * CFloat(lblVisor.Text)
  Else If operacao == "/" Then
    If CFloat(lblVisor.Text) == 0 Then
      Message.Warning("Erro: não pode fazer divisão por zero")
      Return
    Endif
    lblVisor.Text = NumeroAnterior / CFloat(lblVisor.Text)
  Endif
  operacao = ""
  numeroIsFracionado = False

End

Public Sub btnIgual_Click()

  TotalizarCalculo()

End
Now go to the btnOperacoes function and insert the following code at the beginning of it:
If CFloat(lblVisor.Text) <> 0 And NumeroAnterior <> 0 And operacao <> "" Then
  TotalizarCalculo()
Endif
Your function will look like this:
Private Sub btnOperacoes(operacaoSelecionada As String)

  If CFloat(lblVisor.Text) <> 0 And NumeroAnterior <> 0 And operacao <> "" Then
    TotalizarCalculo()
  Endif

  NumeroAnterior = CFloat(lblVisor.Text)
  operacao = operacaoSelecionada
  UltimaOperacao = "OperacaoMatematica"
  LimparLabel = True
  numeroIsFracionado = False

End
And presto, your calculator is done. You can see the full code here.
And so? Got any questions? Do you have any suggestions? Leave your opinion in the comments.
Eu estava revendo alguns posts antigos e encontrei um onde eu mostro como se desenvolve algo com a linguagem BASIC e o Gambas3 e resolvi recriar um dos tutoriais dessa apostila. Claro que eu não incentivo ninguém a criar projetos comerciais novos em Gambas3, mas é interessante a título de curiosidade desenvolver algo com a linguagem de vez em quando.
Por que eu não segui o tutorial da apostila?
Ao ler esse tutorial, você vai ver que ele é visivelmente diferente do tutorial da apostila. Isso tem alguns motivos:
- O tutorial da apostila é difícil de entender
- O tutorial da apostila é válido apenas para versões antigas do Gambas, o que não é o nosso caso
- O tutorial da apostila segue uma lógica muito mais próxima da lógica de programas Delphi ao invés da de programas mais atuais
Se você se sentir mais a vontade seguindo o tutorial da apostila, sinta-se a vontade, mas eu me senti mais confortável lendo o projeto escrito da minha própria forma, ao invés do feito pelo autor original da apostila.
Setup do projeto
Ao abrir o Gambas3 você vai ver uma tela semelhante a essa:
Clique em "Novo projeto":
No menu de tipos de projeto, que virá a seguir, selecione "aplicação gráfica":
E selecione a pasta, o nome do projeto e o título do projeto:
Ao criar o projeto você verá uma tela semelhante a essa (se a doca esquerda não aparecer, aperte F10):
Tipos de dados
Um conceito que temos que compreender na programação é o de tipos de dados. Existem diversos tipos de informações na vida real, como palavras, frases, letras, números, datas, entre outros. Para conseguir representar os tipos de dados, o computador os classifica e monta categorias. Os tipos de dados que tem semelhanças pertencem a uma mesma categoria ou a uma categoria próxima. Porém outros dados pertencem a categorias diferentes, por terem características completamente diferentes. A maioria das linguagens de programação implementam os tipos de dados que o computador pode representar, no entanto, cada linguagem representa os mesmos tipos de dados de forma diferente. Observe os tipos de dados suportados pelo Gambas:
O tipo Boolean representa um tipo lógico, que pode ser falso (0) ou verdadeiro (1). O Gambas3 também possui
Os tipos Byte, Short e Integer representam números inteiros, mas com tamanhos mínimos e máximos diferentes.
O tipo Float representa números de ponto flutuante, ou seja, que possuem valores fracionados. Ele é análogo ao tipo double da linguagem C e representa uma faixa de números enorme, maior até que o integer. Esse tipo também ocupa o dobro de espaço na memória.
O tipo Date é um tipo tipo especial de Float, onde a parte que fica a esquerda representa a data e a parte que fica a direita representa a hora.
O tipo String representa uma letra, uma palavra ou uma frase.
O tipo Variant é um tipo especial que pode representar qualquer outro tipo de dado do Gambas. Por isso que é o mais "caro", que ocupa mais memória: o computador se prepara para representar qualquer coisa nele.
O tipo Object representa geralmente um componente visual, um controle ou uma classe na memória do computador. É utilizado para podermos manipular os componentes em tempo de execução.
Desenhando a tela
Clique no arquivo FMain da doca lateral esquerda. Você verá algo assim:
Essa "tela" que podemos desenhar é chamada de "formulário", ou apenas "Form". No caso, temos ali o formulário inicial, o FMain. Se o FMain for fechado, a aplicação inteira fecha. Perfeito, hora de criar o design.
Para criar o design da nossa calculadora, eu personalizei o design usando como modelo uma calculadora convencional:
Os botões foram feitos usando o componente Button e o campo de resultados com o componente Label. Para os botões, com exceção da fonte, eu usei os mesmos parâmetros do projeto da apostila:
Para a fonte, preferi usar a fonte padrão, enquanto para o campo Text do btnMultiplicacao eu preferi usar a letra "X", mas você pode usar o que preferir. Para o lblVisor, eu usei os seguintes valores:
| Campo | Valor |
|---|---|
| Alignment | Right |
| Background | Right |
| Border | Sunken |
| Foreground | Black |
Claro, você pode personalizar todos esses valores para as suas preferências, mas, pessoalmente, foram os valores que eu mais gostei. Esse passo é muito importante, porque nos demais passos os componentes serão referenciados pelo nome. É uma boa prática nomear cada componente que você irá utilizar no código, para que fique mais fácil de entender o que cada componente é depois. Se tem algum componente que não fará nada de especial, não precisa nomeá-lo, mas, se quiser, não tem problema algum.
Iniciando a programação
Vá na doca esquerda e clique com o botão direito no FMain. Você verá um menu com várias opções. Clique na opção "Abrir código":
Você verá um arquivo de texto vazio, como esse:
Vamos começar criando algumas variáveis:
Private NumeroAnterior As Float ' Esta variável armazenará o primeiro operando
Private operacao As String ' Essa variável armazena a operação matemática escolhida
Private numeroIsFracionado As Boolean ' Esta variável mostra se o número do visor é fracionado
A diretiva Private diz que aquela propriedade não pode ser acessada por outros formulários, apenas pelo atual.
A primeira coisa que vamos criar é uma função para inicializar os valores padrão dessas variáveis. A função Form_Open faz exatamente isso, então vamos sobrescrevê-la:
Public Sub Form_Open()

  operacao = ""
  NumeroAnterior = 0
  numeroIsFracionado = False
  LimparLabel = True
  btnFechar.SetFocus()
  lblVisor.Text = "0"

End
Agora você pode executar o seu projeto para testar clicando nesse botão:
O projeto aberto vai ser parecido com isso:
Você pode notar que o seu programa ainda não faz nada, não se preocupe com isso agora...
Adicionando dígitos à tela
Para fazer o evento de clique do mouse sobre os botões, temos que entender como é a sintaxe das funções dos eventos de objetos no Gambas:
Public Sub elemento_Evento()
    ' código
End
Então primeiramente vamos criar a função que vai adicionar os dígitos à label. A função abaixo verifica se o texto da tela é igual a zero, e, se for, troca o texto pelo valor do dígito, mas, se não for, só concatena a string original:
Private Sub btnNumeroClick(digito As String)

  If CFloat(lblVisor.Text) == 0 Then
    lblVisor.Text = digito
  Else
    lblVisor.Text = lblVisor.Text & digito
  Endif

End
E vamos agora adicionar essa função a cada um dos botões de números (esse código é meio repetitivo, mas bem fácil de entender):
Public Sub btn1_Click()

  btnNumeroClick("1")

End

Public Sub btn2_Click()

  btnNumeroClick("2")

End

Public Sub btn3_Click()

  btnNumeroClick("3")

End

Public Sub btn4_Click()

  btnNumeroClick("4")

End

Public Sub btn5_Click()

  btnNumeroClick("5")

End

Public Sub btn6_Click()

  btnNumeroClick("6")

End

Public Sub btn7_Click()

  btnNumeroClick("7")

End

Public Sub btn8_Click()

  btnNumeroClick("8")

End

Public Sub btn9_Click()

  btnNumeroClick("9")

End

Public Sub btn0_Click()

  btnNumeroClick("0")

End
Vamos adicionar agora o funcionamento do botão de ponto. Primeiro temos que definir o comportamento dele: um botão que torna um número fracionado não pode ser capaz de adicionar duas vezes o caractere de ponto, certo? Então vamos verificar se o botão já foi clicado antes:
Public Sub btnPonto_Click()

  If numeroIsFracionado == False Then
    numeroIsFracionado = True
    lblVisor.Text = lblVisor.Text & "."
  Endif

End
Hora de adicionar as operações
Agora vamos adicionar o funcionamento dos botões de operações matemáticas. Esses botões devem:
- Definir qual será o botão da operação matemática corrente
- Registrar o valor que está na tela como o número anterior
- Permitir ao software limpar completamente a tela ao lim
Comece adaptando a função btnNumeroClick:
Private Sub btnNumeroClick(digito As String)

  If CFloat(lblVisor.Text) == 0 Or LimparLabel == True Then
    lblVisor.Text = digito
    LimparLabel = False
  Else
    lblVisor.Text = lblVisor.Text & digito
  Endif

End
E vamos criar uma função que abstraia o funcionamento dos botões de operação:
Private Sub btnOperacoes(operacaoSelecionada As String)

  NumeroAnterior = CFloat(lblVisor.Text)
  operacao = operacaoSelecionada
  LimparLabel = True

End
Agora adicione essa função aos botões das operações matemáticas:
Public Sub btnAdicao_Click()

  btnOperacoes("+")

End

Public Sub btnSubtracao_Click()

  btnOperacoes("-")

End

Public Sub btnMultiplicacao_Click()

  btnOperacoes("*")

End

Public Sub btnDivisao_Click()

  btnOperacoes("/")

End
Totalizando resultado
Hora de adicionarmos o funcionamento do botão de totalização do cálculo. Existem cinco resultados possíveis para essa ação:
- O resultado ser o mesmo (não ter operação definida)
- Realizar a soma
- Realizar a subtração
- Realizar a multiplicação
- Realizar a divisão
Então a função para o botão de totalização pode ser algo como:
Public Sub btnIgual_Click()

  If operacao == "+" Then
    lblVisor.Text = CFloat(lblVisor.Text) + NumeroAnterior
  Else If operacao == "-" Then
    lblVisor.Text = CFloat(lblVisor.Text) - NumeroAnterior
  Else If operacao == "*" Then
    lblVisor.Text = CFloat(lblVisor.Text) * NumeroAnterior
  Else If operacao == "/" Then
    lblVisor.Text = CFloat(lblVisor.Text) / NumeroAnterior
  Endif
  operacao = ""

End
E pronto, a calculadora já é funcional. Hora das funções secundárias...
Botão "C"
O botão C significa "Clear", e deve limpar a operação atual (como se desligasse a calculadora e ligasse de novo). Vamos começar criando a função clear:
Private Sub clear()

  operacao = ""
  NumeroAnterior = 0
  numeroIsFracionado = False
  LimparLabel = True
  lblVisor.Text = "0"

End
Como você pode ver, a função clear tem um comportamento semelhante a função Form_Open, então vamos modificá-la:
Public Sub Form_Open()

  clear()
  btnFechar.SetFocus()

End
E vamos também adicionar o funcionamento do botão btnC:
Public Sub btnC_Click()

  clear()

End
E pronto, é isso.
Botão "CE"
O botão CE serve para "cancelar entrada", ou seja, remove a última operação realizada, o que permite que o usuário cancele o último registro sem ter que recomeçar o cálculo do zero. Se esse registro for a operação matemática, cancela-se essa operação. Se for um número que foi digitado, apaga-se o número.
Podemos resumir essa funcionalidade na seguinte função:
Public Sub btnCE_Click()

  If UltimaOperacao == "AdicionadoNumero" Then
    LimparLabel = True
    numeroIsFracionado = False
    lblVisor.Text = "0"
  Else If UltimaOperacao == "OperacaoMatematica"
    operacao = ""
  Endif

  UltimaOperacao = ""

End
Botão "fechar"
Pode ser resumido na função:
Public Sub btnFechar_Click()

  Quit

End
Corrigindo bugs
Ao usar nossa calculadora, podemos notar que existem alguns bugs. Vamos resolvê-los?
Divisão por zero
O primeiro bug que vai acontecer é ao tentarmos dividir um número por zero:
Como resolver isso? Simplesmente adicione o seguinte código à operação de divisão:
If CFloat(lblVisor.Text) == 0 Then
  Message.Warning("Erro: não pode fazer divisão por zero")
  Return
Endif
Esse código vai alertar ao usuário que a operação selecionada é ilegal e impedir que ela continue. A função de totalização então ficará mais ou menos assim:
Public Sub btnIgual_Click()

  If operacao == "+" Then
    lblVisor.Text = NumeroAnterior + CFloat(lblVisor.Text)
  Else If operacao == "-" Then
    lblVisor.Text = NumeroAnterior - CFloat(lblVisor.Text)
  Else If operacao == "*" Then
    lblVisor.Text = NumeroAnterior * CFloat(lblVisor.Text)
  Else If operacao == "/" Then
    If CFloat(lblVisor.Text) == 0 Then
      Message.Warning("Erro: não pode fazer divisão por zero")
      Return
    Endif
    lblVisor.Text = NumeroAnterior / CFloat(lblVisor.Text)
  Endif
  operacao = ""

End
Primeiro e segundo número de ponto flutuante
Se o primeiro número for de ponto flutuante (fracionado), o segundo número não poderá ser, da forma atual do sistema. Para resolvermos isso, só precisamos adicionar o código abaixo ao final das funções btnOperacoes e btnIgual_Click:
numeroIsFracionado = False
E pronto, resolvido.
Adicionando operações sucessivas
Quando você está com uma calculadora comum, adiciona um número, aperta o botão de soma, adiciona outro número e aperta o botão de soma anteriormente, a calculadora executa a soma anterior, mostra o resultado e permite fazer a operação seguinte. Vamos implementar essa função.
Primeiramente vamos abstrair o funcionamento de btnIgual_Click para uma função a parte:
Private Sub TotalizarCalculo()

  If operacao == "+" Then
    lblVisor.Text = NumeroAnterior + CFloat(lblVisor.Text)
  Else If operacao == "-" Then
    lblVisor.Text = NumeroAnterior - CFloat(lblVisor.Text)
  Else If operacao == "*" Then
    lblVisor.Text = NumeroAnterior * CFloat(lblVisor.Text)
  Else If operacao == "/" Then
    If CFloat(lblVisor.Text) == 0 Then
      Message.Warning("Erro: não pode fazer divisão por zero")
      Return
    Endif
    lblVisor.Text = NumeroAnterior / CFloat(lblVisor.Text)
  Endif
  operacao = ""
  numeroIsFracionado = False

End

Public Sub btnIgual_Click()

  TotalizarCalculo()

End
Agora vá para a função btnOperacoes e insira logo no início dela o seguinte código:
If CFloat(lblVisor.Text) <> 0 And NumeroAnterior <> 0 And operacao <> "" Then
  TotalizarCalculo()
Endif
Sua função ficará assim:
Private Sub btnOperacoes(operacaoSelecionada As String)

  If CFloat(lblVisor.Text) <> 0 And NumeroAnterior <> 0 And operacao <> "" Then
    TotalizarCalculo()
  Endif

  NumeroAnterior = CFloat(lblVisor.Text)
  operacao = operacaoSelecionada
  UltimaOperacao = "OperacaoMatematica"
  LimparLabel = True
  numeroIsFracionado = False

End
E pronto, sua calculadora está feita. Você pode ver o código completo aqui.
Mas e aí? Ficou com alguma dúvida? Tem alguma sugestão? Deixa sua opinião nos comentários.
Yay! 🤗
Your content has been boosted with Ecency Points, by @arthursiq5.
Use Ecency daily to boost your growth on platform!
Support Ecency
Vote for new Proposal
Delegate HP and earn more
!hivebits !hbits
Hivebits blends Hive's blockchain and Bitcoin's ethos. Your effort = your reward. Mine HBIT simply 1-per-day with (no space):
! hivebitsor! HBITor! hbitor$ hbit.Success! You mined .9 HBIT and the user you replied to received .1 HBIT on your behalf. You can receive 100% of the HBIT by replying to one of your own posts or comments. Or, support Hivebits at the official HBIT mine | your wallet | market | tools | connect | <><
This confirmation reply will go off when Resource Credits (RCs) get low. Yet, your hivebits command will still go through and you'll get your HBIT. :)