Magnetic lamp [Eng+Spa]
English
Greetings to the DIY community, I wish you an excellent week, that every day is full of good opportunities.
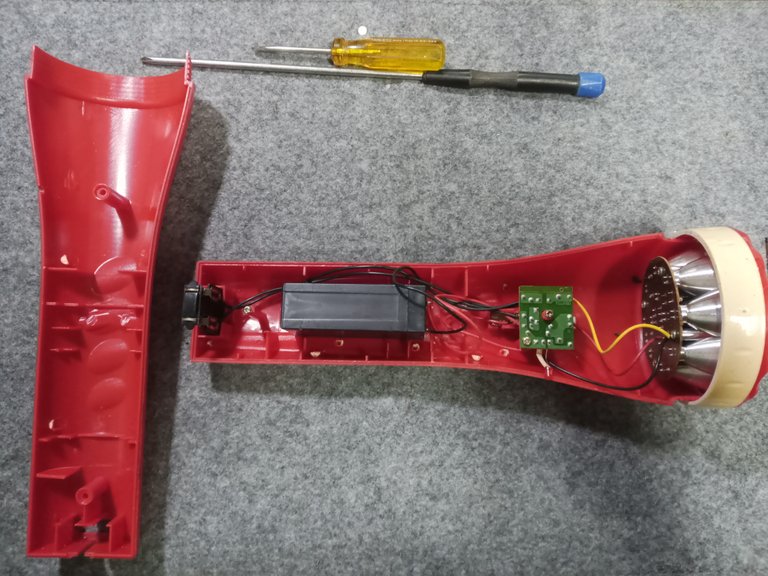
Once again I have the opportunity to share with you part of my recycling work, this time I was working on a commonly used rechargeable LED flashlight. In its favor, I have to admit that it lasted me about ten years of use, of course, with the minimum necessary care.

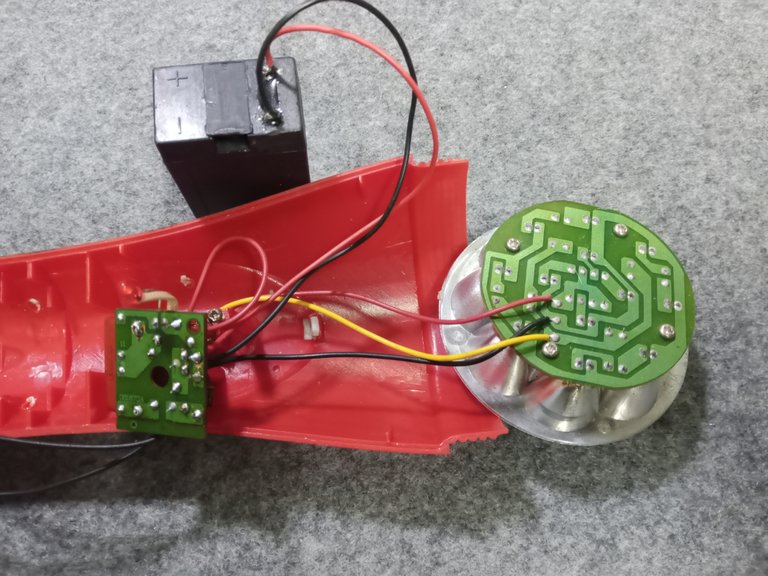
I wanted to find a way to get it working again, the internal circuit is very simple, it's just a couple of resistors, a LED, a bridge rectifier made of diodes and a capacitor.
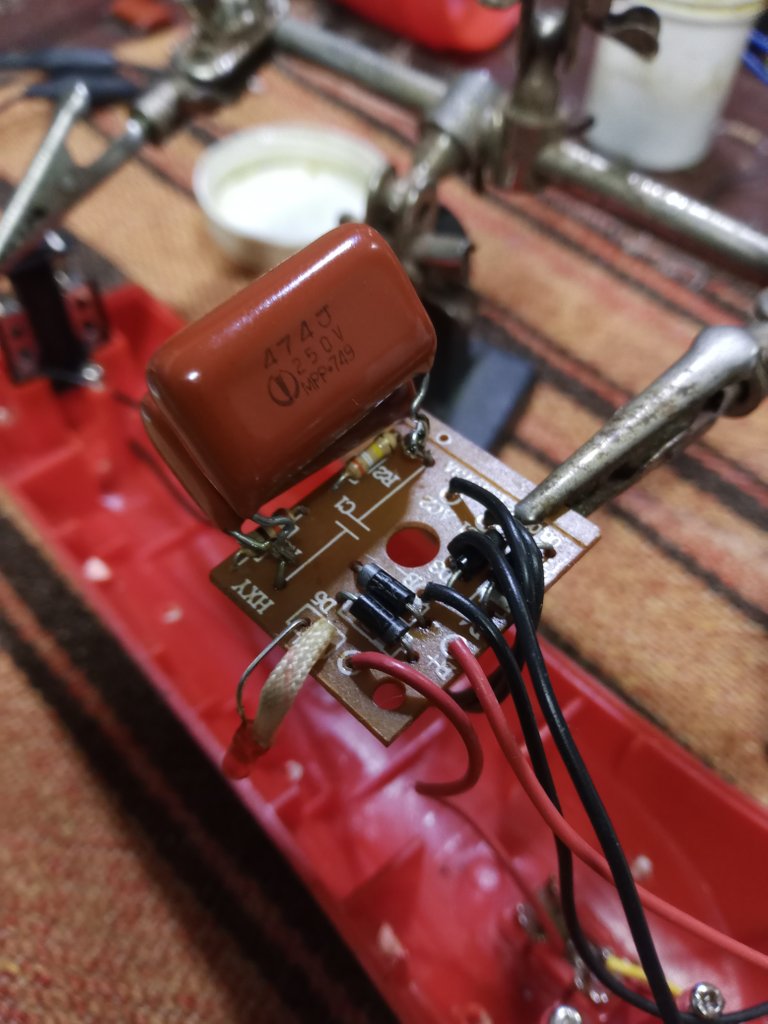
When checking the parts that make up the circuit, only the capacitor was damaged, when measuring it with the capacitance meter it read an acceptable value (1 Uf).
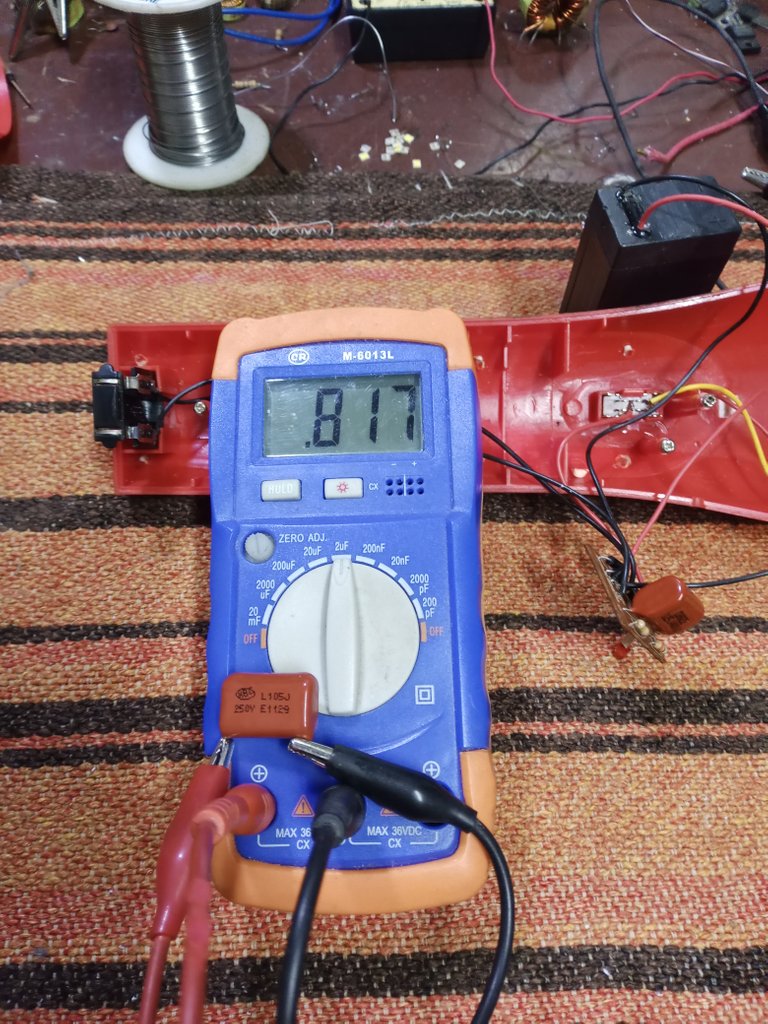
But using a leakage tester which (works on 110 volts) works with a higher voltage than the tester (the tester can measure only using 9 or 12 volt voltages), I found that the capacitor was leaking, and it doesn't work really well, a capacitor after being charged with voltage must not allow the passage of electricity.
(It's a leakage tester that I put together in a damaged transformer casing)
Change the capacitor and let it charge, but it didn't work. The battery was bad and I was unable to service it, despite having service access, they had sealed the battery before installing it.

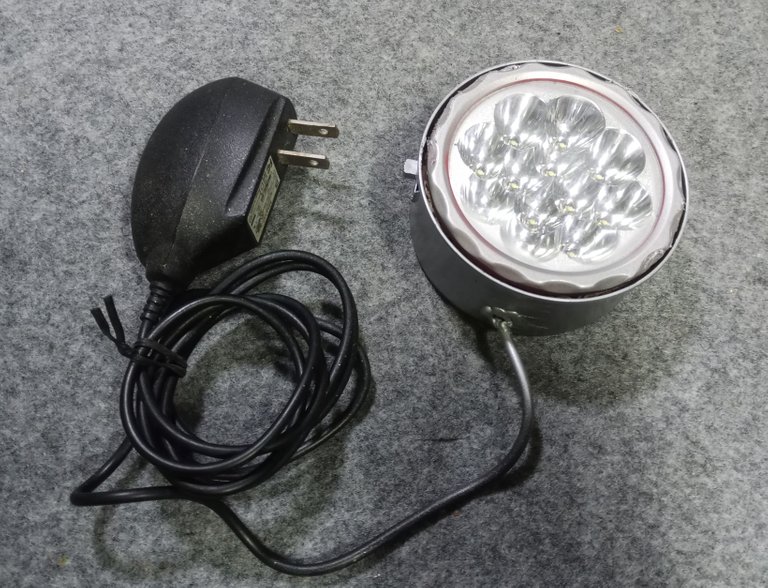
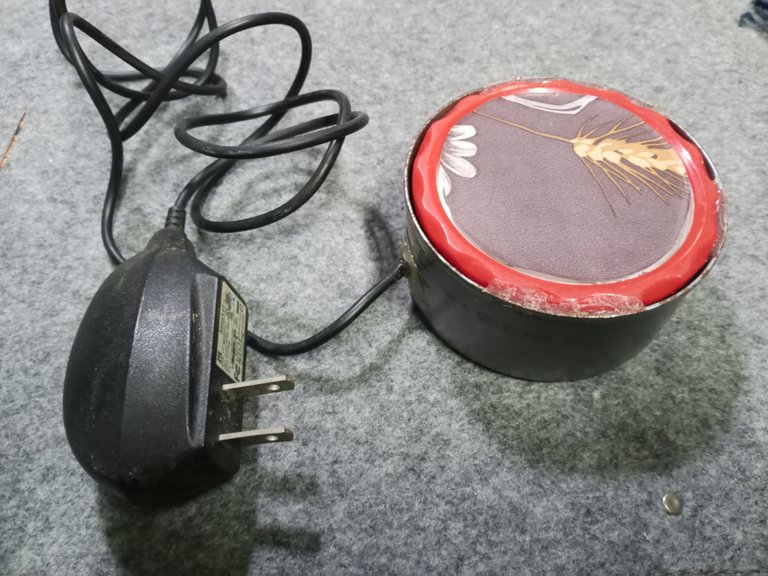
The cost of the flashlight is about $6 and the cost of a replacement battery is more than the cost of the flashlight. So I will have to give it a new use, I will turn it into an auxiliary lamp, with a magnetic support, to be able to fix it without problems on a metal surface or place it on a table.
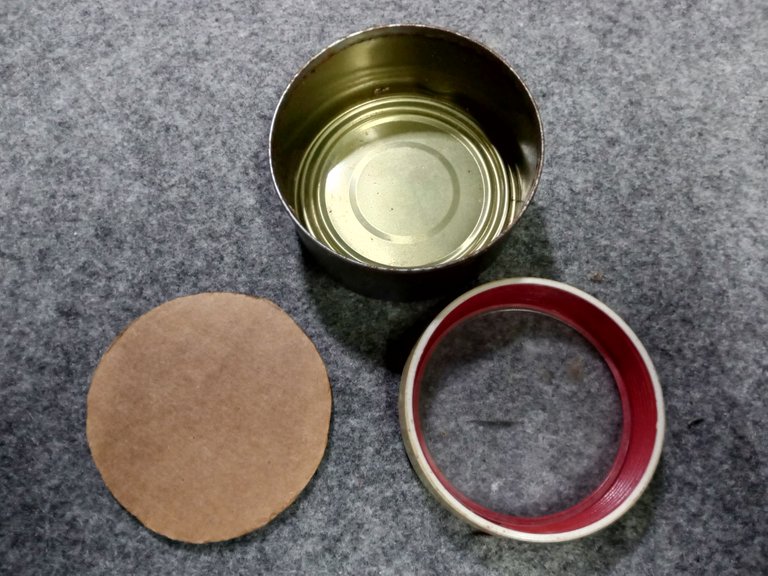
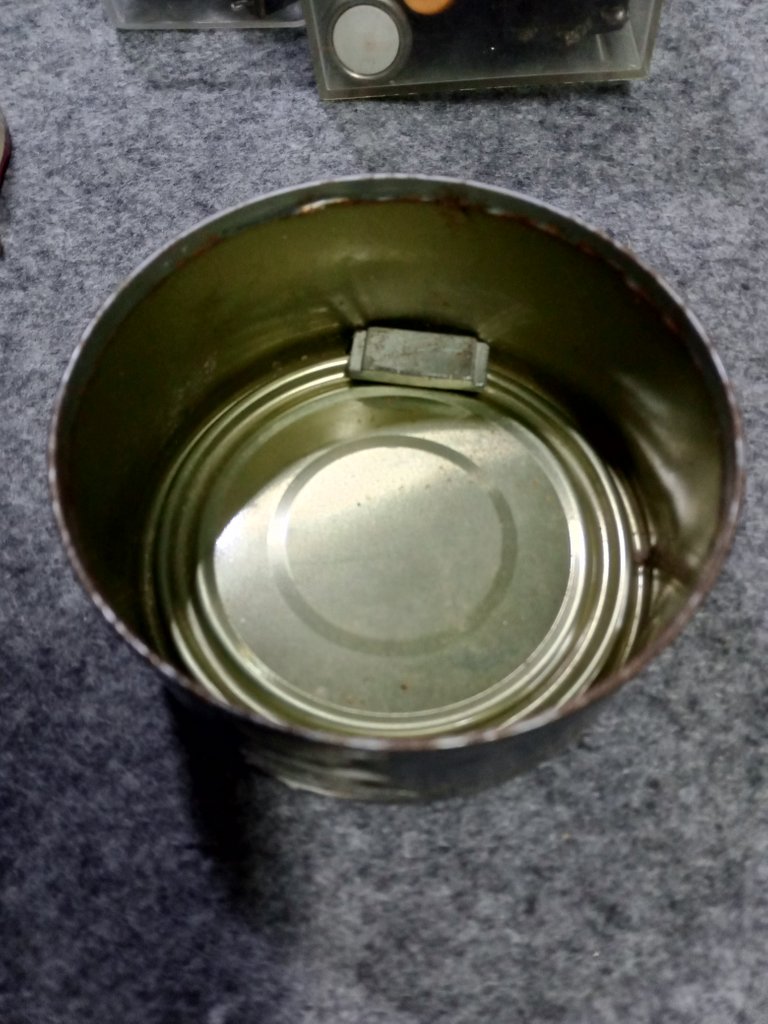
I set aside the parts of the lantern that I will use, with a tuna can and a cardboard base to insulate the metal bottom.
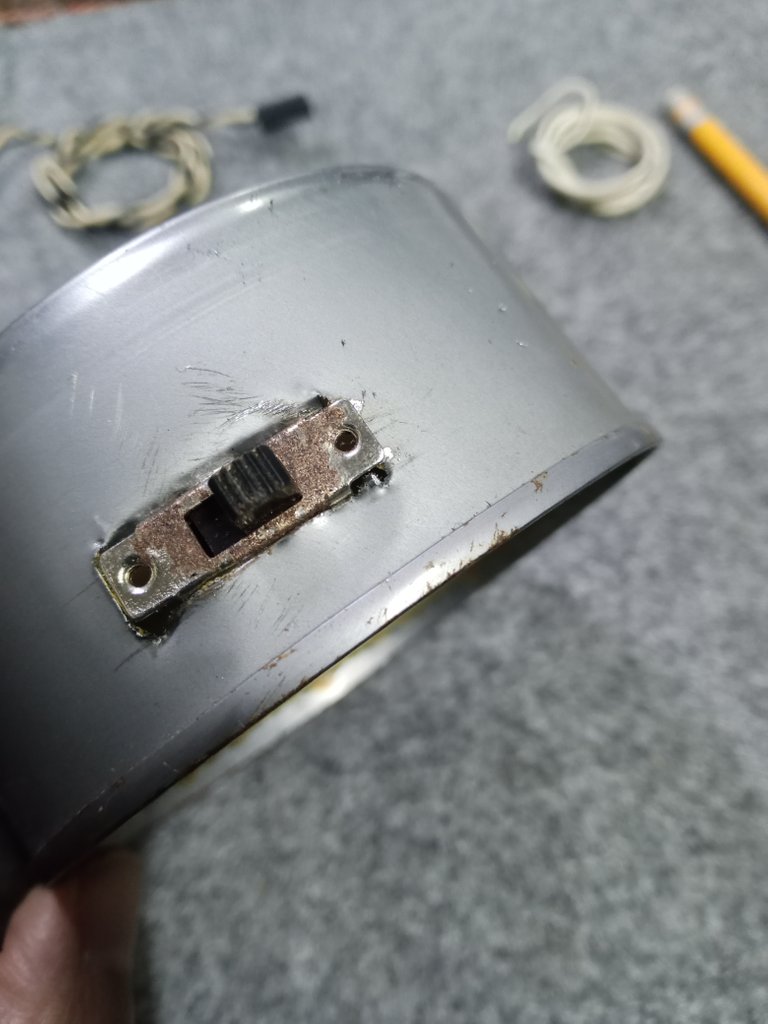
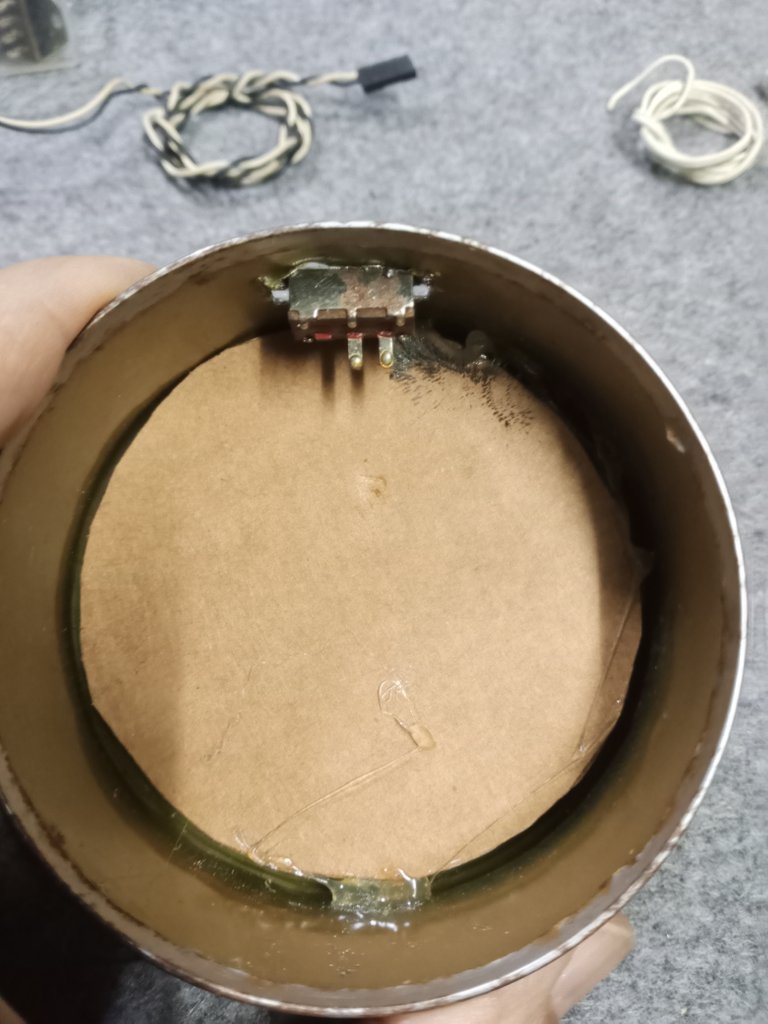
I will need to choose from the parts warehouse, a switch that is as compact as possible, there is not a lot of space and it should not add unnecessary weight.
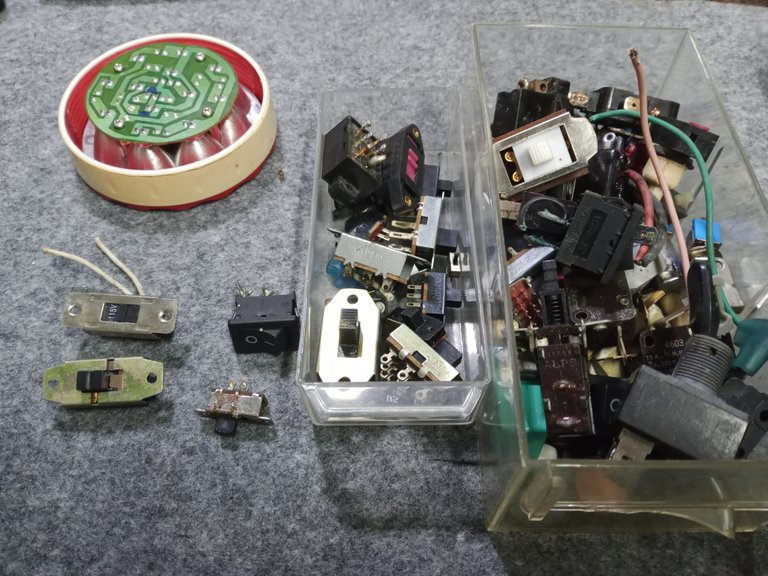
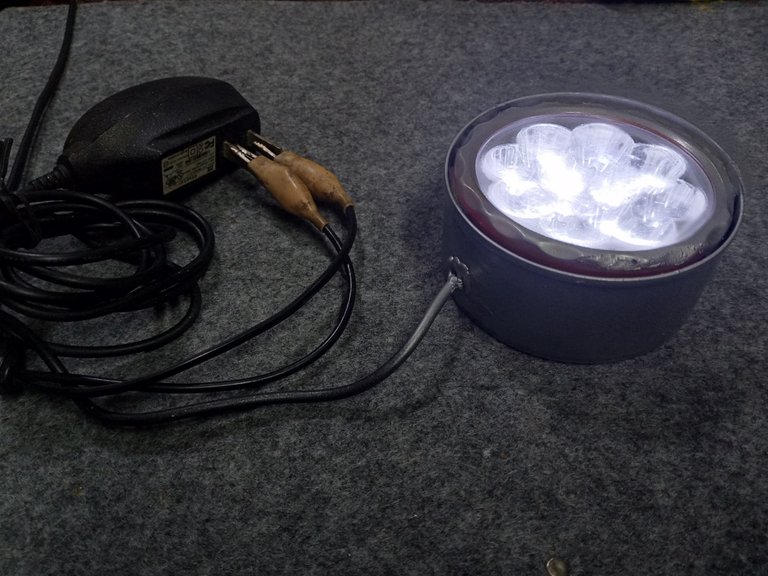
I use a magnet salvaged from an upcycled kitchen cabinet door, it's a good magnet, strong enough to hold the lamp. I could use a magnet from a hard drive, it has pretty good capacity, but this cabinet door magnet did the trick.
The tuna can is light and you have to be careful to make the cuts, it is easy if you are careful.
I made the holes with screws, the drill can damage the work if it is done in very thin sheets.

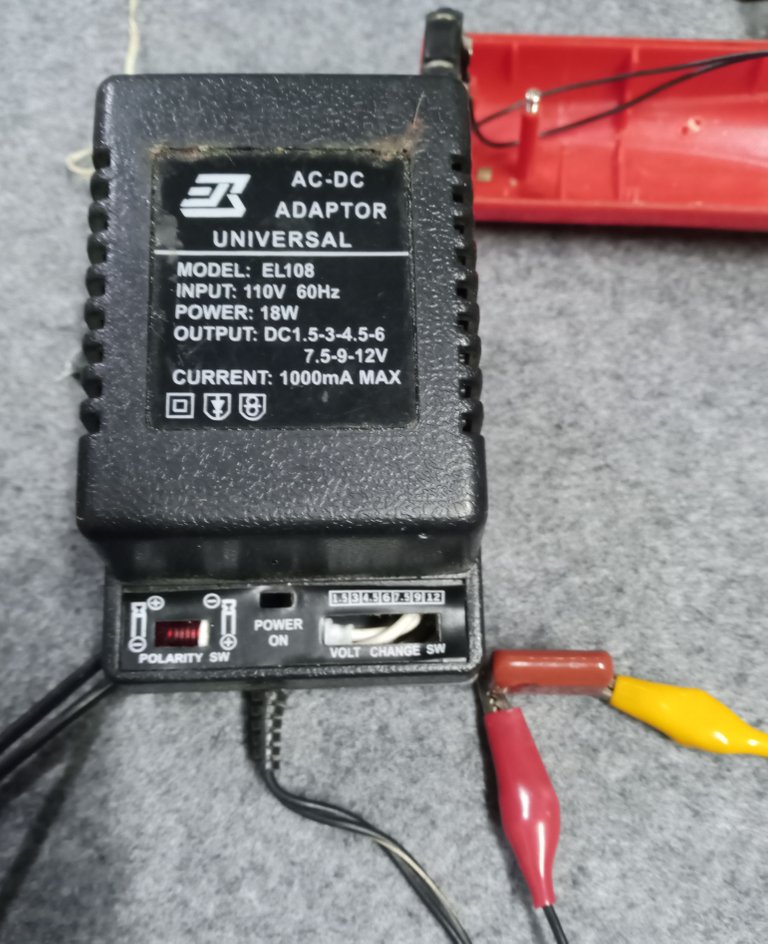
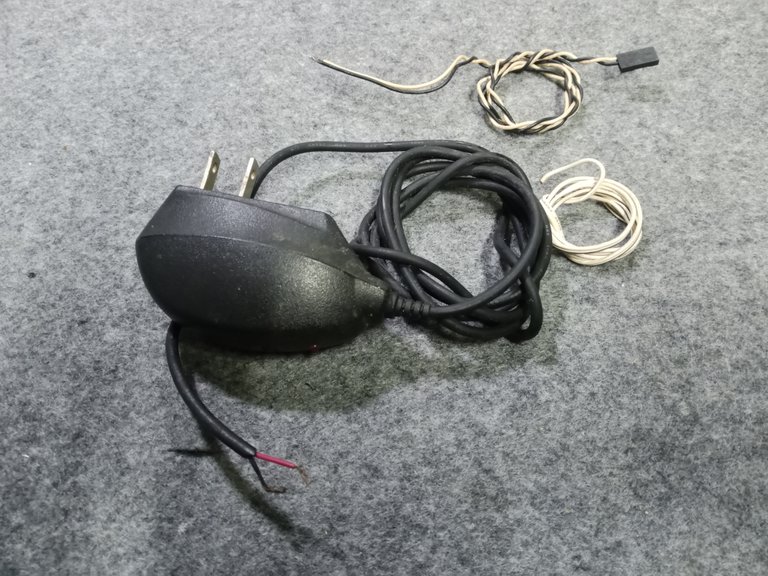
For power I use a recycled charger from an old 5 volt ZTE phone, and recycled cables from discarded computers.
To finish the job, cut out and use a cardboard ring, place it on the inside of the can and thus the led cover, which is so light, stays in place without problems, only with the pressure between the cardboard on the inner edge of the can and the lid with the leds.
(First I had fixed with hot glue, but the appearance was not good, so I changed the way of fixing the parts.) I apply paint to give the lamp a better look.
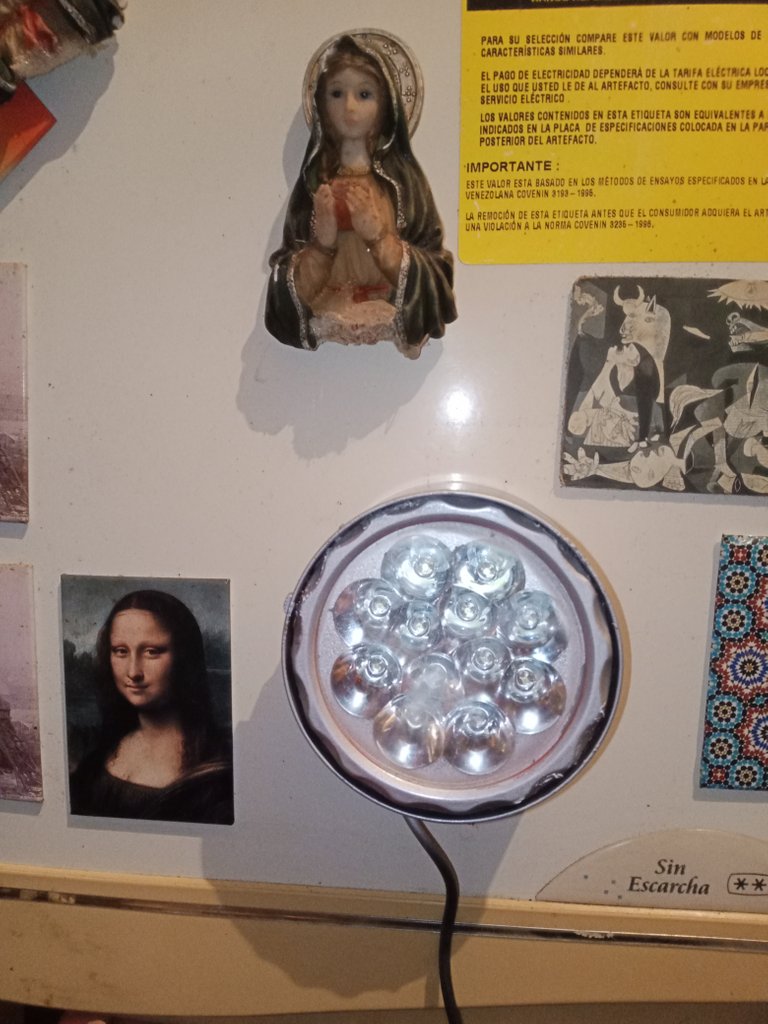
I test that it works without problems and then I verify that it can be held with the magnetic support on the metal door of the fridge.
Well thank you so much for stopping by and reading my post.
As always, I remind you, do not do electrical work if you do not have minimal technical preparation, it is for your safety.
This post is not a tutorial, it's just part of my recycling work in the workshop, it's the way I solve the problem.
Have an excellent week.
Peace.
The images are captures of my work in the workshop.
I have used Google translate for the English language.
Español
Saludos a la comunidad DIY, les deseo una excelente semana, que cada día este lleno de buenas oportunidades.
Una vez más tengo la oportunidad de compartir con ustedes parte de mi trabajo de reciclaje, en esta ocasión estuve trabajando en una linterna recargable de led de uso común. En su favor, tengo que reconocer que me duro unos diez años de uso, claro, teniendo los cuidados mínimos necesarios.
Quería encontrar la manera de volver a dejarla en funcionamiento, el circuito interno es muy simple, solo son un par de resistencias, un led, un puente rectificador hecho con diodos y un condensador.
Al verificar las partes que componen el circuito, solo el condensador estaba dañado, al medirlo con el capacímetro leía un valor aceptable (1 Uf)
Pero al usar un probador de fugas que (funciona en 110 volts) trabaja con un voltaje mayor que el tester (el tester puede medir solo usando voltajes de 9 o de 12 volts), comprobé que el capacitor tenía fugas y no funciona realmente bien, un capacitor después de cargarse con voltaje no debe permitir el paso de la electricidad.
(Es un probador de fugas que arme en una carcasa de un transformador dañado)
Cambie el capacitor y deje cargando, pero no funciono. La batería estaba dañada y no pude hacerle servicio, a pesar de tener acceso para hacer servicio, habían sellado la batería antes de instalarla.
El costo de la linterna es de unos 6 $ y el costo de una batería para el reemplazo, es mayor que el costo de la linterna. Así que tendré que darle un nuevo uso, la convertiré en una lámpara auxiliar, con soporte magnético, para poder fijarla sin problemas en alguna superficie metálica o colocarla sobre una mesa.
Aparto las partes de la linterna que usaré, con una lata de atún y una base de cartón para aislar el fondo de metal.
Necesitaré escoger del depósito de partes, un interruptor lo más compacto posible, no hay mucho espacio y no debe sumar peso innecesario.
Uso un imán recuperado de una puerta de gabinete de cocina reciclada, es un buen imán, lo bastante fuerte para sostener la lámpara. Podía usar un imán de una unidad de disco duro, tiene muy buena capacidad, pero este imán de puerta de gabinete fue suficiente.
La lata de atún es ligera y hay que ser cuidadoso para hacer los cortes, es sencillo si se tiene cuidado.
Los agujeros los hice con tornillos, el taladro puede dañar el trabajo si se hace en láminas muy delgadas.
Para la alimentación eléctrica uso un cargador reciclado de un viejo teléfono ZTE de 5 volts, y cables reciclados de computadoras descartadas.
Para finalizar el trabajo, recorte y use un anillo de cartón, lo coloque en la parte interna de la lata y así la cubierta de led que es tan ligera se mantiene en su sitio sin problemas, solo con la presión entre el cartón del borde interno de la lata y la tapa con los leds.
(Primero había fijado con silicona caliente, pero el aspecto no era bueno, así que cambie la forma de fijar las partes). Aplico pintura para darle mejor aspecto a la lámpara.
Pruebo que funcione sin problemas y luego verifico que pueda sostenerse con el soporte magnético en la puerta metálica de la nevera.
Bueno, muchas gracias por pasar y leer mi publicación.
Como siempre, les recuerdo, no hacer trabajos de electricidad si no tiene preparación técnica mínima, es por su seguridad.
Esta publicación no es un tutorial, es solo parte de mi trabajo de reciclaje en el taller, es la forma en que resuelvo el problema.
Que tengan una excelente semana.
Paz.
Las imágenes son capturas de mi trabajo en el taller.
He usado el traductor de Google para el idioma inglés.
Debo admitir que la falla del circuito de la linterna era bien raro.
Stay !ALIVE
!LOLZ
!GIF nice lamp!
!PGM
!LUV
!CTP
Via Tenor
BUY AND STAKE THE PGM TO SEND A LOT OF TOKENS!
The tokens that the command sends are: 0.1 PGM-0.1 LVL-0.1 THGAMING-0.05 DEC-15 SBT-1 STARBITS-[0.00000001 BTC (SWAP.BTC) only if you have 2500 PGM in stake or more ]
5000 PGM IN STAKE = 2x rewards!
Discord
Support the curation account @ pgm-curator with a delegation 10 HP - 50 HP - 100 HP - 500 HP - 1000 HP
Get potential votes from @ pgm-curator by paying in PGM, here is a guide
I'm a bot, if you want a hand ask @ zottone444
@soltecno! You Are Alive so I just staked 0.1 $ALIVE to your account on behalf of @pedrobrito2004. (2/10)
The tip has been paid for by the We Are Alive Tribe through the earnings on @alive.chat, feel free to swing by our daily chat any time you want.

Excelente e ingenioso. Tienes un gran talento, felicitaciones
Muchas gracias por leerme y comentar, es parte del trabajo en el taller. Aprecio que les parezca bien.
@soltecno una pregunta: Unos audífonos gamer q se le desbarató la punta donde se conecta a la pc (no se cómo se llama) el conector pues...
Eso lo pueden cambiar? O ya con eso tengo q botar los audífonos?
El plug o conector se puede comprar y cambiar, he reparado varios. Solo hay que llevar la muestra del plug a la tienda de repuestos. Yo los he reciclado y los he dejado funcionando sin problemas.
Si es todo el problema, vale la pena repararlo.
Si vale, es sólo eso. Mi esposo se puso hace meses a repararlo y lo daño más. Pero son unos excelentes audífonos gamer, hay q recuperarlos.
Ojalá estuvieras en Maturín
Gracias y felicitaciones por otra publicación de Calidad
Voy a buscar si me queda alguno por reparar y procuro hacerle una publicación, para que lo tenga claro es sencillo.
Xfa... Buenísimo
Gracias 😊
You're really skilled.
!discovery 30
!DIY
This post was shared and voted inside the discord by the curators team of discovery-it
Join our Community and follow our Curation Trail
Discovery-it is also a Witness, vote for us here
Delegate to us for passive income. Check our 80% fee-back Program
Greetings, thank you very much for the support. I really appreciate it.
impressive how you've found another use for the old flashlight. You work is impressive.
I'm glad you liked it, I wanted to give it a new use.
I am very grateful for the gesture. !gif Thank you so much.
There are a fair number of great content creators out there, I'm going to share it to the best of my ability.
Via Tenor
This post has been manually curated by @bhattg from Indiaunited community. Join us on our Discord Server.
Do you know that you can earn a passive income by delegating to @indiaunited. We share more than 100 % of the curation rewards with the delegators in the form of IUC tokens. HP delegators and IUC token holders also get upto 20% additional vote weight.
Here are some handy links for delegations: 100HP, 250HP, 500HP, 1000HP.
100% of the rewards from this comment goes to the curator for their manual curation efforts. Please encourage the curator @bhattg by upvoting this comment and support the community by voting the posts made by @indiaunited.
Yay! 🤗
Your content has been boosted with Ecency Points, by @soltecno.
Use Ecency daily to boost your growth on platform!
Support Ecency
Vote for new Proposal
Delegate HP and earn more
Gracias por el apoyo. Seguiré esforzándome. Aún puedo mejorar más el trabajo.
Eres un Crack! Lo máximo! me encantan mucho tus experimentos y sobre todo ver que funcionan, es maravilloso!
Mi estimada, siempre es un gusto poder saludarte. Muchas gracias por leerme y comentar. Aprecio su apoyo.
Hola :) Me sorprendí por lo mucho que te duró la linterna y más aún por tu habilidad para darle un segundo uso. Me alegra que tu conocimiento sobre los circuitos te permita reutilizar todo y transformarlo en cosas útiles. Me encantó esta lámpara, también que hayas usado un cargador viejo para cargarla. ¡Todo perfecto, el verdadero 'nada se crea ni se destruye, todo se transforma'. ¡Felicitaciones ❣️!
Muchas gracias por las palabras de apoyo, tenemos que evitar que haya tanto desperdicio.
Cantidad de artículos que se desechan en verdad no están dañados de forma irrecuperable, muchos tiene reparación y en la gran mayoría de los casos es algo sencillo.
es un magnífico trabajo!
Saludos, muchas gracias amigo.
Leer un post tuyo es como jugar un juego donde tenes que Craftear objetos jajaja nunca dejas de sorprendernos... ¡Y si! Hablo por todos
Realmente disfruto mucho de los juegos donde puedes combinar y crear cosas para la supervivencia. Es como la serie Americana de televisión: El equipo A, o como la llamaban en mi país: Los Magníficos.
Muchas gracias por revisar mi publicación y comentar.