[ENG|ESP] Fixing my Nintendo 3DS XL Circle Pad
✨English✨
✨English✨
Before I start, I would like to clarify that I'm NOT A TECHNICIAN, from a young age I've been known to disassemble things and end up destroying them, the first remote control car I was given I took it apart and ripped out the circuits, my father had an automatic screwdriver, I tried to open it and it had a mechanism with several gears that I couldn't repair, even once I opened my old PS2 to see why it wouldn't turn on and ended up breaking the flex of the lens, as you can see, I don't have a very good reputation with these things haha.
But that was years ago, I wasn't careful to do this kind of jobs, obviously it's something I've been able to correct, from time to time I do maintenance to my pc or a family member's, but I also don't have professional knowledge in the field of disassembling electronics, I don't know how to use soldering or anything like that, but when I saw that it wasn't such a complicated process (thanks YouTube) I decided to face it on my own because any technician is going to charge you an arm and a leg, not before changing all the good parts for defective ones and tell you "bro your screen is damaged", I know that not all technicians are like that, and I myself have been served by very good technicians, but I didn't want to pay what the console cost me to repair it.
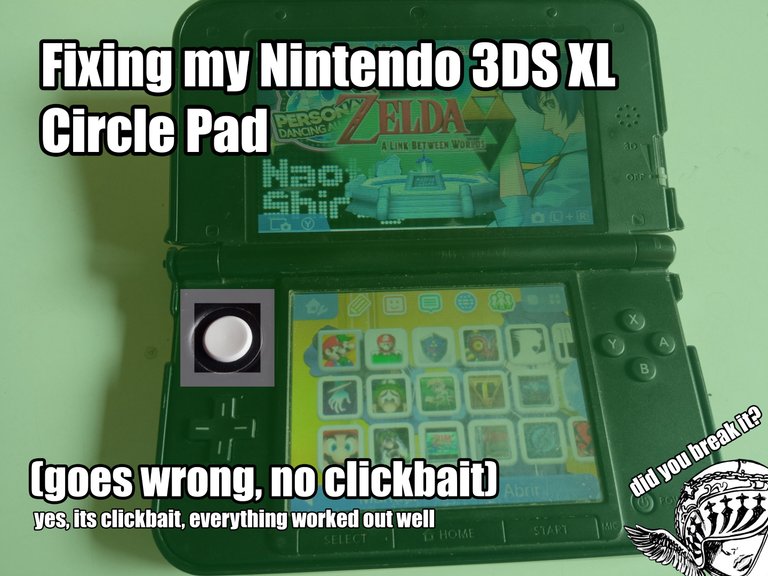
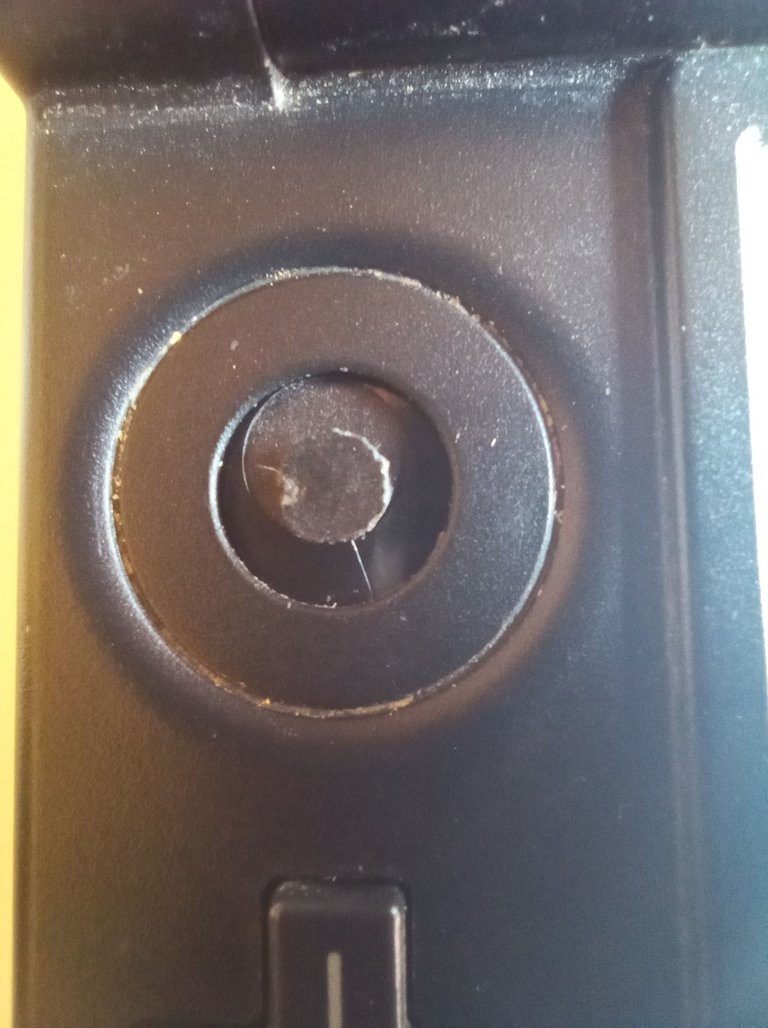
In short, I bought my Nintendo 3DS XL second hand two years and a couple of months ago, the console was impeccable and I couldn't be happier with my purchase, I still have a lot of affection for it and if I don't use it as much as before is because there came a time when the circle pad began to deteriorate, for those who don't locate it, the circle pad is that "stick" that the 3DS have above the d-pad and is almost indispensable for any 3DS game, first the rubber coating came loose, and eventually broke, I think it's inevitable after a while because it's one of the things that is most used when playing.
The console had been like this for a while, but last week I decided to investigate if it was possible to get the necessary spare part to replace it, and to my luck, I found it with free shipping and everything, I just had to wait and this week I could go to pick up the piece, @gutstheme was kind enough to accompany me to pick up the shipment apart from lending me a set of screwdrivers to do the surgery to the console.
Without waiting much, when I returned to the house I started to disassemble the 3DS, I'll tell you a little about the process, but I will advance that I was quite nervous because I didn't want to break anything.
The first thing is to remove the back cover, it only has two small and short screws that hold it, once the screws are removed you have to lift it from the top, since at the bottom it is fixed by some tabs, this wasn't a difficult task since previously I had to remove this cover to check the battery, which was a little loose, despite that it is good to be careful because it's a very thin cover and it can break easily.
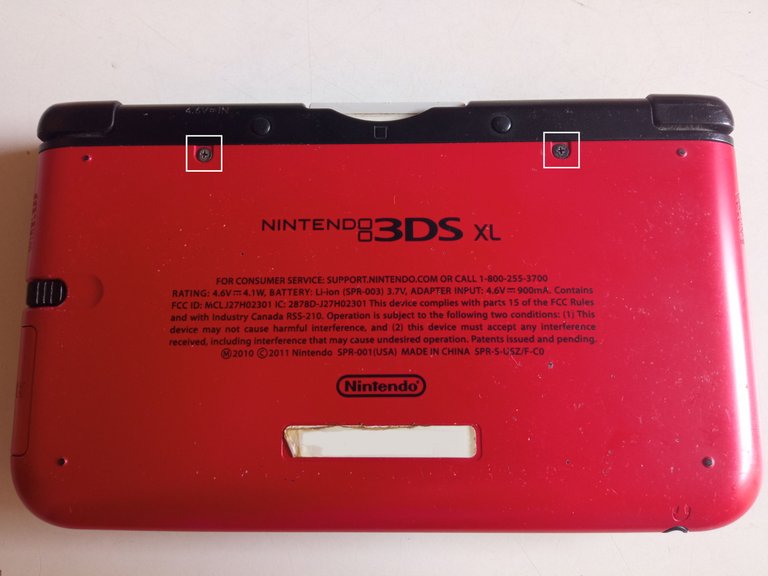
Once with the battery in sight (as you can see, I made a completely professional repair using a bit of paper to prevent it from loosening), it's time to remove the battery and then other screws that fix the real back of the console, there are 4 long screws that are in sight, two more under some pads that we have to remove carefully, and a very small one in the slot where the cartridges are inserted, at first I didn't see this one until the end.
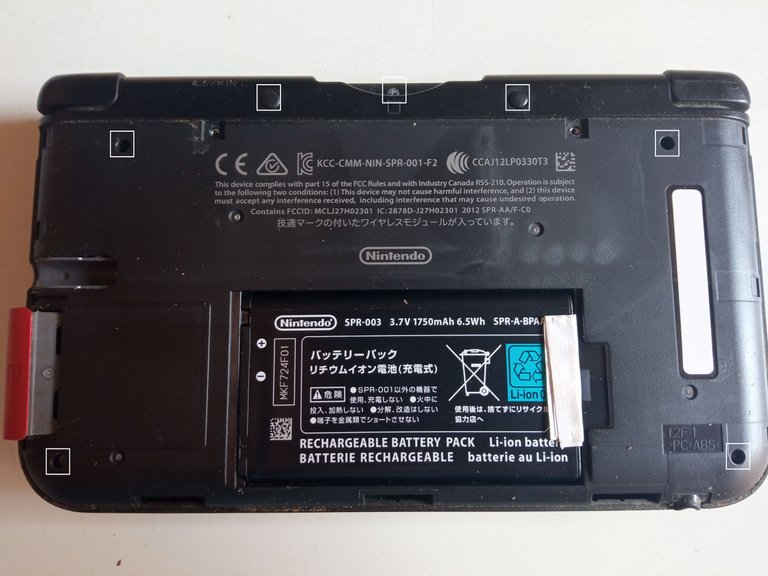
To remove this cover, it's important to do it from the bottom up, as if we were opening a laptop, or a 3DS itself, because at the top are the flex of the triggers and if we start pulling from there they will break.
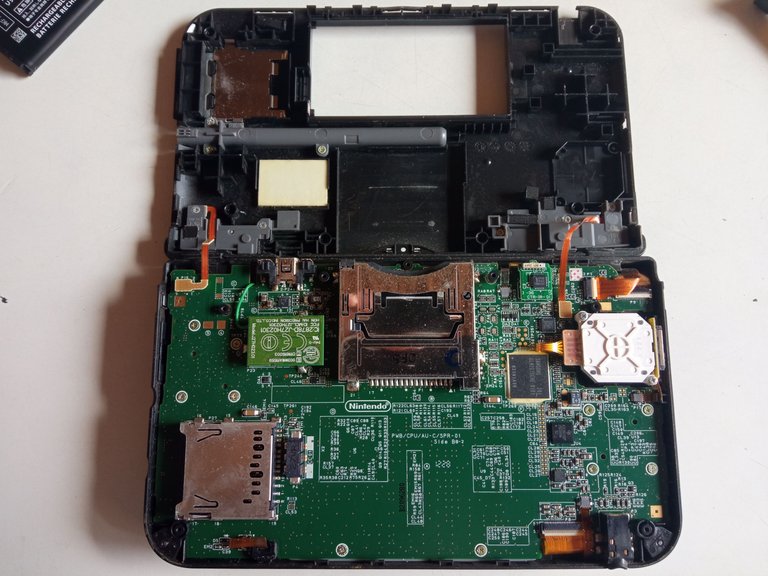
Once with the heart of the 3DS in sight, fortunately, we don't need to disassemble too many more things, the circle pad is fixed by two screws, by removing them we can move the base of the circle pad (carefully, because it has a flex), once we turn it around I could remove the broken piece of plastic that later I'll replace for the one I bought.
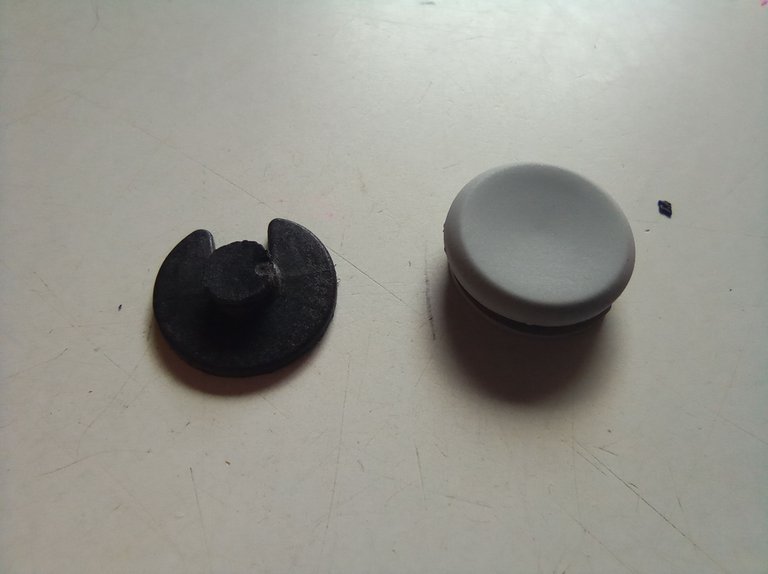
This part was the most cumbersome of the whole process, because I had to open the console (that is, I was disassembling it with the hinges closed), because the spare part must be inserted from the inside of the console thanks to a notch that has precisely for that, this isn't very difficult, but after inserting the piece, it still remains to put this small plastic "washer" which is responsible for the plastic piece stays in place.
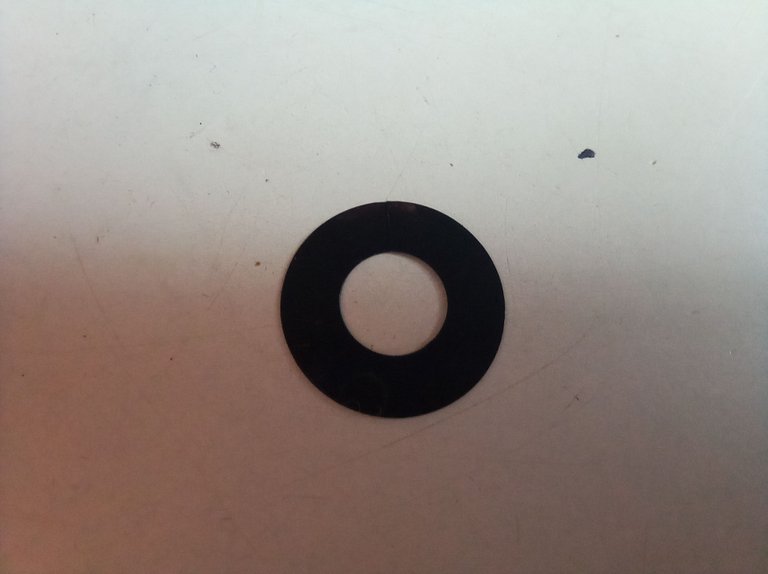
This washer has a cut to be able to bend it slightly, you have to insert it so that it's fixed inside the plastic piece, as I said, it's there so that the piece doesn't come out, being careful not to break it, this was something that took me about 10 minutes looking for the best way to make it fit, but it was certainly difficult to work with such a small piece in such a confined space, but finally I DID IT!.
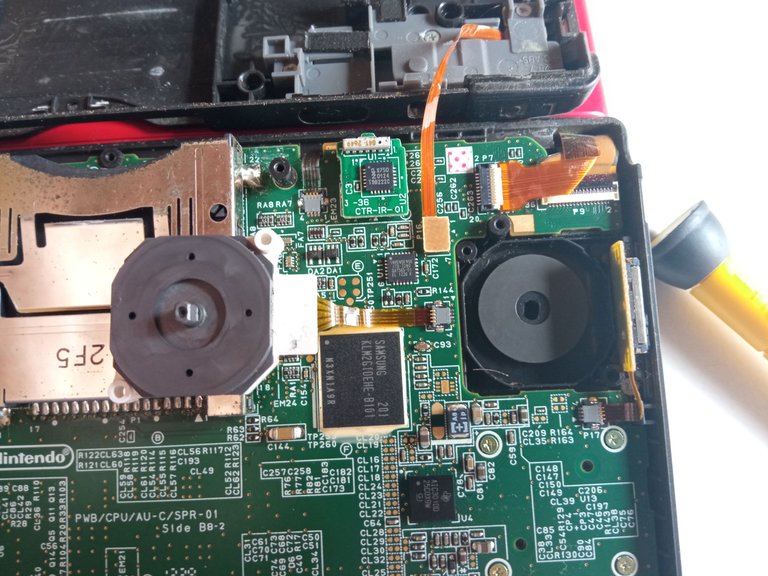
Half of the job was done, it only remained to insert the base of the circle pad into the plastic piece and assemble everything again, this was the most relieved part of the whole process, but I was still careful to use the right screws in each place, as I separated them by groups so as not to confuse them later.

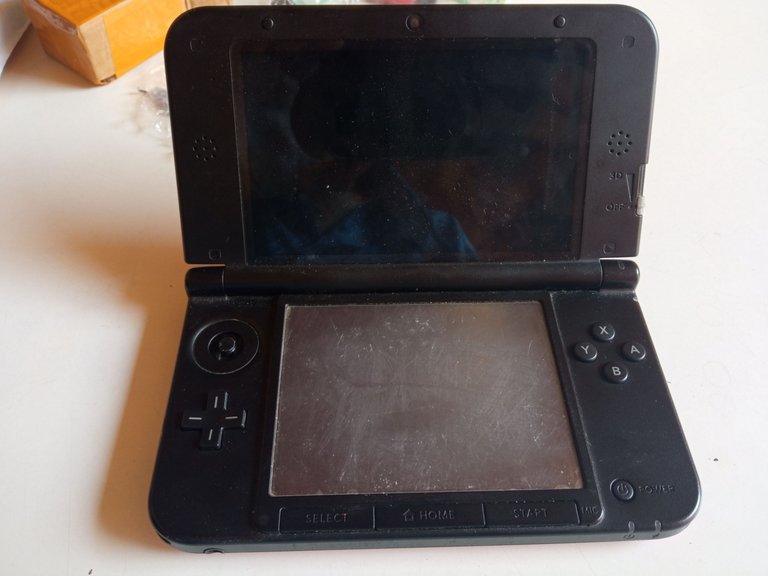
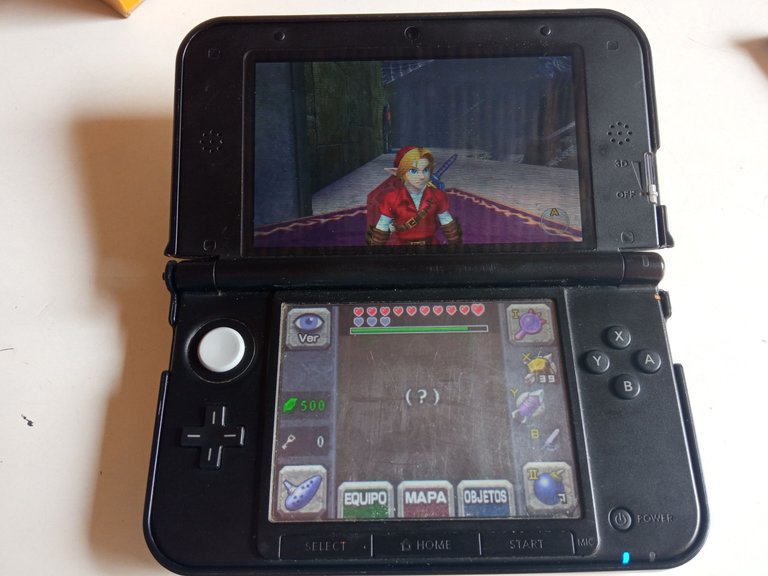
Before fixing again the back cover (the red one), I decided to turn on the console and see if everything worked, otherwise I didn't have to disassemble everything again, and IT WORKED, the console turned on, and the circle pad worked perfectly, so I turned it off and fixed the cover to test for a while.
Once assembled and with its protective cover in place, I turn on the console and start Zelda Ocarina of Time, one of the games that requires the use of the Circle Pad to move, and everything was perfectly fine, it's a game that I already finished, but returning to play it from time to time is inevitable.
Two years ago while I was looking for a 3DS to buy, I saw many at low cost, but more than half of them had the circle pad broken, and I really didn't know that it would be a piece so "simple" to replace, so if you have a 3DS in a corner of your room taking dust (like mine ahem), I encourage you to give it a second life if you're still interested in using it, now, if the 3DS has a broken circle pad, the triggers don't work properly, the stylus is lost, the A doesn't work, and the top screen is broken, well it surely does need more work haha.
In any case, I'm pretty happy with the result, as the console was like new once again, I'd like to see how long this replacement lasts being brand new, without much more to add, thank you very much for reading, I hope you liked it.
See you around, bye bye.
See you around, bye bye.
Photos were taken by me 📷
Translation with help of DeepL

✨Español✨
✨Español✨
Antes de empezar, me gustaría aclarar que yo NO SOY TÉCNICO, desde corta edad he tenido fama de desarmar cosas y terminarlas destrozando, el primer carro a control remoto que me regalaron lo desarmé y le arranqué los circuitos, mi padre tenía un desarmador automático, intenté abrirlo y tenía un mecanismo con varios engranajes que no supe reparar, incluso una vez abrí mi viejo PS2 para ver por qué no encendía y acabé rompiendo el flex de la lente, como pueden ver, no tengo muy buena reputación con estas cosas haha.
Pero eso fue hace años, no tenía cuidado para realizar este tipo de trabajos, obviamente es algo que he sabido corregir, de vez en cuando le hago mantenimiento a mi pc o la de algún familiar, pero tampoco tengo conocimientos profesionales en el campo de desarmar aparatos electrónicos, no sé usar soldadura ni nada por el estilo, pero al ver que no era un proceso TAN complicado (gracias YouTube) decidí afrontarlo por mi cuenta en vista de que cualquier técnico, va a cobrarte un ojo de la cara, no sin antes cambiarte todas las piezas buenas por otras defectuosas y decirte "bro se te dañó la pantalla", sé que no todos los técnicos son así, y yo mismo he sido atendido por muy buenos técnicos, pero no quería pagar lo que me costó la consola para repararla.
En resumen, compré mi Nintendo 3DS XL de segunda mano hace ya dos años y un par de meses, la consola estaba impecable y no podía estar más feliz con mi adquisición, aún le tengo mucho cariño y si no lo uso tanto como antes es porque llegó un momento en el que el circle pad se empezó a deteriorar, para quien no lo ubique, el circle pad es esa "palanca" que los 3DS tienen encima de la cruceta y que es casi indispensable para cualquier juego de 3DS, primero se le soltó el recubrimiento de goma, y eventualmente se rompió, creo que es inevitable después de un tiempo pues es una de las cosas que más se utiliza a la hora de jugar.
La consola ya llevaba un tiempo así, pero la semana pasada decidí investigar si era posible conseguir el repuesto necesario para reemplazarla, y para mi suerte, la encontré con envío gratis y todo, solo tuve que esperar ya esta semana pude ir a recoger la susodicha pieza, @gutstheme tuvo la amabilidad de acompañarme a recoger el envío aparte de prestarme un juego de destornilladores para hacerle la cirugía a la consola.
Sin esperar mucho, al regresar a la casa empecé a desarmar el 3DS, les iré comentando un poco cómo fue el proceso, pero adelantaré que estaba bastante nervioso pues no quería romper nada.
Lo primero es retirar la tapa trasera, solo tiene dos tornillos pequeños y cortos que la sostienen, una vez removidos los tornillos hay que levantarla por la parte superior, ya que en la parte inferior está fijada por unas pestañas, esto no fue tarea difícil ya que anteriormente tuve que quitar esta tapa para revisar la batería, la cual estaba un poco floja, a pesar de eso es bueno tener cuidado porque es una tapa muy delgada y se puede romper con facilidad.
Una vez con la batería a la vista (como pueden ver, le hice una reparación completamente profesional utilizando un poco de papel para que no se aflojara), toca quitar la batería y luego otros tornillos que fijan la verdadera parte trasera de la consola, son 4 tornillos largos que están a la vista, dos más debajo de unas almohadillas que tenemos que remover con cuidado, y uno muy pequeño en la ranura donde se insertan los cartuchos, en un primer momento este no lo vi hasta el final.
Para quita esta tapa, es importante hacerlo de abajo hacia arriba, como si estuviésemos abriendo una laptop, o una 3DS en sí misma, pues en la parte superior están los flex de los gatillos y si empezamos tirando de ahí se van a romper.
Una vez con el corazón de la 3DS a la vista, afortunadamente, no necesitamos desarmar demasiadas cosas más, el circle pad está fijado por dos tornillos, al retirarlos ya podemos mover la base del circle pad (con cuidado, pues tiene un flex), una vez le damos la vuelta pude retirar la pieza rota de plástico que posteriormente voy a reemplazar por la que compré.
Esta parte fue la más engorrosa de todo el proceso, pues tuve que abrir la consola (es decir, la estaba desarmando con las bisagras cerradas), pues la pieza de respuesto hay que insertarla desde la parte interna de la consola gracias a una muesca que tiene precisamente para eso, esto no es muy difícil, pero después de insertar la pieza, aún queda meter esta pequeña "arandela" de plástico la cual se encarga de que la pieza de plástico se quede en su sitio.
Dicha arandela tiene un corte para poder doblarla ligeramente, hay que insertarla de forma que quede fijada dentro de la pieza de plástico, ya que como les dije, está ahí para que la pieza no se salga, teniendo cuidado de no romperla, esto fue algo que me tuvo unos 10 minutos buscando la mejor forma de hacer que encaje, pero ciertamente era difícil trabajar con una pieza tan pequeña en un espacio tan cerrado, pero finalmente LO LOGRÉ.
La mitad del trabajo estaba hecho, solo quedaba insertar la base del circle pad en la pieza de plástico y ensamblar todo otra vez, esta fue la parte más aliviada de todo el proceso, pero aún así tenía cuidado de usar los tornillos correctos en cada lugar, pues los separé por grupos para no confundirlos después.
Antes de fijar nuevamente la tapa trasera (la roja), decidí encender la consola y ver si todo funcionaba, caso contrario no tenía que desarmar todo de nuevo, y FUNCIONÓ, la consola encendió, y el circle pad funcionaba perfectamente, así que la apagué y fijé la tapa para hacer pruebas durante un rato.
Una vez ensamblada y con su forro protector colocado, enciendo la consola y arranco el Zelda Ocarina of Time, uno de los juegos que necesita obligatoriamente el uso del Circle Pad para moverte, y todo iba perfectamente bien, es un juego que ya terminé, pero regresar a jugarlo cada cierto tiempo es inevitable.
Hace dos años mientras buscaba un 3DS el cual comprar, veía muchos a bajo costo, pero más de la mitad tenían el circle pad roto, y realmente no sabía que sería una pieza tan "sencilla" de reparar, por lo que si tienes un 3DS en un rincón de tu cuarto llevando polvo (como el mio ahem), te animo a darle una segunda vida si es que aún te interesa utilizarlo, ahora, si el 3DS tiene roto el circle pad, los gatillos no funcionan bien, el lapiz se perdió, la A no funciona, y la pantalla de arriba está rota, pues seguramente sí necesite más trabajo haha.
En cualquier caso, estoy bastante feliz con el resultado, pues la consola quedó como nueva una vez más, me gustaría ver cuanto tiempo dura este reemplazo al ser completamente nuevo, sin mucho más que agregar, muchas gracias por leer, espero les haya gustado.
Nos vemos por ahí, bye bye.
Nos vemos por ahí, bye bye.
Las fotos fueron tomadas personalmente 📷
Hey me alegra que hayas podido arreglar el stick, ahora esta como y preparada para todas las horas de uso que va a tener, porque sin duda alguna, con un 3ds es para perderse en el tiempo jugando.
Gracias, y totalmente, es una consola con un catálogo enorme, y encima tienes retrocompatibilidad con Ds y otras consolas más antiguas, es por ello que quiero tenerla en condiciones óptimas, así puedo disfrutarla como se debe, gracias por comentar.
Que bueno que hayas podido arreglar tu 3DS bro, espero que éste post le pueda ser de mucha utilidad a más personas, muy bueno. Saludos!
No era mi intención al hacer el post la verdad, como digo lo hago más desde el punto de vista de narrar una experiencia, pero si a alguien le resulta útil pues yo muy feliz haha, gracias por comentar.
de nada 🥵🤙
Congratulations @stk-g! You have completed the following achievement on the Hive blockchain and have been rewarded with new badge(s):
Your next target is to reach 1500 comments.
You can view your badges on your board and compare yourself to others in the Ranking
If you no longer want to receive notifications, reply to this comment with the word
STOPTo support your work, I also upvoted your post!
Check out the last post from @hivebuzz:
Support the HiveBuzz project. Vote for our proposal!
Great job! I didn't think the 3DS would be so simple to open.
My Old 3DS's circle pad's white part fell off once, nothing major though. I literally used superglue on it, a tiny little drop on the center and it never came off again.
Since it was just cosmetic damage and I made sure to not let the glue sip into the internals, it was okay
That's nice, in my case that wasn't an option though, the plastic of the circle pad broke on multiple pieces so I had no option but to replace de entire piece, but on both cases we can still use our consoles, so nice haha.