(ENG/ESP) Old School PC Computer - Asrock Raid Kentsfield 4CoreDX90-VSTA | Restoration and deep maintenance of its components | It can definitely become a low-resource Gamer PC | Part 2
Howdy colleagues! Welcome once again to another content of my authorship. Today I will be sharing with all of you the second part of my project, which is about restoring and trying to repower the CPU with Asrock Raid Kentsfield 4CoreDX90-VSTA board that I have been given as a gift.
This project that I have started fascinates me in every way, I feel that it is something that I am passionate about and I feel very happy about it, I am happy for the fact that I have been able to discover in my other field in which I feel very comfortable.
¡Que tal colegas! Sean bienvenidos una vez más a otro contenido de mi autoría. El día de hoy estaré compartiendo con todos ustedes la segunda parte de mi proyecto, el cual trata de restaurar e intentar repotenciar el CPU con placa Asrock Raid Kentsfield 4CoreDX90-VSTA que me han obsequiado.
Este proyecto que he iniciado me fascina en todos los sentidos, siento que es algo que me apasiona y me siento muy contento por eso, me alegra el hecho que he podido descubrir en mí otro ámbito en el cual me siento muy a gusto.
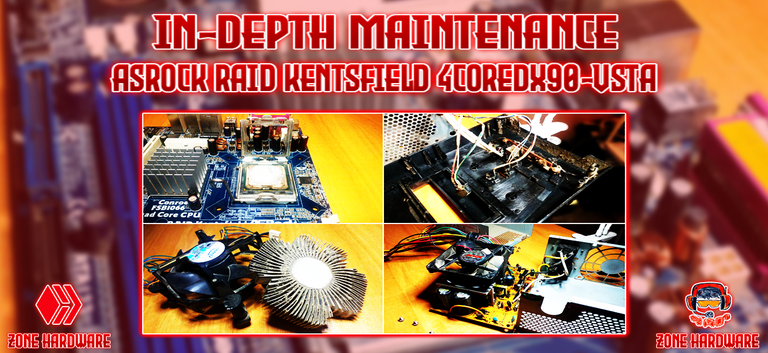

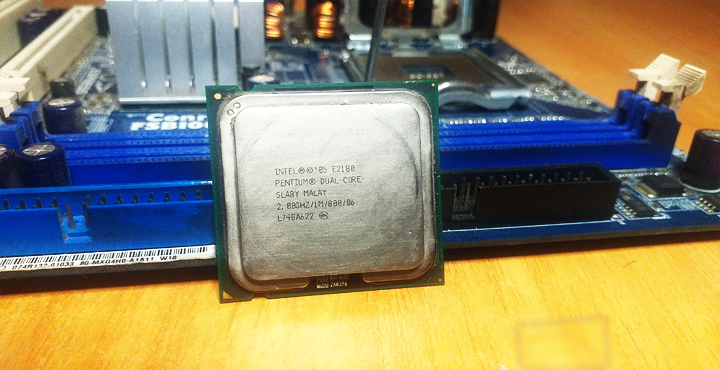
Going into details... In my previous content (Part 1) I focused on looking for the possible fault that could have this modest old school CPU. Luckily for me the problem was not more than the Ram Memories, which did not make a good contact due to the dirt that penetrated the slots.
After getting it working, I focused on giving it a good maintenance with a pretty deep cleaning and partly doing a few restorations to make everything a little neater.
Entrando ahora en detalles... En mi anterior contenido (Parte 1) me enfoqué en buscar la posible falla que podía tener este modesto CPU de la vieja escuela. Para mi suerte el problema que presentaba no iba más allá de las Memorias Ram, las cuales no hacían un buen contacto debido a la suciedad que penetro en las ranuras.
Después de hacerla funcionar, me enfoqué en hacerle un buen mantenimiento con una limpieza bastante profunda y en parte hacer también unas cuantas restauraciones para que todo quedará un poco más prolijo.

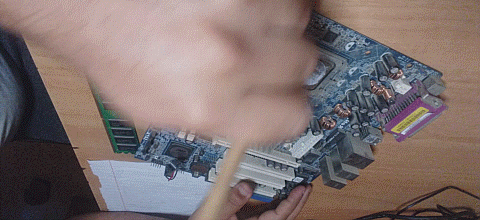
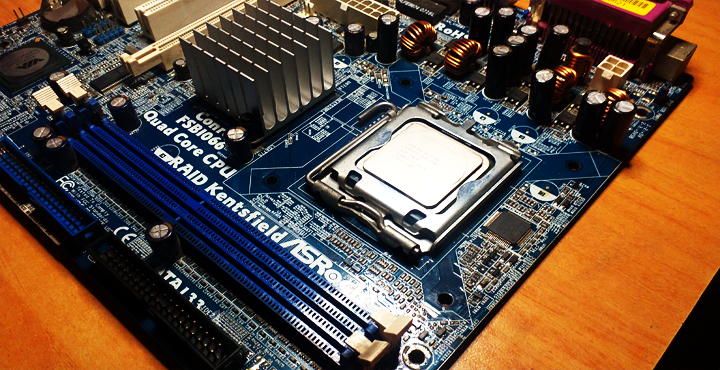
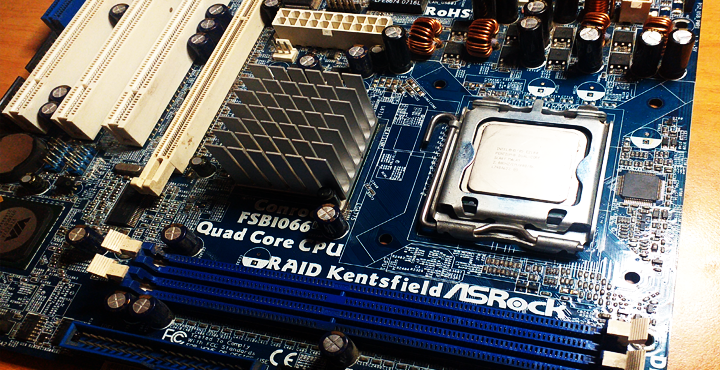
To start with the cleaning I prioritized first the motherboard, I should mention that for this I did not use special cleaning tools or anything like that, I just made use of what I had at my fingertips, for dust and all the dirt that was on the board I used a small brush, but it worked for me to make a good cleaning.
Para empezar con la limpieza priorice primeramente la tarjeta madre, debo mencionar que para esto no use herramientas especiales de limpieza ni nada por el estilo, solo hice uso de lo que tenía a mi alcance, para el polvo y toda la suciedad que se encontraba en la placa use un pincel un tanto pequeño, pero el mismo me funciono para hacer una buena limpieza.
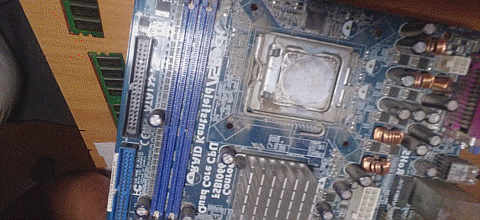
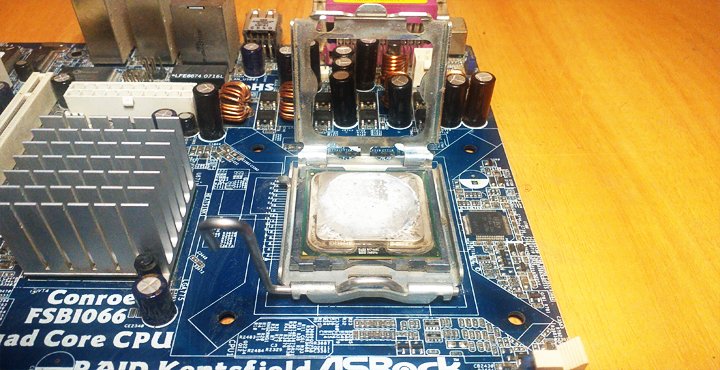
In spite of not having something that allowed me to use compressed air to make the cleaning more efficient, I was still able to give it the deep cleaning I wanted, it is important to say that I also used Isopropyl Alcohol, which allowed me to remove the dirt that was stuck to the plate. Upon completion of the cleaning of the plate, I have been quite satisfied with the end result, it was quite shiny.
A pesar de no tener algo que me permitiera utilizar aire comprimido para que la limpieza fuera más eficiente, igual pude darle esa limpieza profunda que quería, es importante decir también que he usado Alcohol Isopropilico, el cual me permitió quitar esa suciedad que estaba pegada a la placa. Al culminar con la limpieza de la placa, he quedado bastante satisfecho con el resultado final, quedo bastante reluciente.
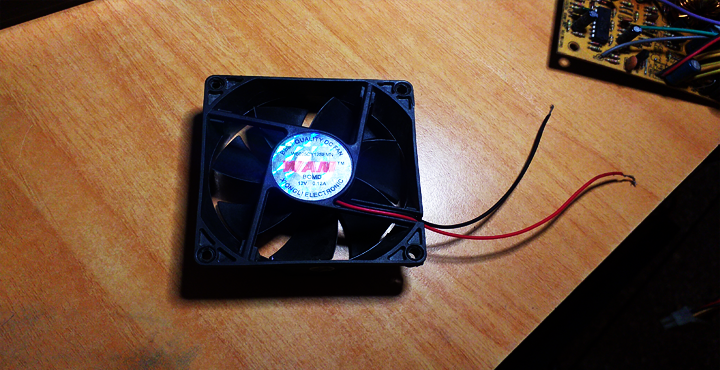
After finishing the cleaning of the motherboard, I focused on the heatsink. I must say that of all the components this was the dirtiest, dust and dirt abounded in the heatsink grid, on the other hand, the Fan Cooler was also with a lot of dirt, I remember that when I was doing the tests, when I turned on the heatsink emitted a noise quite annoying, all because of the dirt that was on it.
Después de terminar la limpieza de la tarjeta madre, me enfoqué con el disipador de calor. Debo decir que de todos los componentes esté era el más sucio, el polvo y la suciedad abundaban en la rejilla disipadora, por otra parte, el Fan Cooler también estaba con mucha mugre, recuerdo que cuando estuve haciendo las pruebas, al encender el disipador emitía un ruido bastante molesto, todo a causa de la mugre que tenía encima.
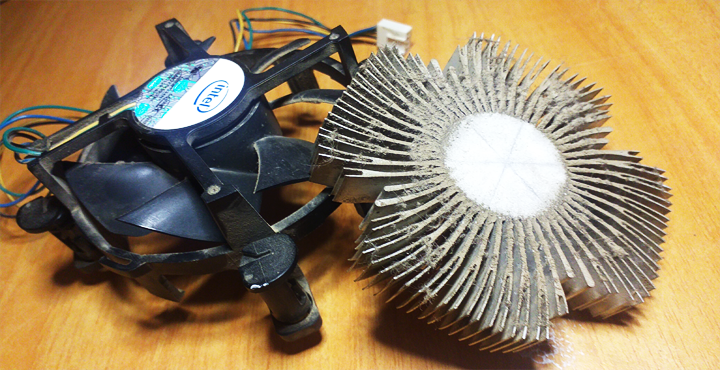
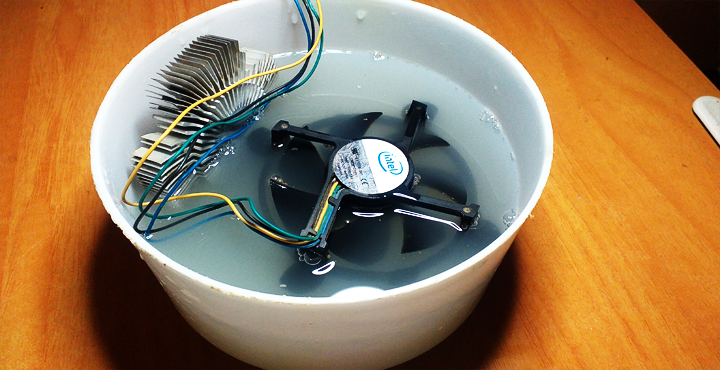
For the cleaning of this component I went to another level of cleanliness. Digging through the web I was able to inform myself in such a way that I could get the best out of the cleaning of this heatsink, the fan cooler brings sealed as far as its mechanism is concerned and the heatsink grille did not give so much trouble as to be careful. The cleaning of this component I ended up doing it with "AXION", here it is known as a strong grease remover and dirt remover, combine water with Axion and submerged the fan cooler with the heatsink grill.
Para la limpieza de este componente he ido a otro nivel de limpieza. Indagando por la web pude informarme de tal manera que he podido sacarle el mejor provecho a la limpieza de este disipador, el fan cooler trae sellado lo que se refiere a su mecanismo y la rejilla disipadora no daba tanto problema en cuanto hacer cuidadoso. La limpieza de este componente la terminé haciendo con "AXION", aquí se conoce como un fuerte quita grasa y removedor de sucio, combine agua con Axion y sumergí el fan cooler con la rejilla disipadora.
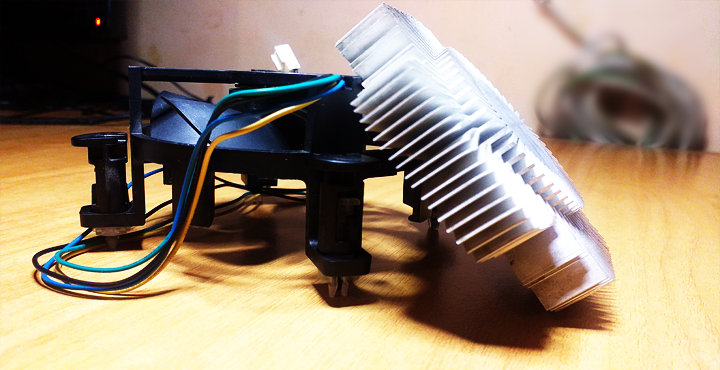
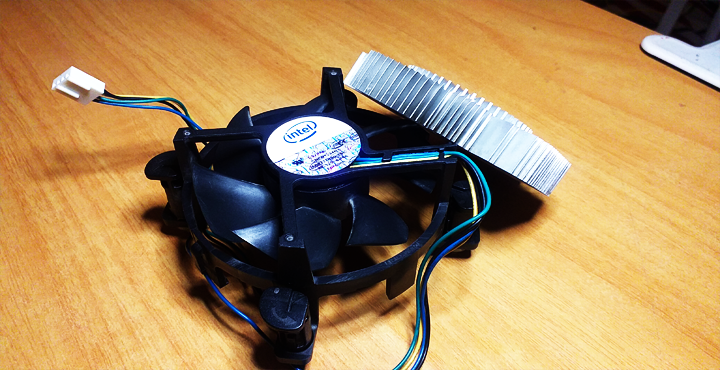
After having applied this type of cleaning to the heatsink, the final result could not be better, I have been quite surprised with how clean it was, it looked like new.
Después de haber aplicado este tipo de limpieza al disipador, el resultado final no pudo ser mejor, he quedado bastante sorprendido con lo limpio quedo, se veía como nuevo.
Now at this point will enter as such the word restoration, this is because this is where I will start applying those details that will give a new life to this modest old school CPU.
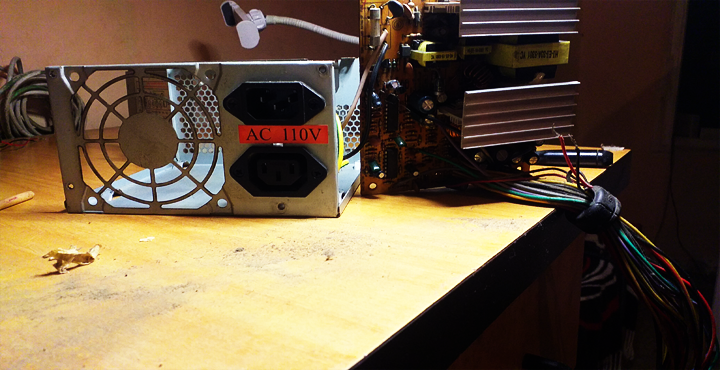
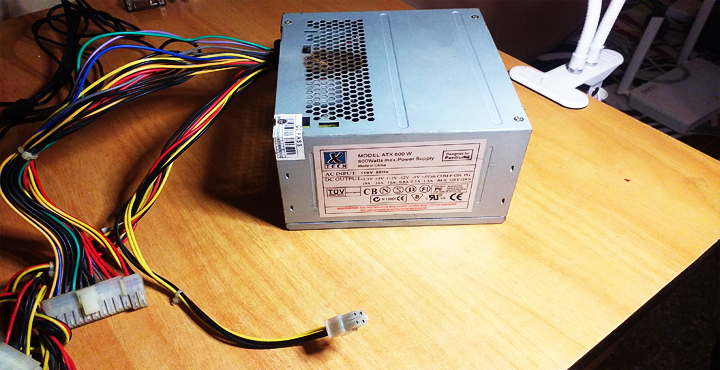
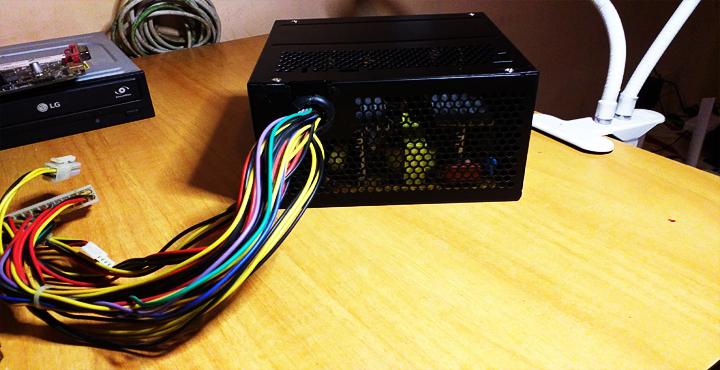
The first restoration that I applied was to the power supply, first what I did was to give it a good cleaning, since it was quite dirty, full of dust and with some cobwebs.
Ahora en este punto entrará como tal la palabra restauración, esto se debe a que es aquí donde empezaré aplicar esos detalles que le darán una nueva vida a este modesto CPU de la vieja escuela.
La primera restauración que aplique fue a la fuente de poder, primeramente lo que hice fue darle una buena limpieza, ya que la misma estaba bastante sucia, llena de mucho polvo y con algunas telarañas.
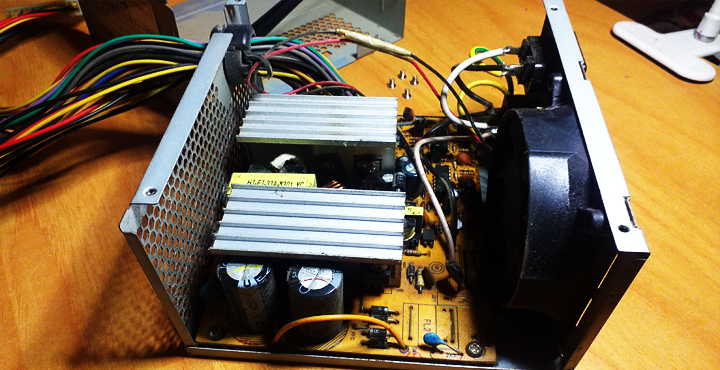
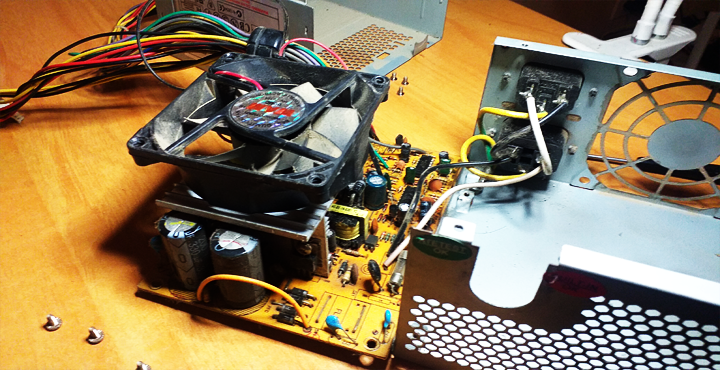
Being quite limited with the cleaning implements, what I tried was to use the brush that I had in the best possible way to remove as much dirt from the inside of the power supply. After a while, I managed to leave it much better than before, the fan cooler of the power supply was different from the one of the heatsink, so I could not do such a deep cleaning immersing it in water with Axion degreaser, what I did with it was to start cleaning it little by little with isopropyl alcohol until reaching the desired cleaning point, in the end I liked how the fan cooler of the power supply was.
Al estar bastante limitado con los implementos de limpieza, lo que trate fue de utilizar el pincel que tenía de la mejor manera posible para poder sacar la mayor cantidad de suciedad del interior de la fuente de poder. Después de un rato, logre dejarla mucho mejor que antes, el fan cooler de la fuente era diferente al del disipador, así que no pude hacerle una limpieza tan profunda sumergiéndolo en agua con Axion desengrasante, lo que hice con él fue empezar a limpiarlo de a poco con alcohol isopropolico hasta llegar al punto de limpieza deseado, al final me gusto como quedo el fan cooler de la fuente de poder.
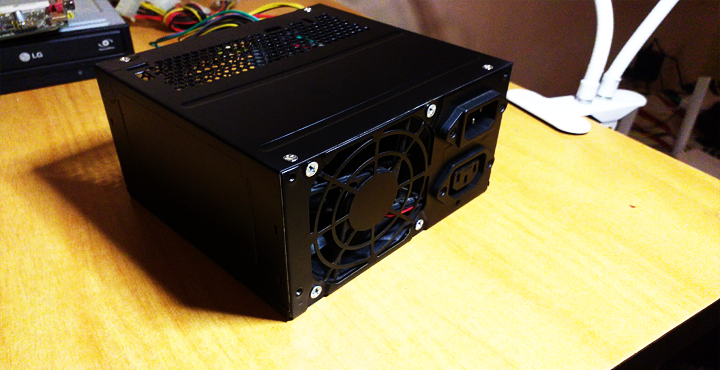
Up to this point I had already made a fairly acceptable cleaning to the power supply, so my next step was to give it that touch of restoration, that detail of a new life so to speak. For this I have used Spray Paint with black and white "MATT" colors.
Hasta este punto ya había hecho una limpieza bastante aceptable a la fuente de poder, así que mi próximo paso era darle ese toque de restauración, ese detalle de una vida nueva por decirlo de algún modo. Para ello he usado Pintura en Spray con colores negro y blanco "MATE".

To do this painting process I had to be quite careful, since I could not find a way to disassemble the plate of the power supply completely, but I managed to do what I had in mind and give another different visibility to this power supply. The color I ended up using on it was black, the finish was quite gratifying for me, because I ended up giving it that cool touch that I was looking for, the final result was quite neat.
Para hacer este proceso de pintura he tenido que ser bastante cuidadoso, ya que no pude encontrar la forma de desmontar la placa de la fuente por completo, pero me las ingenié para poder hacer lo que tenía en mente y darle otra visibilidad distinta a esta fuente de poder. El color que termine utilizando en ella fue el color negro, el terminado fue bastante gratificante para mí, porque termino dándole ese toque tan genial que tanto buscaba, el resultado final fue bastante prolijo.


In this way I will conclude this second part .... Now I have to work in depth with the Case to which I also plan to give a good touch up, for the third part I hope everything ready to put an end to this beautiful project. Everything is starting to have a better shape and no doubt this modest old school CPU will become a modest PC Gamer for low resource games, I'm sure!
De esta manera iré dando por concluida esta segunda parte... Ahora me toca trabajar a fondo con el Case al cual también pienso darle un buen retoque, para la tercera parte espero todo listo para ponerle punto y final a este bonito proyecto. Ya todo empieza a tener una mejor forma y sin duda alguna este modesto CPU de la vieja escuela se convertirá en modesto PC Gamer para juegos de bajos recursos, estoy seguro!

All the images that I showed in this content are of my total authorship. Thanks for visiting and reading my content, see you soon!
Todas las imágenes que mostré en este contenido son de mi total autoría. Gracias por visitar y leer mi contenido, hasta pronto!

 |  |  |
0
0
0.000
Hermano admiro mucho el hecho de que puedas amar las CPU, yo cuando compre la mía la tuve que comprar ya pre armada, obviamente me salió mucho mas cara ya que por partes terminas armando algo mejor, mas barato también pero la mía esta bien, solo que me daba algo de miedo armarla y joderla.
Hola Bro! Gracias por el cumplido =) En realidad no soy tan experto que digamos, pero poco a poco voy aprendiendo. Este CPU me cayo del cielo para poner en practica todo lo que he ido aprendiendo con el paso del tiempo.
Y tienes razón, para armar un CPU debes tener conocimientos, bueno por lo menos lo básico. De resto no es tan complicado ;) Gracias por visitar y leer mi contenido, hasta pronto!
Thank you for sharing this amazing post on HIVE!
Your content got selected by our fellow curator @stevenson7 & you just received a little thank you via an upvote from our non-profit curation initiative!
You will be featured in one of our recurring curation compilations and on our pinterest boards! Both are aiming to offer you a stage to widen your audience within and outside of the DIY scene of hive.
Join the official DIYHub community on HIVE and show us more of your amazing work and feel free to connect with us and other DIYers via our discord server: https://discord.gg/mY5uCfQ !
If you want to support our goal to motivate other DIY/art/music/homesteading/... creators just delegate to us and earn 100% of your curation rewards!
Stay creative & hive on!
Gracias por el apoyo!
Ya va agarrando forma, me gusto como ha quedado la placa madre, quedo como nueva, una limpieza y todo va quedando como nuevo, le va quedando muy bien su trabajo, lo felicito. Un saludo amigo
Gracias colega! Al principio me estaba costando un poco, pero poco a poco fui removiendo toda esa mugre que estaba pegada de la placa. Espero terminarlo pronto ;) Saludos!
Amigo te ha quedado precioso todo, esa fuente se ve hermosa con la pintura. Felicidades por el gran trabajo realizado y se nota muchísimo que te apasiona como lo decis en el blog.
El post está tremendo, me gusta como lo organizas, tus imágenes, los gifs y los separadores.
Solo un consejo te dejo, tomalo como eso, el título me parece que está muy largo, tal vez podrías haber omitido la parte que dice "It can definitely become a low-resource Gamer PC" y lo de "parte2". Lo de parte 2 ya está aclarado en el texto y en adicional podes agregar la primera parte también con un link directo para que podamos acceder a ella en el mismo post.
Nada más compadre, me ha encantado el post. Saludos bro!
Amigo te ha quedado precioso todo, esa fuente se ve hermosa con la pintura. Felicidades por el gran trabajo realizado y se nota muchísimo que te apasiona como lo decis en el blog.
tal vez podrías haber omitido la parte que dice "It can definitely become a low-resource Gamer PC" y lo de "parte2". Lo de parte 2 ya está aclarado en el texto y en adicional podes agregar la primera parte también con un link directo para que podamos acceder a ella en el mismo post.
Nada más compadre, me ha encantado el post. Saludos bro!
Congratulations @leogolj! You have completed the following achievement on the Hive blockchain and have been rewarded with new badge(s):
Your next target is to reach 25000 upvotes.
You can view your badges on your board and compare yourself to others in the Ranking
If you no longer want to receive notifications, reply to this comment with the word
STOPSaludos, usted ha hecho un trabajo bastante bueno, no había visto el uso del axion para el ventilador. Cuando hago ese servicio, sumerjo el ventilador en alcohol y le hago funcionar sumergido, para sacarle todo el polvo. Bien le deseo lo mejor, mucho animo.