Archivos más ligeros para la web + bonus [esp][eng]

VERSIÓN EN ESPAÑOL
Una de las últimas habilidades que en programación he adquirido es trabajar mis proyectos con Webpack, el cual al principio -tal vez por no comprenderlo - lo consideré algo abstracto y poco útil para lo que quería, sin embargo, a medida que fui profundizando e investigando me di cuenta lo errado que estaba, ya que actualmente la considero una gran herramienta, y en este post les quiero contar por qué, y lo haré mediante una comparativa que me ha ayudado a entender su utilidad.
Entrega ligera
Una de los hechos más comunes que se escucha en la programación es la diferencia entre trabajar en un entorno de desarrollo y hacerlo en un entorno de producción, ya que el primero es todo lo que se hace tras el telón (peleas con los bugs, testing, etc.) mientras el segundo es presentar el producto ya terminado, servido para su consumo. Aquí empezamos nuestra comparación, y es que podemos imaginar que cuando se programa en la fase de desarrollo es como estar en una cocina picando aliños, buscando un sartén, prendiendo las hornillas, graduando el horno, etc., todo un poco caótico, cuando ya sale un plato para servir este es precisamente el entorno de producción, donde los comensales ni se imaginan todo el proceso e incidentes para que todos los ingredientes de su plato llegaran a la mesa.
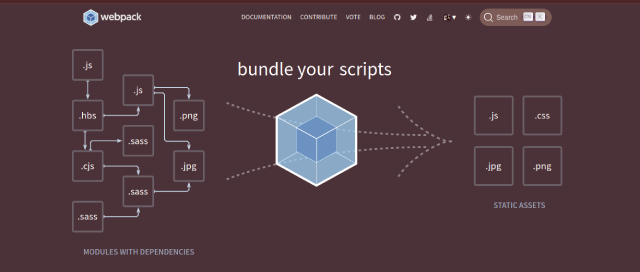
Webpack es precisamente uno de esos servicios, digamos - para seguir con la comparación - restaurantes, que nos hacen llegar los software de la web para un uso óptimo, ya sea como sitio web o incluso una aplicación más compleja. Existen otros restaurantes (Parce, Rollup, Vite, entre otros) que también hacen lo mismo, pero de distintas formas (así como cada chef tiene su sazón) optimizan todos los diversos archivos que usamos para desarrollar una aplicación (html, css, js, png, jpg, gif, sass, stylus, jsx, etc.) para que lo que se sirva al navegador sea, sin perder su esencia, algo más fácil de procesar. Por poner un ejemplo, al pasar por Webpack todos los archivos JavaScript que hicimos en el desarrollo, este no entregará uno solo, con la misma información y lógica, pero además optimizado para su lanzamiento. ¿Cómo ocurre la magia? ¿Quiénes están implicados en esta maravilla? Sígueme en mi historia.
Los trabajadores (Basic Setup)
Detrás del telón, en la cocina, no solo está el chef, hay otras personas que prestan su servicio según un área específica: desde los que limpian y ordenan el lugar, quienes traen los insumos, los que están pendiente de los pedidos, los mesoneros, hasta los gerentes y el dueño del lugar. Cada uno cumple con una tarea para que el plato llegue a la mesa, en el caso de Webpack se habla de "paquete", por eso, se le llama empaquetador web, para armar el mismo necesitamos en primer lugar instalar las dependencias o librerías correspondientes dentro del proyecto que vayamos a realizar con los comandos:
- npm i webpack webpack-cli -D
Luego, creamos un archivo en nuestra carpeta raíz con el nombre de webpack.config.js, esta es la "cocina" según nuestra historia, ya que aquí es donde haremos toda nuestra configuración, de la cual me gustaría subrayar dos cosas: Primero que es totalmente personalizable, quizá por eso el tema en principio puede ser un poco abrumador, y segundo que podemos automatizar algunas tareas tales como mover algunos archivos, darles un nombre, transpilar código, montar un servidor para desarrollo, etc. Mi intención no es enseñar en detalle como funciona todo esto, sino dar una idea y animar a su uso, lo que sí puedo adelantarles es la configuración y estructura básica a tener en cuenta, tomando la comparación establecida sería como los planos arquitectónicos para montar el restaurante.
Solo debemos llamar al principio de nuestro archivo al módulo "path" que node.js ya nos instala de manera predeterminada, luego haremos una variable tipo objeto con el nombre de "module.exports" con unos requerimientos básicos, tal como se muestra:
const path = require('path');
const HtmlWebpackPlugin = require('html-webpack-plugin');
const MiniCssExtractPlugin = require('mini-css-extract-plugin');

module.exports = {
  entry: './src/index.js',

  output: {
    path: path.resolve(__dirname, 'dist'),
    filename: 'bundle.js',
  },

  resolve: {
    extensions: ['.js', '.jsx']
  },

  module: {
    rules: [
      {
        test: /\.(js|jsx)$/,
        exclude: /node_modules/,
        use: {
          loader: 'babel-loader',
        }
      },

      {
        test: /\.css$/,
        use: [
          'style-loader',
          'css-loader',

        ]
      }
    ]
  },

  plugins: [
    new HtmlWebpackPlugin({
      template: './public/index.html',
      filename: './index.html'
    }),
    new MiniCssExtractPlugin({
      filename: '[name].css'
    })
  ],

}
Dentro de esta configuración podemos observar que hemos colocado las siguientes propiedades:
entry, donde establecemos el archivo javascript principal de nuestro proyecto, cuyo estándar es: './src/index.js'
output, aquí va la ruta de salida, es decir, donde vamos a empaquetar nuestro código, sería como el plato donde vamos a servir la comida. Usamos la dependencia path así path: path.resolve(__dirname, 'dist') y le damos un nombre que aunque puede ser cualquiera convencionalmente es o main.js o bundle.js., en el ejemplo: filename: 'bundle.js'
resolve, Los archivos con los que vamos a trabajar, en la imagen de arriba, extensions: ['.js', '.jsx'], esto es, archivos de javascript y de react, pero si también vamos a integrar Typescript, por ejemplo, añadiríamos '.ts'.
modules, este espacio es muy importante porque establecemos las rules (directrices) que vamos a seguir, de manera especial los loaders o dependencias que nos van a ayudar a ello, en los que resalta 'babel-loader' que hace que el código javascript que escribamos sea entendible para cualquier navegador y los loaders que traducen para nuestro Webpack los estilos que apliquemos a nuestros proyectos como 'css-loader' entre otros.
Plugins, también este último apartado es importante, ya que es donde colocamos todas las extensiones y recursos que requiramos. Al menos deberían estar new HtmlWebpackPlugin y new MiniCssExtractPlugin que se encargan de mover, optimizar y enlazar nuestros archivos .html y .css con nuestro paquete principal de javascript (el que pusimos en entry).
La Industria (Bonus)
Quizá tanta configuración nos apabulle, ya que al final y al cabo una de las cosas que más queremos al programar es crear código y esto sentimos, nos quita tiempo. ¿Qué pasaría si te dijera que el restaurante de nuestra historia empieza a formar parte de una industria más grande que agiliza su trabajo? De esta manera, aunque llegue un momento en que su clientela (desarrolladores) se empieza a quejar por los protocolos que hay que seguir para el servicio que desean (un plato de comida = Webpack) vuelve a surgir como el ave fénix en todo su esplendor.
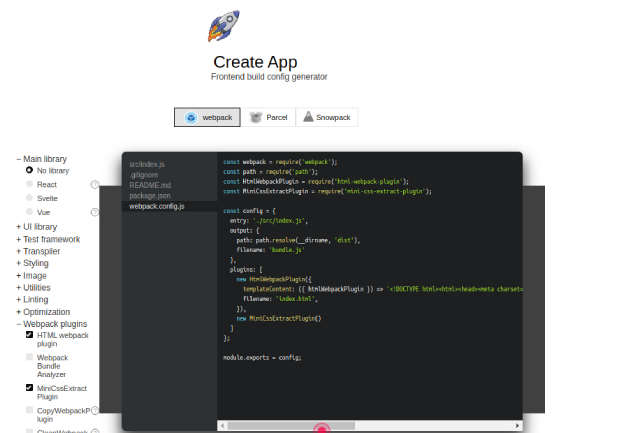
Pues bien, he conocido una página que cumple con estos requerimientos de entregarnos, servida la configuración que requiramos para nuestro Webpack, digamos que ya los cocineros, chef, mesoneros, y todos los que trabajan en nuestro restaurante son robots que automatizan toda la labor. Se trata de CreateApp donde con unos cuantos clics nos permite no solo hacer la configuración básica que mostré arriba, sino también integrar otras herramientas útiles a ella.
Vale acotar que la página también nos entrega un archivo .gitignore, un readme.md y un package.json el cual tiene todas las dependencias que hemos configurado porque al final de esto también se trata Webpack, una herramienta que registra las dependencias que necesitamos para optimizarlas al 100%. Finalmente, para poder usar todo sin problemas no olvidemos ejecutar el comando npm install para que todo lo que en el packge.json está también se instale en nuestro entorno de desarrollo local.
Muchas gracias por haberme acompañado en la lectura de este post, espero tus comentarios y que nos podamos volver a encontrar en una próxima publicación, hasta luego.

ENGLISH VERSION
One of the last skills that I have acquired in programming is to work my projects with Webpack, which at the beginning -perhaps for not understanding it- I considered it something abstract and not very useful for what I wanted, however, as I was deepening and investigating I realized how wrong I was, because now I consider it a great tool, and in this post I want to tell you why, and I will do it through a comparison that has helped me understand its usefulness.
Light delivery
One of the most common facts you hear in programming is the difference between working in a development environment and doing it in a production environment, since the first is all that is done behind the curtain (fights with bugs, testing, etc.) while the second is to present the finished product, served for consumption. Here we begin our comparison, and we can imagine that when programming in the development phase is like being in a kitchen chopping seasonings, looking for a pan, turning on the burners, adjusting the oven, etc., all a bit chaotic, when a dish comes out to serve this is precisely the production environment, where diners can not even imagine the whole process and incidents for all the ingredients of their dish to reach the table.
Webpack is precisely one of those services, let's say - to continue with the comparison - restaurants, that make us get the web software for an optimal use, either as a website or even a more complex application. There are other restaurants (Parce, Rollup, Vite, among others) that also do the same, but in different ways (just as each chef has his seasoning) optimize all the various files we use to develop an application (html, css, js, png, jpg, gif, sass, stylus, jsx, etc.) so that what is served to the browser is, without losing its essence, something easier to process. To give an example, by passing through Webpack all the JavaScript files we did in the development, it will not deliver a single one, with the same information and logic, but also optimized for launch. How does the magic happen? Who are involved in this wonder? Follow me in my story.
The workers (Basic Setup)
Behind the curtain, in the kitchen, there is not only the chef, there are other people who provide their services according to a specific area: from those who clean and tidy the place, those who bring the supplies, those who take care of the orders, the waiters, to the managers and the owner of the place. Each one fulfills a task so that the dish reaches the table, in the case of Webpack we speak of "package", for that reason, it is called web packer, to assemble it we need first to install the corresponding dependencies or libraries inside the project that we are going to carry out with the commands:
- npm i webpack webpack-cli -D
Then, we create a file in our root folder with the name webpack.config.js, this is the "kitchen" according to our story since this is where we will do all our configuration, of which I would like to underline two things: First that it is totally customizable, maybe that's why the theme at first can be a bit overwhelming, and second that we can automate some tasks such as moving some files, giving them a name, transpiling code, setting up a server for development, etc. My intention is not to describe in detail how all this works but to give an idea and encourage its use, what I can tell you is the basic configuration and structure to take into account, taking the established comparison would be like the architectural plans to set up the restaurant.
We must only call at the beginning of our file to the module "path " that node.js already installs us by default, then we will make an object type variable with the name of "module.exports " with some basic requirements, as shown here:
const path = require('path');
const HtmlWebpackPlugin = require('html-webpack-plugin');
const MiniCssExtractPlugin = require('mini-css-extract-plugin');

module.exports = {
  entry: './src/index.js',

  output: {
    path: path.resolve(__dirname, 'dist'),
    filename: 'bundle.js',
  },

  resolve: {
    extensions: ['.js', '.jsx']
  },

  module: {
    rules: [
      {
        test: /\.(js|jsx)$/,
        exclude: /node_modules/,
        use: {
          loader: 'babel-loader',
        }
      },

      {
        test: /\.css$/,
        use: [
          'style-loader',
          'css-loader',

        ]
      }
    ]
  },

  plugins: [
    new HtmlWebpackPlugin({
      template: './public/index.html',
      filename: './index.html'
    }),
    new MiniCssExtractPlugin({
      filename: '[name].css'
    })
  ],

}
Within this configuration we can see that we have placed the following properties:
entry, where we set the main javascript file of our project, whose standard is : './src/index.js'.
output*, here goes the output path, that is to say, where we are going to pack our code, it would be like the plate where we are going to serve the food. We use the path dependency so path: path.resolve(__dirname, 'dist') and we give it a name that although it can be any conventionally is either main.js or bundle.js.,in the example: filename: 'bundle.js'.
resolve, the files we are going to work with, in the image above extensions: ['.js', '.jsx'], that is, javascript and react files, but if we are also going to integrate Typescript, for example, we would add '.ts'.
modules*, this space is very important because we establish the rules (guidelines) that we are going to follow, specially the loaders or dependencies that are going to help us to do it, in which stands out 'babel-loader' that makes the javascript code that we write understandable for any browser and the loaders that translate for our Webpack the styles that we apply to our projects as 'css-loader' among others.
Plugins*, also this last section is important, since it is where we place all the extensions and resources that we require. At least there should be new HtmlWebpackPlugin and new MiniCssExtractPlugin that are in charge of moving, optimizing and linking our .html and .css files with our main javascript package (the one we put in entry).
The Industry (Bonus)
Maybe so much configuration overwhelms us, because at the end of the day one of the things we most want to do when programming is to create code and we feel this takes time. What if I told you that the restaurant of our story begins to be part of a larger industry that streamlines its work? This way, even if there comes a time when its clientele (developers) start complaining about the protocols to follow for the service they want (a plate of food = Webpack) it rises again like the phoenix in all its splendor.
Well, I have met a page that meets these requirements to deliver served the configuration we require for our Webpack, let's say that the cooks, chef, waiters, and all those who work in our restaurant are robots that automate all the work. This is CreateApp where with a few clicks allows us not only to make the basic configuration that I showed above but also integrate other useful tools to it.
It is worth noting that the page also gives us a .gitignore file, a readme.md and a package.json which has all the dependencies that we have configured because in the end this is also Webpack, a tool that records the dependencies we need to optimize them to 100%. Finally, to be able to use everything without problems do not forget to execute the command npm install so that everything in the packge.json is also installed in our local development environment.
Thank you very much for having accompanied me in the reading of this post, wishing you always the best and that we can meet again in the next publication, I say goodbye, see you later.


https://twitter.com/JBitcoins/status/1568661723048984579
The rewards earned on this comment will go directly to the people( @jesusalejos ) sharing the post on Twitter as long as they are registered with @poshtoken. Sign up at https://hiveposh.com.