¿Cuál Es La Mejor Forma De Cuidar Nuestro Disco Duro? [Es-En]

Hola chicos, me gusta traer un poco de las cosas que he aprendido a lo largo de mi aprendizaje como técnico de computadoras, el cuidado de nuestro Disco Duro debe ser algo primordial, ya que es el lugar donde guardamos toda nuestra información más importante, que si se llega a morir de un día para otro y tenemos cosas importantes, pues... lamentablemente podemos perder todo, a veces si son rescatables, hay otras veces que ya es un pisapapeles (jajajajajaja), por no hacerle el mantenimiento debido, como yo quiero cuidarlos, les enseñaré mis trucos, desde lo más básico, hasta lo medio, ya que lo avanzado pueden dañar el disco si lo hacen mal y solo se usa en casos de emergencia (que no es nuestro caso).
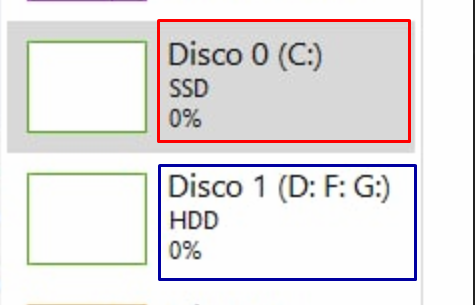
Vamos a ponernos malos a la obra (manos jajajaj), lo primero que debemos de saber es que tipo de Disco Duro tenemos, los más comunes son 2, los HDD (Hard Drive Disk - Disco duro) y los SSD (Solid State Drive - Unidad de Estado Sólido), entre ellos hay una diferencia abismal, ya que en su trabajo normal el SSD supera un x10 en velocidad de escritura al HDD, y eso de debe a que el SSD es como una memoria SD (ya su nomblre da una idea), y es mucho más fácil al sistema encontrar la información, a diferencia del HDD que tiene un disco y una aguja (la prehistoria y la actualidad jajajaja).
Tengo que aclarar que no porque el HDD sea viejo, se deba prescindir de usarlo, este lo debemos tener para almacenamiento, es decir para guardar juegos, fotos y todo lo que sea importante, dejando en el SSD el sistema operativo y uno que otro programa que vaya a perdurar en el tiempo; hay algo que tenemos que tener en cuenta y es que los SSD tienen un límite de escritura de por vida, es decir que tiene un máximo de GB entre escrito y borrado, esto depende de la marca del disco (Si no entienden este punto del SSD me lo dejan en los comentarios).
Con el HDD no pasa eso, se puede escribir y borrar todo que nosotros queramos y nada va a cambiar en él, esté con el tiempo se le dañan sectores el disco que son imposibles de recuperar, hay otras que puedes estar en la misma situación pero son salvables.
Nota
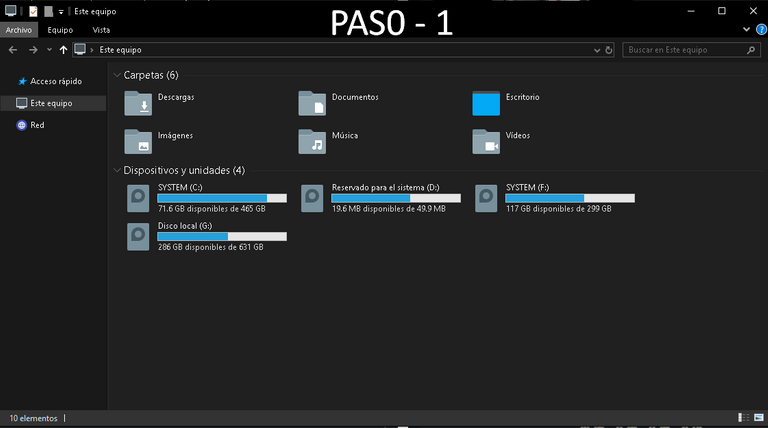
Tengo que aclarar que todo lo que voy a hablar de aqui en adelante es solo para Discos HDD, los SSD no lo necesitan, para saber qué disco tienen, les dejaré un paso a paso en imágenes.
Cuidado básico.
 |  |  |
|---|
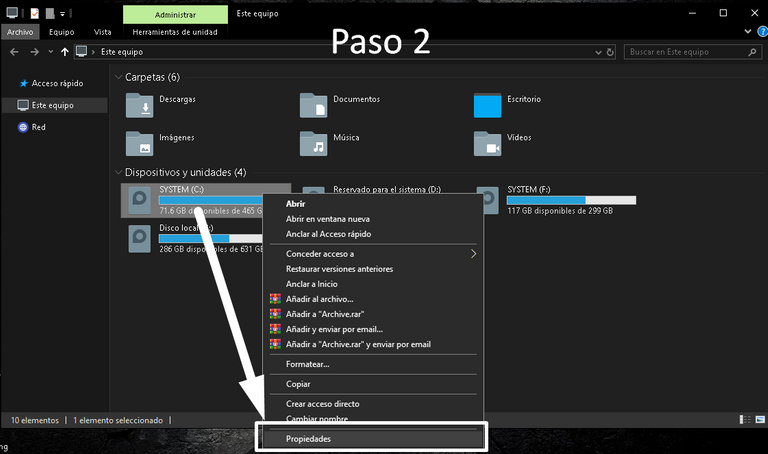
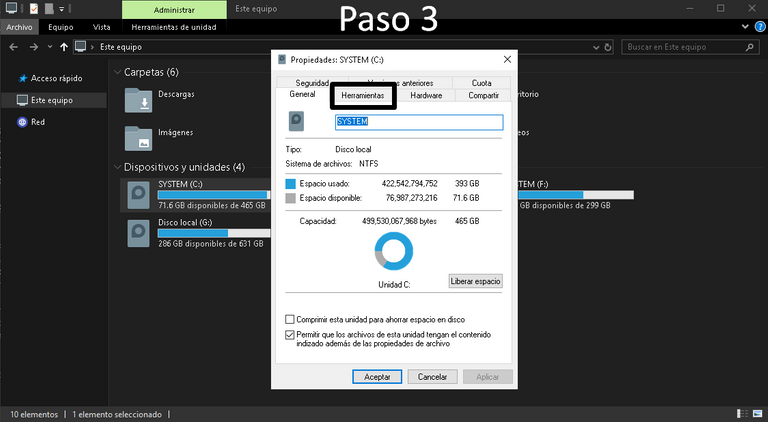
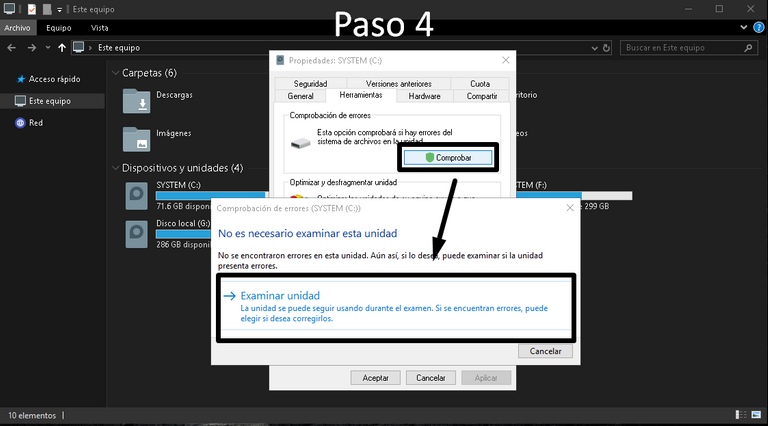
Lo primero que debemos de hacer es entrar en las opciones del disco, vamos a equipo, le damos clic derecho al disco que queremos verificar, vamos a la opción de propiedades, en la parte superior de la ventana buscamos herramientas, tenemos 2 opciones una que dice la damos a la primera que dice "Comprobación de errores", nos sale otra ventana que nos va a dar una opción llamada examinar unidad, le damos y esperamos un poco (esto por lo general no arroja nada malo, así que no se preocupen, es más por protocolo, si sale algo, pues... su disco está grave).
 |  |  |
|---|
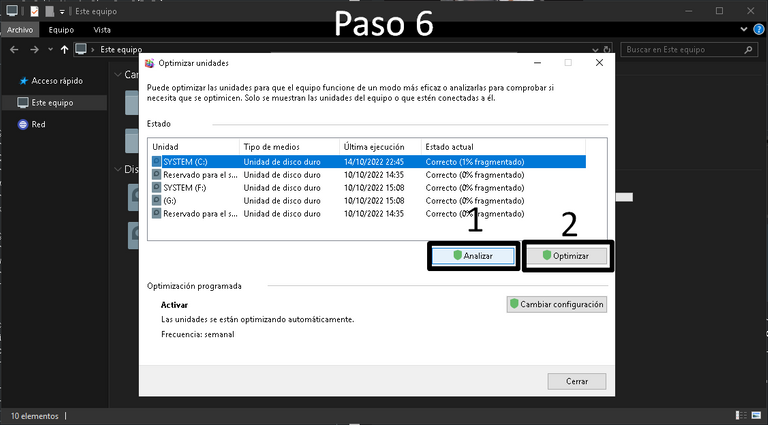
Con eso listo, vamos a la opción 2 "Optimizar y desfragmentar unidad", aqui se nos abre una ventana, debes de estar pendiente si el disco que estamos revisando, está seleccionado en la parte superior, tenemos 2 botones en la parte central, primero le damos "Analizar" esperamos que termine su proceso y luego "Optimizar", para estos procesos mientras se hacen pueden seguir usando su computado con normalidad.
Cuidado Medio
(Para hacer este paso, debes saber hacer ciertas cosas una de ella descomprimir archivos)
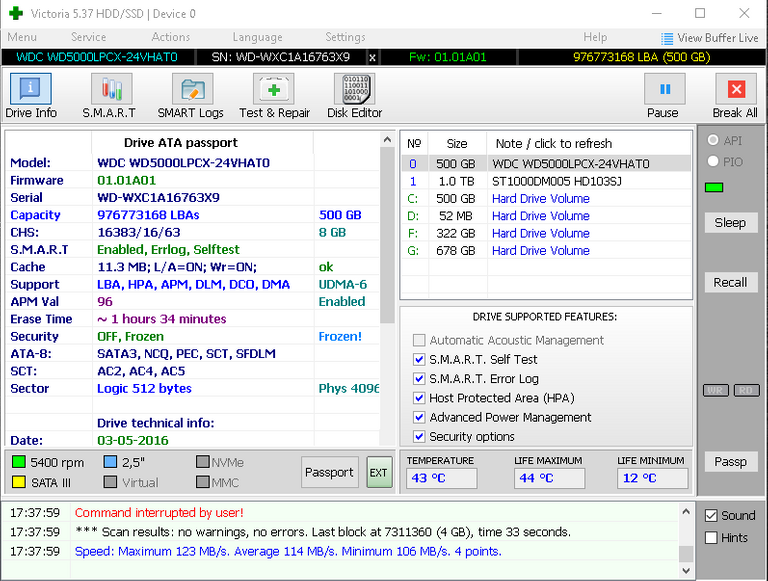
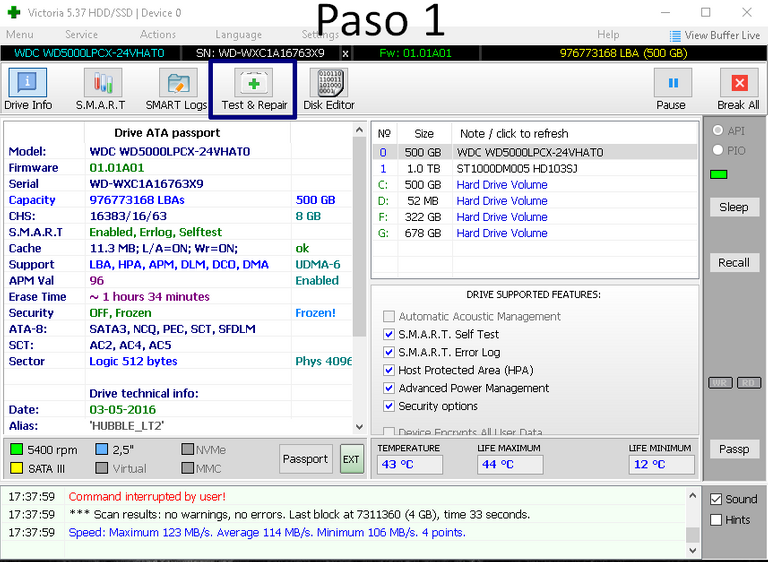
Para este vamos a necesitar un programa llamado "Victoria", es un programa 100% gratuito y seguro (Descarga directa Aqui), ya con el programa descargado, lo descomprimimos en el escritorio y lo ejecutamos, su interfaz no es muy bonita, tiene muchos parámetros y botones, como en las ocasiones anteriores debemos de seleccionar el disco duro que vamos a reparar, para irnos a la pestaña que nos importa, vamos a la pestaña que está en la parte superior que dice "Test & Repain" (aqui es donde vamos a hacer todo lo que necesitamos para darle un buen mantenimiento a nuestro Disco Duro, cave resaltar que eso solo para los HDD).
 |  |  |
|---|
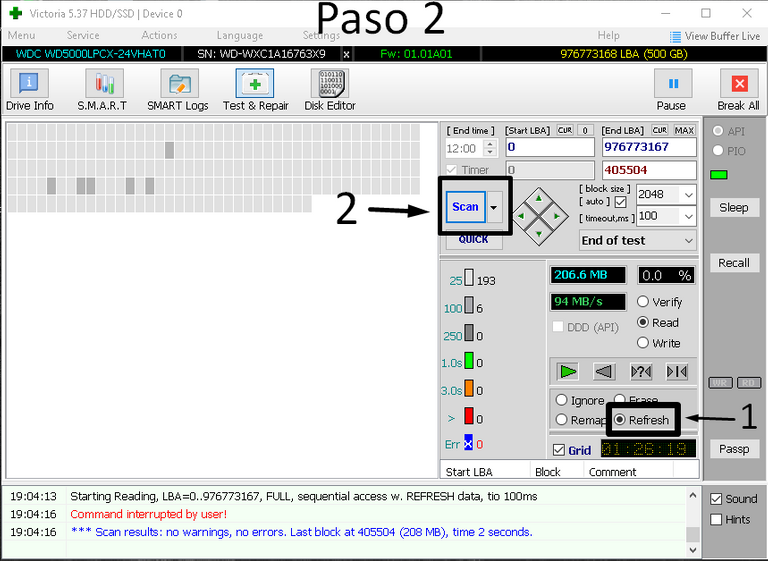
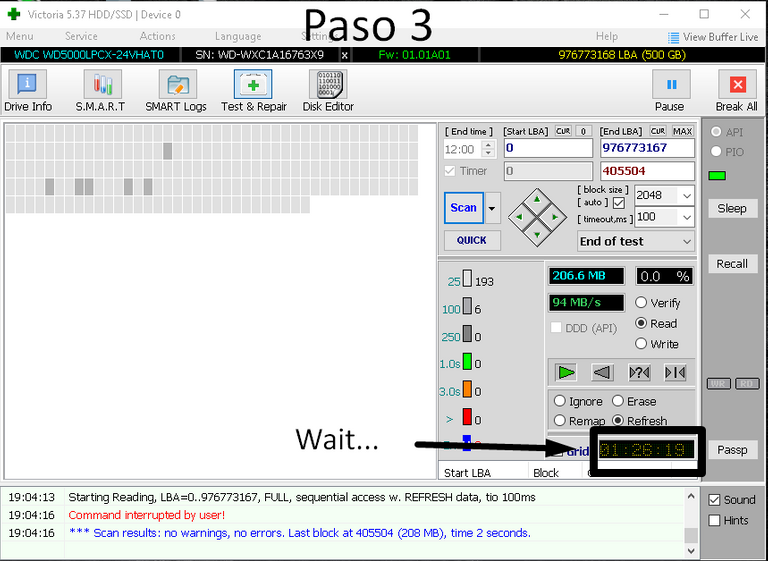
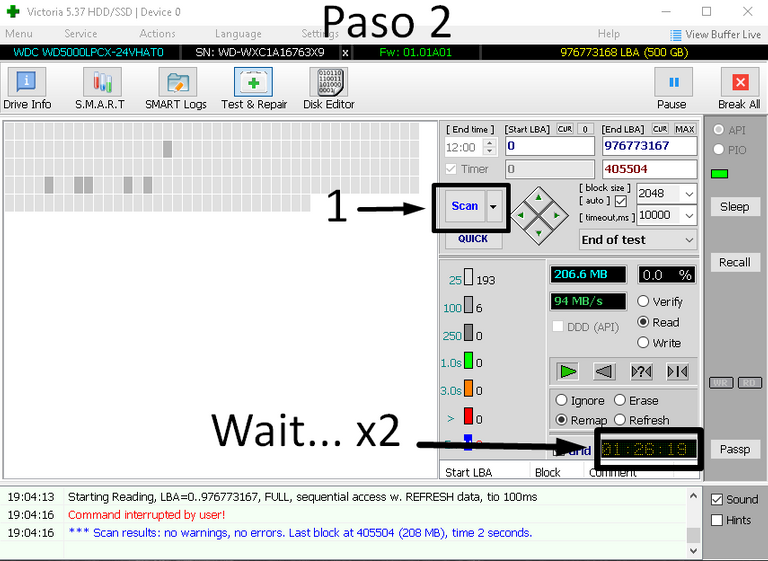
Lo primera que vamos a hacer es refrescar todos los sectores del disco, esto es para recuperar sectores que puedan estar pasando el umbral de la muerte, esto es muy fácil de hacer, seleccionamos la opción "Refresh" y le damos "Scan", esto puede tardar más o menos tiempo dependiendo del tamaño del disco, (No se preocupen si ven muchos sectores con una X o en rojo, eso quiere decir que no pudo hacer el proceso de refrescarlo).
 |  |
|---|
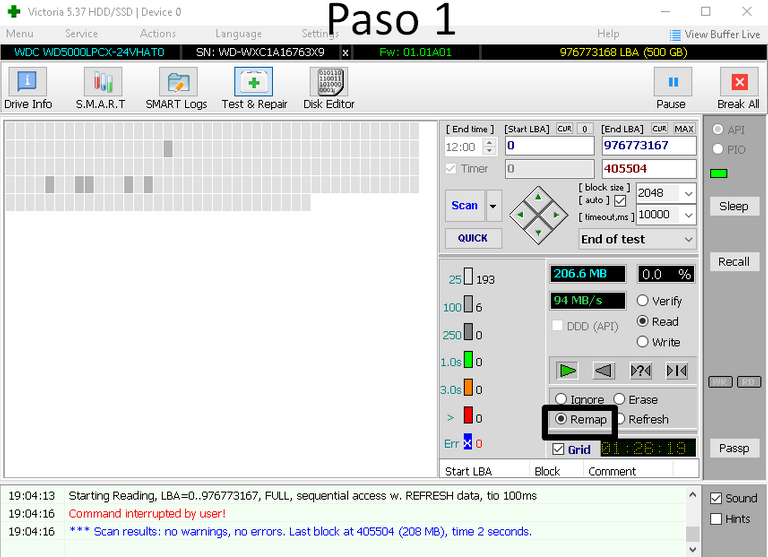
Cuando este proceso termine, seleccionamos "Remap", esto nos ayudará a mover los archivos a otros sectores que no estén defectuosos (igual esto tardara su tiempo), cuanto todo termine, cierran victoria, apagan la Computadora y la vuelven a encender, deberían sentir alguna mejora si su disco duro estaba en muy mal estado y se les pegaba de vez en cuando.
Les recomiendo que para los 2 últimos procesos dejen a la computadora tranquila, únicamente el Victoria abierto, en ese tiempo se pueden poner otras cosas que no incluya la computadora, esto es para agilizar el proceso, cualquier duda o inquietud me la dejan en los comentarios.
PD: Cualquier duda me la dejan en los comentarios.
Un Fuerte Abrazo En La Distancia.

I N G L E S -- I N G L E S

Hi guys, I like to bring a little of the things I have learned throughout my learning as a computer technician, the care of our hard drive should be paramount, because it is the place where we keep all our most important information, if it dies from one day to another and we have important things, well? unfortunately we can lose everything, sometimes if they are salvageable, there are other times that it is already a paperweight (hahahahahahahaha), for not doing the due maintenance, as I want to take care of them, I will teach you my tricks, from the most basic, to the average, since the advanced can damage the disk if they do it badly and it is only used in emergency cases (that is not our case).
Let's get bad to the work (hands jajajajaj), the first thing we must know is that type of Hard Disk we have, the most common are 2, the HDD (Hard Drive Disk - Hard Disk) and SSD (Solid State Drive - Solid State Drive), between them there is an abysmal difference, since in its normal work the SSD exceeds a x10 in writing speed to the HDD, and that is because the SSD is like an SD memory (and its name gives an idea), and it is much easier for the system to find the information, unlike the HDD that has a disk and a needle (the prehistory and today hahahaha).
I have to clarify that not because the HDD is old, you should dispense with using it, this we must have it for storage, ie to save games, photos and everything that is important, leaving the SSD operating system and one or another program that will last over time, there is something we have to keep in mind and is that the SSD has a lifetime writing limit, ie it has a maximum of GB between written and deleted, this depends on the brand of disk (If you do not understand this point of the SSD leave it to me in the comments).
With the HDD this does not happen, you can write and erase everything that we want and nothing will change in him, it is with the time sectors are damaged the disk that are impossible to recover, there are others that you can be in the same situation but they are salvageable.
Note
I have to clarify that everything what I am going to speak from here on is only for Disks HDD, the SSD do not need it, to know what disk you have, I will leave a step by step in images.
Basic Care
| | |
|---|
The first thing we must do is to enter in the options of the disk, we go to equipment, we give right click to the disk that we want to verify, we go to the option of properties, in the superior part of the window we look for tools, we have 2 options one that says we give it to the first one that says "Checking of errors", another window comes out to us that is going to give us an option called examine unit, we give it and we wait a little (this usually does not throw anything bad, so do not worry, it is more for protocol, if something comes out, because... its disk is serious).
| | |
|---|
With that ready, we go to the option 2 "Optimize and defragment unit", here a window opens us, you must be pending if the disk that we are checking, is selected in the superior part, we have 2 buttons in the central part, first we give him "Analyze" we wait that it finishes its process and then "Optimize", for these processes while they are made they can continue using its computer with normality.
Medium Care
(To do this step, you must know how to do certain things, one of them is to decompress files).
For this one we are going to need a program called "Victoria", it is a 100% free and safe program (Direct Download Here), already with the downloaded program, we unzip it on the desktop and run it, its interface is not very pretty, it has many parameters and buttons, as in the previous occasions we must select the hard disk that we are going to repair, to go to the tab that matters to us, we go to the tab that is in the superior part that says "Test & Repain" (here it is where we are going to make everything what we need to give a good maintenance to our Hard Disk, cave to emphasize that that only for the HDD).
| | |
|---|
The first thing we are going to do is to refresh all the sectors of the disk, this is to recover sectors that can be passing the threshold of death, this is very easy to do, we select the option "Refresh" and we give Play, this can take more or less time depending on the size of the disk, (Do not worry if you see many sectors with an X or in red, that means that it could not make the process of refreshing it).
| |
|---|
When this process finishes, we select "Remap", this will help us to move the files to other sectors that are not defective (even this will take some time), when everything finishes, close victoria, turn off the computer and turn it on again, you should feel some improvement if your hard disk was in very bad condition and it was sticking from time to time.
I recommend that for the last 2 processes leave the computer quiet, only the Victoria open, in that time you can put other things that does not include the computer, this is to speed up the process, any questions or concerns leave them to me in the comments.
PD: If you have any questions, please let me know in the comments.
A Big Hug In The Distance.

Translated
Separadores
GIF Pordatada
GIF Extra
El Resto De Imagenes Son De Mi Propiedad.
¡Enhorabuena!
✅ Has hecho un buen trabajo, por lo cual tu publicación ha sido valorada y ha recibido el apoyo de parte de CHESS BROTHERS ♔ 💪
♟ Te invitamos a usar nuestra etiqueta #chessbrothers y a que aprendas más sobre nosotros.
♟♟ También puedes contactarnos en nuestro servidor de Discord y promocionar allí tus publicaciones.
♟♟♟ Considera unirte a nuestro trail de curación para que trabajemos en equipo y recibas recompensas automáticamente.
♞♟ Echa un vistazo a nuestra cuenta @chessbrotherspro para que te informes sobre el proceso de curación llevado a diario por nuestro equipo.
Cordialmente
El equipo de CHESS BROTHERS
Oye te botaste con este tuto! Está genial, además de que me acabas de recordar que debo darle una limpiadita a mi compu que anda que la quiero matar por lo lenta. Y creo que le voy a hacer el mantenimiento medio porque siempre le he hecho nada más el básico y ya tiene sus buenos años la pobre 😅
Muchas gracias por compartir esto amigo ❤️
De vez en cuando es bueno hacerla, a veces no la hago porque tarda mucho y pone la pc lenta en el proceso, entonces no la puedo usar como por 1h o hora y media, ayer justo con el post la estaba haciendo y me tocó detener la segunda parte 😅 o no iba a terminar nunca.
Pobre de tu pc, ella anda a duras penas, posiblemente le hace falta otro disco por los años que pueda tener, nada que 40$ no la arreglen, con un disco SSD jajajaja.
Gracias, el post lo hice con mucho cariño, aunque fue ladilla por tantas fotos 😅 el maquetado es terrible 🤣
Un gran abrazo ada 😋
Nope, ya necesito una nueva, tiene 11 años, necesito nueva tarjeta y nuevo procesador 😅
Bueno... 11 años son 11 años, la experiencia manda jajajajaja, aquí no entra ese criterio 🤣🤣, en el futuro cuando la vayas a comprar si os gusta te puedo ayudar a buscar una buena pc 😊😉
Si, pobrecita, mucho hace todavía 😅
Te estaré hablando para que me des tu opinión 🙈✌️
Qué tutorial tan necesario. Yo tengo una laptop y realmente nunca le he hecho nada jaja. Creo que debería hacerle mantenimiento y no tengo ni idea de como se hace eso. Pero voy a seguir los pasos que das aquí a ver.
Muchas gracias por compartir ❤️
El mantenimiento de las laptops fácil si es solo software (ya que es lo mismo para todas las pc) a cambio de hardware... es fastidioso, muchos tornillos que quitar (jajajaja).
Si sigues el paso a paso, todo estará bien, cualquier cosa me escribes al DM y te ayudo.
Un fuerte abrazo en la distancia 😀
Jajaja. Si va. Muchas gracias! Cualquier cosa te escribo.
Thanks for your contribution to the STEMsocial community. Feel free to join us on discord to get to know the rest of us!
Please consider delegating to the @stemsocial account (85% of the curation rewards are returned).
You may also include @stemsocial as a beneficiary of the rewards of this post to get a stronger support.
Muy buena explicación , hoy mismo le doy una revisión a mi laptop 👍
Hola bro, gracias 💪, siempre es bueno aprender cosas nuevas y que eso nos ayude a mantener nuestros equipos pues, es un ganar ganar,
un gran abrazo 😁
Buena data bro... en win 10 podes hacer varias de esas cosas por comandos restaurar el disco y arreglar los errores del mismo... solo es un anexo jajajaj pero el post esta EPICCARDI... !PGM !PIZZA
BUY AND STAKE THE PGM TO SEND A LOT OF TOKENS!
The tokens that the command sends are: 0.1 PGM-0.1 LVL-0.1 THGAMING-0.05 DEC-15 SBT-1 STARBITS-[0.00000001 BTC (SWAP.BTC) only if you have 2500 PGM in stake or more ]
5000 PGM IN STAKE = 2x rewards!
Discord
Support the curation account @ pgm-curator with a delegation 10 HP - 50 HP - 100 HP - 500 HP - 1000 HP
Get potential votes from @ pgm-curator by paying in PGM, here is a guide
I'm a bot, if you want a hand ask @ zottone444
Hola bro... Si eso lo tengo muy en cuenta, aunque para explicarlo muchas personas iban a quedar fuera de lugar, hasta posiblemente les dé miedo hacerlo, a cambio con un programa es más fácil y no hay riesgo de errores, por lo automático, esa es como la parte avanzada de la que no quise hablar 😅
Un gran abrazo en la distancia 💪 saludos.
PIZZA Holders sent $PIZZA tips in this post's comments:
@pablodare(1/5) tipped @eliudgnzlz (x1)
Learn more at https://hive.pizza.