Efecto 3D en illustrator | Tutorial [ESP -ENG]
Florecido día amigos geekers!! es un placer traer a ustedes este tutorial con una fantástica herramienta disponible en Illustrator, como saben mi editor de vectores favorito.
Existen muchas maneras de lograr el efecto 3D con programas de diseño, pero el más completo (y genial) lo encontramos en Illustrator, claro que también podemos usar blender, pero esa es otra historia. Mejor comenzamos a ver en profundidad como funciona y que opciones nos ofrece esta herramienta, que poco a poco a querido explorar otras opciones... pero aún las desconozco, debo actualizar el programa.
Entras las opciones de la herramienta 3D encontramos varias maneras de crear este efecto, así que depende de lo que estamos buscando y de nuestra creatividad ver hasta donde podemos llegar. ¡Comencemos!
Blooming day fellow geekers!!! it's a pleasure to bring to you this tutorial with a fantastic tool available in Illustrator, as you know my favorite vector editor.
There are many ways to achieve the 3D effect with design programs, but the most complete (and great) we find it in Illustrator, of course we can also use blender, but that's another story. We better start to see in depth how it works and what options this tool offers us, that little by little I wanted to explore other options... but I still don't know them, I must update the program.
In the options of the 3D tool we find several ways to create this effect, so it depends on what we are looking for and our creativity to see how far we can go. Let's start!
Las opciones que nos ofrece la herramienta 3D son tres (en mi versión del programa), la encontramos en la barra de Menú en el apartado Efecto > 3D y aquí se nos despliegan las opciones, Extrusión y biselado, Girar, y Rotar. Vamos a ver como se usa cada una y crear fabulosos efectos para texto y básicamente para cualquier vector que diseñemos en Adobe.
Primero veremos como funcionan las dos segundas herramientas: Girar y Rotar. Estas son más sencillas y tienen muy útiles aplicaciones, en el siguiente GIF se puede apreciar un poco el mecanismo de aplicación de los efectos, pero los vamos a detallar paso a paso para no perdernos nada.
The options offered by the 3D tool are three (in my version of the program), we find it in the Menu bar in the section Effect > 3D and here we have the options Extrude and bevel, Rotate, and Rotate. Let's see how to use each one and create fabulous effects for text and basically for any vector we design in Adobe.
First we will see how the second two tools work: Rotate and Rotate. These are simpler and have very useful applications, in the following GIF you can see a little of the mechanism of application of the effects, but we are going to detail them step by step so we don't miss anything.
Girar
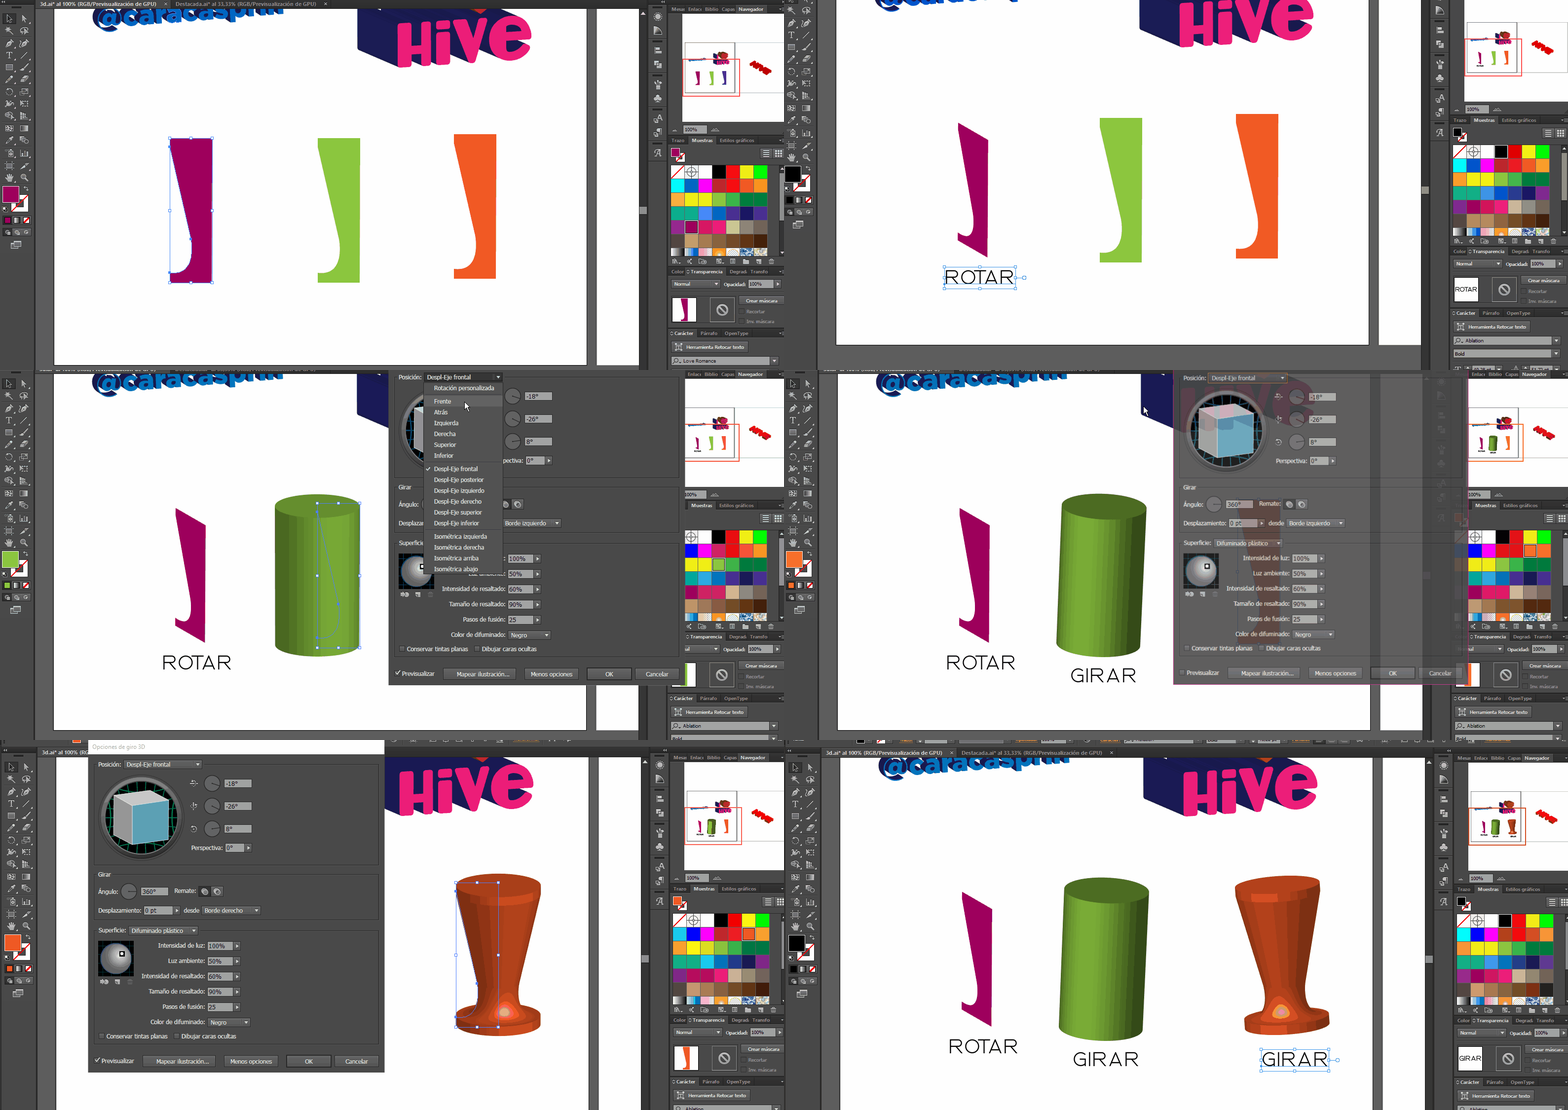
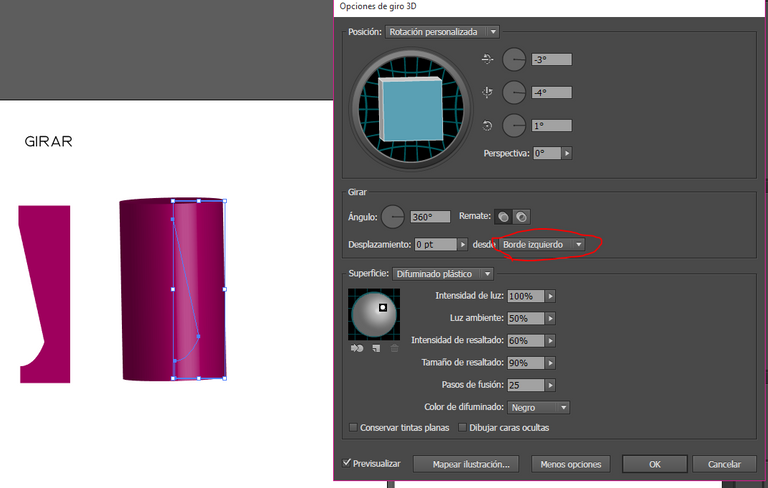
Con esta herramienta podemos dibujar la mitad de un objeto, por ejemplo la mitad de un pilón, una vasija o algo parecido, que al rotarla en en programa éste lo transforma en un objeto 3D, pero tiene sus trucos, vamos por partes:
With this tool we can draw half of an object, for example half of a pylon, a pot or something similar, that when rotated in the program it transforms it into a 3D object, but it has its tricks, let's go by parts:
 |  |  |
|---|
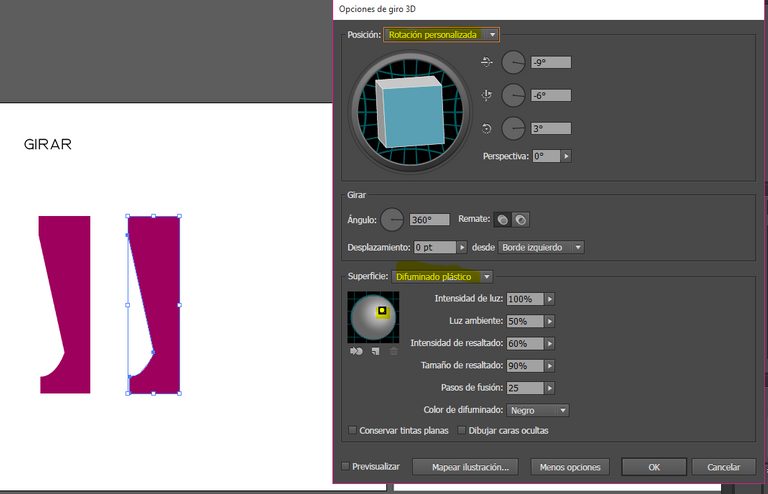
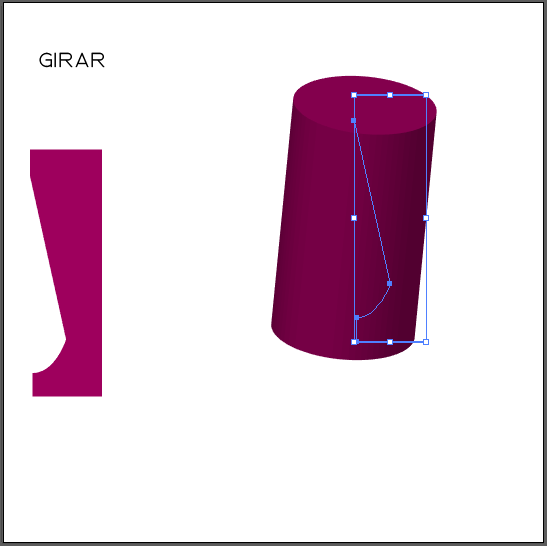
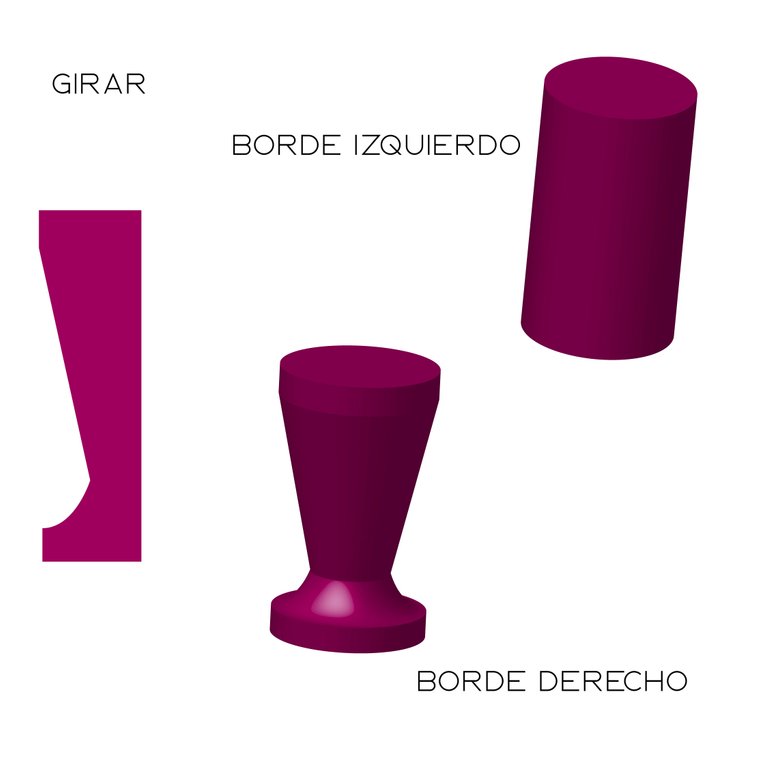
Existen dos manera de interpretar el giro de nuestro vector, como ustedes pueden ver, dibujé lo que parece ser la mitad de un cuenco, si optamos por seleccionar el borde izquierdo de nuestro cuenco Illustrator lo interpretará como un cilindro muy limpio, también podemos jugar con la incidencia de la luz y la dirección de ésta, así afincamos más el efecto. Pero si nos situamos en el borde derecho de la línea del vector el resultado será muy diferente:
There are two ways to interpret the rotation of our vector, as you can see, I drew what seems to be the middle of a bowl, if we choose to select the left edge of our bowl Illustrator will interpret it as a very clean cylinder, we can also play with the incidence of light and the direction of this, so we can get a better effect. But if we place ourselves on the right edge of the vector line the result will be very different:
 |  |
|---|
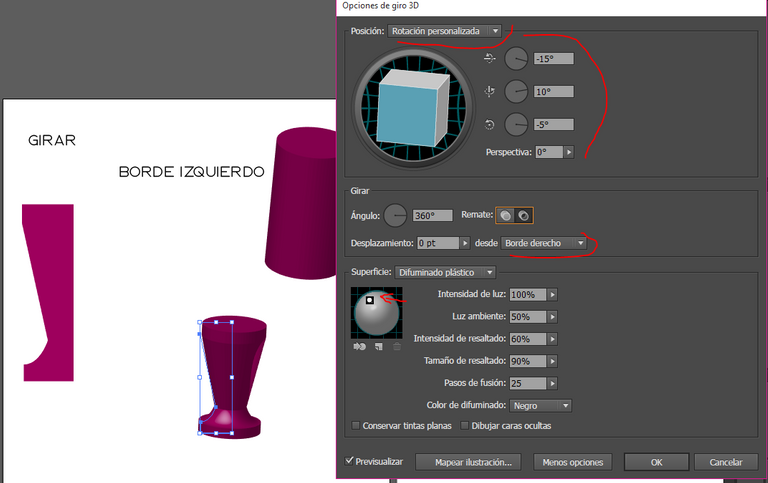
Con una misma línea vectorizada se crearon dos objetos 3D completamente diferentes, tenemos muchos botones con los que podemos jugar para tratar de encontrar el mayor equilibrio y armonía a nuestro efecto, podemos tomar el punto de luz sobre la bola con el cursor (identificado con una flecha roja) y moverla a nuestra propia conveniencia, hasta encontrar la vista perfecta, el ángulo de luz perfecto. Les recomiendo ir explorando las opciones con la vista previa activada para ver si nos acercamos a nuestros deseos.
Podemos personalizar la rotación y la inclinación, manipulando el cubo a nuestro antojo, también cuenta con vistas por defecto que podemos explorar si nos tiembla el pulso.
With the same vectorized line we created two completely different 3D objects, we have many buttons with which we can play to try to find the best balance and harmony to our effect, we can take the point of light on the ball with the cursor (identified with a red arrow) and move it to our own convenience, until we find the perfect view, the perfect angle of light. I recommend exploring the options with the preview activated to see if we get closer to our desires.
We can customize the rotation and tilt, manipulating the cube as we wish, it also has default views that we can explore if our pulse trembles.
Rotar
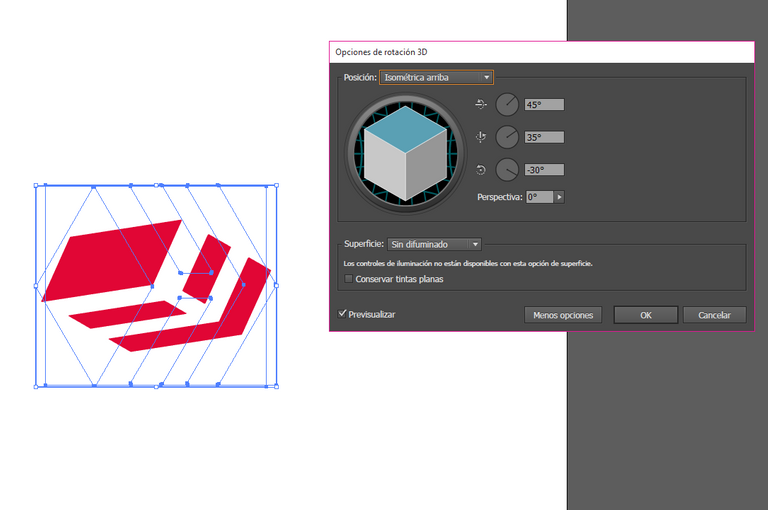
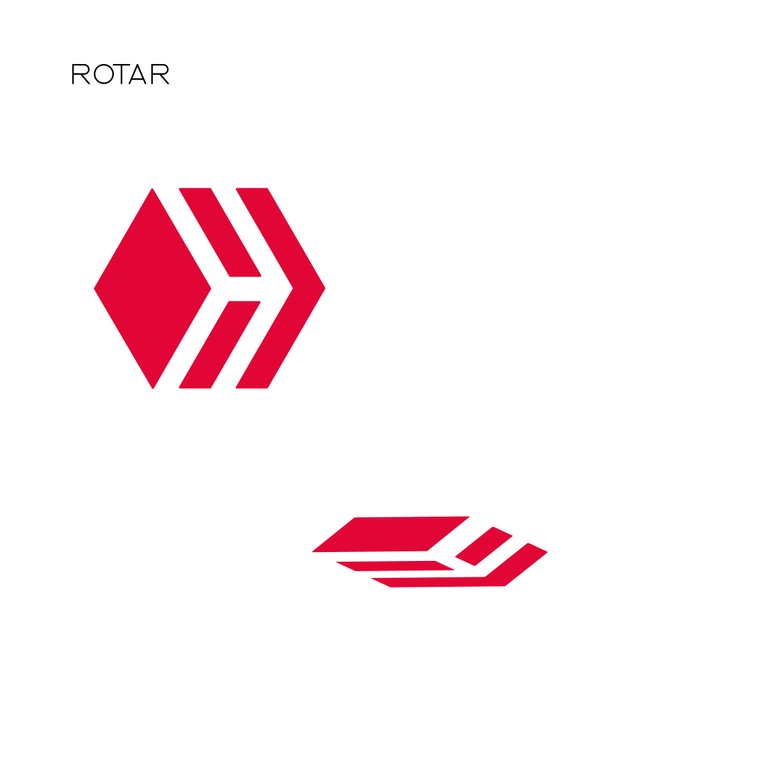
Este apartado de la herramienta 3D no sirve para crear un objeto 3D, sino para mover un plano en un espacio 3D, en otras palabras, aplica una rotación dentro de los valores de alto, ancho y profundidad.
Debemos recordar que para editar y manipular nuestros vectores luego de aplicar cualquiera de estos efectos 3D, debemos Expandir Apariencia, este apartado lo encontramos en el menú principal Objeto > Expandir apariencia.
This section of the 3D tool does not serve to create a 3D object, but to move a plane in a 3D space, in other words, it applies a rotation within the values of height, width and depth.
We must remember that to edit and manipulate our vectors after applying any of these 3D effects, we must Expand Appearance, this section can be found in the main menu Object > Expand Appearance.
 |  |
|---|
Ahora vamos a intentar unos efectos divertidos para los textos, ya que también podemos manipularlos una vez vectorizados, como ya expliqué en el pasado tutorial, el texto se vectoriza al activar la opción de "Crear contornos", podemos encontrar esta función en el Menú principal de Texto, o simplemente seleccionando el texto que queremos expandir y dar click derecho > crear contornos.
Now let's try some fun effects for the texts, as we can also manipulate them once vectorized, as I explained in the last tutorial, the text is vectorized by activating the "Create outlines" option, we can find this function in the main Text Menu, or simply by selecting the text we want to expand and right click > create outlines.
Extrusión y biselado / Extrusion and beveling
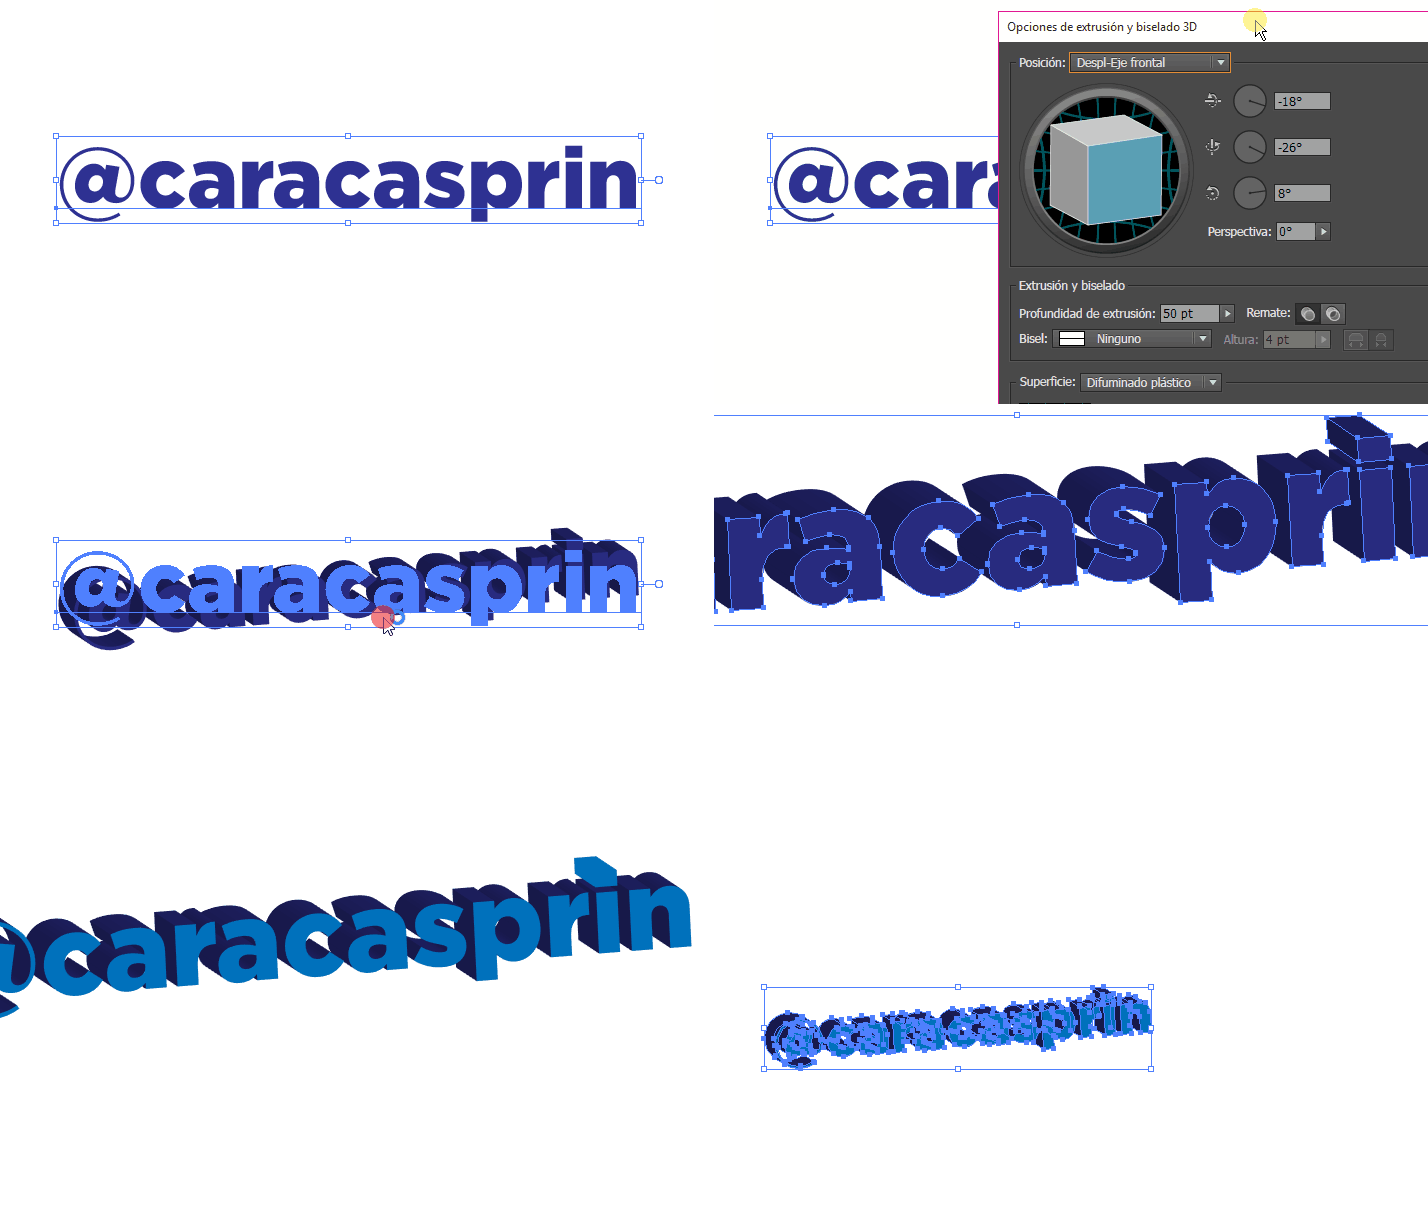
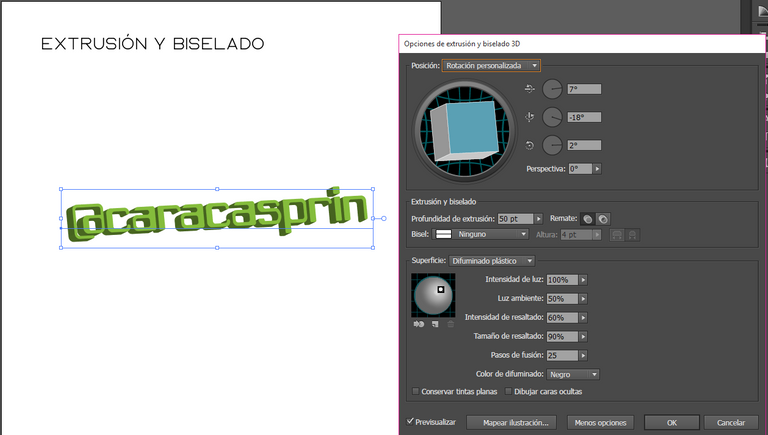
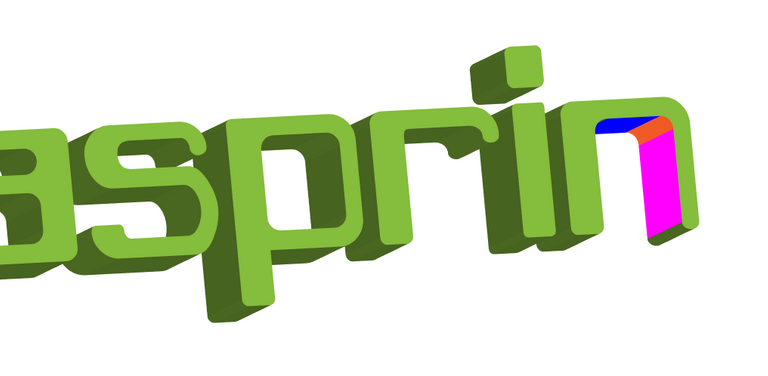
Es la opción realista de la misma herramienta de Photoshop, solo que aquí podemos obtener perfiles más limpios y nítidos y resultados vectorizados, con lo que conseguiremos que nuestro texto en 3D pueda ser ampliado sin perder calidad ni pixelarse.
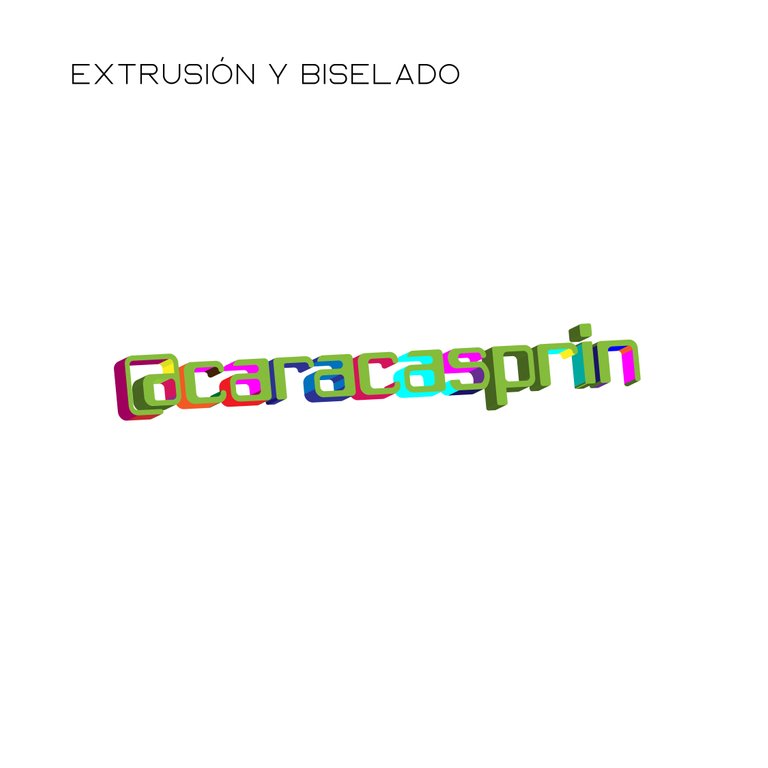
Lo primero que vamos a hacer es crear un nuevo documento con las medidas que mejor se adapte a nuestros propósitos, yo usé 1080x1080px, y con la herramienta texto (T) vamos a escribir nuestra frase o palabra, para efectos del tutorial voy a usar mi nombre de usuario de Hive. También usé la tipografía llamada Caracas, porque se adapta perfectamente a mi marca personal. Le damos color y comenzamos a aplicar este efecto.
Para poder editar nuestro texto una vez alcanzado el resultado esperado, debemos Crear contornos y Expandir la apariencia. Lo podemos separar para cambiar el color a cada una de las caras de nuestro texto.
It is the realistic option of the same Photoshop tool, only here we can get cleaner and sharper profiles and vectorized results, so we will get that our 3D text can be enlarged without losing quality or pixelation.
The first thing we are going to do is to create a new document with the measures that best suits our purposes, I used 1080x1080px, and with the text tool (T) we are going to write our phrase or word, for tutorial purposes I am going to use my Hive username. I also used the typography called Caracas, because it fits perfectly to my personal brand. We give it color and start applying this effect.
To be able to edit our text once we reach the expected result, we must Create outlines and Expand appearance. We can separate it to change the color to each of the faces of our text.
 |  |  |
|---|
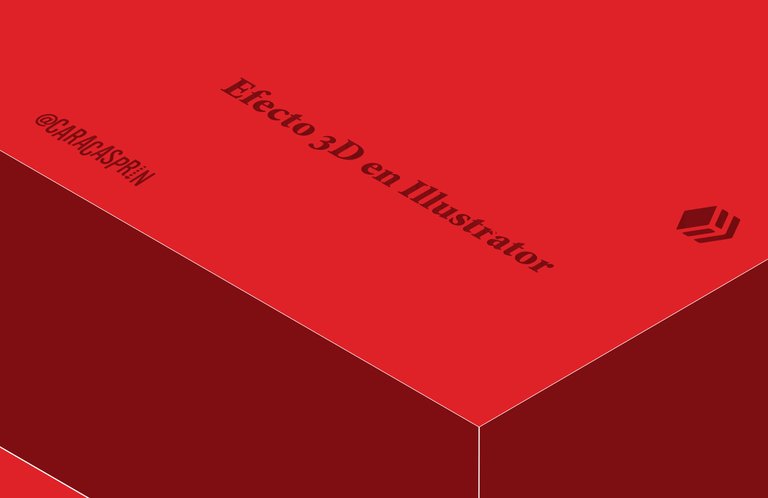
También podemos crear otro efecto de texto 3D como un hueco en el piso, como el que engalana la imagen de portada de este post. Para eso usaremos esta misma herramienta, vamos con el paso a paso:
We can also create another 3D text effect such as a hole in the floor, like the one that adorns the cover image of this post. For that we will use this same tool, let's go through the step by step:
1.-
Creamos una nueva mesa de trabajo, con las medidas que se ajuste mejor a nuestros planes macabros! Volví a usar 1080 x 1080px, la verdad es que no he cambiado de mesa, así que esta misma me sirve.
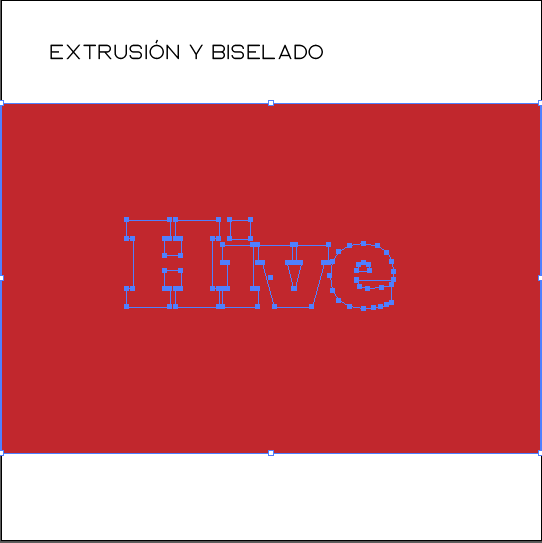
Escribimos nuestra frase, esta vez voy a escribir Hive. Usé la tipografía Alfa Slab One que tiene serifas (los remates de las letras) lo que nos va a ayudar a definir mejor nuestro texto y que sea más legible. y aplicamos color yo le puse el rojo de Hive, ¿Cuál más? Creamos contornos y luego creamos un rectángulo y lo colocamos detrás de nuestra palabra (botón derecho > Organizar> Enviar detrás)
We create a new work table, with the measures that best fits our macabre plans! I went back to using 1080 x 1080px, the truth is that I have not changed table, so this same one works for me.
We wrote our phrase, this time I'm going to write Hive. I used the typeface Alpha Slab One which has serifs (the ends of the letters) which will help us to better define our text and make it more readable. and apply color I put the red of Hive, what else? We create outlines and then create a rectangle and place it behind our word (right click > Arrange> Send behind).
2.-
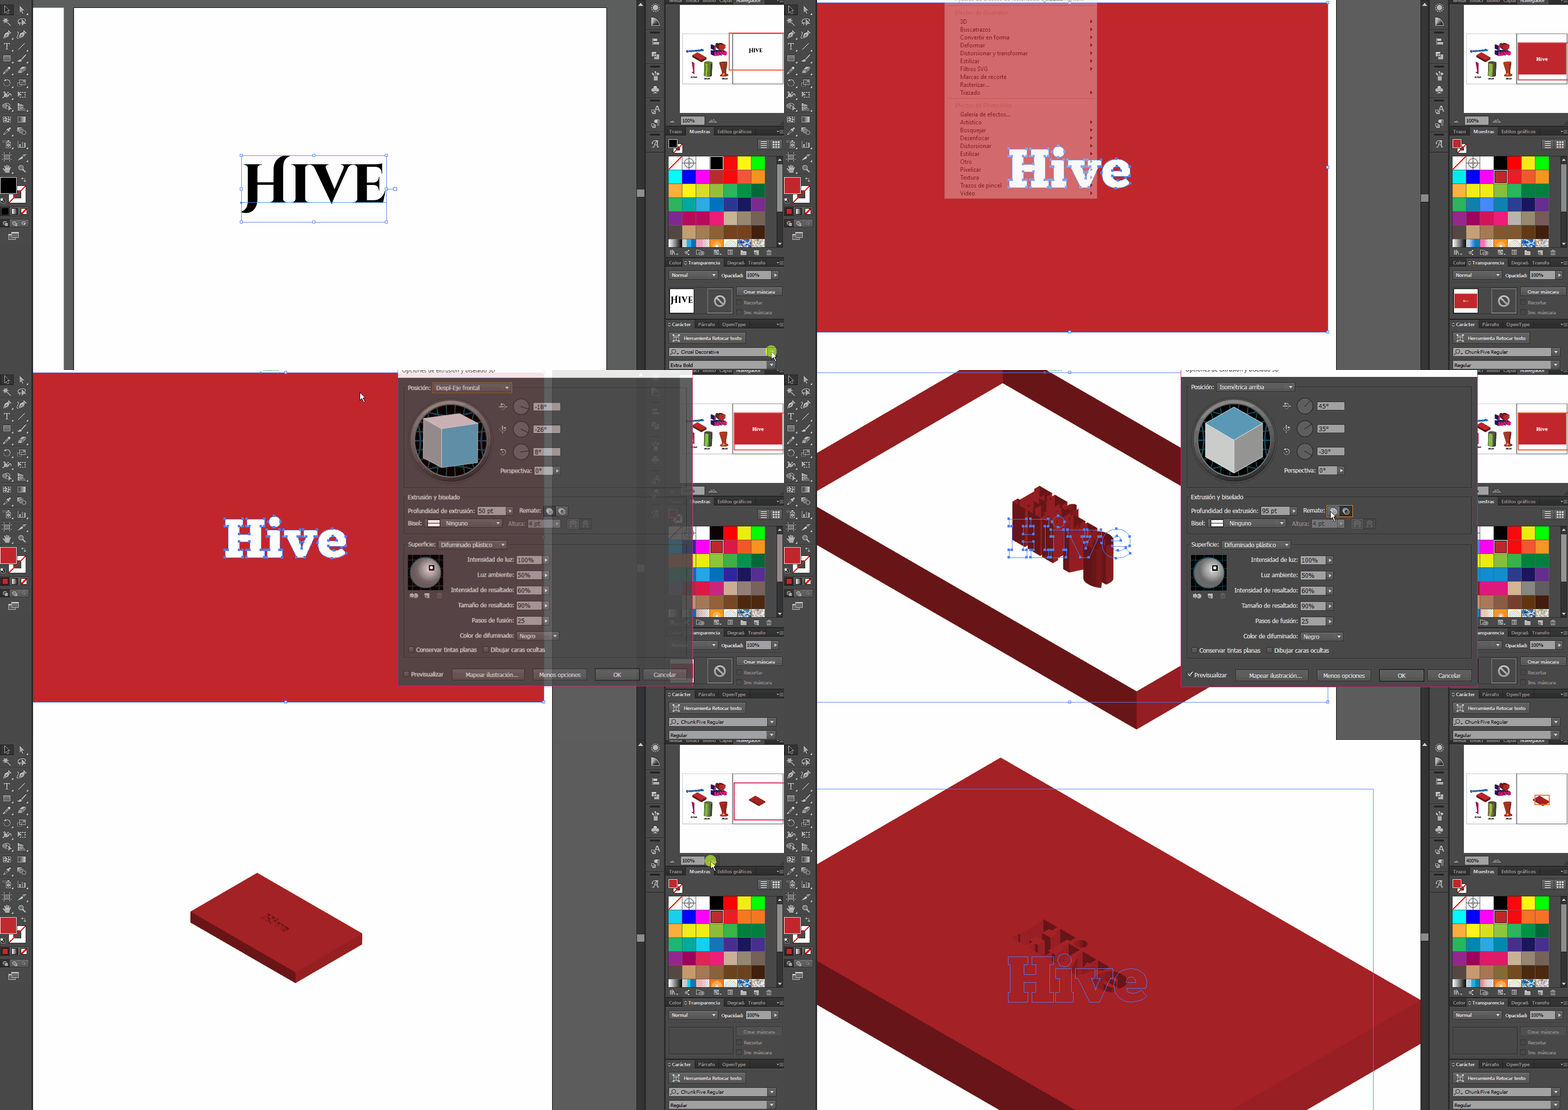
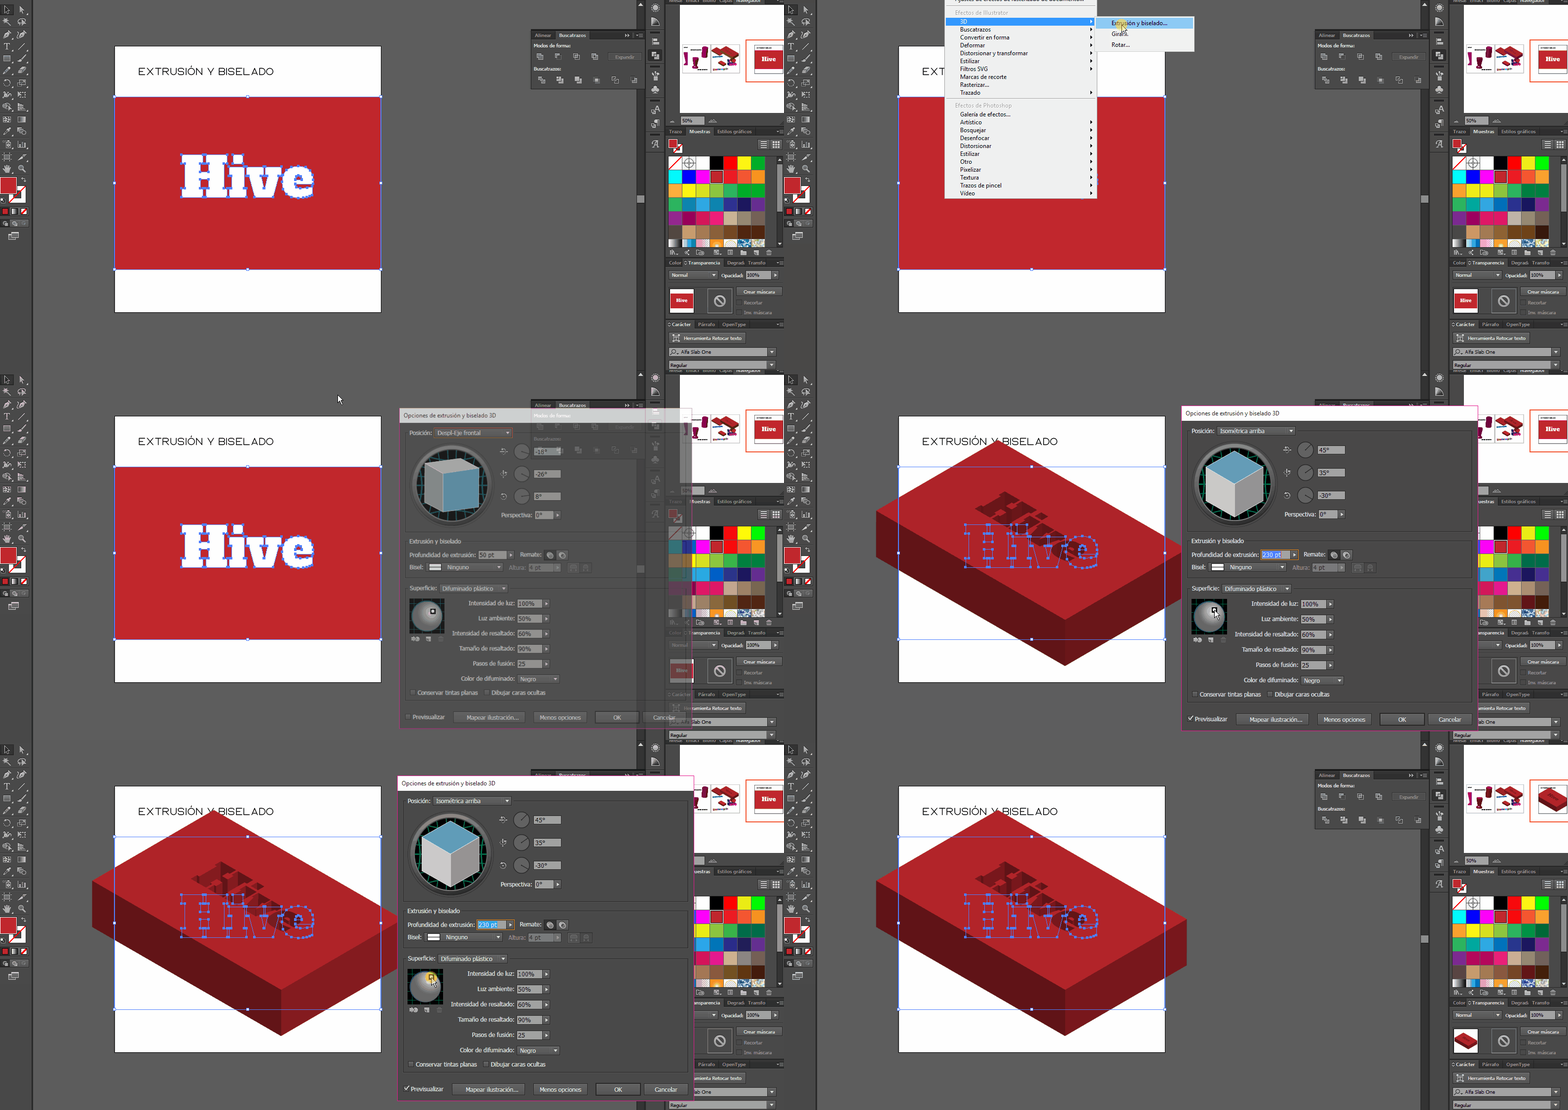
Luego, en el menú principal > Ventana > Busca Trazos, y aplicamos la opción "Menos frente", esto hará que realmente se forme un hoyo entre nuestro texto y el rectángulo que hicimos. Luego abrimos la opción de Extrusión y biselado en la herramienta 3D del menú efecto y comienza la magia.
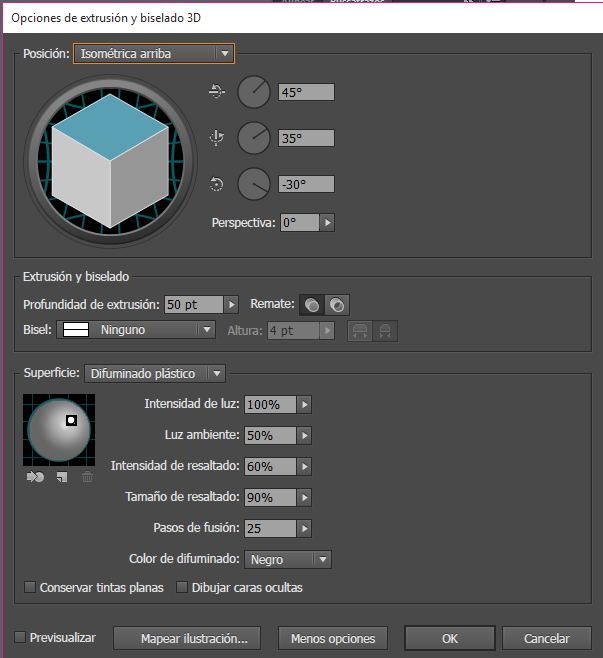
Lo primero que haremos es cambiar la posición y pondremos el valor de perspectiva Isométrica arriba, también podemos jugar con el cubo, pero esta es una perspectiva preestablecida y muy precisa, con la profundidad de extrusión le daremos el alto al ladrillo de la figura. Y podemos jugar con la luz, buscando el ángulo donde se aprecie mejor la sombra de las letras, es cuestión de práctica. Y listo!
Next, in the main menu > Window > Find Strokes, and apply the "Minus Forehead" option, this will actually make a hole form between our text and the rectangle we made. Then we open the Extrude and Bevel option in the 3D tool of the effect menu and the magic begins.
The first thing we will do is to change the position and we will put the Isometric perspective value above, we can also play with the cube, but this is a preset perspective and very accurate, with the extrusion depth we will give the height to the brick of the figure. And we can play with the light, looking for the angle where the shadow of the letters is better appreciated, it's a matter of practice. And that's it!
Espero les sea útil este tutorial y que más pronto que tarde lo puedan poner en práctica y crear fabulosos efectos en 3D. El límite es el cielo!!
I hope you find this tutorial useful and that sooner rather than later you can put it into practice and create fabulous 3D effects. The sky is the limit!
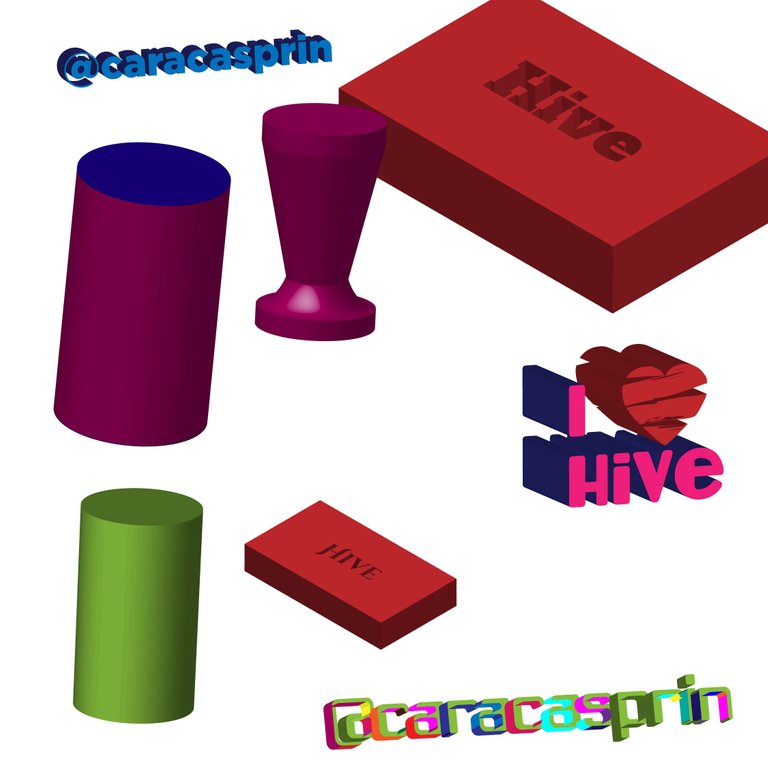

El contenido aquí presentado es de mi autoría.
Las fotografías y GIF son capturas de pantalla del programa Adobe Illustrator.
La imagen de portada fue editada en Illustrator.
Los separadores y banner fueron hechos por mi en Illustrator
The content presented here is my own.
The pictures and gifs are screenshots from the Adobe Illustrator program.
The cover image was edited in Illustrator with one of my photos.
The separators and banner were made by me in Illustrator.

Follow me


https://twitter.com/1336813597742288897/status/1590791130249302016
The rewards earned on this comment will go directly to the people( @caracasprin ) sharing the post on Twitter as long as they are registered with @poshtoken. Sign up at https://hiveposh.com.
Gracias!!! Que momento tan agradable!!!
Sùper Genial, desde hace tiempo quiero aprender, pero no tengo los requerimientos mínimos al nivel de equipo.
Hay una versión del Adobe Illustrator portable, es gratis y la puedes descargar de internet, su peso es más bajo y no requiera tanto ram para funcionar!
He tendido muchas ganas de aprender a utilizar Illustrator, se ve muy genial... el tutorial me gusto...veo que se pueden hacer muchas cosas con ese programa.
Gracias por compartirla...saludos
Lo mejor es descubrir otras maneras de jugar con el programa, de los errores también se aprende! Y practicando es que se comenten esos errores!!
Suerte con la práctica, si tienes alguna duda no dudes :) en consultarme!!
Saludos!!!
Muchas gracias por ofrecerte a dar ayuda... lo tomaré em cuenta... Saludos
normalmente prefiero hacer los efectos manualmente. pero no me quejo de las herramientas, la de ilustrator es la más completa sin dudas. en mi caso serviría para darme una idea de como debería ser la forma para luego hacerlo a mano jajaja...
Claro, a mano siempre es mejor... pero para quienes necesitamos la rapidez para sacar el trabajo lo mejor es hacerlo ayudados con nuestro simpático amigo de la familia Adobe
La última vez que practiqué esto del diseño 3D, fue en PSD CS5, el problema mayor, es que lo estaba haciendo con una pc de muy bajos recursos y casi la exploto, lo intenté por par de días, pero quise evitar quedarme sin pc, me gusta la practicidad que tiene Illustrator siempre, gracias por compartir este tutorial, saludos!
jeje... yo tengo 8 de Ram y a veces cuando estoy mucho tiempo diseñando se pone un poco lenta... antes tenía una Mac y era increíble la rapidez que antes daba por normal... y después vi que definitivamente hay que potenciar las pc para que no exploten!! (me tocó esa experiencia también)
Me encantó tu tutorial, yo uso AI para unos diseños, pero la verdad es que no me va tan bien con él y una de las cosas que no sé hacer es justamente esto, ese efecto 3d, no es que quiera meterle duro al diseño, pero a veces sí quiero hacer letras un poco más llamativas, este fin de semana me pongo a practicar con este tutorial a ver qué tal me queda :D
Muchas gracias por compartir ✌️
Oh!! me alegra mucho que decidieras poner en práctica el tutorial!! Es una emoción muy placentera sentir que puedo aportar algo al conocimiento o habilidad de alguien... me encantaría que me compartieras tus resultados!! Si tienes alguna duda no dudes en preguntar!!
Gracias a ti por comentar!!!
Mañana voy a intentar hacer un texto, eso si mi computadora no implosiona jajajaja, que últimamente ha estado muy malita 😅