3D Printing Some Calibration Cubes
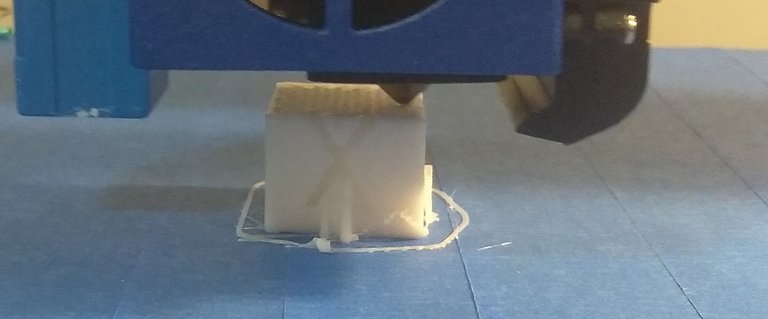
Image Source: Personal Photo
In my previous 3D printing post I detailed my first 3D printing attempt. The nozzle scraped the elephant as it was being printed resulting in a model with misaligned base and no head. Tronxy support suggested that I increase the Z-offset to prevent that in the future.
Probably that's the solution to the problem. I had it near the recommended minimum. Before attempting to print another large model I thought I'd print a small calibration model.
It's not that I don't trust the product or the company. It's the whole "trust and verify" thing. Most of the failed model looked good so it should be accurate enough but it's better to rule out the possibility the machine might be off a tiny bit.
I found a calibration cube on Thingiverse posted by user iDig3Dprinting that is 20 mm along all three axes. Having equal dimensions should make it foolproof to measure.
I downloaded the calibration cube .stl file off Thingiverse and imported the file into the Tronxy slicer program. With a 30% grid infill the program estimated a print time of 22 minutes and a consumption of 1.63 meters of filament.

Image Source: screen capture
I printed two of these cubes. For now let's focus on the Z axis since that seemed more of a problem than the X or Y dimension.
I measured each Z axis on the calibration cubes with a digital caliper.
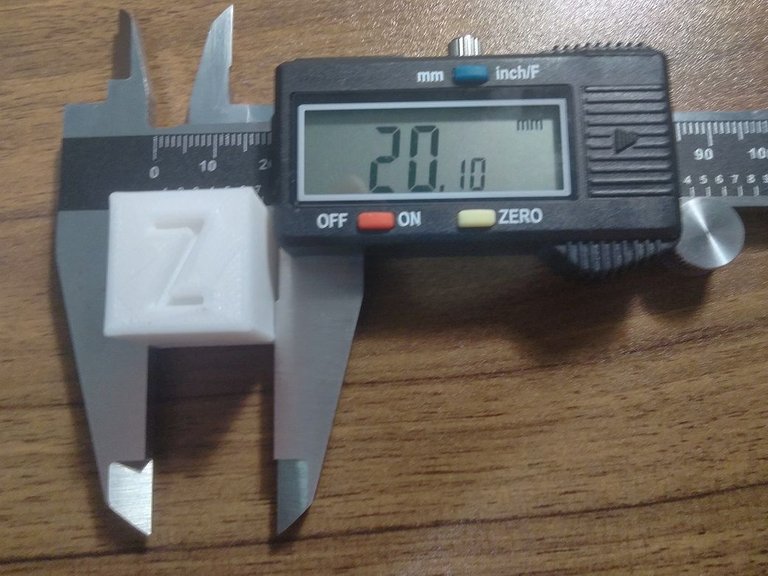
Image Source: Personal Photo
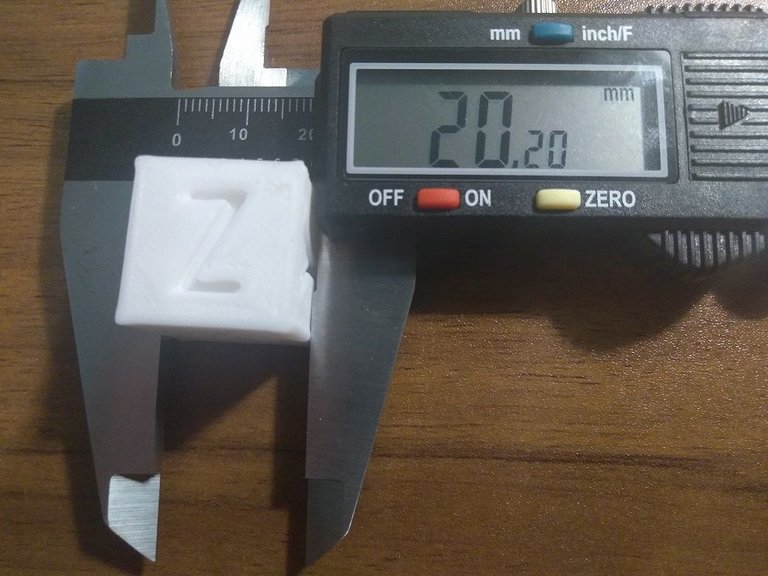
Image Source: Personal Photo
According to this article's mathematical formulas:
The clearance of my 3D printer is:
20.20 mm -20.10 mm = 0.1 mm
The tolerance of my 3D printer is
0.1 mm / 2 = +/- 0.05 mm
I also see in the article it recommends printing three to five cubes. My sample might be too small but assuming it's in the ballpark the Z axis of my 3D printer seems to be fine.
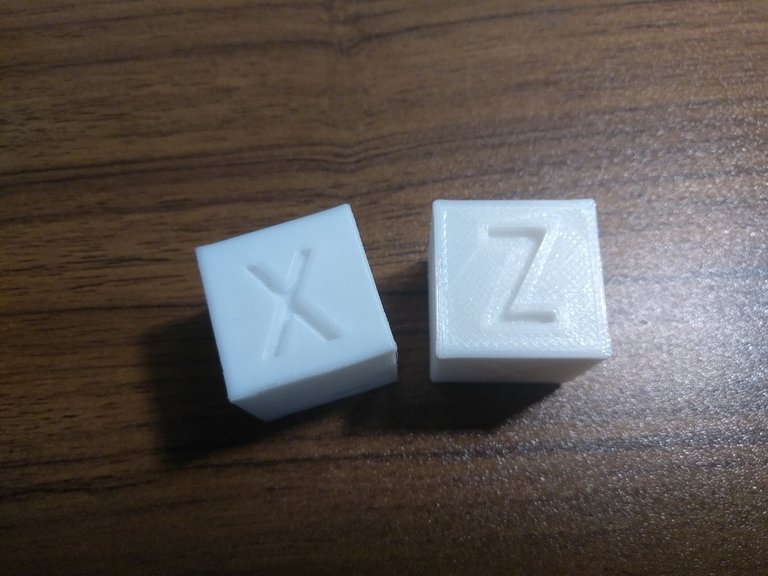
Image Source: Personal Photo
Links:
My Thingiverse account: https://www.thingiverse.com/holovision/designs
My Thangs account: https://thangs.com/Holovision
3D printing community on Hive: https://peakd.com/c/hive-103035/created
The calibration cubes are looking pretty crisp!
I'm having a bit of difficulty with my comprehension of the Z-offset and tolerance, and am going to utilize this nice mathematical formulas post you linked.
Great post and resources, thank you.
What specifically are you having trouble understanding about Z-offset? Right now my problem is getting the height just right so it doesn't scrape or string all over the place. For some reason that's a problem for me with large models but small models come out good. I am narrowing my issue's possible cause down. The concept Z-offset in general I believe I understand.
I am having trouble understanding what the compensation is for exactly, but I'm probably overthinking it.
It raises or lowers Z axis to compensate for the bed being too far or close to the nozzle?
My logic is just manually raise or lower the bed, but using the paper leveling method would make this difficult as well.
I also don't get how you're able to measure the distance of the nozzle from the bed. Do you stick your micrometer right down in there? I have pretty much the same micrometer, just never tried to actually measure the nozzle distance before lol.
Yeah I have been having the same issue with scraping and am printing a cube as we speak right now, I randomly threw a + 0.100 mm Z-offest in Fluidd dashboard and it's a bit better, now I'm playing around trying to get some macro photos of blobbing and other undesirable things. Mostly I just want to get some rad shots of the nozzle spitting out PLA but it's not an easy feat.
I'll make a blog post later today that may help you understand some more, at least to the point I am at in understanding. Answering in a blog post would also make it easier for others to find the information.
Quick answer for the nozzle: The distance of the nozzle from the bed can be displayed on my printer's LCD screen in one of the menu options.
I was more busy today than I expected. I might have to post about a mod to my 3D printer tonight since that's already mostly been written and make that post about bed leveling and Z-offset tomorrow.
Thanks a bunch friend, no worries I am a bit busy myself tonight.
I use SuperSlicer and am planning to run some of the built in calibrations for retraction and flow. (I keep running the flow test and it calls for -20% reduction on extrusion multiplier and then the prints under extrude.. lol)
I've also found some nice resources for calibrating E-step for the extruder. I will share my findings of different methods for this calibration as well.
I printed this last night and adjusted flow rate +- 10% with not much deviation. This is one of my better prints so far: thingiverse design.
The lower level separation is indicative of underextrusion (I think)..
This is printed with 0.4 mm nozzle @ 0.12 LH.
EDIT: The first layer blobbing/pancaking is quite visible on this print, and is my logic for thinking it must be a matter of Z-offset not being set, and is consistent with every print at every layer height.
That looks pretty fantastic. Much better than my headless elephant.
I am slowly narrowing down the cause of my problem and the Z axis has been getting higher before failure. I think I've finally figured out my problem. I need to print two or three models during the next week to make sure.
Hi @holovision, I seemed to have missed this comment for some reason, I need to work out a better system for keeping up with all the wonderful engagement I've been having here.
I've been inspecting your prints here very closely, and have noticed an anomaly that is similar with an issue I was having and trying to troubleshoot for a very long time. (like 3 months, the whole time I've had my printer) I only recently figured out what it was.
It was eccentric nuts, and I will explain what the anomaly was that made me think, over/under extrusion, bad extruder, bad bowden tube, bad leveling, improper Z-offset..
It was deviations in the layering. (and the scraping of course)
I even bought a new extruder trying to diagnose!
While we were chatting about the Z-offset, I started messing around with it, having better results, but then the anomaly resurfaced.
When those eccentric nuts wobble from improper placement, this is the result, as well as scraping.
Now that I've tightened up the eccentric nuts (which some were so bad they were not even touching the rails) all of those layering deviations have ceased, and any scraping I've incurred has been a result of over extrusion and shell thickness, but overall the problem is now fixed. ( and at the perfect time now that I'm starting a 3D printing blog.)
I cannot be sure that it's your eccentric nuts.
I suggest checking those first, (also check for gunk and obstructions on the rails)
and then if they are good, extruder and bowden tube.
I think your issue here might not be the Z-offset.
I hope it is just a matter of eccentric nuts.
Please let me know how things are working out.
Thanks for the suggestions. I'll check on that.👍
!BEER
View or trade
BEER.Hey @print3dpro, here is a little bit of
BEERfrom @holovision for you. Enjoy it!Learn how to earn FREE BEER each day by staking your
BEER.I wasn't able to get around to finishing my draft of the new magnetic bed mod on my 3D printer either. I don't have anything planned for tomorrow so I'll be able to make that Z-offset post.
Your content has been voted as a part of Encouragement program. Keep up the good work!
Use Ecency daily to boost your growth on platform!
Support Ecency
Vote for Proposal
Delegate HP and earn more
I don't print 3D, but I'm glad you guys enjoyed it. Cheers and keep up the good work.
As we 3D print so shall you one day. So it is written. So will it be.😎
I don't see why not, who knows one day I will start printing car parts. Especially rare parts that stopped production or classic vehicles.
If you're interested in 3D printed car parts you may find this video very interesting:
I just discovered this community today! interesting stuff around here and that one is a great guide. It is one of my goal to have a 3D printer :D since 2017. Hopefully this year around, I could get a touch to one of it. I'll browse around if there's any 3D printer recommendation for a beginner.
Micro-Mark sells a few different printers at good prices for a beginner. Most of this community's content is devoted to fused-deposition modelling (FDM) printing, but I and a couple others do resin printing. What we can recommend to you is based on what you'd like to make. Generally speaking, FDM is an easier process, and resin is better for high detail.
The cube looks like good with good corner shapes..
Hope the calibration will give more confidence....
Best of luck for your projects.....
Looking good on the calibration cube. Next step would be to look at your overhang calibration. I often feel that is a better indicator as to if your print speed is to fast or slow, and if your z hop and retraction are set to the right setting for your printer. Each printer operates different it’s part of the fun just to get things dialed in.