9 Tips for PowerBI Users
A big Hello to everyone at the Excel Club! I am thrilled and honored to share my learning from the Power BI world with you folks.
In this post, I am going to share 9 awesome tips on DAX and Power BI. These tricks cover some of the common problems ranging from auditing DAX measures to enhancing productivity. Let's dive right in! Enjoy!
Tip 1 - Copy Data from Power BI
DAX Data view is quite inflexible (as compared to Excel) for the sole reason that you can't write formulas in a cell. Amidst your modeling exercise, you'll feel the need to copy the data from Power BI to Excel. Here is how you can do that.
- Apply Filters on Power BI Table (if you want to).
- Right Click >> Copy Table. Side note Copy option will only copy the column selected and not the entire table.
- Go to Excel and Paste (Ctrl + V).
Copying data to Excel is one of the easiest ways I have been able to fix errors and of course, write better DAX.
Note - If the copied data exceeds the number of rows in an excel sheet, the data would truncate in the last row.
Side Note - Here is more comprehensive post on copying and pasting data in Power BI
Tip 2 - Create Dummy Table using ROW() Function
This tip extends from TIP 1. What if the number of copied rows exceeds the capacity of Excel. In that case, you can create a dummy table to get aggregation on your table. Let me explain…
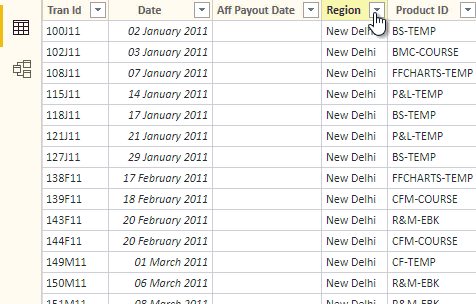
Consider the filtered table below that you can't copy in Excel.
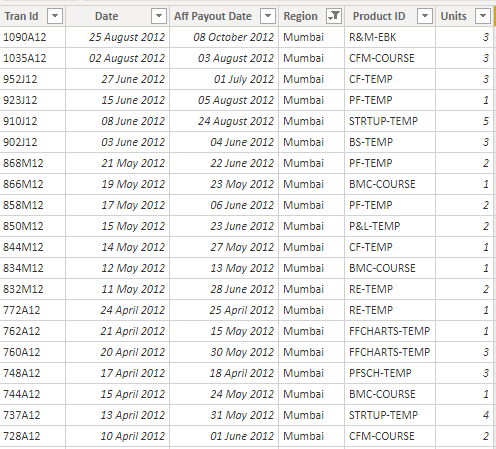
You want to sum the Units column. How do you do that in Power BI ?
I am going to create a one-row table to sum Units for Mumbai.
- From the Modeling Tab, >> New Table. Let's call it Quick Summary Table
- Write the following DAX
Quick Summary Table =
ROW (
    "SUM of Mumbai",
    CALCULATE (
        SUM ( Sales[Units] ),
        Sales[Region] = "Mumbai"
    )
)
You can see the output is the SUM of Units for Mumbai.
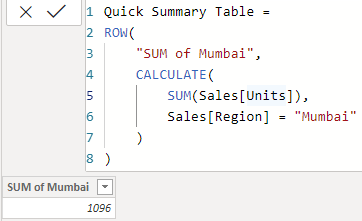
Here is a quick explanation
- The ROW function creates a one-row table and has at-least 2 inputs
- Column Name - Whatever name you want. (Sum of Mumbai in my case)
- Expression - The calculation you'd like to do in the row.
- Needless to say that the row expression can be as sophisticated as you'd want.
- You can continue writing the Column name and Row Expression again to add another column.
This technique can come very handy if you quickly want to summarize your data in Power BI.
Tip 3 - Writing COUNTIF using DAX
If you are a graduate of Excel, now using Power BI. You'd often have wondered how can I write an excel-like COUNTIF in Power BI. Unfortunately, there is no COUNTIF function in Power BI, but that doesn't mean that you can't write it.
A few considerations
- I know that you know that if you drag a column in Matrix (equivalent of Pivot Table) you can change the summarisation to Count. That is a COUNTIF!
- But here I want to discuss the good old COUNTIF that we have the habit of writing in a column of a table.
Consider this data that we have been using..
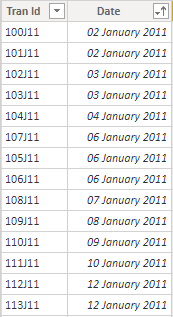
I'd like to find the COUNT of Dates. Against 2nd Jan, I should get the count 2 and so on..
- Right Click >> Create a new Column
- Write the following DAX
COUNTIF for Date =
COUNTROWS(
    FILTER(
        ALL(Sales),
        EARLIER(Sales[Date]) = Sales[Date]
    )
)
Result..
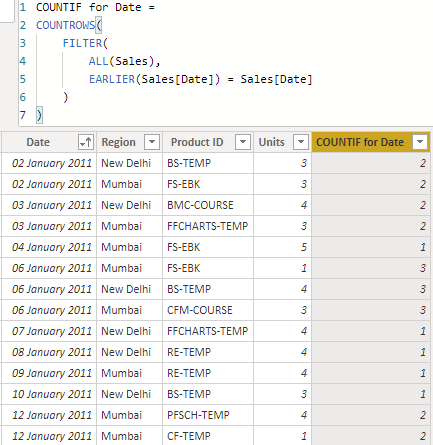
Quick Explanation -
- ALL function removes any Filter from the Sales Table
- FILTER function delivers a table where the Current Date is equal to any Date in Sales Table
- COUNTROWS does the count for the Filtered Table
So that's how you do a COUNTIF. I have a lot more scenarios for COUNTIF explained here
Tip 4 - DAX Shortcuts
My god.. this is big one! Writing DAX can be tedious.. deleting a part of the formula, moving codes around..
I have put together a comprehensive list of DAX Keyboard shortcuts and guess what they even work in Power Query (M Code) too. My favorite ones are - 4, 5, 6, 7, 9
Tip 5 - Show All Labels
I'd need a bit of explaining here. Consider this Pivot and a simple measure
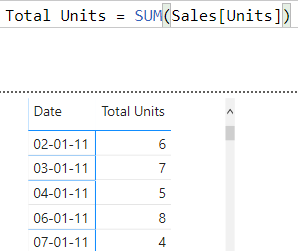
- On Rows I have Date (from a Date table)
- In values I have SUM of Units - Measure
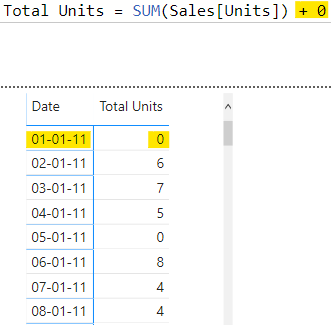
Since no sale happened on 1st Jan, the label doesn't appear but what if I want to see the label whether or not the sale happened. This can be achieved with a simple DAX trick.
Just add (+) a 0 at the end of your code. Bingo!
TIP 6 - Create a Measures Table
If you have tried a table named Measures, Power BI doesn't like that and won't allow it. But you can. Let me first give the credit to Phil Seamark, I learned this trick on his blog
[ Measures] = {BLANK()}
- In the Modeling Tab
- Create a New Table and write the above code
- And voila you have a table named Measures
Note the little Space before " Measures". Don't worry that'll be truncated when the table is created!
TIP 7 - Typing Data in Power BI
Power BI doesn't let you type data. But you can! Here is a quick one!
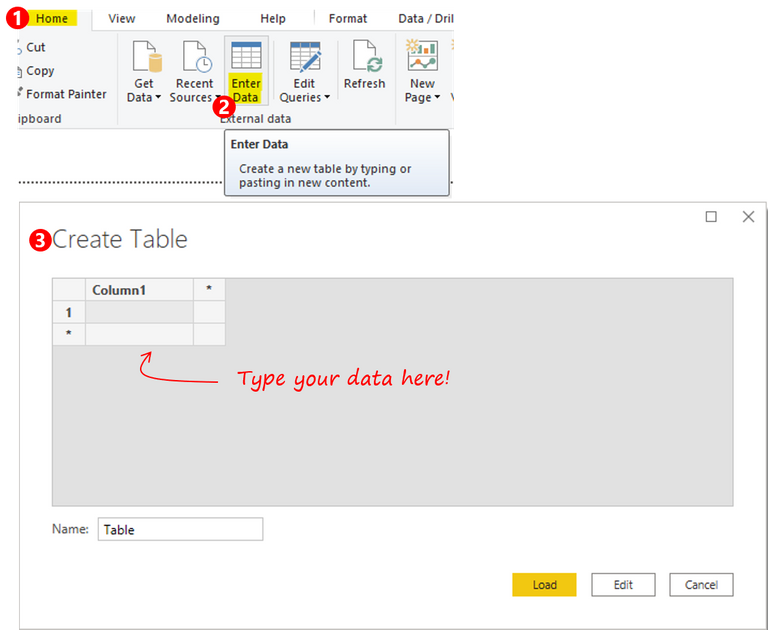
- Go to Home Tab.
- Click on Enter Data.
- The window that pops up, let's you type data and create custom tables.
- Side note - You can also paste tabular data from any source (even Excel).
Caution :
- Unless your table is very small and isn't going to change, don't use this option.
- The table that you create becomes static, the only way to edit the table is to go the Query Editor and make changes in the Source step.
- Also you won't be able to create a large table using this option, Power BI restricts that!
Tip 8 - Organizing Measures into Folders
This technique is super helpful when you have created a ton of measures and want to segregate them. You can use Folders. Here is how it works
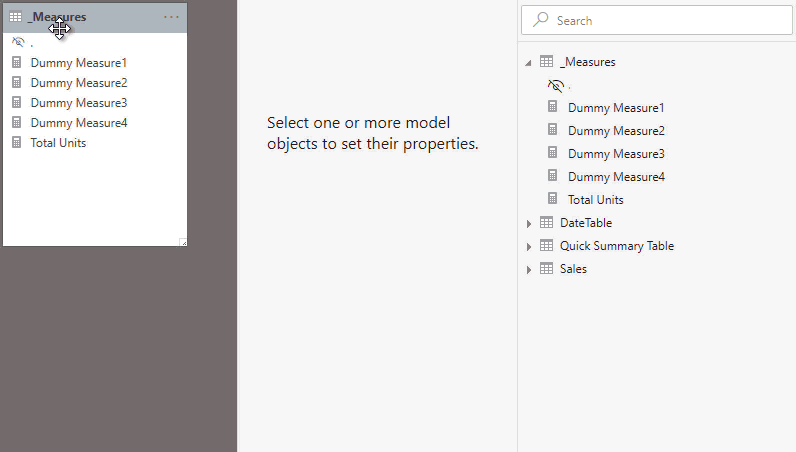
- In the Relationship View.
- Select the Table which contains the Measures.
- Select a Measure and you'll see Display Folder Option in the Properties Pane.
- Type the name of the Folder.
- And drag the rest Measures in the same folder.
- You'll see a folder created containing all the measures.
This is a super cool method to organize your measures in one place.
TIP 9 - Documentation Tool Tips for Measures
If you have created enough visuals with Power BI, you know what tooltips are (the little window that appears with additional info on a mouse hover). Similarly, you can create documentation that appears when you hover over the Measure. You'd understand better when you see it.
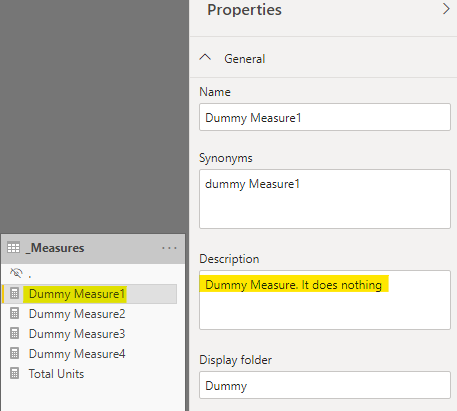
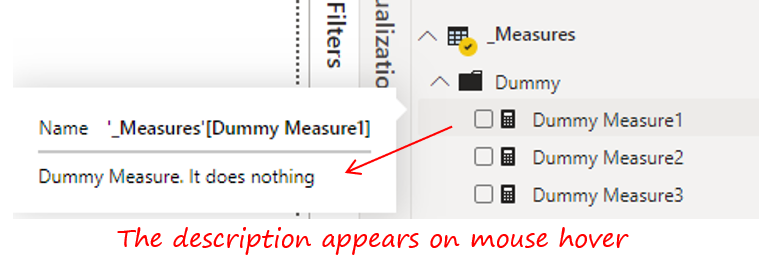
- In the Relationship View.
- Select any Measure.
- In the Properties Pane write a description of the Measures.
- Now on mouse hover the description will appear.
Let me know
Comment below with 2 things.
- Which tricks did you know already and which ones did you like the most?
- Share one of your own nifty Power BI / DAX trick?
About Chandeep
Chandeep is a fellow Power BI / Excel enthusiast based in Gurgaon (India). His work focuses on training & consulting companies on implementing Power BI solutions. He is an avid blogger and writes about Excel, Charting, DAX, M and Power BI on his blog
We think you would like:
DAX AND OR IN or syntax(&& ||) – Which one?
6 DAX tips for Excel and Power BI users
If you would like to start collecting rewards quickly for learning Excel then you should try:
10+ Excel Learn and Earn Activities YOU can do Today
SIGN UP FOR OUR NEWSLETTER TODAY – GET EXCEL TIPS TRICKS & LEARN AND EARN ACTIVITIES TO YOUR INBOX
SIGN UP
Cross posted from my blog with SteemPress : https://theexcelclub.com/9-tips-for-powerbi-users/
nice post... :)
thanks, its a guest post from Chandeep . I am glad you liked it :-). You should check out his blog
cool idea for a business, followed
I Support the Real Top 20 Witnesses - I Support Steem v0.22.4444
Congratulations @theexcelclub! You have completed the following achievement on the Steem blockchain and have been rewarded with new badge(s) :
You can view your badges on your Steem Board and compare to others on the Steem Ranking
If you no longer want to receive notifications, reply to this comment with the word
STOPDo not miss the last post from @steemitboard:
Vote for @Steemitboard as a witness to get one more award and increased upvotes!