Toturial paso a paso para que aprendas a realizar remesas desde cuba usando Slyk. (ESP-ENG).
Toturial paso a paso para que aprendas a realizar remesas desde cuba usando Slyk.
Saludos y buenos días mis estimados amigos de hive y de esta espectacular comunidad, el día de hoy estoy de vuelta por acá para traerles un tema muy interesante, les mostraré un tutorial paso a paso de cómo realizar remesas y recargas en la plataforma de Slyk. Además les iré dando en el trascurso de este articulo tips para que tengan en cuenta y no comentan errores al hacer el proceso de pago. Espero que este blog les pueda ser de utilidad si estabas buscando otras alternativas para adquirir este tipo de servicios, pues sin más dilación damos comienzo a este interesante tema.

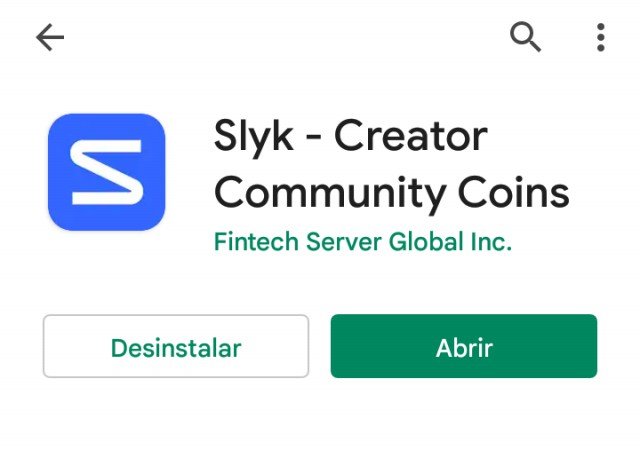
Paso 1: Descargar la aplicación.
El primer paso que debemos realizar es obviamente descargar la aplicación móvil, esta la necesitamos para poder realizar los pedidos. La podemos encontrar disponible tanto en la Google Play para Android como en la App Store para el sistema operativo de IOS.
Captura de Pantalla en mi Móvil
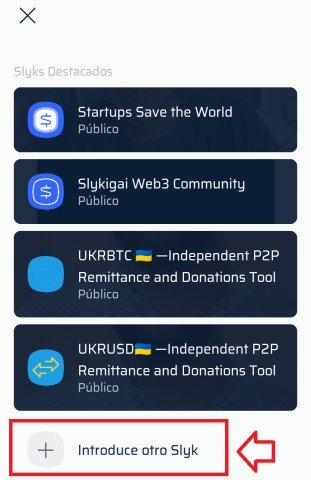
Paso 2: Registrarse en una Slyk.
Ya teniendo la aplicación descargada solo tenemos que registrarnos en alguna Slyk o tienda que ofrezca los servicios que nosotros deseamos. En el caso de cuba tenemos varias de estas tiendas que están especializadas en diferentes campos asociados a las remesas y la compra de saldo móvil. En este artículo usaré como ejemplo a la Slyk de QvaStore, pero hay muchas más.
Captura de Pantalla en mi Móvil
Como pueden observar en la imagen de arriba tenemos que pulsar donde dice (introduce otro slyk), en ese lugar lo que debemos poner es el nombre de la tienda. En la siguiente imagen les muestro como quedaría.

Captura de Pantalla en mi Móvil
Después de poner el nombre de la Slyk deseada pulsaremos en (siguiente), a continuación se nos presentarán 3 opciones de registro las cuales son: Iniciar con Google, registrar usando Facebook o por correo. En mi opinión personal lo mejor sería el correo, si elegimos esta última tendremos verificarlo. Finalmente tendrás que poner un nombre de usuario, una contraseña y habrás completado el registro.
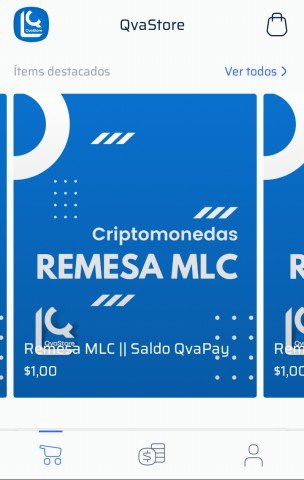
Paso 3: Adquirir el servicio deseado.
Ya registrados en una tienda podremos elegir el producto o servicio que nosotros queramos adquirir, para ello podrás desplazarte por un catalogo que tienen todas las tiendas. A continuación les dejo una imagen para que puedan observar como esta sección.
Captura de Pantalla en mi Móvil
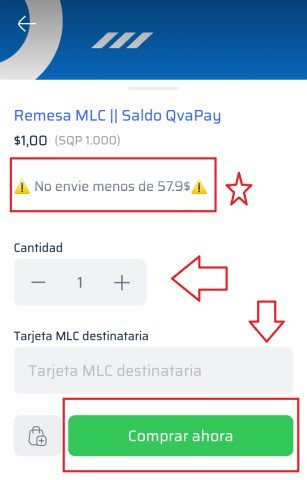
Paso 4: Hacer el pedido.
Cuando tengamos decidido el servicio que deseamos adquirir, tenemos que hacer el pedido, para ello pulsamos en dicho servicio. Luego se nos mostrarán todos los detalles sobre ese producto, es decir la cantidad que recibiremos, el precio entre otros. Es de vital importancia que siempre los leamos bien ya que estos pueden cambiar.
Captura de Pantalla en mi Móvil
Lo siguiente que tenemos que hacer es poner nuestros datos, es decir nuestro número de tarjeta bancaria o si es el caso el número de teléfono. Luego pondremos la cantidad de dólares que vamos a enviar, aquí debes tener muy en cuenta que algunas tiendas tienen un mínimo, este se especifica en los detalles, debes respetarlo ya que entonces no podrás adquirir el servicio.
Paso 5: Proceso de Pago.
Ahora que tenemos el pedido realizado procederemos a pagarlo, cada tienda tiene métodos de pago diferentes, pero la mayoría usa saldo de Qvapay por lo que usaré esa vía en este tutorial para que te sea más fácil entender.
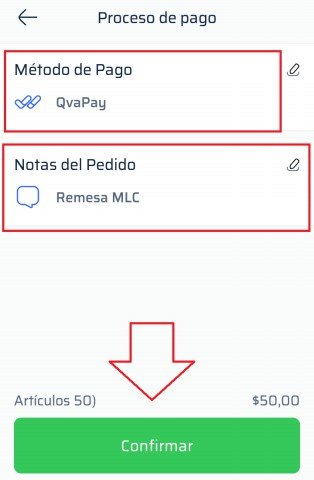
Captura de Pantalla en mi Móvil
En la primera sección de arriba erigiremos el método de pago, yo elegí Qvapay, pero también puedes con cryptomonedas. En la parte de abajo pondremos una nota, en ella escribirás lo que creas será útil para la tienda que te va a realizar el servicio. Finalmente pulsas en confirmar.
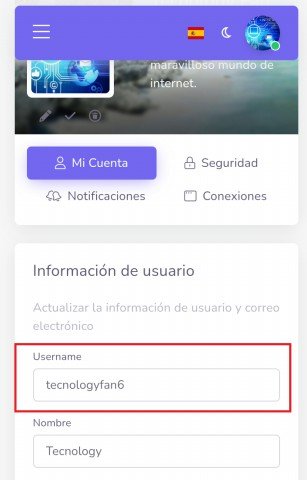
Paso 6: Enviar los fondos.
Con el proceso de pago terminado procederemos a enviar los fondos, esta parte del tutorial puede cambiar si eliges otro método de pago diferente a Qvapay.

Captura de Pantalla en mi Móvil
Lo primero que se te pedirá es que pongas tu usuario de qvapay, este no es el nombre con el cual te registraste sino tu usuario que es diferente. Si no lo conoces lo único que debes hacer es dirigirte a los ajustes de tu cuenta en la página de Qvapay y copiarlo. En la siguiente imagen te muestro cual sería:
Captura de Pantalla en mi Móvil
Después de llenar ese campo en el pedido que estabas haciendo en Slyk y pulsar siguiente se te mostrará el link o enlace de pago. Este te llevará a la página de Qvastore en Qvapay. Lo único que debes hacer es copiarlo y pegarlo en tu navegador, pero no debes cerrar la aplicación de Slyk mientras estas en el navegador ya que tendrás que volver para hacer una última operación. En la siguiente imagen te muestro como es esta sección.
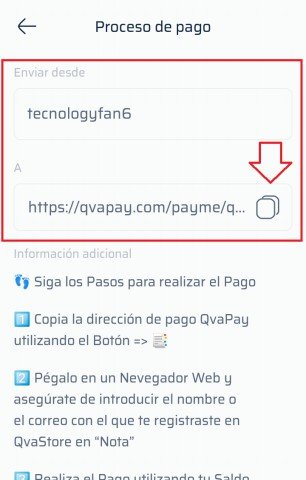
Captura de Pantalla en mi Móvil
Ahora que tenemos el link de pago nos dirigiremos al navegador (recordando) lo que mencioné, pegaremos ese enlace en la barra de búsqueda, esto mostrará la pagina para enviar fondos de Qvapay al usuario de Qvastore. Antes de seguir tengo que recalcar que debes tener iniciada la sesión en Qvapay antes de hacer todo el proceso y obviamente tener fondos. En la siguiente imagen se los muestro.
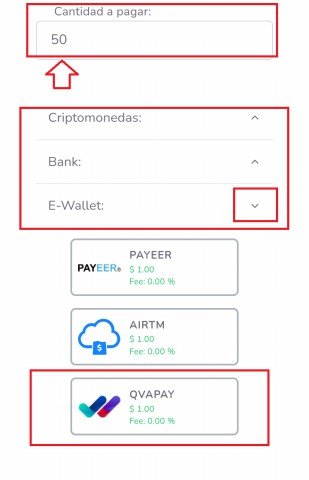
Captura de Pantalla en mi Móvil
Lo primero es poner la cantidad que enviaremos, aquí debes recordar que algunas tiendas tienen un mínimo, si la cantidad que tu deseas es superior al mínimo entonces no hay problema. Lo segundo es de qué manera enviaras los fondos, esto se repite porque qvapay te permite extraer tu saldo de su moneda nativa a cryptomendas, pero en este caso nosotros enviaremos directamente saldo de Qvapay. Para ello pulsaremos en el menú (E-Wallet) y tocaremos la opción Qvapay. Luego de hacer esto solo nos queda escribir una nota adicional, en ella lo primero que pondrás es el correo con el cual te registraste en la Slyk y lo otro que puedes poner es el nombre del servicio que estas a punto de pagar. Finalmente pulsaras en el botón que dice (PAGAR), Y los fondos se enviarán.
Paso 7: Confirmar el Pago.
Ahora que hemos enviado los fondos nos dirigiremos nuevamente a la aplicación de Slyk , si recuerdas te mencione que no debías cerrarla mientras hacemos este proceso. Lo único que debes hacer pulsar en el botón que dice (he enviado los fondos), cuando lo hagas habrás terminado el proceso de pedido y solo resta esperar que te llegue el servicio que acabas de adquirir.
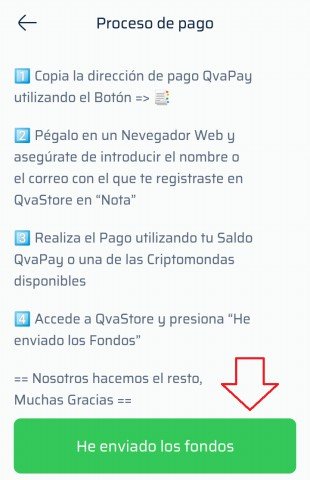
Captura de Pantalla en mi Móvil
Pues como han podido ver mis amigos este es el proceso completo para realizar una remesa o recarga usando Slyk, como les decía algunos detalles y pasos pueden cambiar dependiendo del método de pago o la tienda que estemos usando, pero en su gran mayoría es el mismo proceso. Espero que este artículo les haya gustado y sobre todo ayudado si no conocías esta vía. Muchísimas gracias por leer, tengan un feliz día.
Si lo deseas puedes seguirme en mis redes:
Twitter.
English
Step-by-step tutorial for you to learn how to make remittances from Cuba using Slyk.
Greetings and good morning my dear friends from hive and from this spectacular community, today I am back here to bring you a very interesting topic, I will show you a step-by-step tutorial on how to make remittances and top-ups on the Slyk platform. In addition, I will give you tips in the course of this article so that you take into account and do not comment on errors when making the payment process. I hope that this blog can be useful to you if you were looking for other alternatives to acquire this type of service, because without further delay we begin this interesting topic.
Step 1: Download the app.
The first step we must take is obviously to download the mobile application, we need this to be able to place the orders. We can find it available both on Google Play for Android and on the App Store for the IOS operating system.
Screenshot on my Mobile
Step 2: Sign up for a Slyk.
Once we have the application downloaded, we only have to register in a Slyk or store that offers the services that we want. In the case of Cuba we have several of these stores that are specialized in different fields associated with remittances and the purchase of mobile credit. In this article I will use the QvaStore Slyk as an example, but there are many more.
Screenshot on my Mobile
As you can see in the image above we have to click where it says (enter another slyk), in that place what we have to put is the name of the store. In the following image I show you how it would look.
Screenshot on my Mobile
After putting the name of the desired Slyk we will click on (next), then we will be presented with 3 registration options which are: Start with Google, register using Facebook or by mail. In my personal opinion, the best would be the mail, if we choose the latter we will have to verify it. Finally you will have to put a username, a password and you will have completed the registration.
Step 3: Acquire the desired service.
Already registered in a store we can choose the product or service that we want to acquire, for this you can scroll through a catalog that all stores have. Then I leave an image so you can see how this section.
Screenshot on my Mobile
Step 4: Place the order.
When we have decided on the service we want to acquire, we have to place the order, to do so we click on said service. Then we will be shown all the details about that product, that is, the amount that we will receive, the price, among others. It is vitally important that we always read them well as they can change.
Screenshot on my Mobile
The next thing we have to do is put our data, that is, our bank card number or, if applicable, the telephone number. Then we will put the amount of dollars that we are going to send, here you must take into account that some stores have a minimum, this is specified in the details, you must respect it since then you will not be able to acquire the service.
Step 5: Payment Process.
Now that we have the order placed, we will proceed to pay it. Each store has different payment methods, but most use Qvapay balance, so I will use that method in this tutorial to make it easier for you to understand.
Screenshot on my Mobile
In the first section above we will set up the payment method, I chose Qvapay, but you can also with cryptocurrencies. At the bottom we will put a note, in it you will write what you think will be useful for the store that is going to perform the service. Finally click on confirm.
Step 6: Send the funds.
With the payment process finished we will proceed to send the funds, this part of the tutorial may change if you choose another payment method other than Qvapay.
Screenshot on my Mobile
The first thing you will be asked is to enter your qvapay username, this is not the name with which you registered but your username, which is different. If you don't know it, all you have to do is go to your account settings on the Qvapay page and copy it. In the following image I show you what it would be:
Screenshot on my Mobile
After filling in that field in the order you were making in Slyk and pressing next, the payment link will be shown. This will take you to the Qvastore page on Qvapay. All you have to do is copy and paste it into your browser, but you shouldn't close the Slyk application while you're in the browser as you'll have to go back for one last operation. In the following image I show you how this section is.
Screenshot on my Mobile
Now that we have the payment link we will go to the browser (remembering) what I mentioned, we will paste that link in the search bar, this will show the page to send Qvapay funds to the Qvastore user. Before continuing, I have to emphasize that you must be logged into Qvapay before doing the whole process and obviously have funds. I show them in the next image.
Screenshot on my Mobile
The first thing is to put the amount that we will send, here you must remember that some stores have a minimum, if the amount you want is greater than the minimum then there is no problem. The second thing is how you will send the funds, this is repeated because qvapay allows you to extract your balance from its native currency to cryptocurrencies, but in this case we will directly send Qvapay balance. To do this, we will click on the menu (E-Wallet) and touch the Qvapay option. After doing this we only have to write an additional note, in it the first thing you will put is the email with which you registered in Slyk and the other thing you can put is the name of the service that you are about to pay. Finally you will click on the button that says (PAY), and the funds will be sent.
Step 7: Confirm Payment.
Now that we have sent the funds we will go back to the Slyk application, if you remember I mentioned that you should not close it while we do this process. The only thing you have to do is click on the button that says (I have sent the funds), when you do so you will have finished the order process and all you have to do is wait for the service you just purchased to arrive.
Screenshot on my Mobile
Well, as my friends have seen, this is the complete process to make a remittance or recharge using Slyk, as I was saying, some details and steps may change depending on the payment method or the store we are using, but for the most part it is the same process. I hope you liked this article and above all it helped if you didn't know this way. Thank you very much for reading, have a nice day.
If you wish you can follow me on my networks:
Twitter.
https://twitter.com/TecnologyFan1/status/1527350658567139328
The rewards earned on this comment will go directly to the person sharing the post on Twitter as long as they are registered with @poshtoken. Sign up at https://hiveposh.com.
Muy bueno este post @tecnologyfan1 muy bien explicado todo !Gracias pronto haré la prueba !
Muchas gracias amigo, 👍.
Congratulations @tecnologyfan1! You have completed the following achievement on the Hive blockchain and have been rewarded with new badge(s):
Your next payout target is 500 HP.
The unit is Hive Power equivalent because post and comment rewards can be split into HP and HBD
You can view your badges on your board and compare yourself to others in the Ranking
If you no longer want to receive notifications, reply to this comment with the word
STOPCheck out the last post from @hivebuzz:
Support the HiveBuzz project. Vote for our proposal!
Dear @tecnologyfan1, we need your help!
The Hivebuzz proposal already got an important support from the community. However, it lost its funding few days ago and only needs a few more HP to get funded again.
May we ask you to support it so our team can continue its work this year?
You can do it on Peakd, ecency, Hive.blog or using HiveSigner.
https://peakd.com/me/proposals/199
Your support would be really helpful and you could make the difference! Thank you!
Excelente artículo detallado
Muchas gracias, me alegro mucho que les haya gustado. Saludos cordiales.👍👍