How To Set Up A Raspberry Pi With No Monitor
Greetings Steemians,
I decided to set up a tutorial for the Raspberry Pi.
The specifics of this tutorial:
Installation of Raspbian Buster Lite onto SD card.
SSH into Pi via Windows 10 for configuration.
If you're not familiar with the awesome Raspberry Pi, have a look at the official website and prepare to have your nerdy mind blown!
Hardware used in this tutorial is:
- Standard Micro SD card and card reader.
- Raspberry Pi 3 Model B Board
chipest Boardcom BCM 2837 64 bIT ARMv7 Quad Core processor
Board running @ 1200MHz
RAM : 1GB SDRAM@400MHz
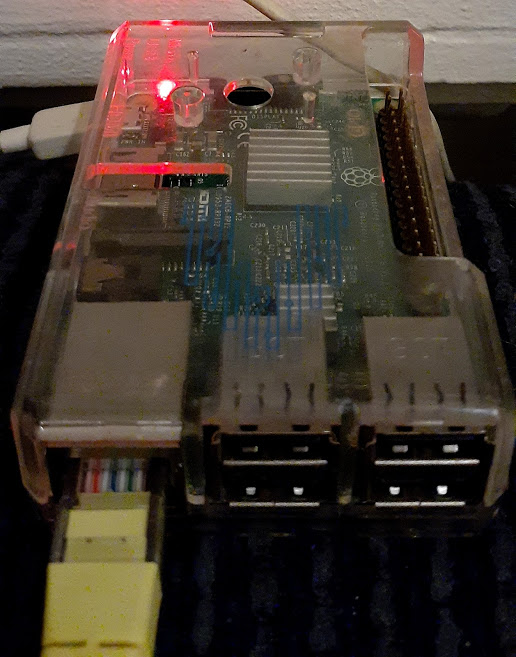
My Pi :)
There could be various reasons one may want to configure the Pi without a monitor. It could be for lack of a monitor, it could be for maximization of CPU resources, it could be for learning purposes, or like in my case, it could be the default monitor configurations cause error and need adjusting via SSH.
Even if you don't have another monitor and want a GUI (graphical user interface), you can set this amazing micro computer up for remote desktop. I will teach how to easily set this up in another tutorial. Let's begin.
This tutorial is specific for set up through Windows OS.
Aside from the listed hardware, you will need a wired connection via ethernet to your internet router, and a power source (standard smart phone charger) for the Pi.
It should also be noted that various softwares are available for free that carry out the same tasks as the softwares I will list in the tutorial. This is specific to what I used, and this was the easiest method I have ever encountered for setting up a Raspberry Pi.
First you will need to download a disk image operating system for the Pi. The most reliable and safe place to do this is the official website. For this tutorial we are using Raspbian Buster Lite, because it is not only the quickest method, but it's an excellent "base" to build your own system to your specific needs. A GUI can later be installed (and I will make a tutorial in the future on how to easily do this.)
Grab a zip file of the image here.
(You do not need to use Buster Lite, but it's definitely the quickest method and recommended for learning.)
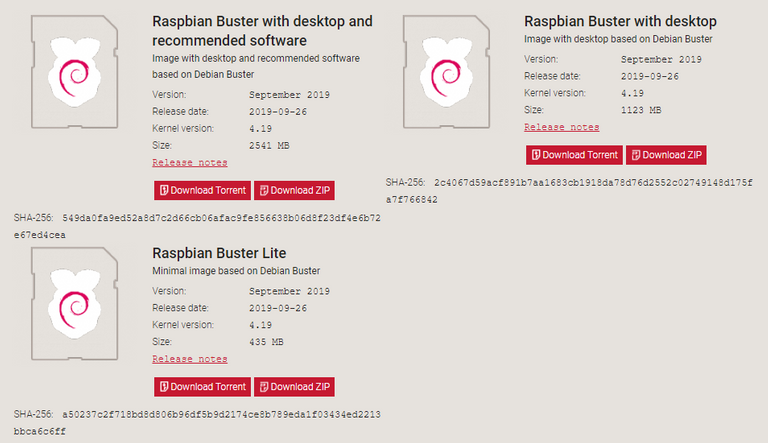
Once you have downloaded the zip (or torrent) create a new folder on your desktop, labelled whatever you want, and extract the image into the folder. Or you can just extract the image wherever you want, so long as you know where to locate it.
Unlike the drag and drop capabilities of the NOOBS OS, you will need specific software to write this image to your SD card.
For this task, I recommend Win32 Disk Imager. It's simple, free, and works flawlessly.
Download is available here.
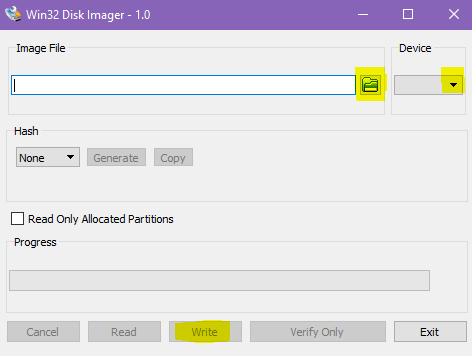
The highlighted areas are all you need here. Select your OS image, device (SD), and then write to the SD card. (Your Micro SD needs to be in the card reader and attached to your PC at this point.)
Once the task is complete, you will need to open up notepad and save a blank file as SSH, open up the root directory of your SD, and drag/drop this file in. (Thank you @themarkymark for bringing this to my attention!)
(Raspbian no longer comes with SSH enabled by default, this is a protection due to a standard username and password. It protects you from having someone remotely log into your device.)
Now you will need to pop the Micro SD into your Pi, plug in your ethernet and power it up.
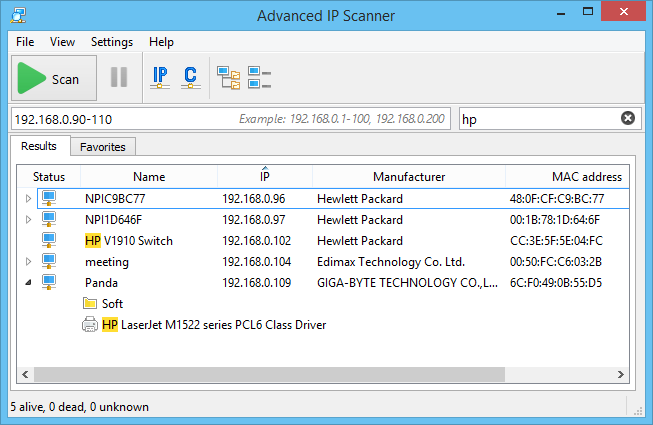
Before doing this however, there are two more programs you'll need to download. The first one will help you detect your IP address of the Pi on the network. This is needed for SSH.
I recommend Advanced IP Scanner. It's free, easy to use, and gets the job done perfectly.
https://www.advanced-ip-scanner.com/
You can download it directly from the site link above.
The last software you will need is necessary for SSH connection. I recommend PuTTY.
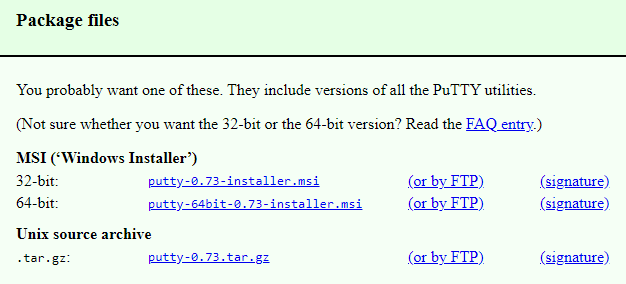
Download the 32-bit or 64-bit installer. If you're not sure if your computer is 64-bit, download the 32-bit version.
Once Advanced IP Scanner and PuTTY are installed, connect your Pi to the network and power it up.
The next step will be to scan your network utilizing Advanced IP Scanner. If all goes well, you should see an IP with a Raspberry Pi Foundation in the manufacturer area. This is the IP you will need.
Next you will start PuTTY for SSH.
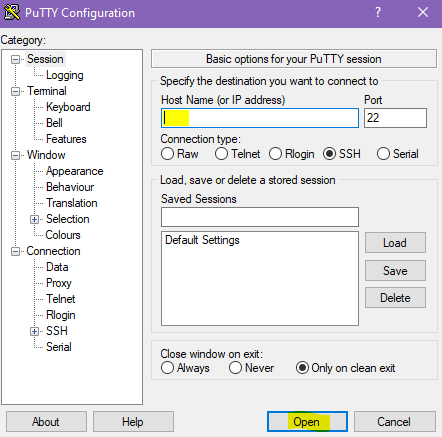
Input your Raspberry Pi's IP, and then click open.
You will see a terminal pop up next, prompting you to log in.
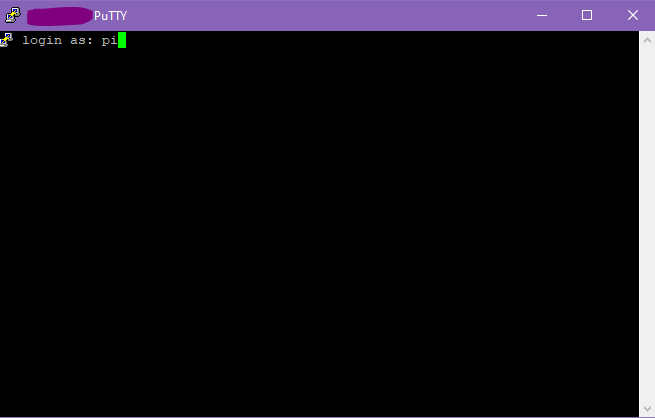
The terminal will display your device IP at the top, and will display:
login as:
Input username: pi
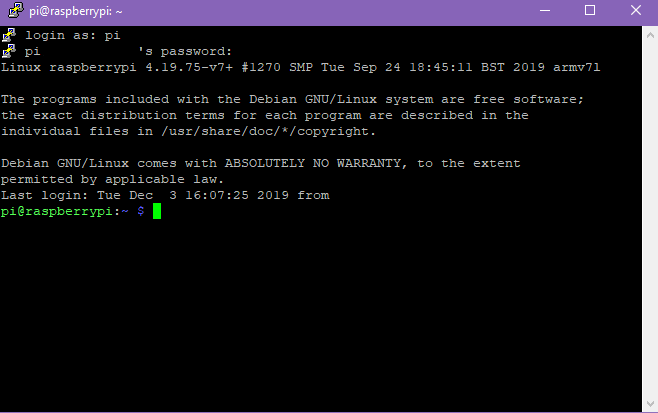
Next you will be prompted to enter a password.
The default password is: raspberry
Input that and watch the magic happen.
Congratulations, you are now SSH'd into your Pi.

Considering you have SSH enabled, you aren't going to want to leave that default password as raspberry.
To easily change your password, input:
sudo raspi-config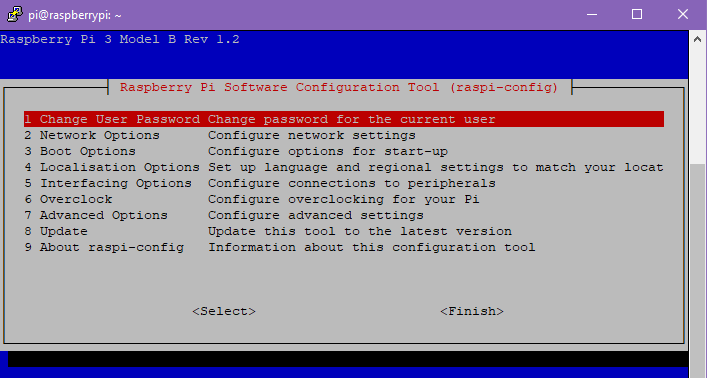
Click enter, and follow the prompts.
After changing the password, exit the raspi-config and input this command:
sudo apt-get update && sudo apt-get upgradeThis command will both search the repositories for needed updates, as well as install them. You will likely encounter some prompts where you will need to input "y" to continue, go ahead and do that until you are back to the main terminal screen.

For my next tutorial I'm planning on showing you how to set up a minimal graphical user interface and remotely control it right on your Windows desktop!
Thanks for stopping by, I hope you're all having a wonderful day!

Posted with eSteem Surfer

Thanks for using eSteem!
Your post has been voted as a part of eSteem encouragement program. Keep up the good work! Install Android, iOS Mobile app or Windows, Mac, Linux Surfer app, if you haven't already!
Learn more: https://esteem.app
Join our discord: https://discord.gg/8eHupPq
This info
My head
😁
Posted using Partiko Android
This little chip is so cool bro. There's so much you can do with it. Retropie is what sparked my interest initially. The nostalgia of being able to play NES games with a Logitech gamepad (or any USB gamepad really) is quit indescribable.
It's good to stock up on multiple SD cards when playing around with one of these, because you can have multiple projects running at the same time, and switching projects is as easy as just popping the micro SD's in and out of the chip, because they act as the hard drive.
Maybe I'll make a retropie tutorial in the future. The cool thing is you don't even need a Raspberry Pi for it. You can run a virtual machine on a regular PC and it works just fine.
Yeah computers are pretty mind blowing.
Hi my friend @futuremind, very happy to be able to read your post again. Really useful writing. You discuss the steps very clearly, sir. thanks. This really adds insight into everyone's knowledge. Have a nice day, sir.
Thank you so much miss,
Have a great day.
Hi, @futuremind!
You just got a 25.96% upvote from SteemPlus!
To get higher upvotes, earn more SteemPlus Points (SPP). On your Steemit wallet, check your SPP balance and click on "How to earn SPP?" to find out all the ways to earn.
If you're not using SteemPlus yet, please check our last posts in here to see the many ways in which SteemPlus can improve your Steem experience on Steemit and Busy.
Hello,
Your post has been manually curated by a @stem.curate curator.
We are dedicated to supporting great content, like yours on the STEMGeeks tribe.
If you like what we are doing, please show your support as well by following our Steem Auto curation trail.
Please join us on discord.
Thank you so much! I'm happy the STEMGeeks tribe liked my first post on the network. More to come in the future! :)
Hi Jacob, I just saw this. Upvoted before it is too late as well.
I am/was curious about the Raspberry Pi, looked into it several years ago at
Micro Center.
Some of what you speak of here, I don't have the terminology to understand.
SSH? what's that?
Most everything else I could follow, except (and maybe I skipped over something) at the end you are showing a command prompt black screen, how could you get that without a monitor @futuremind?
Signed woefully undereducated. 😜