No Code Development With Bubble.io - Part 1
I've been wanting to get my hands dirty with Bubble.io for a long time now but have been struggling with some of the details and concepts, but I think I have just been overthinking things. By already having experience with programming and product development, I think I just didn't trust that the application could be as easy as it was. I started looking for some books and guides to try and help me get grasp of what I was doing, and struggled to find anything and saw Bubble.io had a lot of training partners, which I think was there preferred option to help new users. There is a lot of documentation on their site, but I think it is either overly basic and doesn't go into more advanced topics, or is too high level and does give the detail needed to explain the concepts.
This is where these articles come in. I thought I would put together a series of articles to hopefully fill in the blanks and hopefully show other users how easy it is to build your applications with Bubble.io.
So far, I have found the easiest way to get comfortable with using Bubble.io to build applications is to simply attack it!
If you don't have an account already, then the following section, goes through setting up a new account with Bubble.io
https://bubble.io/login?mode=signup
Once you have an account and are ready to start working with Bubble.io you need to create an App. You do this from your home page of your Bubble.io account. When you log in you will be taken to the following location:
https://bubble.io/home/apps
There are a tone of templates you can use to help speed up your application creation. When you are just getting started though, they can be a little over whelming and slow your progress. We will also get a better understanding of how the application works without using a template as well.
To create a App, you simply click on the Create App button on your Bubble.io account home page, or as we mentioned earlier, from the page https://bubble.io/home/apps
When you click on the Create App button, you will be asked if you want to start from a template, this is optional, so please leave it blank for now, but you do need to give your app a name, so type a name for the app to get started.
After you enter a name, click on create and you will most likely be asked if you want to upgrade your plan to a paid version of the app. You won't need any of those features in these articles, so scroll down to the end of this pop up and click on the "Start with basic features" option.
Bubble.io will take a few seconds to set things up, and will ask one or two simple questions as part of this set up, before it will let you start to customise your new app. You can skip these steps, but the questions are pretty easy to get you started, like
- Upload a favicon
- Set your default font. I always choose Ubuntu, from my engineering background
- Set Your default colours
- If you want to add plugins
Don't worry though, all these options can be configured once you start your project.
When your new app starts up, you will see a screen similar to the one below. We have, of course added the numbers as reference points to allow us to explain each point.
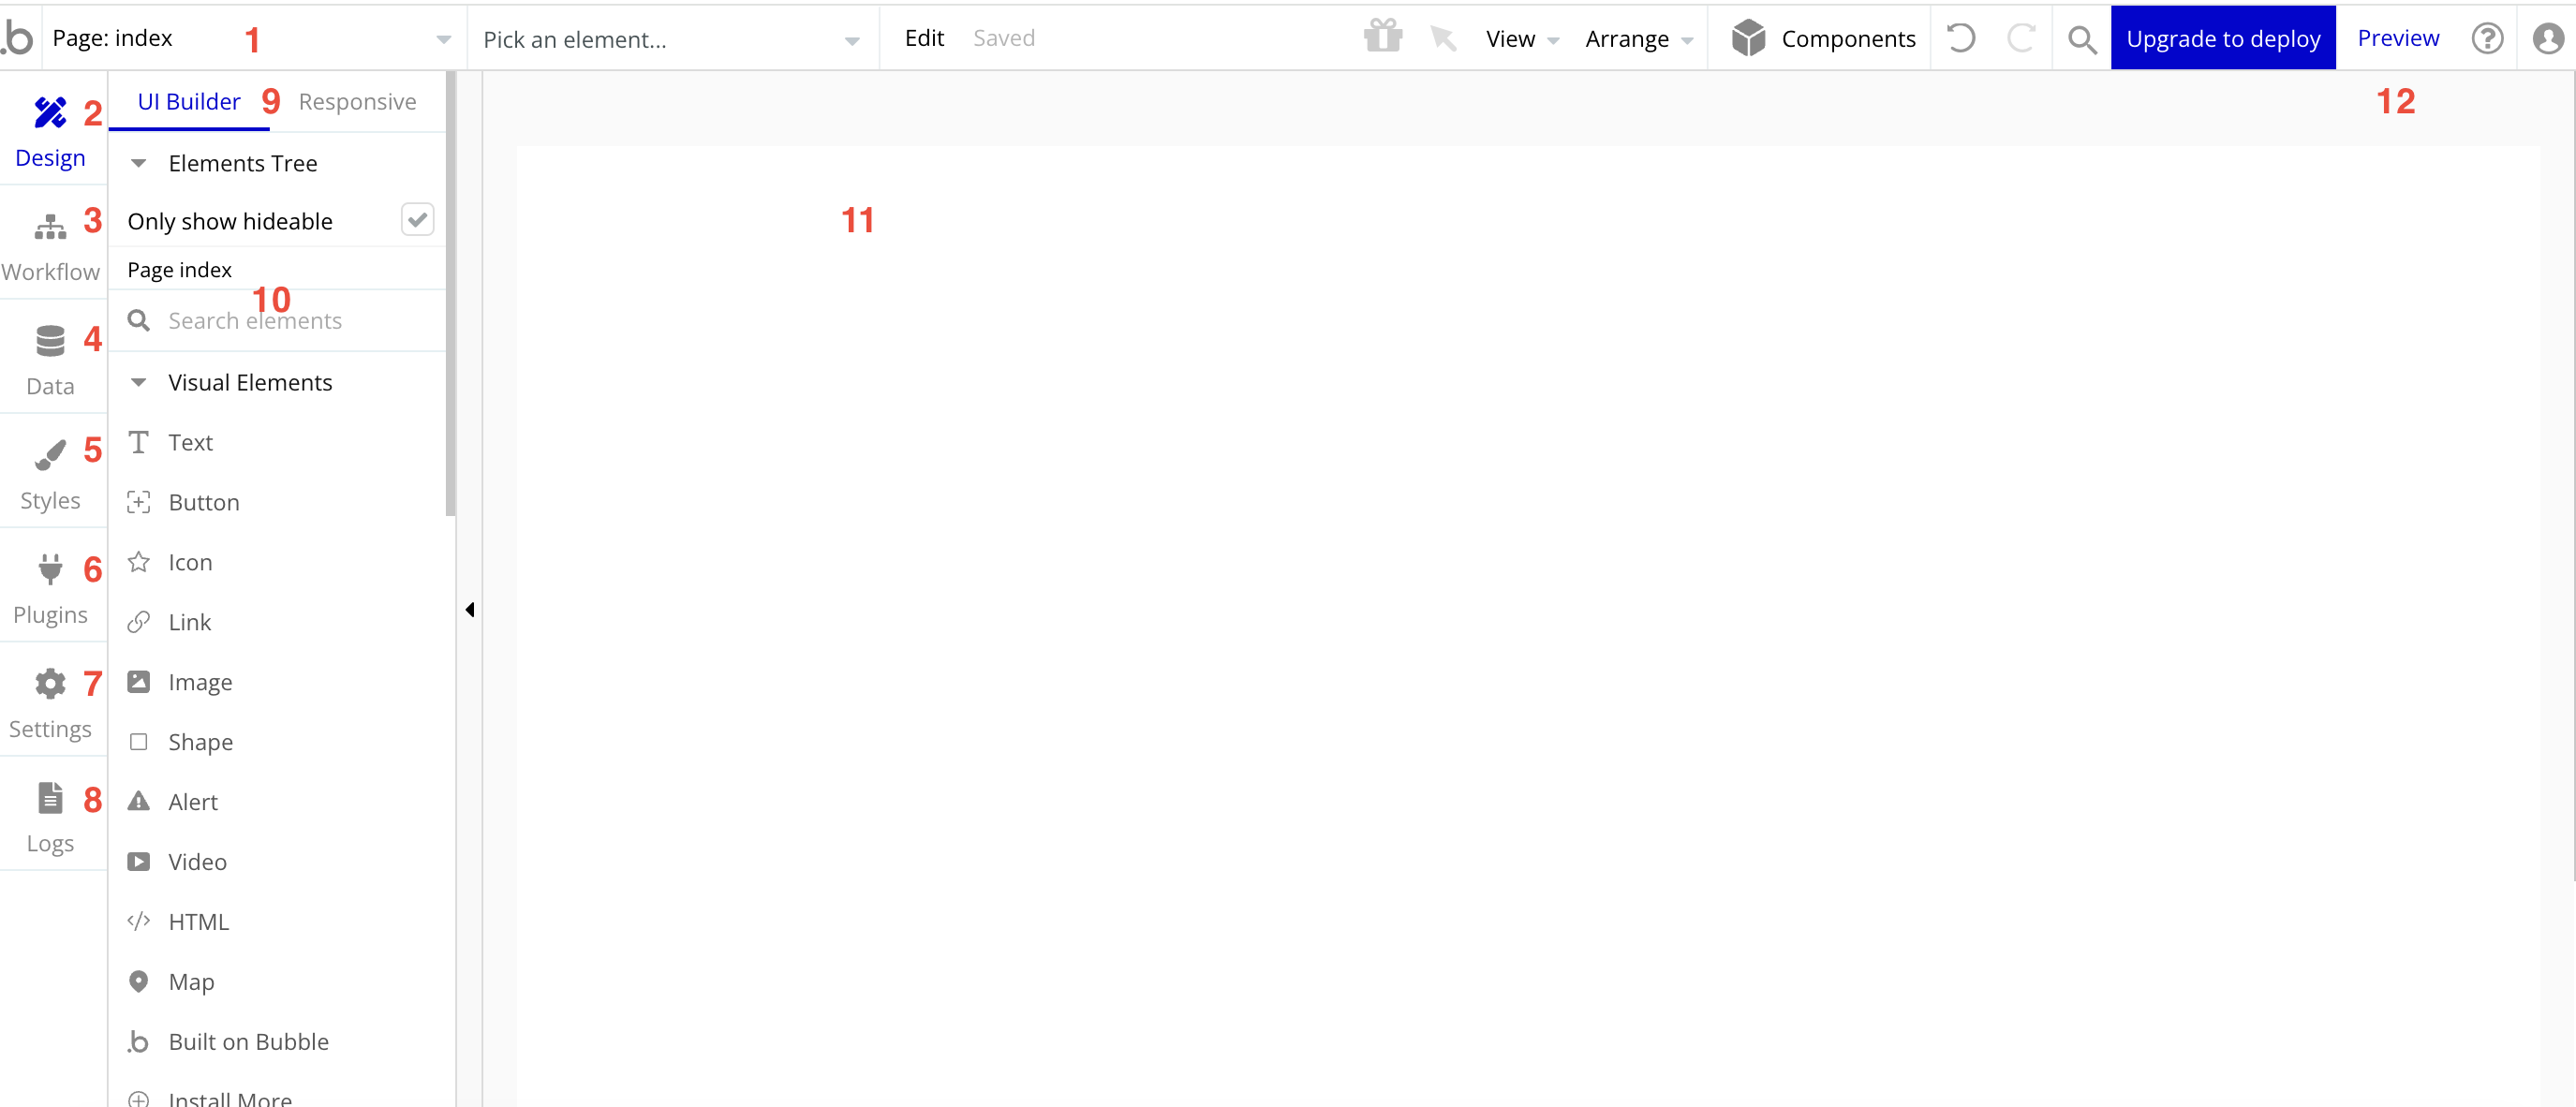
.b or the Bubble.io icon at the top left of the screen will take you back to your user account home page.
- Pages - This is where you can add new pages to your app or navigate the pages you already have. You should have the index, 404 and reset_pw pages set up by default when you create your app.
- Design - This is where you add all your design elements and set up the look and feel of your page. It will be the default page that is loaded up each time you open your app to edit it.
- Workflow - This is where you set up how the app will work, for example, when you click on a button, what does that button do.
- Data - This is where you store and manage your data.
- Styles - You can set up default styles and colours to match your app and keep everything as consistent as possible.
- Plugins - Plugins help you extend the functionality of Bubble.io, and this is where you can add and manage the plugins you use as part of your app.
- Settings - This is where you can set general settings for your app and your account.
- Logs - If you need to troubleshoot your app, logs can help you determine where any issues might be.
- UI Builder - These are all the different UI items you can add to your app interface.
- UI Builder Search - I have added this as there are a large number of items and when you are new to using the interface, it may be easier to use the search function.
- Workspace - This is where you design your app pages.
- Preview - When you want to test your app, click on the preview button to show you what all your work has achieved.
So lets get started just putting something basic together. There are a lot of pre built components you can add to your app to help you get started but if we just start with some thing back, I am sure you will start to see how easy it is to put things together.
For now, we are going to set up a basic header for our new app, create a second page and then link the two pages together.
1.You should be in the Design view, and you can see that about half way down the page, there is an element called "Shape". This will simply create shapes for you, and in this small project, we are going to create the background to our header. We do this by simply using our mouse to create a rectangle across the top of the screen. Don't worry about the colour of the rectangle, Bubble.io will use a colour from your styles settings. We will look at controlling these later.
2.Next use the "Text" element, which is the first item in the list. Create the text element by dragging another rectangle shape on top of the rectangle you added previously. Your page should be starting to look similar to the page below:

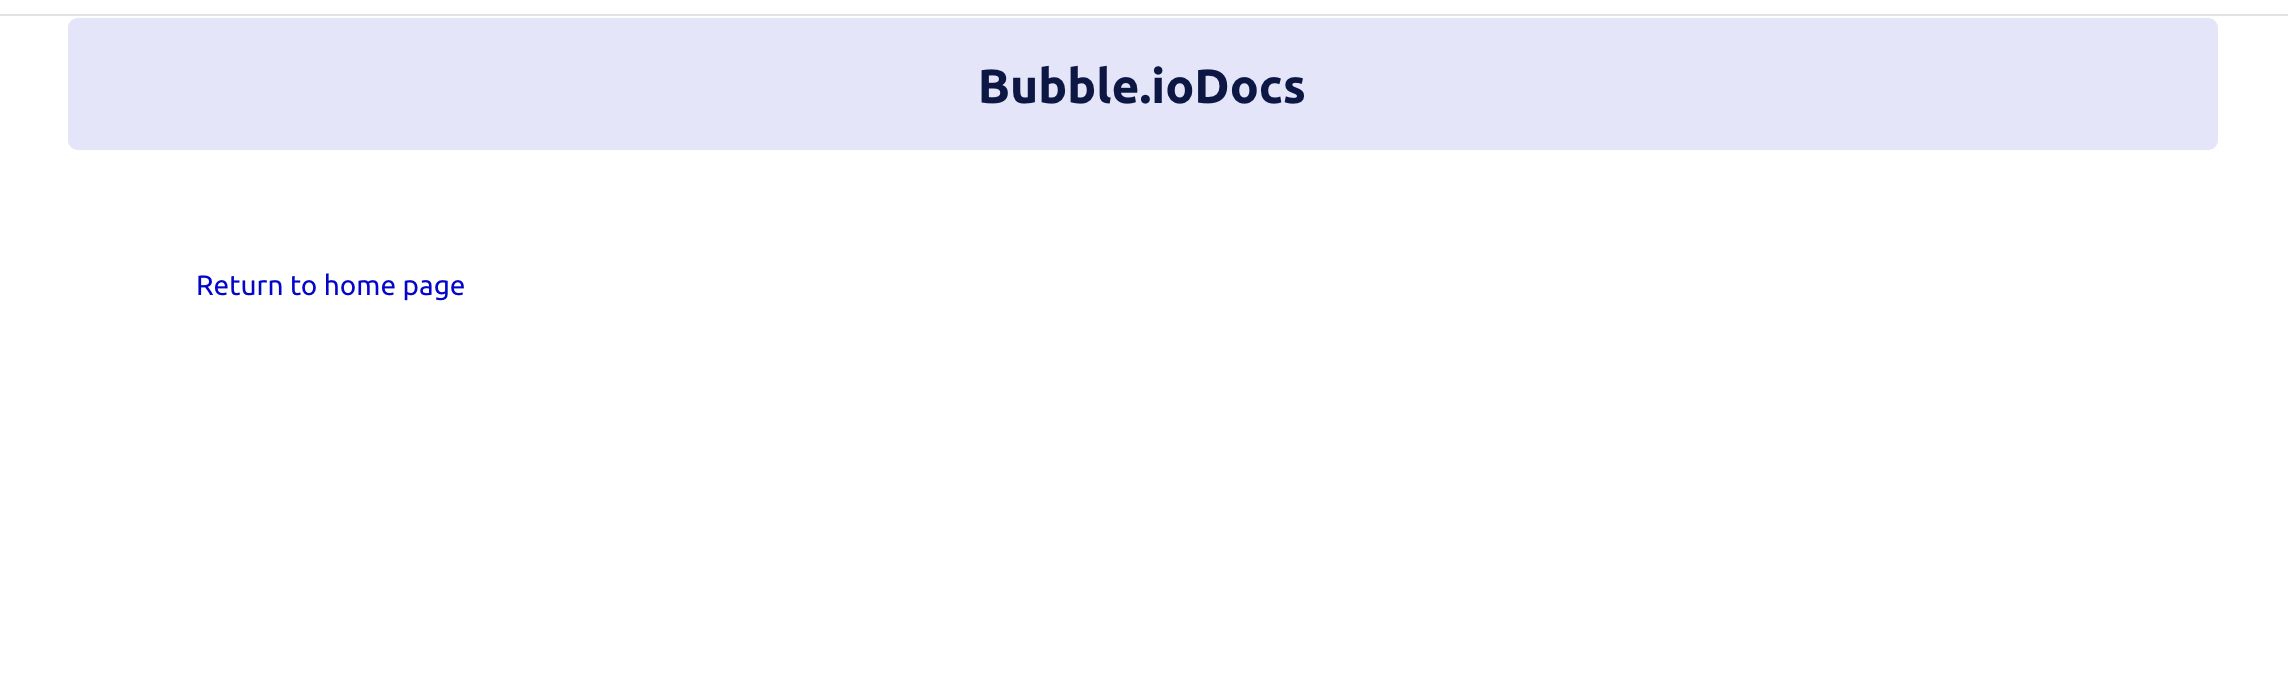
3.You probably notices that whenever you add an element to the page, you will be given a pop up menu, giving you a lot of different options on how to control this element, just like the image above. In our instance, we have added the text of "Bubble.ioDocs", we have centred the text, and we have also set the text size to be 24px and Bold.
4.We can now use this page as a template for any new pages we add. Everything we have added here, will now be added to any new pages if we use the clone function. We will create new page now. Click on the Page option, which is at the top left of the screen, and click on the "Add new page..." option.
5.You will be presented with the following options, to name your new page, in our instance we have simply called it new_page, and then for the option of "Clone from" we have used the index page. If you don't want to clone, you can simply leave this option blank.
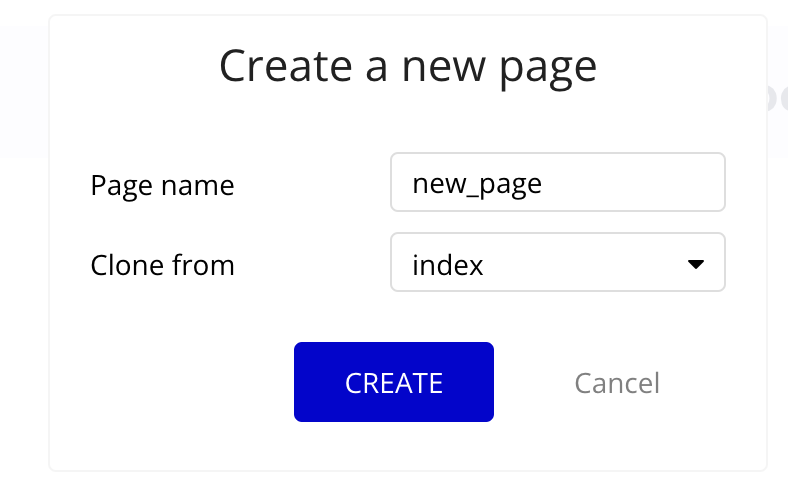
You will have a new page, exactly the same as your index page. We will add one more element to this project and then test that everything is working.
6.Stay on your new page and select the "Link" element from the visual elements menu. Draw a new rectangle any where on the new page. Add the text of "Return to home page" as text, and as you will notice that underneath, the "Link destination" will be an internal page, and the "Destination page" will be the original index page. We can set this to anything we want, including external pages or applications.
7.We have only done a small amount of work right now, but hopefully we should have a fully function site with header and links to get back to the index page. Click on the Preview button at the top right of the screen, which will open up your project in a new tab.
The Preview button gives you a good indication if everything has worked correctly. Our app so far is looking nice and clean and consistent, and if you click on the "Return to home page" link, it will return to the main index page. After testing you can now simply close the preview page.
I've not looked into this. I'm a bit old school when it comes to programming, but then I have not done much with web apps. Sometimes you just want to implements an idea.
Yeah when it comes to getting things working quickly, it looks like an interesting option. I am still very new to it but will keep you updated with my progress... thanks for the support @steevc
This is cool. Well, I don't really know so much about programming but I'm not that bad either
Thanks for your contribution to the STEMsocial community. Feel free to join us on discord to get to know the rest of us!
Please consider delegating to the @stemsocial account (85% of the curation rewards are returned).
You may also include @stemsocial as a beneficiary of the rewards of this post to get a stronger support.
Excelent article, I like to use card (another no code platform)
Thanks for the info @ingnia I have not heard of that, I will need to check it out. !LUV