(Esp-Eng) How to Repair a Super Woofer that won't Turn On/ Cómo Reparar un Súper Woofer que no enciende
Saludos Hiver de Geek Zone.
Muchos de nosotros compramos artefactos de sonido para tener una experiencia más agradable al momento de utilizar nuestras computadoras.
Los amantes de los juegos de videos, de películas y de la música podemos adquirir parlantes para obtener un mejor sonido.
Greetings Hiver from Geek Zone.
Many of us buy sound devices to have a more enjoyable experience when using our computers.
Those of us who love video games, movies and music can buy speakers for better sound.
Pero qué sucede cuando de un momento a otro nuestro parlante deja de funcionar? Nos sentimos tristes, frustrados y molestos porque ese parlante que tenía un maravilloso sonido ya no funciona y duró muy poco.
Aquí es donde entra en juego el conocimiento de la electrónica, la audacia del curioso y la magia de la reparación en casa.
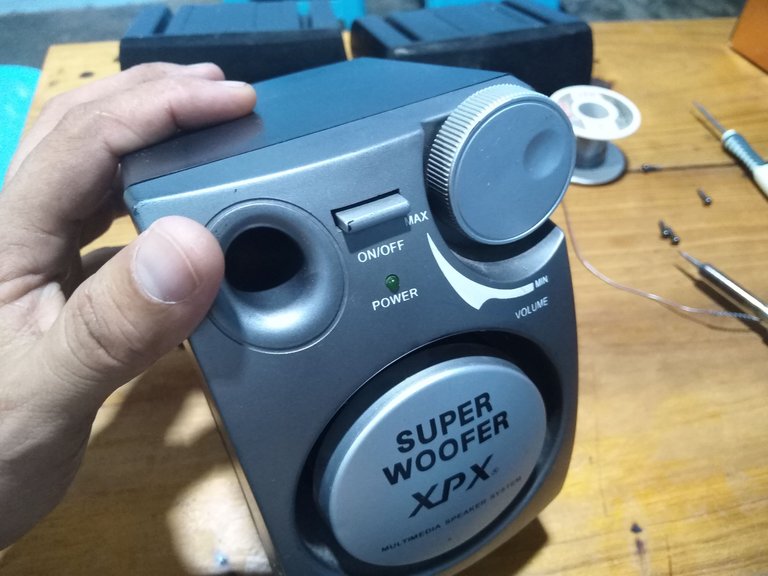
Super Woofer dejó de funcionar, no prendía y lo que parecía ser sencillo por ver un cable suelto, resultó ser algo un poco más complejo, pero que al final tuvo solución.
But what happens when all of a sudden our speaker stops working? We feel sad, frustrated and annoyed because that speaker that had a wonderful sound no longer works and lasted only a short time.
This is where the knowledge of electronics, the audacity of the curious and the magic of home repair come into play.
Super Woofer stopped working, it wouldn't turn on and what seemed to be simple because of a loose wire, turned out to be something a little more complex, but in the end it had a solution.
uction.
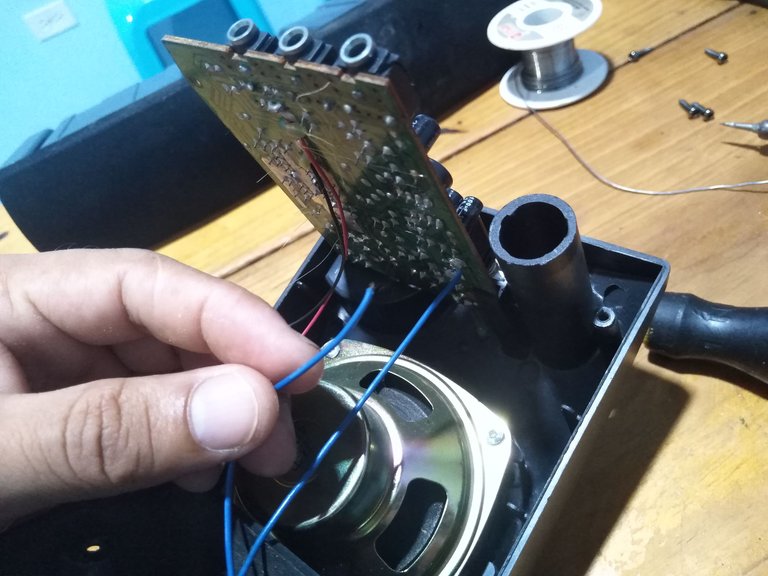
Resulta que al soldar el cable suelto el parlante seguía sin encender y sus componentes internos visualmente se veían en buen estado.
Tenemos que tener en cuenta que la observación es muy importante al momento de hacer reparaciones, pero también debemos utilizar la lógica del funcionamiento de un aparato.
It turns out that when soldering the loose wire the speaker still did not turn on and its internal components visually looked in good condition.
We have to keep in mind that observation is very important when making repairs, but we must also use the logic of how a device works.
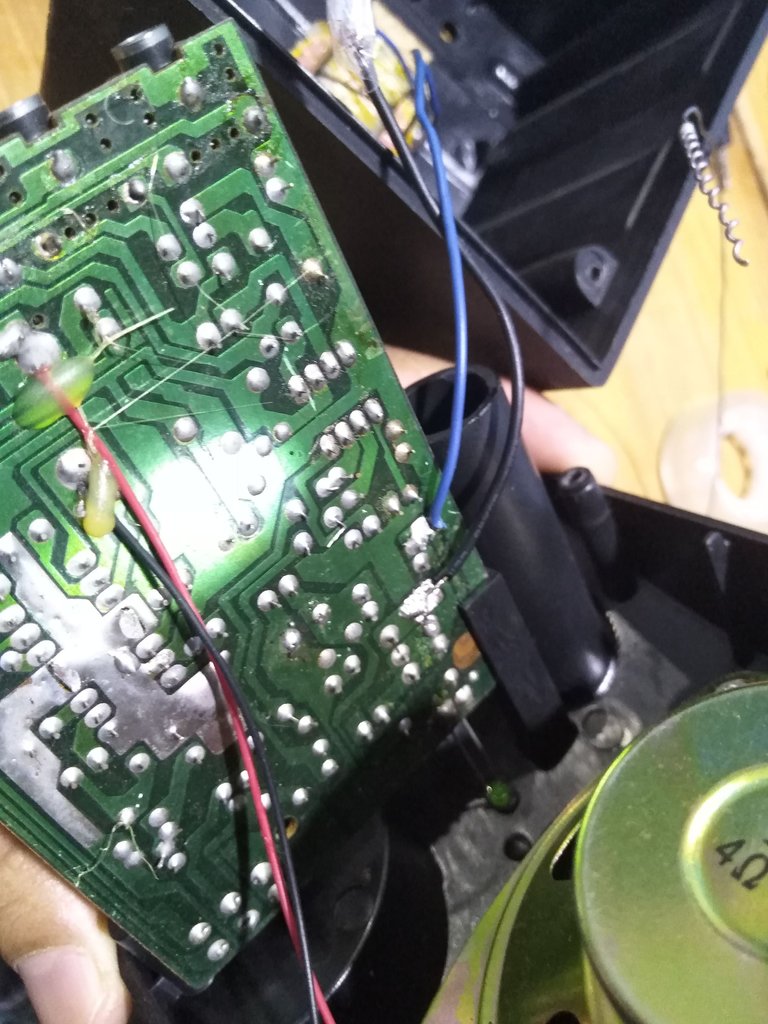
Esto quiere decir; que sí el que estaba suelto fue soldado y sigue son prender, debemos irnos más abajo, a la entrada de la corriente.
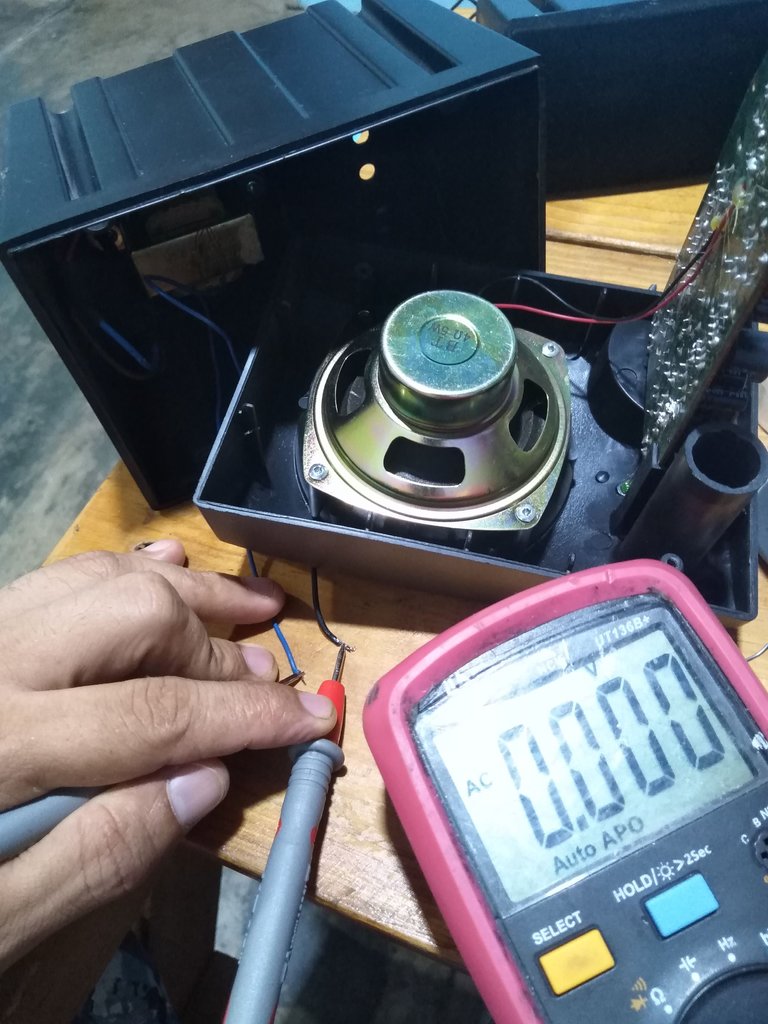
Debemos verificar el estado del cable que alimenta el parlante y en la imágen siguiente podemos ver que lo está entrando la corriente al circuito.
En esta lectura deberíamos visualizar unos 9vAc, pero está en 0,00 v.
Ya detectamos una falla, así que nos toca sacar el transformador de voltaje.
This means that if the one that was loose was soldered and still does not turn on, we must go further down, to the current input.
We must verify the state of the cable that feeds the speaker and in the following image we can see that the current is entering the circuit.
In this reading we should visualize about 9vAc, but it is at 0.00 v.
We have detected a fault, so we have to remove the voltage transformer.
voltage transformer.
Un transformador tiene la función de convertir una un voltaje, en este caso convierte el voltaje residencial de 110vac a 9vac. Es decir; reduce el voltaje.
En su interior tiene un embobinado, unos alambres de cobre que tienen un inicio y un fin común,esto quiere decir que al medir el extremo de cada alambre de cobre con el multimetro, este debe registrar una medición.
Pero aquí vemos que el multimetro no marca nada, es decir, hay una ruptura en la continuidad de ese alambre de cobre.
A transformer has the function of converting a voltage, in this case converting residential voltage from 110vac to 9vac. That is to say; it reduces the voltage.
Inside it has a winding, copper wires that have a common beginning and end, this means that when measuring the end of each copper wire with the multimeter, this should record a measurement.
But here we see that the multimeter does not mark anything, that is to say, there is a break in the continuity of that copper wire.
bre.

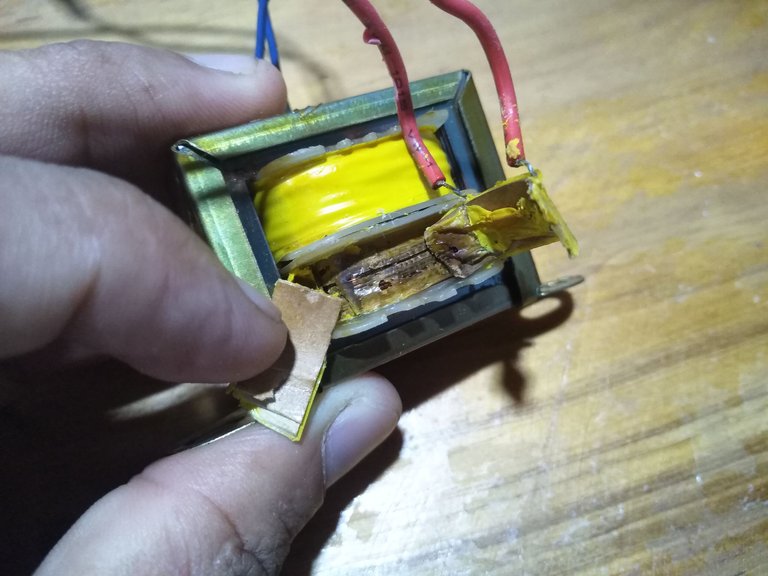
Por lo tanto el embobinado primario del transformador está dañado y debe ser reemplazado.
Al retirar la cubierta aislante de color amarillo, vemos que sufrió una alta temperatura que ocasionó el daño, el amperaje en este transformador se elevó sobre su valor nominal y lo quemó.
Therefore the primary winding of the transformer is damaged and must be replaced.
By removing the yellow insulating cover, we see that it suffered a high temperature that caused the damage, the amperage in this transformer rose above its rated value and burned it out.
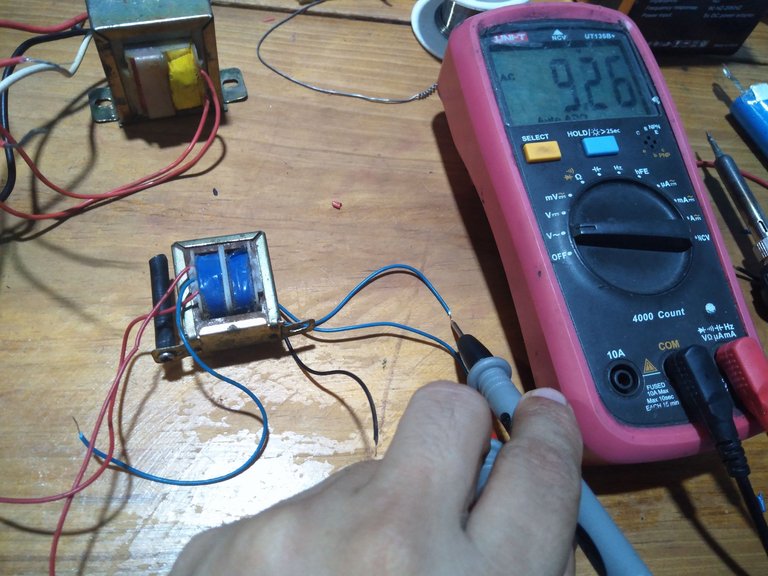
Ubiqué entre mis repuestos reciclados un transformador adecuado, uno que me suministrara en la salida 9vac.
Aquí podemos ver que en la salida está marcando 9.27 vac. Quiere decir que es el adecuado para este parlante.
I located among my recycled spare parts a suitable transformer, one that would supply me on the 9vac output.
Here we can see that the output is reading 9.27 vac. It means that it is the right one for this speaker.
e.
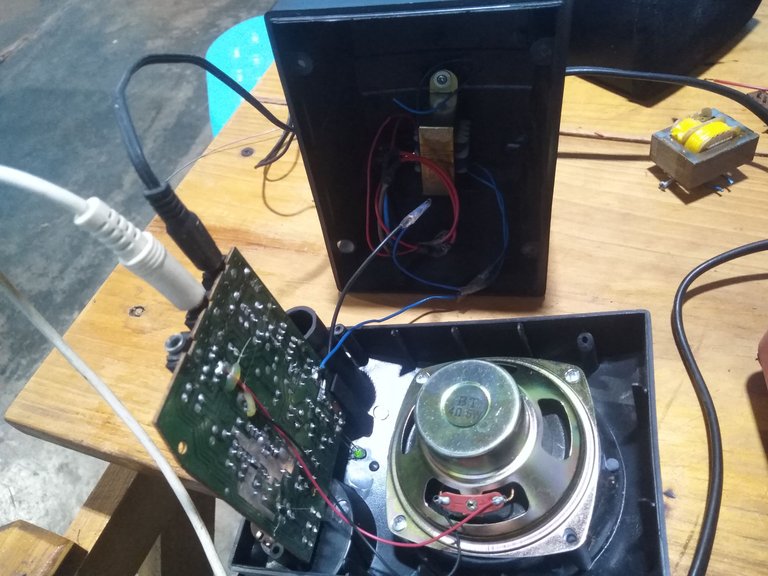
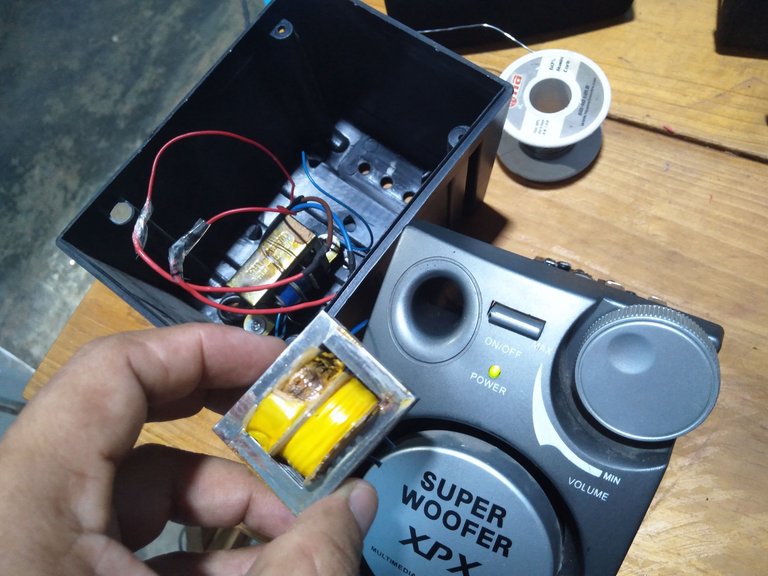
Lo adapté dentro de la carcasa del Súper Woofer para conectarlo en el circuito electrónico.
Ya con todo conectado procedemos a probar el encendedor del Super Woofer.
I adapted it inside the Super Woofer housing to connect it to the electronic circuit.
Now that everything is connected we proceed to test the Super Woofe
r.
Aquí vemos el led de color verde que señala que el dispositivo está encendido.
Ya funciona y podemos disfrutar nuevamente de su sonido. No necesitamos gastar dinero en la compra de otro Súper Woofer y si este era nuestro preferido, bueno aquí lo tenemos de vuelta.
Here we see the green LED that indicates that the device is on.
It is now working and we can enjoy its sound again. We don't need to spend money to buy another Super Woofer and if this one was our favorite, well here it is again.
Los artefactos electrónicos pueden tener reparación en muchos casos, todos ellos cumplen con una función y sí los compramos es porque nos hacía falta para determinada tarea.
Espero que esté tutorial les sirva en un futuro, la idea es demostrar que nosotros mismos podemos reparar en casa.
Hasta una próxima oportunidad.
Electronic devices can be repaired in many cases, all of them fulfill a function and if we bought them is because we needed them for a certain task.
I hope this tutorial will be useful in the future, the idea is to demonstrate that we can repair them ourselves at home.
See you next time.
Todas las fotografías fueron tomadas con mí Smartphone Huawei Dub-Al00.
Translated with DeepL.com (free version)

Oye bro qué excelente me encantó esta publicación.
Recientemente mi corneta inalámbrica también se dañó pero imagino que es el puerto de carga porque le conecto el cable del teléfono o el cable que vino con ella y no carga tendré que hacer una adaptación así para que pueda usarla normalmente.
Gracias amigo por apreciar mi contenido. Claro que puedes hacer una adaptación, de todas formas debes observar bien los contactos del pin de carga.
En dado caso que lo veas bien, puede que el controlador de carga se haya dañando, pero e todo caso igual tiene reparación.
Espero te animes a repararla y mostrar tu paso a paso, sería de mucha ayuda para todos los aficionados a la electrónica y las reparaciones.
Evidentemente reparar cosas no solo genera satisfacción, también ayuda a ahorrar dinero y contaminación.