[ESP/ENG] 🚀💻Configuración del Entorno de Desarrollo para Microcontroladores🚀💻Setting Up the Development Environment for Microcontrollers
[ESP]
¡Hola, comunidad de Hive! 👋
Hoy vamos a hablar sobre algo fundamental para todos los que trabajamos con microcontroladores: cómo configurar correctamente el entorno de desarrollo. La preparación de este entorno es clave para programar y probar con éxito dispositivos como los microcontroladores Arduino, STM32, PIC, y muchos otros. En esta publicación, te guiaré paso a paso para que tengas todo listo y puedas empezar a programar tus proyectos de manera eficiente. 🌐🛠️
Paso 1: Selección del Microcontrolador y la Placa 🤔
Antes de configurar tu entorno, es esencial saber qué tipo de microcontrolador vas a utilizar. Las opciones más comunes incluyen:
- Arduino: Con ATmega328p para proyectos educativos y DIY.

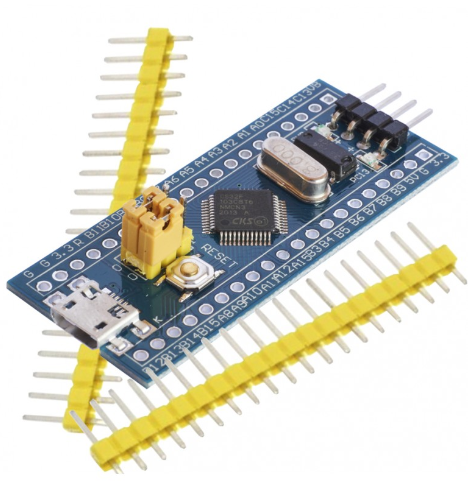
STM32: Para aplicaciones que requieren más potencia y flexibilidad.
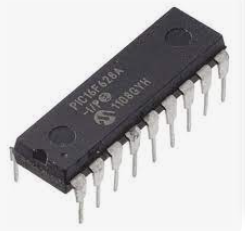
PIC: Utilizados en automatización y aplicaciones industriales.
Dependiendo de tu elección, el entorno de desarrollo variará ligeramente, pero los principios básicos son similares.
Paso 2: Instalación del Entorno de Desarrollo (IDE) 🖥️
Cada tipo de microcontrolador suele tener su propio IDE (Entorno de Desarrollo Integrado):
Arduino: El Arduino IDE es el más común. Es simple y fácil de usar, perfecto para principiantes. Se puede descargar de la página oficial de Arduino.
STM32: Utiliza STM32CubeIDE, una herramienta completa para el desarrollo con microcontroladores ARM de STMicroelectronics.
PIC: El software MPLAB X de Microchip es la opción predeterminada para programar estos microcontroladores.
Paso 3: Instalación de Controladores y Configuración 🛠️
Después de instalar el IDE, necesitarás conectar tu microcontrolador a la computadora:
Conexión USB: La mayoría de las placas, como Arduino y STM32, se conectan a través de USB. Asegúrate de que el controlador USB esté instalado correctamente para que el IDE lo reconozca.
Fuente de Alimentación Externa: Algunas placas pueden alimentarse externamente (usando un adaptador o batería) además del puerto USB. Esto es útil para pruebas y aplicaciones donde el microcontrolador debe funcionar de manera independiente.
Paso 4: Programación y Carga del Código 📝
Con el entorno configurado y la placa conectada, estás listo para programar:
Escribir el Código: Los IDEs vienen con ejemplos y plantillas que puedes modificar según tus necesidades. Por ejemplo, el Arduino IDE tiene un programa "Blink" que es perfecto para probar si tu configuración está funcionando.
Carga y Monitoreo: Una vez que el código esté listo, puedes cargarlo en tu microcontrolador con un solo clic. El monitor serial del IDE te permitirá ver datos en tiempo real desde tu dispositivo.
Aplicaciones y Ejemplos Prácticos 📚
La configuración de un entorno de desarrollo te abre la puerta a infinitas posibilidades:
Automatización del Hogar: Controlar luces y sistemas de climatización.
Estación Meteorológica: Usando sensores para medir temperatura y humedad.
Proyectos Robóticos: Construcción y programación de robots con microcontroladores como Arduino.
📢 ¡Gracias por configurar tu entorno de desarrollo conmigo! 📘
Espero que esta guía te haya sido útil para entender cómo configurar correctamente el entorno para trabajar con microcontroladores. Si tienes dudas o quieres compartir tus proyectos, ¡déjalo en los comentarios! 📝
🔔 No te pierdas más tutoriales donde seguiremos explorando el fascinante mundo de los microcontroladores y su programación. 🌐
🤝 Únete a nuestra comunidad para aprender y compartir tus experiencias en el mundo de la electrónica y la programación. 💬
📷 Comparte tus proyectos: ¿Ya has configurado tu entorno y programado tu primer microcontrolador? Comparte tus avances y recibe retroalimentación de otros entusiastas. 🛠️
🌟 Continúa explorando y aprendiendo: Mantente activo en Hive para descubrir nuevas formas de aprovechar tus microcontroladores en proyectos innovadores. 🚀✨
¡Hasta la próxima, sigue desarrollando y creando con microcontroladores!
[ENG]
Hello, Hive community! 👋
Today we are going to talk about something fundamental for all of us who work with microcontrollers: how to properly configure the development environment. Preparing this environment is key to successfully programming and testing devices such as Arduino, STM32, PIC, and many other microcontrollers. In this post, I will guide you step by step so that you have everything ready and can start programming your projects efficiently. 🌐🛠️
Step 1: Selecting the Microcontroller and Board 🤔
Before setting up your environment, it is essential to know what type of microcontroller you are going to use. The most common options include:
Arduino: With ATmega328p for educational and DIY projects.
STM32: For applications that require more power and flexibility.
PIC: Used in automation and industrial applications.
Depending on your choice, the development environment will vary slightly, but the basic principles are similar.
Step 2: Installing the Development Environment (IDE) 🖥️
Each type of microcontroller usually has its own IDE (Integrated Development Environment):
Arduino: The Arduino IDE is the most common. It is simple and easy to use, perfect for beginners. It can be downloaded from the official Arduino page.
STM32: Uses STM32CubeIDE, a complete tool for development with ARM microcontrollers from STMicroelectronics.
PIC: Microchip's MPLAB X software is the default choice for programming these microcontrollers.
Step 3: Installing Drivers and Configuring 🛠️
After installing the IDE, you'll need to connect your microcontroller to your computer:
USB Connection: Most boards, such as Arduino and STM32, connect via USB. Make sure the USB driver is installed correctly so that the IDE recognizes it.
External Power Supply: Some boards can be powered externally (using an adapter or battery) in addition to the USB port. This is useful for testing and applications where the microcontroller needs to operate independently.
Step 4: Programming and Uploading Code 📝
With the environment set up and the board connected, you're ready to program:
Writing Code: IDEs come with examples and templates that you can modify to suit your needs. For example, the Arduino IDE has a "Blink" program that's perfect for testing if your setup is working.
Uploading and Monitoring: Once the code is ready, you can upload it to your microcontroller with a single click. The IDE's serial monitor will allow you to view real-time data from your device.
Applications and Practical Examples 📚
Setting up a development environment opens the door to endless possibilities:
Home Automation: Controlling lights and HVAC systems.
Weather Station: Using sensors to measure temperature and humidity.
Robotic Projects: Building and programming robots with microcontrollers like Arduino.
📢 Thank you for setting up your development environment with me! 📘
I hope this guide has been useful for you to understand how to properly configure the environment to work with microcontrollers. If you have questions or want to share your projects, leave it in the comments! 📝
🔔 Don't miss more tutorials where we will continue exploring the fascinating world of microcontrollers and their programming. 🌐
🤝 Join our community to learn and share your experiences in the world of electronics and programming. 💬
📷 Share your projects: Have you already set up your environment and programmed your first microcontroller? Share your progress and receive feedback from other enthusiasts. 🛠️
🌟 Keep exploring and learning: Stay active on Hive to discover new ways to leverage your microcontrollers in innovative projects. 🚀✨
Greetings @profwhitetower ,
Lovely to see you posting again!
Just what the electronic community wants to learn about today especially in the engaging manner you present it....Well done!
Kind Regards,
Bleunay
Hello, Bleunay!
Thank you so much for your kind words. I'm thrilled to be back and sharing content with the community. It’s always rewarding to know that the topics and the way I present them resonate with everyone. I appreciate your support!
Best regards,
Prof. White Tower"
Thanks for your contribution to the STEMsocial community. Feel free to join us on discord to get to know the rest of us!
Please consider delegating to the @stemsocial account (85% of the curation rewards are returned).
You may also include @stemsocial as a beneficiary of the rewards of this post to get a stronger support.
GRACIAS por el apoyo
Congratulations @profwhitetower! You have completed the following achievement on the Hive blockchain And have been rewarded with New badge(s)
Your next target is to reach 100 comments.
You can view your badges on your board and compare yourself to others in the Ranking
If you no longer want to receive notifications, reply to this comment with the word
STOPCheck out our last posts: