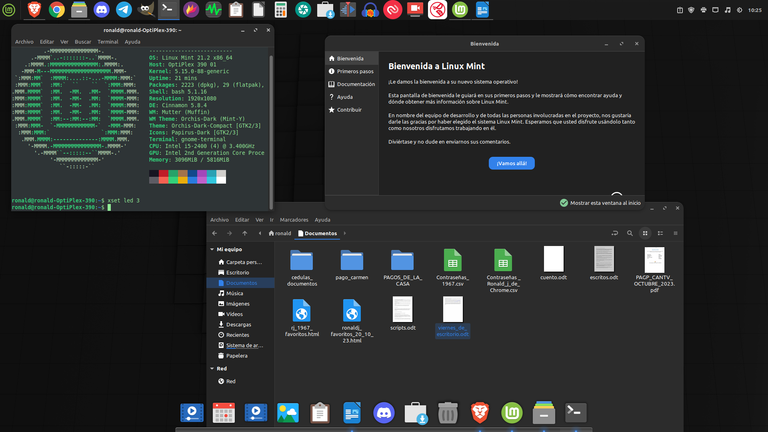
#ViernesDeEscritorio, Linux Mint 21.2 “Victoria” con edición Cinnamon y Software de Captura de Pantalla Flameshot. ESP/EN.

Saludos Linuxeros y en especial saludos a la comunidad #Linux&SoftwareLibre y a todos loa amantes y seguidores de #Linux en #hive, bienvenidos nuevamente a un nuevo post de #ViernesDeEscritorio.
Como todas las semanas, a pesar de dar a conocer mi escritorio en el SO de #Linux que este usando, siempre intento presentar alguna de las bondades que tiene el #SoftwareLibre para nuestra comunidad.
Hoy además de presentar mi escritorio de Linux Mint 21.2 “Victoria” con Cinnamon en su edición de escritorio, quiero hablar del software Flameshot.
¿Qué es Flameshot?
Flameshot es una software de código abierto gratuito y que se puede usar en todas las plataformas, de para tomar capturas de pantalla con funciones de edición integradas,con ella el usuario puede agregar una señal con la figura de flecha, se puede crear y resaltar texto, desenfocar o pixelar una sección de la captura de pantalla, se pueden hacer marcos circulares y rectangulares, se pueden agregar también números de contador de manera incremental y agregar un cuadro de color sólido. La página de Flameshot, donde puedes bajar la aplicación para Linux, Mac y Windows es esta.

¿Cómo instalar Flameshot?
Flamesshot puede ser instalado desde las tiendas de Snap, llamada Snap Store ya través de Flatpack desde su tienda Flathub.
También desde la página podemos bajar una AppImage, que nos permite usar la aplicación sin instalarla en nuestro sistema.
Y podemos instalarlo a través de la terminal. En la pestaña de Download de la página, indica como hacerlo para cada sistema operativo #Linux.
En el caso de Ubuntu y Debian para instalarlo desde el terminal, lo hacemos de la siguiente manera:
~ apt install flameshot
Si lo vamos a instalar a través de Snap por el terminal, lo hacemos con el siguiente comando:
~ snap install flameshot
Y para hacerlo a través de Flatpack desde el terminal, lo hacemos con este comando:
~ flatpak install flathub org.flameshot.Flameshot
Para descargarlo para Windows o Mac, se hace a través de la pestaña de descarga de la pagina de la aplicación.
¿Cómo usar la aplicación?
Para usar la aplicación, le damos doble click con el ratón, después de hacerlo se va a abrir un icono, que en Linux Mint, sale en la pestaña superior derecha, que nos indica que la aplicación está activa.
Para capturar la imagen, lo hacemos escogiendo el área donde vamos a hacer la captura de pantalla con el ratón. Una vez que escogemos el área, se abre la aplicación, en el área seleccionada.
Cada cuando abrimos la aplicación nos sale el menú de la herramienta. El menú se mueve y se coloca según el tamaño del área escogida para realizar la captura.
Cuando se ve el menú en el lado izquierdo de la aplicación hay una pestaña de ajustes, al pisar sobre ella, podemos ajustar el tamaño, el color y otros atributos, de la herramienta seleccionada.
Para cambiar los colores de la herramienta, también le damos al botón derecho del ratón y escogemos el color que queremos usar en la aplicación.
Lo cierto. es que la herramienta es muy intuitiva, así que en la barra de ajustes escogemos los parámetros que vamos a usar con la herramienta, realizamos la captura de pantalla, le colocamos el contenido que deseamos y al terminar, le damos en el menú en el icono de guardar y ya tenemos nuestra captura de pantalla, lista para usar.
Gracias por leerme y mis mejores deseos para todos este fin de semana.
Ver video.
Para ver el repositorio ir aquí.
Click to read English
Greetings Linuxeros and especially greetings to the #Linux&Softwarefree community and to all the #Linux lovers and followers in #hive, welcome back to a new post of #ViernesDeEscritorio.
Like every week, despite making my desktop known on the #Linux OS that I'm using, I always try to present some of the benefits that #Freeware has for our community.
Today in addition to presenting my Linux Mint 21.2 “Victoria" desktop with Cinnamon in its desktop edition, I want to talk about the Flameshot software.
What is Flameshot?
Flameshot is a free open source software that can be used on all platforms, from to take screenshots with integrated editing functions, with it the user can add a sign with the arrow figure, you can create and highlight text, blur or pixelate a section of the screenshot, you can make circular and rectangular frames, you can also add counter numbers incrementally and add a solid color box. The page of Flameshot, where you can download the application for Linux, Mac and Windows is this.
How to install Flameshot?
Flamessot can be installed from Snap stores, called Snap Store and through Flatpack from its Flathub store.
Also from the page we can download an AppImage, which allows us to use the application without installing it on our system.
And we can install it through the terminal. In the Download tab of the page, indicate how to do it for each #Linux operating system.
In the case of Ubuntu and Debian to install it from the terminal, we do it as follows:
~ apt install flameshot
If we are going to install it through Snap by the terminal, we do it with the following command:
~ snap install flameshot
And to do it through Flatpack from the terminal, we do it with this command:
~ flatpak install flathub org.flameshot.Flameshot
To download it for Windows or Mac, it is done through the download tab of the application page.
How to use the application?
To use the application, we give it double click with the mouse, after doing so an icon will open, which in Linux Mint, comes out in the upper right tab, which tells us that the application is active.
To capture the image, we do it by choosing the area where we are going to take the screenshot with the mouse. Once we choose the area, the application opens, in the selected area.
Every time we open the application, the tool's menu appears. The menu is moved and placed according to the size of the area chosen to make the capture.
When you see the menu on the left side of the application there is a settings tab, by stepping on it, we can adjust the size, color and other attributes, of the selected tool.
To change the colors of the tool, we also click the right mouse button and choose the color we want to use in the application.
It's true. the fact is that the tool is very intuitive, so in the settings bar we choose the parameters that we are going to use with the tool, we take the screenshot, we place the content we want and when finished, we give it in the menu in the save icon and we already have our screenshot, ready to use.
Thanks for reading and best wishes to all this weekend.
To see the repository go here.
https://twitter.com/ronaldjmarrero/status/1720502621386031266
#hive
#posh
Thanks for your contribution to the STEMsocial community. Feel free to join us on discord to get to know the rest of us!
Please consider delegating to the @stemsocial account (85% of the curation rewards are returned).
You may also include @stemsocial as a beneficiary of the rewards of this post to get a stronger support.