Creando un Script para Actualizar y Limpiar Nuestro Sistema Operativo Linux. ESP/EN.
Antes que nada cordiales saludos a la comunidad @Linux&SoftwareLibre, la comunidad de #Linux de #hive y a todos los nuevos usuarios del #Opensource.
Este post se lo había ofrecido a la compañera @alicia2022 y tenía pensado publicarlo el Viernes pasado en el espacio de #ViernesDeEscritorio, sin embargo; por razones de tiempo se me hizo imposible poder realizar dicho post.
La idea del post, es explicar como podemos hacer un Scripts, para actualizar y limpiar nuestro sistema en #Linux a través del terminal.
Este Scrips, lo estoy haciendo en Linux Mint, así que debe servir para todas las distribuciones basadas en Debian.
Espero que le sea de utilidad a todos los lectores y, si algún miembro de la comunidad lo puede mejorar, no dude en colocar sus aportes, para que todos vayamos aprendiendo cada vez más.
¿Que es un Scripts?
Podemos decir que un Scripts, en un archivo que posee un conjunto o agrupación de instrucciones que lo podemos convertir en un proceso ejecutable, para poder utilizar, hacer funcionar o arrancar esas instrucciones a través de nuestro terminal, para que ejecuten las funciones para las cuales hemos creado el scripts.
¿Qué debemos hacer para realizar un Scripts?
En lo personal, conozco dos formas de hacerlo que son las siguientes:
Lo primera, es abrir un archivo “.sh”
Ahora bien, una persona o un usuario nuevo en #Linux se preguntará ¿Cómo se hace eso?
Es muy simple, nos vamos a nuestra carpeta personal o al Escritorio, luego vamos a darle al botón derecho del ratón y le vamos a dar abrir un documento. En el caso de algunos gestores de archivos de Linux como Dolphin, se nos permite colocar la terminación de los documentos, si es así, le ponemos el nombre al documento y lo cerramos con “.sh”.
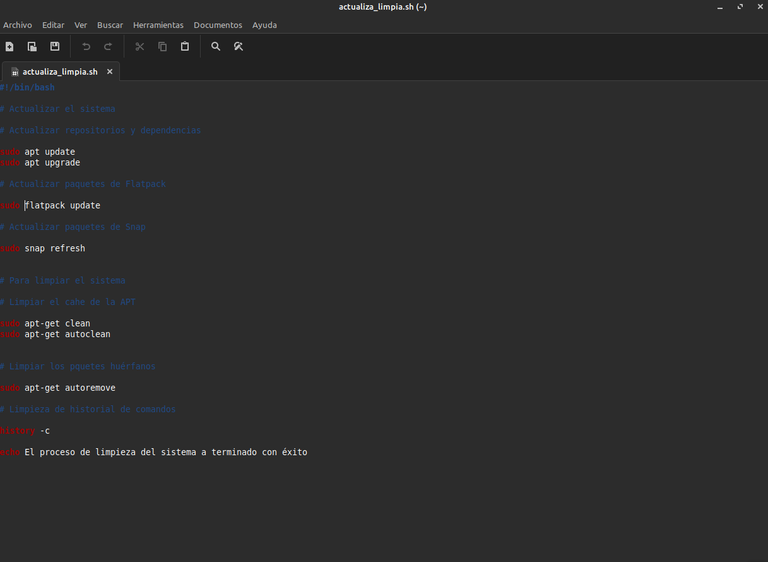
En otros procesadores de archivo, como es el caso “Nemo” que es el gestor de #Linux Mint no tienen esa función, así que simplemente abrimos un documento y le colocamos el nombre con la terminación “.sh” en mi ejemplo voy a poner al archivo el nombre “actualiza_limpia.sh”. Deben recordar siempre no dejar espacios abiertos en los nombres de los archivos.
Ver imagen.
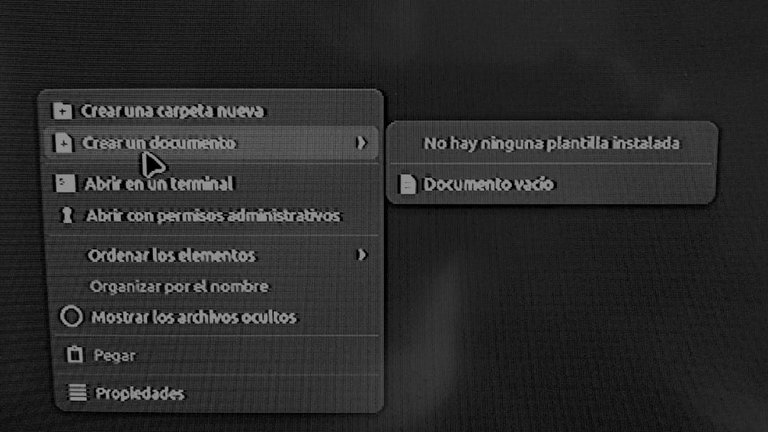
Foto Propia.
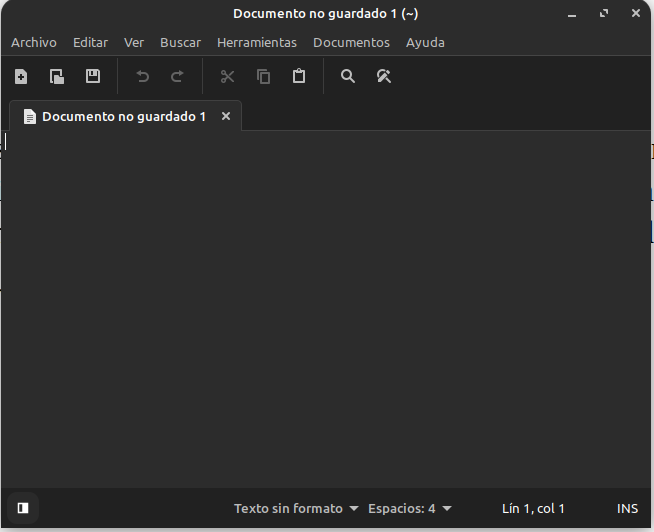
Una vez que hayamos creado el archivo le damos a abrir y el editor de texto que tiene nuestro sistema Linux lo abrirá y podemos iniciar a escribir el scripts.
El segundo modo, es abrir un editor de texto, cualquiera nos sirve, ya sea el que trae nuestro sistema #Linux o cualquier otro que deseemos, luego escribimos nuestro scripts y lo guardamos con la terminación “.sh”, yo para este ejemplo utilizaré el editor xed, que es el editor que trae Linux Mint.
Ver Imagen.
Captura de pantalla.
Hacer el Scripts.
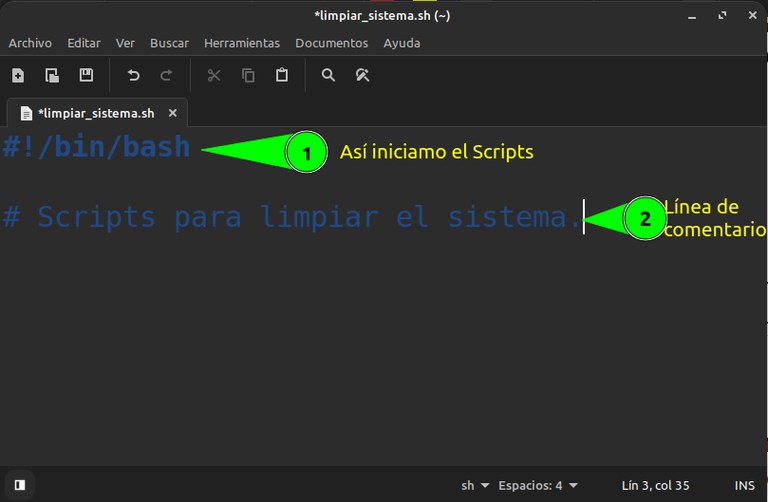
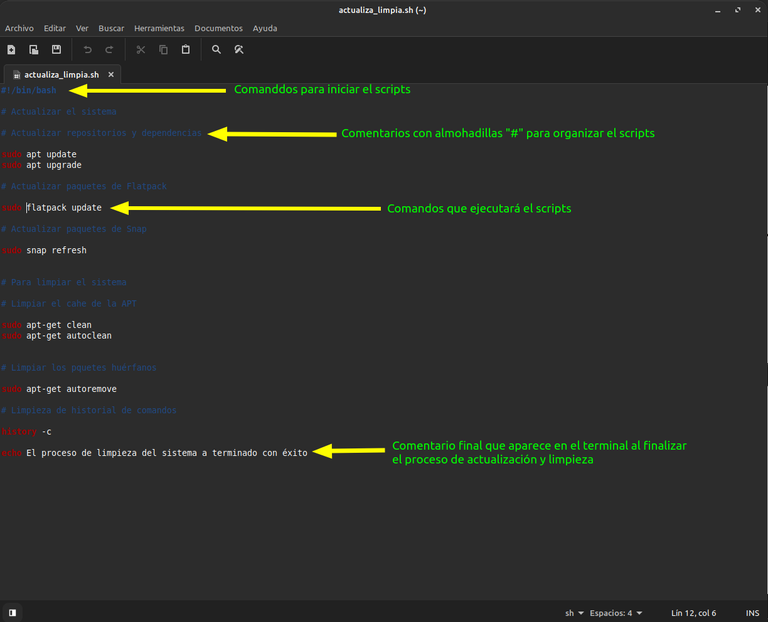
Una vez que tenemos nuestro documento abierto en el editor de texto, iniciamos la realización de nuestro scripts y para iniciar lo primero que debemos hacer es colocar el comando:
#!/bin/bash
Este comando, es el interprete de comandos, así que una vez que lo coloquemos, podemos comenzar a colocar las ordenes en el documento y la suma de todas esas ordenes que coloquemos serán finalmente nuestro scripts.
Ahora bien, para no colocarlas órdenes de manera desordenada, lo que normalmente se hace es colocar las líneas de comentario. Y estas líneas de comentarios, nos sirven para ubicarnos en cada una de las órdenes que deseamos que ejecute el scripts y nos explican para que sirve cada orden o comando colocado, lo que a su vez nos permite organizarnos en el escrito y saber qué estamos haciendo.
Las líneas de comentario inician con el símbolo de almohadilla o numeral “#”. También debemos tomar en cuenta que el símbolo de almohadilla “#”, también nos sirve para neutralizar una orden o comando, por ejemplo; si yo tengo una orden de limpiar la papelera de reciclaje y le coloco la almohadilla adelante o al inicio de esa orden, no se ejecutará, ya que será tomada como un comentario y quedará el comando neutralizado.
Ver imagen.
Captura de pantalla.
Colocando las ordenes para actualizar el sistema:
Comandos para actualizar el sistema:
Lo primero que vamos a hacer es actualizar todos los repositorios y software de nuestro sistema #Linux, eso lo vamos a hacer a través del comando APT.
Y más de uno se preguntará ¿Qué es la APT?
Bueno, la APT es la Herramienta Organizada de Empaquetamiento de nuestro software. Es decir, es la herramienta que guarda todos los software y repositorios de nuestro sistema operativo, a la cual llamamos APT.
Ahora bien, cuando usamos el comando “apt” lo hacemos o lo vemos de dos formas en la web cuando buscamos información, y son las siguientes: “sudo apt-get” y “sudo apt”.
Es importante saber que ambas ordenes o comandos hacen casi lo mismo, la diferencia radica en lo siguiente, coloco un ejemplo, si colocamos el comando “sudo apt-get upgrade” se actualizarán todos los paquetes que tenemos en nuestro equipo, pero si esos paquete necesitan nuevas dependencias, las mismas no se van a instalar.
Cuando usamos el comando o la orden “sudo apt upgrade” se van actualizar todos los paquetes que tenemos en nuestro equipo y del mismo modo se instalarán las nuevas dependencias que se necesiten instalar. Esa es la diferencia entre ambas ordenes o comandos.
Creo es importante aclarar el punto tocado en los párrafos de arriba, para aclarar cualquier posible confusión con el uso de esos comandos. Pero si quieres conocer más del tema te invito a leer este artículo.
Vamos a actualizar nuestro sistema:
Comentarios:
(#)Actualizar el sistema
(#)Actualizar repositorios y dependencias
Comandos:
- Lo primero que vamos a hacer es actualizar los repositorios de nuestro sistema, para hacer esto, vamos usar el siguiente comando.
~ sudo apt update
- Lo segundo, es actualizar los paquetes que tenemos instalados y sus dependencias. Para hacer eso vamos a usar el comando.
~ sudo apt ugrade
- Lo tercero es actualizar nuestros paquetes bajados de Flatpack. Esto es opcional, solo si usamos paquetes de Flatpack. Para hacerlo usamos el siguiente comando.
(#) Actualizar paquetes de Flatpack
~ sudo flatpack update
Cuarto vamos a actualizar los paquete que usamos de Sanap. Lo hacemos con el siguiente comando.
(#) Actualizar paquetes de Snap
~ sudo snap refresh
Con estos pasos actualizamos el sistema.
Ahora vamos a limpiar nuestro sistema:
- Lo primero que vamos a hacer es limpiar los paquetes huérfanos de nuestro sistema.
Y más de uno se ha de preguntar ¿Qué son los paquetes huérfanos? Los paquetes huérfanos, son los residuos que quedan de los software que instalamos en el sistema, ya que cuando actualizamos un paquete, o lo desinstalamos, en nuestro sistema quedan bibliotecas y restos de esos paquetes que ya no se usan y ellos ocupan espacio. Así que al limpiar esos paquetes, recuperamos espacio y limpiamos el sistema de residuos de paquetes que nos puedan causar algún tipo de problemas.
Comentario:
(#) Limpiar los paquetes huérfanos
Comando:
sudo apt-get autorremove
- Ahora, vamos a limpiar la cache de la APT.
Para hacer eso vamos a usar los comandos:
sudo apt-get clean
sudo apt-get autoclean
Limpiar el historial de comandos. Cuando limpiamos el historial de comando, estamos limpiando todos los comando que quedan en la cache de nuestro terminal y así lo limpiamos y recuperamos espacio.
Lo hacemos con el siguiente comando.
(#) Limpieza de historial de comandos
history -c
- Para terminar el documento, escribiremos un comentario que nos indique que el proceso de limpieza del sistema termino, y lo haremos de la siguiente manera:
Comando: “echo”
echo El proceso de actualización y limpieza del sistema a terminado con éxito
- Una vez que terminemos de escribir nuestro mensaje de cierre, le damos a guardar el documento y ya tenemos nuestro scripts listo, pero aún no está listo para ser usado.
Captura de pantalla.
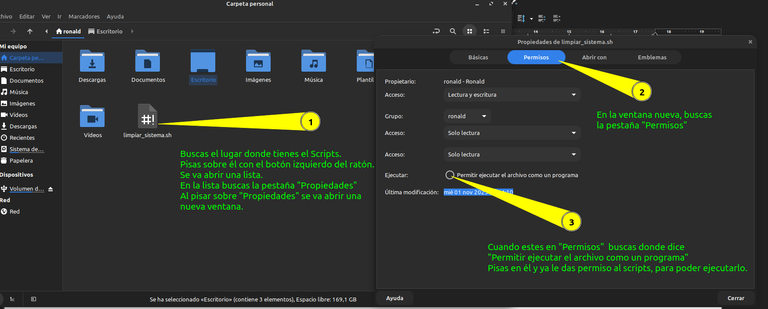
- Ahora, para poder usar nuestro scripts, tenemos que darle el permiso de ejecución. ¿Y cómo hacemos eso? Es muy simple, vamos al lugar donde tenemos nuestro guardado nuestro scripts, no paramos sobre él con el ratón, le damos clic al botón derecho y se nos va abrir una lista, en la lista buscamos, propiedades, “permisos” y cuando entremos vamos a buscar donde dice “ejecutable” tildamos ahí y listo, ya es ejecutable nuestro scripts y podemos usarlo.
Ver imagen.
Captura de pantalla.
Cómo usar el Scripts:
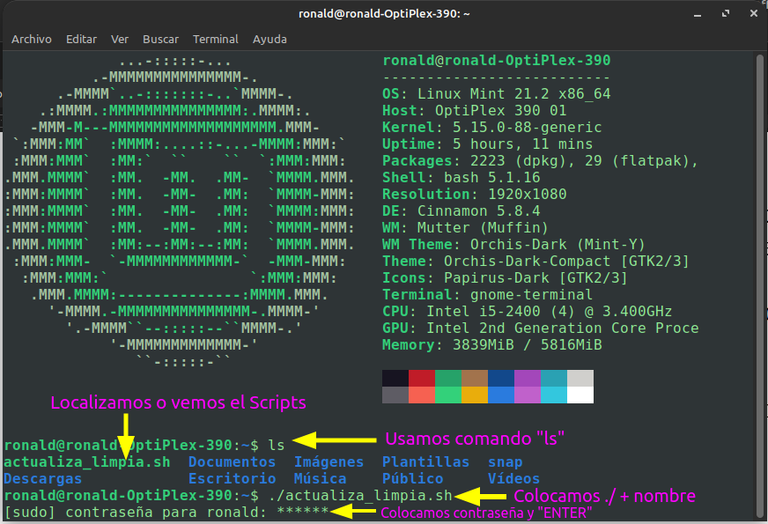
Para usar el scripts, vamos a abrir el terminal, usamos el comando “ls” para buscar nuestro scripts.
Como lo tenemos en la carpeta personal, se ve de inmediato.
Luego para iniciarlo, vamos a usar el comando “./” (Punto + barra) y luego colocamos el nombre de nuestro archivo.
Le damos “Enter” colocamos nuestra clave y lo dejamos funcionar.
Ver imagen.
Captura de pantalla.
Comentario final:
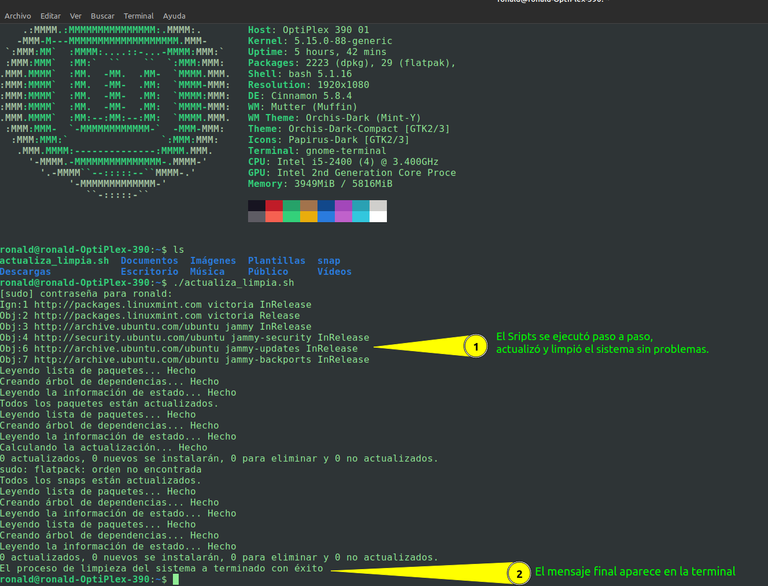
En general, lo podemos dejar hasta acá para hacer una actualización y una limpieza general del sistema, pero le podemos poner otras órdenes si lo deseamos, como la de limpiar la carpeta temporal, limpiar la historia de comandos, esto último borraría el historial de los comandos que hemos usado en el terminal, limpiando su cache, limpiar la papelera y otras actividades que deseemos hacer.
En cuanto a los comentarios, no es necesario colocarlos, yo lo hago, ya que me gusta tener todo ordenado y organizado para poder trabajar con comodidad, así si cuando uno corre el scripts o un programa, sale un error en la terminal, uno teniendo todo ordenado sabe a donde ir en el documento, pero eso es una opción y una decisión personal.
Captura de pantalla.
Es importante saber que nosotros podemos hacer scripts, para muchas otras funciones o actividades, según nuestras necesidades.
Sin embargo, este fue el scripts, que le ofrecí a la compañera @alicia2022, para ayudarla a limpiar su PC con una sola aplicación echa por ella misma y de igual manera yo lo usaré y espero que el que lo desee lo pueda hacer también. Y si algún compañero de la comunidad lo mejora, puede colocar su aporte en la comunidad y así aprendemos y lo mejoramos todos.
Muchas gracias por leerme.

Click to read English
Creating a Scripts to Update and Clean Our Linux Operating System:
First of all warm greetings to the @Linux&SoftwareLibre community, the #hive #Linux community and to all the new users of the #Opensource.
This post had been offered to the colleague @alicia2022 and I had planned to publish it last Friday in the space of #ViernesDeEscritorio, however; for reasons of time it became impossible for me to make said post.
The idea of the post is to explain how we can make a Scripts, to update and clean our system in #Linux through the terminal.
This Scripts, I'm doing it in Linux Mint, so it should work for all Debian-based distributions.
I hope it will be useful to all readers and, if any member of the community can improve it, do not hesitate to post their contributions, so that we can all learn more and more.
What is a script?
We can say that a Scripts, in a file that has a set or grouping of instructions that we can convert into an executable process, to be able to use, run or start those instructions through our terminal, to execute the functions for which we have created the scripts.
What should we do to make a Script?
Personally, I know two ways to do it which are as follows:
The first thing, is to open a “.sh” file
Now, a person or a user new to #Linux will wonder how is that done?
It's very simple, we're going to go to our personal folder or Desktop, then we're going to click the right mouse button and we're going to open a document. In the case of some Linux file managers like Dolphin, we are allowed to place the ending of the documents, if so, we name the document and close it with “.sh".
In other file processors, as is the case "Nemo" which is the #Linux Mint manager, they don't have that function, so we simply open a document and name it with the ending “.sh” in my example I'm going to name the file “actualiza_limpia.sh ". They should always remember not to leave any open spaces in the file names.
See image.
Own Photo.
Once we have created the file we give it to open and the text editor that our Linux system has will open it and we can start writing the scripts.
The second way, is to open a text editor, anyone serves us, either the one that brings our #Linux system or any other that we want, then we write our scripts and save it with the ending “.sh", I for this example will use the xed editor, which is the editor that brings Linux Mint.
See Image.
Screenshot.
Make the Scripts.
Once we have our document open in the text editor, we start the realization of our scripts and to start the first thing we must do is place the command:
#!/bin/bash
This command is the command interpreter, so once we place it, we can start placing the commands in the document and the sum of all those commands that we place will finally be our scripts.
Now, in order not to place the orders in a disorderly way, what is usually done is to place the comment lines. And these lines of comments serve us to locate ourselves in each of the commands that we want the scripts to execute and explain to us what each command or command placed is for, which in turn allows us to organize ourselves in the writing and know what we are doing.
The comment lines start with the pad symbol or numeral "#". We must also take into account that the pad symbol “#” also serves to neutralize a command or command, for example; if I have a command to clean the recycle bin and I place the pad in front or at the beginning of that command, it will not be executed, since it will be taken as a comment and the command will be neutralized.
See image.
Screenshot.
Placing the orders to update the system:
Commands to update the system:
The first thing we are going to do is update all the repositories and software of our #Linux system, we are going to do that through the APT command.
And more than one will ask, what is the APT?
Well, the APT is the Organized Packaging Tool of our software. That is, it is the tool that saves all the software and repositories of our operating system, which we call APT.
Now, when we use the "apt" command we do it or we see it in two ways on the web when we search for information, and they are the following: “sudo apt-get” and “sudo apt”.
It is important to know that both commands do almost the same thing, the difference lies in the following, I place an example, if we place the command “sudo apt-get upgrade” all the packages we have on our computer will be updated, but if those packages need new dependencies, they will not be installed.
When we use the command or the command “sudo apt upgrade" all the packages that we have on our computer will be updated and in the same way the new dependencies that need to be installed will be installed. That's the difference between the two commands.
I think it is important to clarify the point made in the paragraphs above, to clarify any possible confusion with the use of those commands. But if you want to know more about the topic I invite you to read this article.
We are going to update our system:
Comments:
(#)Update the system
(#)Update repositories and dependencies
Commands:
- The first thing we are going to do is update the repositories of our system, to do this, we are going to use the following command.
~ sudo apt update
- The second thing is to update the packages that we have installed and their dependencies. To do that we are going to use the command.
~ sudo apt ugrade
- The third thing is to update our downloaded Flatpack packages. This is optional, only if we use Flatpack packages. To do this we use the following command.
(#) Update Flatpack Packages
~ sudo flatpack update
Fourth we are going to update the packages we use from Sanap. We do this with the following command.
(#) Update Snap packages
~ sudo snap refresh
With these steps we update the system.
Now let's clean up our system:
- The first thing we are going to do is clean the orphaned packages from our system.
And more than one has to ask, what are orphan packages? The orphaned packages, are the residues that remain of the software that we install in the system, since when we update a package, or uninstall it, in our system there are libraries and remnants of those packages that are no longer used and they take up space. So by cleaning those packages, we recover space and clean the system of waste packages that may cause us some kind of problems.
Comment:
(#) Clean up the orphaned packages
Command:
sudo apt-get autoremove
- Now, let's clear the APT cache.
To do that we are going to use the commands:
sudo apt-get clean
sudo apt-get autoclean
Clear the command history. When we clean the command history, we are cleaning all the commands that are left in the cache of our terminal and thus we clean it and recover space.
We do this with the following command.
(#) Cleaning up command history
history -c
- To finish the document, we will write a comment that tells us that the system cleaning process is over, and we will do it as follows:
Command: "Echo”
echo The system update and cleaning process has been successfully completed
- Once we finish writing our closing message, we hit save the document and we already have our scripts ready, but it's not ready to be used yet.
Screenshot.
- Now, in order to use our scripts, we have to give it the execution permission. And how do we do that? It's very simple, we go to the place where we have our scripts saved, we don't stop over it with the mouse, we click the right button and a list will open, in the list we look for, properties, “permissions” and when we enter we will look where it says “executable” we check there and that's it, our scripts is already executable and we can use it.
See image.
Screenshot.
How to use the Scripts:
To use the scripts, let's open the terminal, we use the “ls" command to search for our scripts.
As we have it in the personal folder, it shows immediately.
Then to start it, we're going to use the command."/” (Dot + slash) and then we put the name of our file.
We give it "Enter" we put our key and let it work.
See image.
Screenshot.
Final comment:
In general, we can leave it until here to do an update and a general cleaning of the system, but we can put other commands if we wish, such as cleaning the temporary folder, cleaning the command history, the latter would erase the history of the commands that we have used in the terminal, cleaning its cache, cleaning the trash and other activities that we wish to do.
As for the comments, it is not necessary to place them, I do it, since I like to have everything organized and organized to be able to work comfortably, so if when one runs the scripts or a program, an error comes out in the terminal, one having everything ordered knows where to go in the document, but that is an option and a personal decision.
Screenshot.
It is important to know that we can make scripts, for many other functions or activities, according to our needs.
However, this was the script, which I offered to the colleague @alicia2022, to help her clean her PC with a single echa application by herself and in the same way I will use it and I hope that whoever wants to can do it too. And if a colleague from the community improves it, he can place his contribution in the community and that's how we all learn and improve it.
Thank you very much for reading me.
https://twitter.com/ronaldjmarrero/status/1719838664367157725
#hive
#posh
!DHEDGE
Gracias, Bro.
parece que aún no puedo hacer que voten, no estoy entendiendo esto aún pero lo voy a lograr pronto
Que genial!!!!!! 😀
Hola, buen día, me alegra que te guste, espero que lo puedas usar.
Feliz día.
¡Enhorabuena!
✅ Has hecho un buen trabajo, por lo cual tu publicación ha sido valorada y ha recibido el apoyo de parte de CHESS BROTHERS ♔ 💪
♟ Te invitamos a usar nuestra etiqueta #chessbrothers y a que aprendas más sobre nosotros.
♟♟ También puedes contactarnos en nuestro servidor de Discord y promocionar allí tus publicaciones.
♟♟♟ Considera unirte a nuestro trail de curación para que trabajemos en equipo y recibas recompensas automáticamente.
♞♟ Echa un vistazo a nuestra cuenta @chessbrotherspro para que te informes sobre el proceso de curación llevado a diario por nuestro equipo.
🏅 Si quieres obtener ganancias con tu delegacion de HP y apoyar a nuestro proyecto, te invitamos a unirte al plan Master Investor. Aquí puedes aprender cómo hacerlo.
Cordialmente
El equipo de CHESS BROTHERS
Hola, gracias por el apoyo
Thanks for your contribution to the STEMsocial community. Feel free to join us on discord to get to know the rest of us!
Please consider delegating to the @stemsocial account (85% of the curation rewards are returned).
You may also include @stemsocial as a beneficiary of the rewards of this post to get a stronger support.
Muchas gracias por el apoyo.
Excelente información para los que usamos Linux
Gracias Osomar! Siempre aportando a la comunidad.
!PIZZA
!PGM
BUY AND STAKE THE PGM TO SEND A LOT OF TOKENS!
The tokens that the command sends are: 0.1 PGM-0.1 LVL-0.1 THGAMING-0.05 DEC-15 SBT-1 STARBITS-[0.00000001 BTC (SWAP.BTC) only if you have 2500 PGM in stake or more ]
5000 PGM IN STAKE = 2x rewards!
Discord
Support the curation account @ pgm-curator with a delegation 10 HP - 50 HP - 100 HP - 500 HP - 1000 HP
Get potential votes from @ pgm-curator by paying in PGM, here is a guide
I'm a bot, if you want a hand ask @ zottone444
Hola @alicia2022, mis mejores deseos.
Espero lo uses y le des el mayor de los provechos.
Ahora voy a hacer algunos post de este estilo para ayudar a los nuevos usuarios de Linux y a los usuarios nóveles.
Gracias por el comentario.
!ALIVE
@alicia2022! You Are Alive so I just staked 0.1 $ALIVE to your account on behalf of @ osomar357. (1/10)
The tip has been paid for by the We Are Alive Tribe through the earnings on @alive.chat, feel free to swing by our daily chat any time you want, plus you can win Hive Power (2x 50 HP) and Alive Power (2x 500 AP) delegations (4 weeks), and Ecency Points (4x 50 EP), in our chat every day.

$PIZZA slices delivered:
@alicia2022(3/15) tipped @osomar357