Cómo colocar el guion de diálogo en Libreoffice y cómo activar y desactivar el Teclado Luminoso en Linux. ESP/EN.
Captura de pantalla.

Saludos, comunidad de #Linux&SoftwareLibre y a todos los usuarios de #Linux en #Hive, hoy decidí escribir este post para dar respuesta a una compañera que me preguntó como colocar el signo o guion de diálogo en Libreoffice.
Esto se debe a que las personas que escriben, cuentos, relatos, historias y otros escritos, muchas veces quieren hacer diálogos y no consiguen ninguna manera de conseguir este signo (—) en el teclado, ya que normalmente solo tenemos activos en el teclado el guion corto (-) y el piso o guion bajo (_); sin embargo, ninguno de ellos nos sirve para hacer un diálogo en un escrito.
Colocar el guion de diálogo:
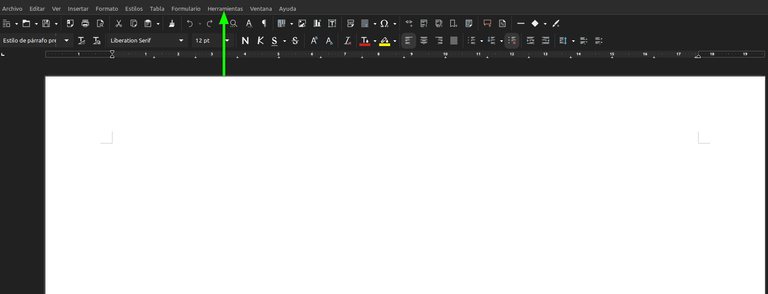
- Hoy aprenderemos como colocar el guion, para hacerlo lo primero que debemos hacer es abrir nuestro Libreoffice, y una vez que lo abrimos, vamos a buscar la pestaña herramientas. Ver imagen.
Captura de pantalla.
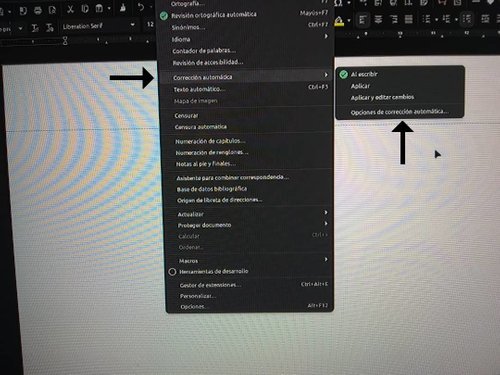
- Lo segundo es pisar con el ratón sobre la pestaña, herramientas y cuando abra, vamos a buscar la pestaña de corrección automática y opciones. Ver imagen.
Captura de pantalla.
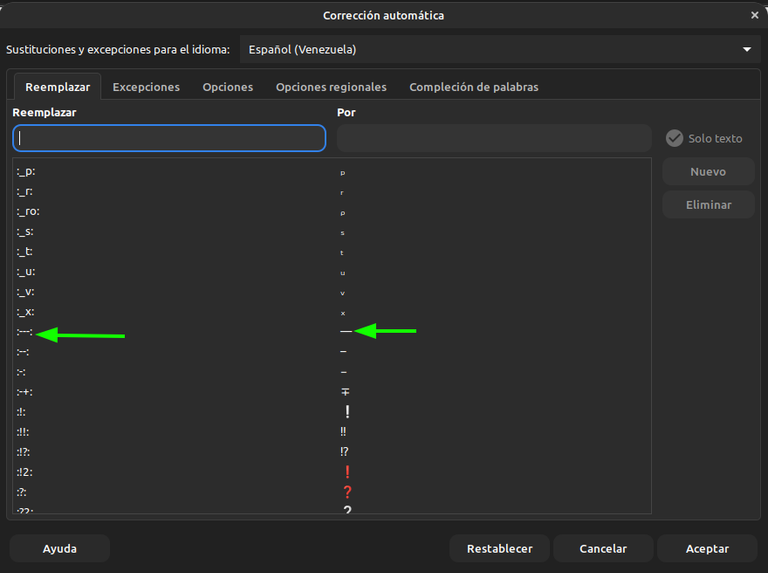
- Cuando abra la ventana de opciones, vamos a buscar la opción que dice cambiar 3 guiones cortos (---) por un guion de diálogo (—). La escogemos, le damos aceptar y listo ya tenemos el guion largo de diálogo. Ver imagen.
Captura de pantalla.
Ahora que tenemos el guion largo activado, nos vamos a encontrar que si pisamos los tres guiones seguidos, no aparece el guion de diálogo, pero eso se debe que para que funcione debemos colocar los 3 guiones cortos y dar un espacio. (--- + espacio) pero esa opción así se nos va a hacer muy incómoda, debido a que cada vez que iniciemos un diálogo, tendremos que corregirlo eliminando el espacio, ya que si lo dejamos de esta manera, cada vez que vayamos a iniciar un diálogo lo veremos así: — Hola Ramón.— y tendríamos que corregir los espacios.
Resolviendo el problema:
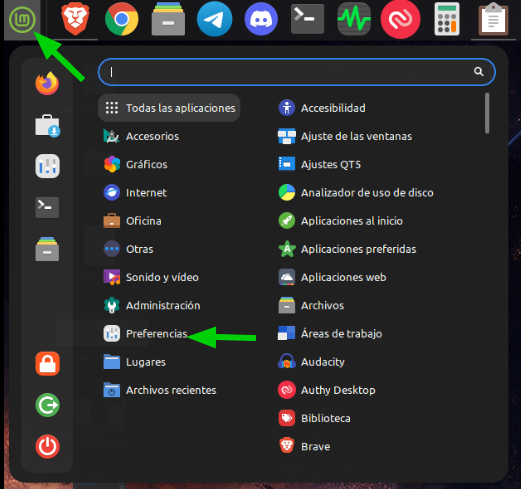
- Para resolver esa situación lo que vamos a hacer es irnos al Menú del Sistema Operativo, una vez que entremos vamos a ir a Preferencias y después a Configuración del Sistema o Centro de Control. Ver imagen.
Captura de pantalla.

Captura de pantalla.
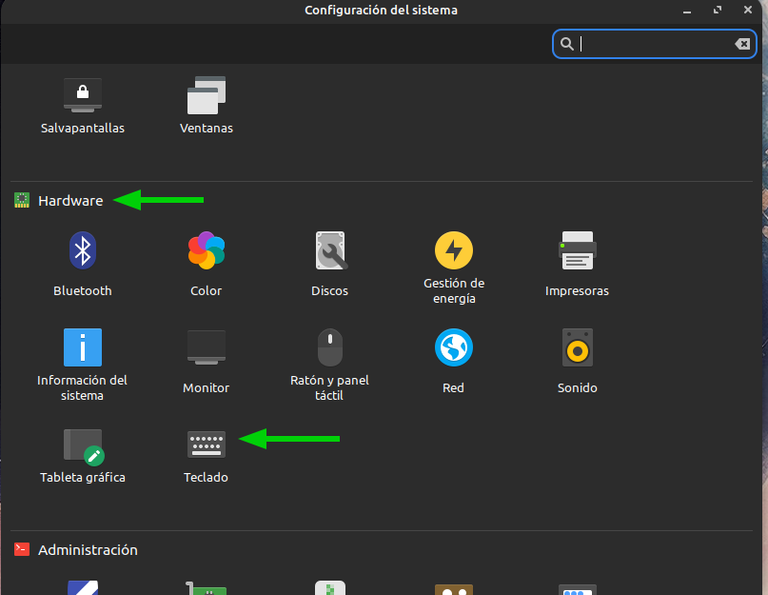
- En configuración del Sistema o Centro de Control, nos vamos a dirigir a Hardware y ahí vamos a ir a Teclado. Ver Imagen.
Captura de pantalla.
- Cuando abra la ventana de Teclado, vamos a ir a la pestaña de Distribuciones y después a Opciones. Ver imagen.

Captura de pantalla.
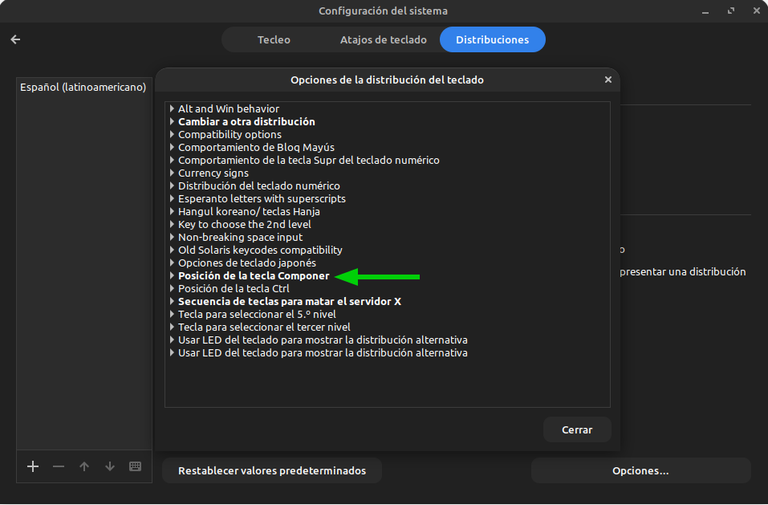
- Cuando entremos a la pestaña de opciones, vamos a buscar la pestaña que se llama “Posición de la Tecla Componer” y pisamos sobre ella. Ver imagen.
Captura de pantalla.
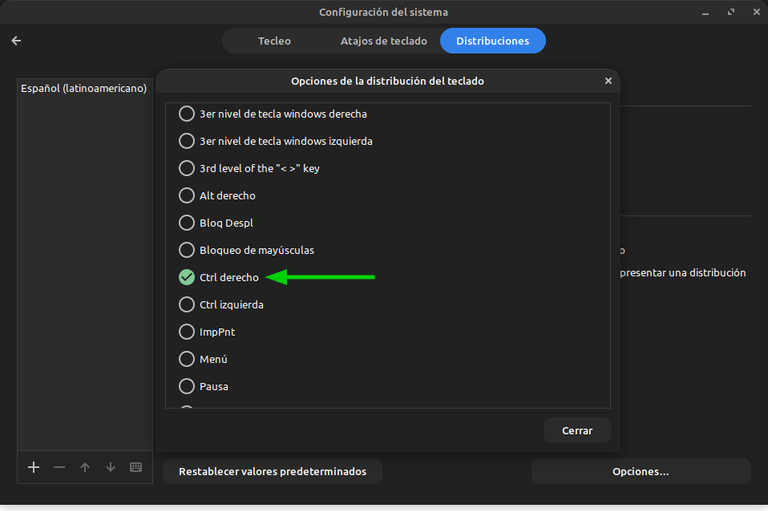
- Cuando abra, nos vamos a encontrar con todas las pestañas sin seleccionar o desmarcadas. Acá, vamos a escoger una tecla que nos sirva como “Tecla Componer” al escoger la tecla le estamos dando una función de componer, es decir, si queremos hacer una acción, colocamos los parámetros de la acción, pisando la “Tecla Componer” y la acción se ejecutará inmediatamente. En nuestro caso, apretaremos la “Tecla Componer” pisaremos los 3 guiones cortos y tendremos nuestro guion de diálogo sin espacios. Sería así (Tecla, Componer + ---) y eso nos daría (—).
Ahora bien, si es cierto se puede escoger cualquiera de las opciones colocadas, yo normalmente uso la “Tecla Componer” usando la tecla “Control del lado derecho”, ya que es una tecla muy poco usada para funciones. Ver imagen.
Captura de pantalla.
- Al escoger la tecla “Ctrl del lado derecho” cerramos las ventanas y ya tenemos nuestra “Tecla Componer” activada.
Ahora podemos usar nuestro guion para diálogo sin ningún tipo de problemas, solo aplicando la tecla de Control del lado derecho y los 3 guiones cortos, (Ctrl del lado derecho + ---) = (—)
Ejemplo: —Hola Carlos—
Espero que esta configuración les ayude a los amigos escritores que usan #Linux y LibreOffice.
Prender y apagar el teclado luminoso:
Una amiga me preguntó como prender los teclados luminosos en #Linux, en lo personal solamente conozco una forma y es a través de la terminal.
Para prender el teclado, colocamos:
- xset led 3
Para apagar el teclado, colocamos:
- xset led off
Si algún compañero de la comunidad conoce otra forma de hacerlo, podría colocarlo en los comentarios y así todos los lectores aprenderíamos un nuevo método de hacerlo.
En cuanto a configurar los tonos y la intensidad, no sé hacerlo, se podría hacer con Windows, pero eso jamás lo haré, ya que soy usuario de #Lunux y sigo la filosofía del #OpenSource y el #SoftwareLibre.
Muchas gracias por leerme.
Click to read English
Screenshot.
Greetings, #Linux&SoftwareLibre community and to all #Linux users in #Hive, today I decided to write this post to give an answer to a colleague who asked me how to place the dialogue sign or script in Libreoffice.
This is because people who write, stories, stories and other writings, often want to make dialogues and do not get any way to get this sign (—) on the keyboard, since normally we only have active on the keyboard the short script (-) and the floor or underscore (_); however, none of them serves us to make a dialogue in a piece of writing.
Place the dialogue script:
- Today we will learn how to place the script, to do it the first thing we must do is open our Libreoffice, and once we open it, we will look for the tools tab. See image.
Screenshot.
- The second thing is to step with the mouse on the tab, tools and when it opens, we are going to look for the automatic correction tab and options. See image.
Screenshot.
- When the options window opens, let's look for the option that says change 3 short hyphens (---) to a dialogue hyphen (—). We choose her, we give her to accept and ready we have the long script of dialogue. See image.
Screenshot.
Now that we have the long script activated, we are going to find that if we step on the three dashes in a row, the dialogue script does not appear, but that is because in order for it to work we must place the 3 short dashes and give a space. (--- + space) but that option is going to make us very uncomfortable, because every time we start a dialogue, we will have to correct it by deleting the space, because if we leave it this way, every time we are going to start a dialogue we will see it like this: — Hi Ramón.- and we would have to correct the spaces.
Solving the problem:
- To solve that situation what we are going to do is go to the Operating System Menu, once we enter we are going to go to Preferences and then to System Configuration or Control Center. See image.
Screenshot.
Screenshot.
- In System Configuration or Control Center, we are going to go to Hardware and there we are going to go to Keyboard. See Image.
Screenshot.
- When the Keyboard window opens, we are going to go to the Distributions tab and then to Options. See image.
Screenshot.
- When we enter the options tab, we are going to look for the tab called "Compose Key Position” and step on it. See image.
Screenshot.
- When it opens, we are going to find all the tabs without selecting or unchecked. Here, we are going to choose a key that serves as a "Compose Key“ by choosing the key we are giving it a compose function, that is, if we want to do an action, we place the parameters of the action, pressing the ”Compose Key" and the action will be executed immediately. In our case, we will press the "Compose Key" we will step on the 3 short dashes and we will have our dialogue script without spaces. It would be like this (Key, Compose +---) and that would give us (—).
Now, if it is true you can choose any of the options placed, I usually use the "Compose Key" using the “Right Side Control" key, since it is a very little used key for functions. See image.
Screenshot.
- By choosing the "Ctrl key on the right side" we close the windows and we already have our ”Compose Key" activated.
Now we can use our script for dialogue without any problems, just by applying the right side Control key and the 3 short dashes, (right side Ctrl +---) = (—)
Example: - Hi Carlos—
I hope this configuration will help you writer friends who use #Linux and LibreOffice.
Turning the luminous keyboard on and off:
A friend asked me how to turn on the luminous keyboards in #Linux, personally I only know one way and that's through the terminal.
To turn on the keyboard, we place:
- xset led 3
To turn off the keyboard, we place:
- xset led off
If some fellow community member knows another way to do it, he could put it in the comments and so all readers would learn a new method of doing it.
As for setting the tones and intensity, I do not know how to do it, it could be done with Windows, but I will never do that, since I am a user of #Lunux and I follow the philosophy of #OpenSource and #SoftwareLibre.
Thank you very much for reading me.
Translated with https://translate.yandex.com (free version)
https://twitter.com/ronaldjmarrero/status/1730422386619547681
#hive
Thanks for your contribution to the STEMsocial community. Feel free to join us on discord to get to know the rest of us!
Please consider delegating to the @stemsocial account (85% of the curation rewards are returned).
You may also include @stemsocial as a beneficiary of the rewards of this post to get a stronger support.