"Exploring the power of Creality Laser Falcon." [ENG-ESP]
Greetings friends of Hive Geek, welcome to my post once again, I'm Nitsu and this time I bring a little more about my latest acquisition, if you do not know a few months ago I bought a laser recorder the Creality Laser Falcon 5w I leave here the previous post if you want to go to read some interesting facts about this equipment.
Saludos amigos de Hive Geek, bienvenidos a mi post una vez más, soy Nitsu y esta vez traigo un poco más sobre mi ultima adquisición, por si no lo saben hace unos meses compre una grabadora laser la Creality Laser Falcon de 5w dejo por aquí el post anterior por si quieren ir a leer algún dato interesante sobre este equipo.
"Exploring new possibilities: My foray into laser cutting" [ENG-ESP]
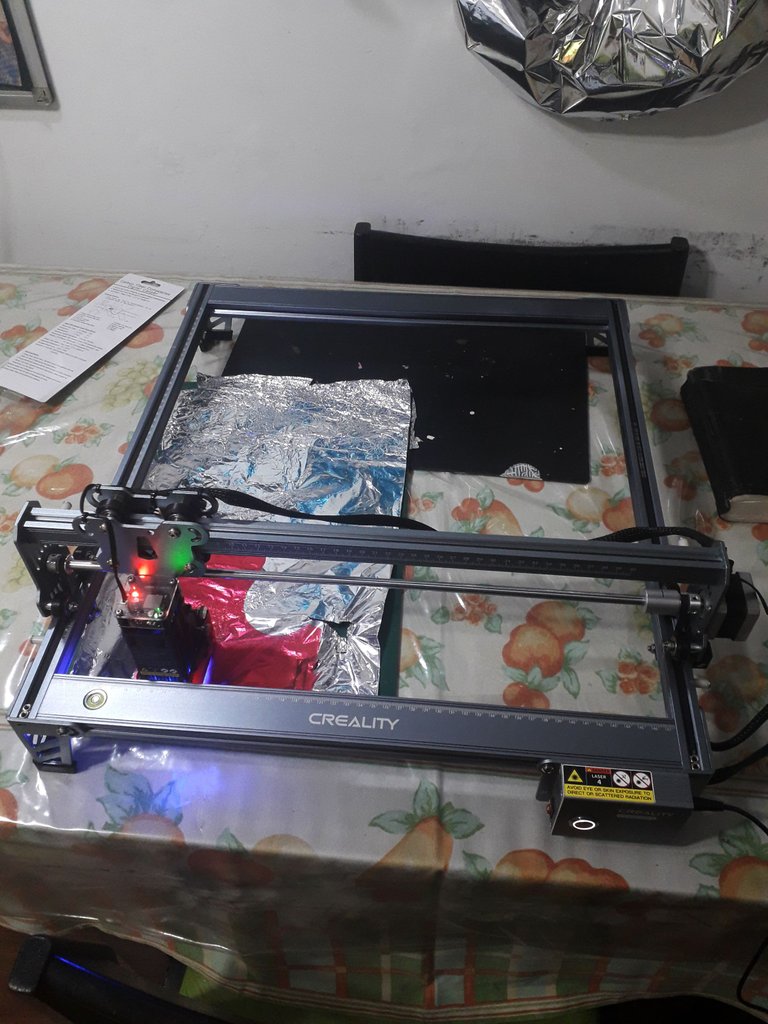
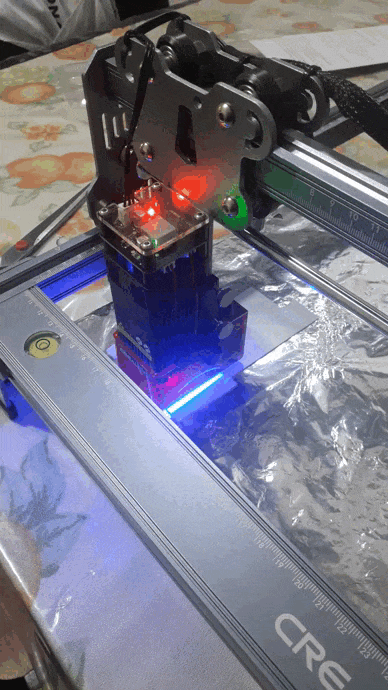
It is a machine that occupies an important space, luckily for now I still have a place to store it, but later I want to make a piece of furniture to place it under the desk of the 3D printers, so there I have another small future project, but let's go to the case after learning to use the Light Burn better I began to make tests in different materials Why? To get to know the capabilities of the machine and its limitations.
Es una maquina que ocupa un espacio importante, por suerte por ahora todavía cuento con un lugar para guardarla, pero más adelante quiero hacer un mueble para colocarla debajo del escritorio de las impresoras 3D, así que ahí tengo otro pequeño proyecto a futuro, pero vamos al caso tras aprender a usar mejor el Light Burn comencé a realizar pruebas en diferentes materiales ¿Para qué? Para poder conocer las capacidades de la maquina y sus limitaciones.
|
|
|---|
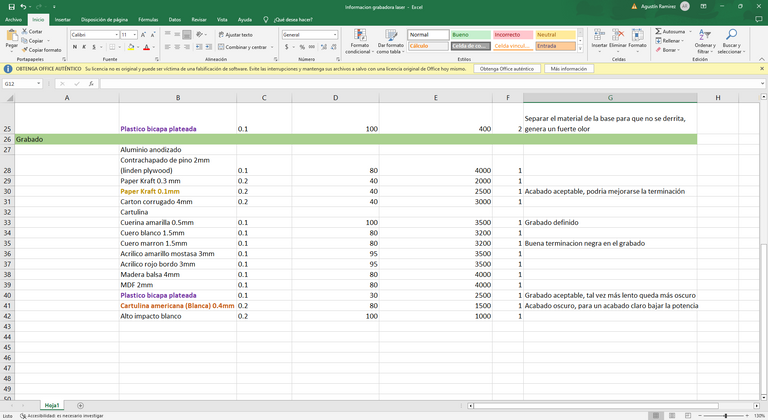
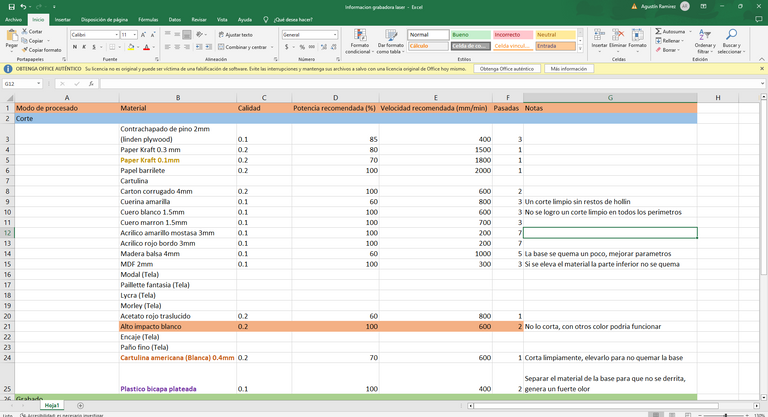
So as the weeks went by I started to get different materials such as 3 and 6mm MDF, 3mm acrylic, American cardboard, corrugated cardboard, biface plastic, paper, different types of leather and fabrics. I wanted to try as much material as I could and document the configuration I used to get the best result so that, if necessary, in a future order I could do a good job. I put together an Excel file placing all the materials and dividing the types of settings into LASER CUTTING and LASER ENGRAVING because although it may not seem like it, the settings vary a lot.
Así que con el paso de las semanas fui consiguiendo diversos materiales como MDF de 3 y 6mm, acrílico de 3mm, cartulina americana, cartón corrugado, plástico bifaz, papel, diferentes tipos de cuero y telas. Quería probar con todo el material que pudiera e ir documentando la configuración que usaba para obtener el mejor resultado así, llegado el caso, en un pedido futuro pudiera hacer un buen trabajo. Arme un Excel colocando todos los materiales y dividiendo los tipos de configuración en CORTE LASER y GRABADO LASER ya que aunque no lo parezca la configuración varia muchísimo.
|
|
|---|
|  |
|---|
Broadly speaking for laser engraving is necessary a low or medium power and a high speed. Why? Our goal when engraving is to burn the material to be marked, if we use a very high power we could burn excessively or cut the material and the fast speed is to achieve a good decision instead when we want to cut with the laser we will need a high power and a low speed to take advantage of the energy in the cutting area. Clearly all this will depend on the material and also the equipment we use because if we have a better machine will surely be other values, but anyway I share here the information in case someone can be useful.
A grandes rasgos para grabar en laser es necesario una baja o potencia media y una velocidad alta ¿Para qué? Nuestro objetivo al grabar es quemar el material para que quede marcado, si usamos una potencia muy alta podríamos quemar en exceso o cortar el material y la velocidad rápida es para lograr una buena decisión en cambio al querer cortar con el laser necesitaremos una potencia alta y una velocidad baja para aprovechar la energía en la zona de corte. Claramente todo esto dependerá del material y también del equipo que usemos ya que si tenemos una maquina mejor seguramente serán otros valores, pero de todas formas comparto aquí la información por si a alguien le puede ser de utilidad.
|
|
|---|
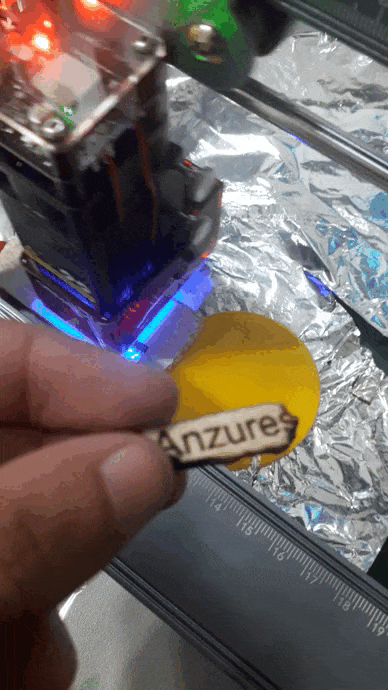
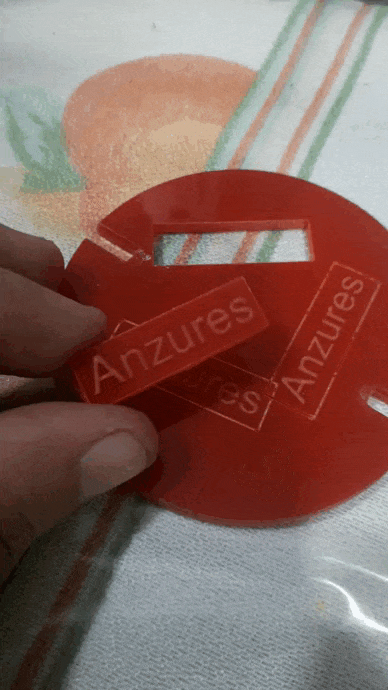
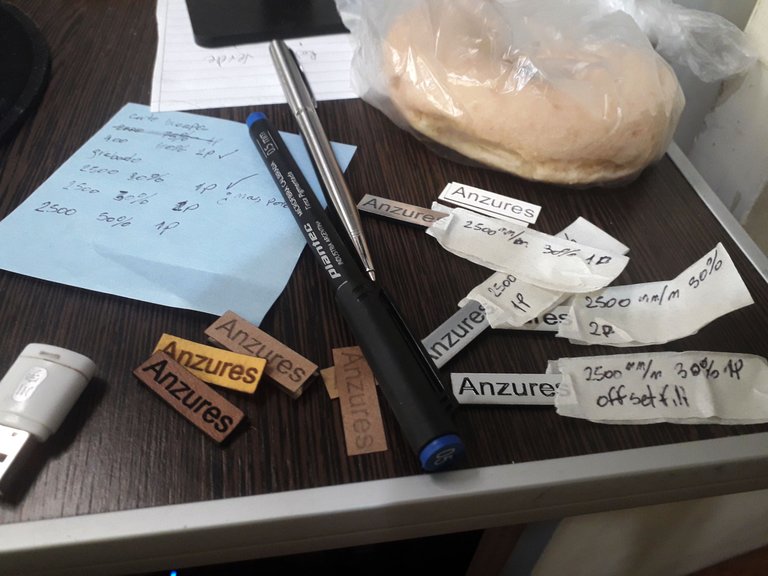
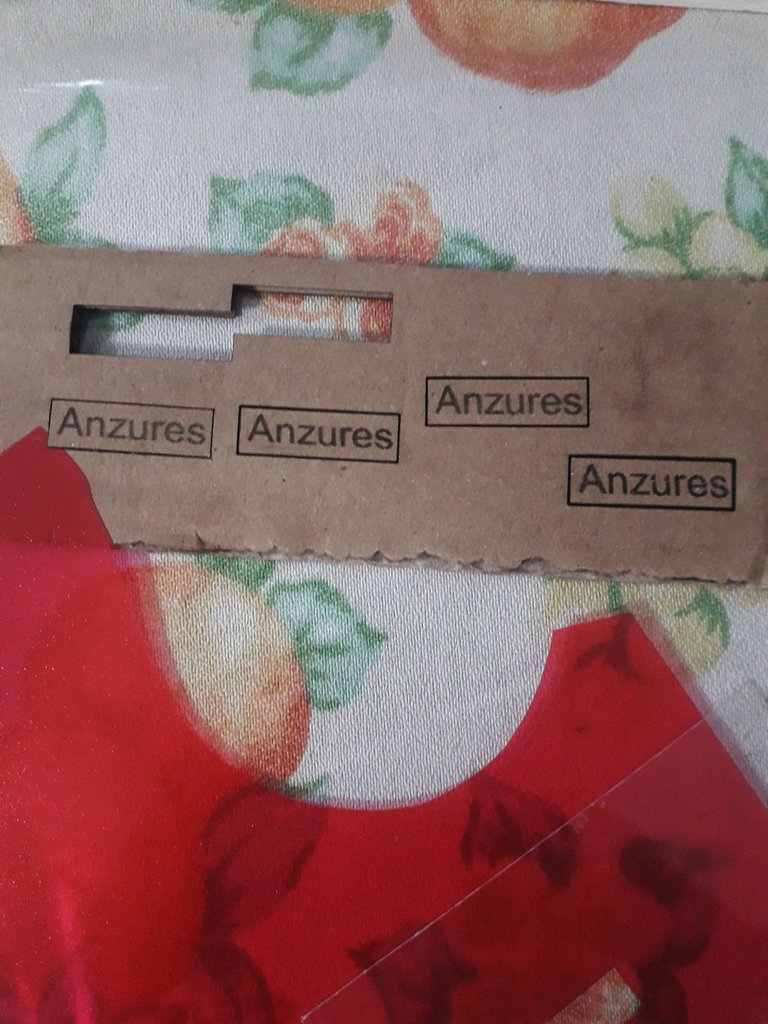
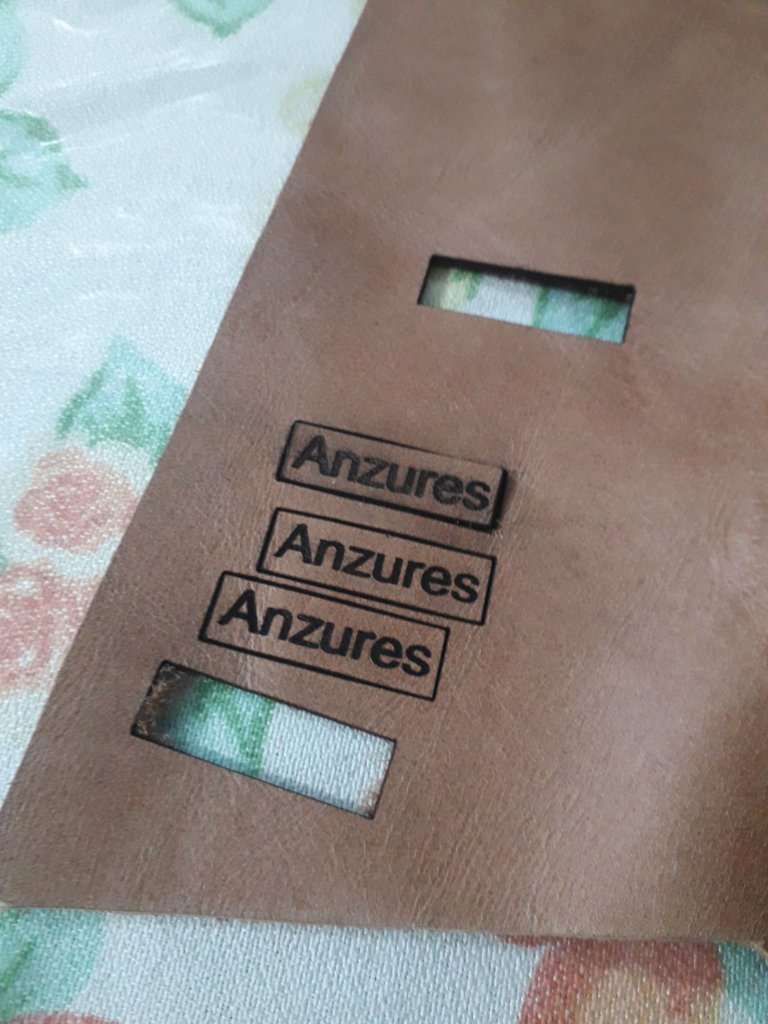
I was making small rectangles with the logo of the company where I work in this way I had a basic template to test both cutting and engraving in the different materials but clearly I did not get all these good results at the first attempt, as you can see in this image I failed several times to find the exact point or more optimal for each material sometimes I burned the pieces or directly did not cut / engraved because I was too tight when placing the parameters in the Light Burn but the good thing that all this was a great learning experience.
Estuve haciendo pequeños rectángulos con el logo de la empresa donde trabajo de esta forma tenía una plantilla básica para probar tanto corte como grabado en los diferentes materiales pero claramente no obtuve todos estos buenos resultados al primer intento, como podrán ver en esta imagen falle varias veces hasta encontrar el punto exacto o mas optimo para cada material a veces quemaba las piezas o directamente no se cortaban/ grababan por quedarme muy justo a la hora de colocar los parámetros en el Light Burn pero lo bueno que todo esto fue un gran aprendizaje.
|
|
|---|
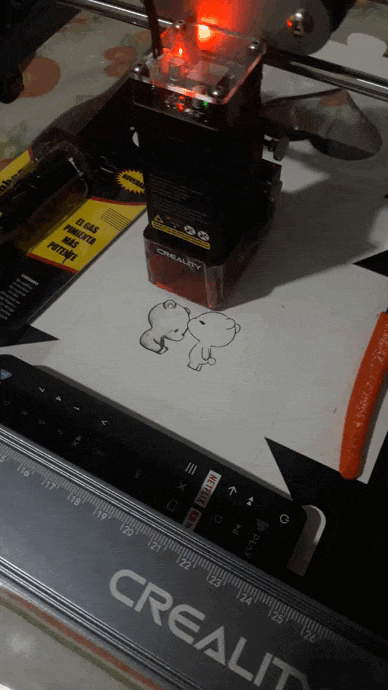
Also something I learned by watching other people handling this type of machines is that it is very important to place something under where we cut or engrave because if the laser reaches the base of the table or where we have our equipment this can burn it irreversibly so if you want to avoid a scolding keep this in mind. I for example was using the back of some cutting boards and above an aluminum mine to try to reflect or dissipate some of the heat that came I have to say that it is not the best way, but it helped me to get out of the way.
También algo que aprendí al ver a otras personas manejando este tipo de maquinas es que es de suma importancia colocar algo debajo de donde cortamos o grabamos ya que si el laser llega a la base de la mesa o donde tengamos nuestro equipo este puede quemarlo de forma irreversible así que si se quieren evitar un regaño tengan esto en cuenta. Yo por ejemplo estuve usando la parte trasera de unas tablas de corte y por encima una la mina de aluminio para intentar reflejar o disipar un poco el calor que llegaba tengo decir que no es la mejor manera, pero me sirvió para salir del paso.
It is recommended to use a kind of separator between the piece we cut and the base, as a kind of mesh, there are some that come with honeycomb pattern, although these pieces are quite expensive so surely later design something that meets this function but is not very expensive For what is this? Well it has two functions, one would be to avoid burning the base where we work and the second is to leave a space so that the smoke, gases and heat can dissipate; this is very important because it will affect the final quality of our cuts and engravings but mainly for our cuts because otherwise the part that is supported on the base will be burned.
Se recomienda usar una especie de separador entre la pieza que cortamos y la base, como una especie de malla, hay algunas que vienen con patrón de panal de abeja, aunque estas piezas son bastante caras así que seguramente más adelante diseñe algo que cumpla con esta función pero que no sea muy cara ¿Para qué sirve esto? Bueno tiene dos funciones, una seria evitar quemar la base donde trabajamos y la segunda es dejar un espacio para que el humo, gases y calor puedas disiparse; esto es algo muy importante ya que afectara a la calidad final de nuestros cortes y grabados pero principalmente para nuestros cortes porque sino de otra manera la parte que se encuentra apoyada en la base quedara quemada.
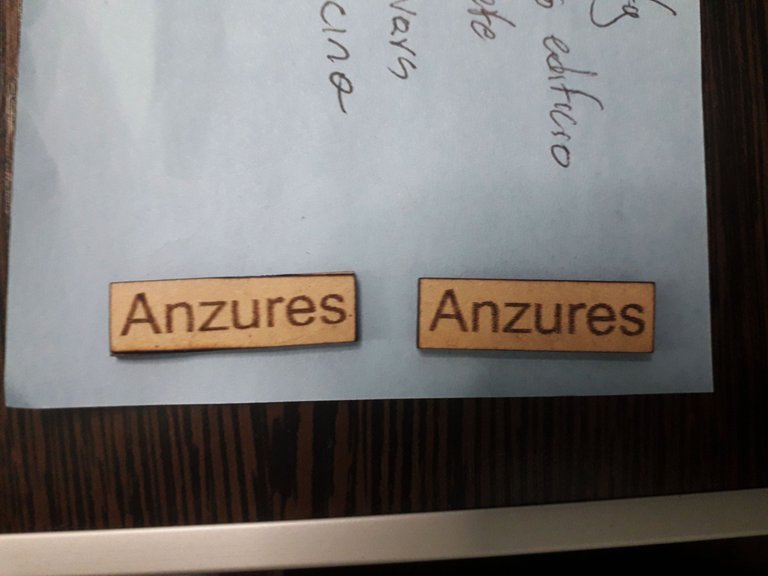
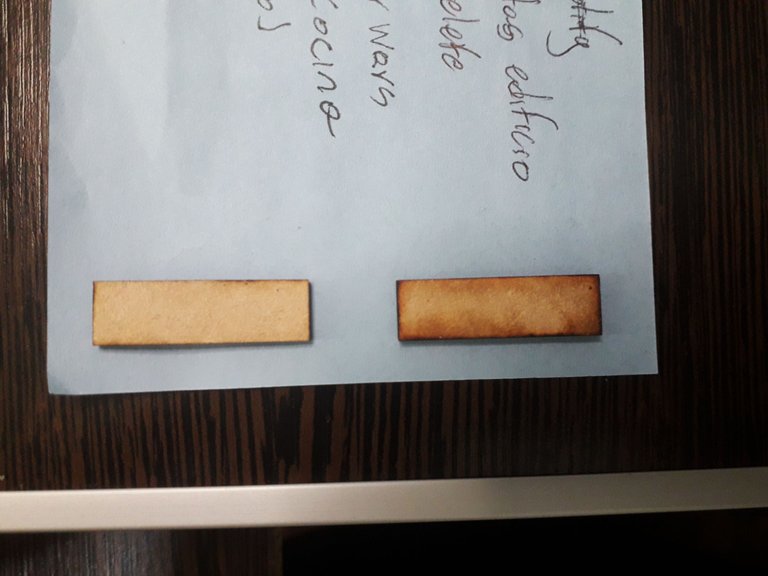
Here in these photos you can clearly see what I mentioned, the piece of 3mm MDF on the left was raised a little to make the cut, instead the one on the right was cut flush with the base, in the front there is no major difference, but if we look back you can see on the right a black halo around the perimeter of the piece. With the simple fact of raising a little we can obtain much neater results.
Aquí en estas fotos se puede ver claramente lo que menciono, la pieza de MDF de 3mm que se encuentra a la izquierda fue elevada un poco para realizar el corte, en cambio el de la derecha se corto al ras de la base, en la parte del frente no hay mayor diferencia, pero si miramos atrás se puede observar en la derecha un halo negro en todo el perímetro de la pieza. Con el simple hecho de elevar un poco podemos obtener resultados mucho más prolijos.
|
|
|---|
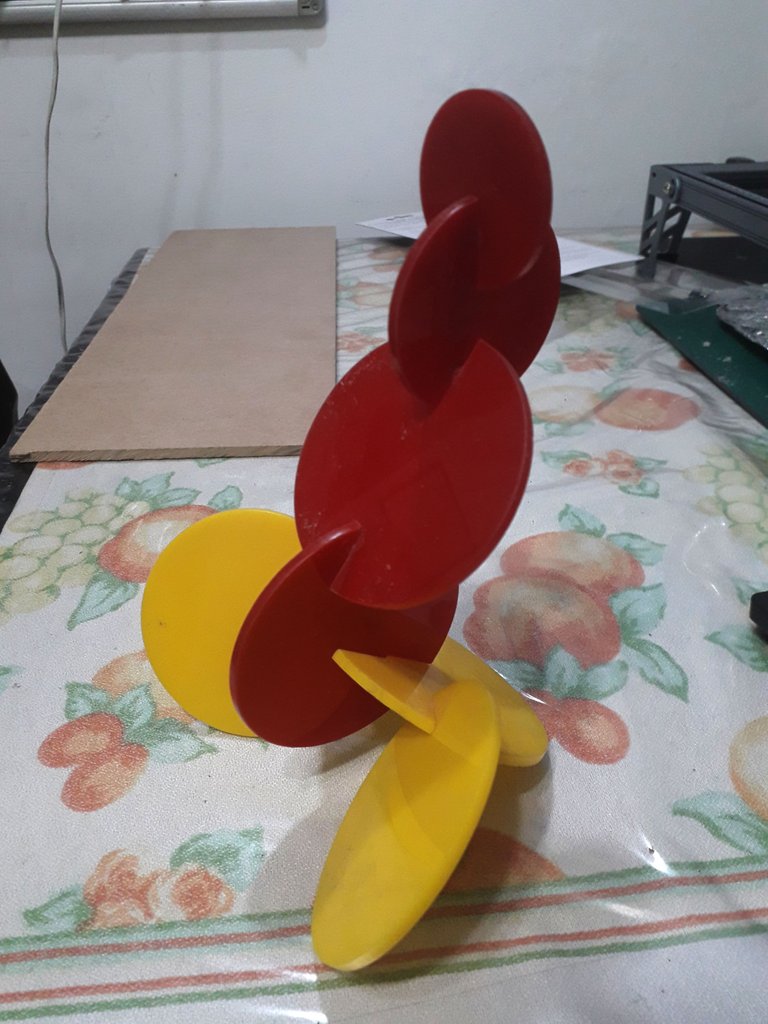
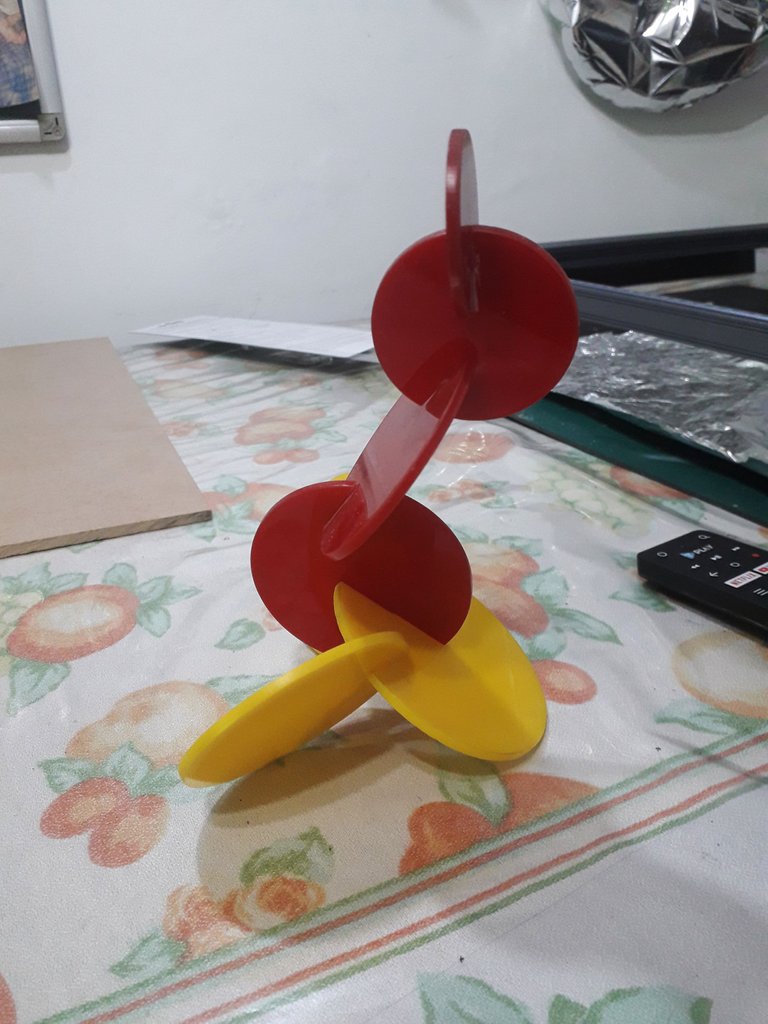
Then, as if to close the post, I tell you this little story. The strange piece you are seeing below was the first thing I designed consciously in my life, I did it in the CBC which here is like an introductory year to the career to level the students, it consisted of taking a painter, analyze colors or techniques he used and design something to convey those concepts so I made this piece of acrylic that were embedded. I needed to test with my laser engraver, I wanted to cut acrylic, but I didn't have any, or so I thought until I remembered I had this saved. I have to be honest, it cost me a little to sacrifice the piece, but it was necessary for the sake of knowledge, so without giving too much thought because otherwise I was going to regret it, I disassembled it and used the parts to make the tests that as you may have seen were a success.
Después como para ir cerrando el post les cuento esta pequeña historia. La pieza extraña que están viendo aquí abajo fue la primera cosa que diseñe conscientemente en mi vida, lo hice en el CBC que aquí es como un año introductorio a la carrera para nivelar a los alumnos, consistía en tomar a un pintor, analizar colores o técnicas que usaba y diseñar algo que transmitiera esos conceptos así que hice esta pieza de acrílico que se iban encastrando. Yo necesitaba hacer pruebas con mi grabadora laser, quería cortar acrílico, pero no tenia, o eso creía hasta que recordé que tenia esto guardado. Tengo que ser sincero, me costo un poco sacrificar la pieza, pero fue necesario en pos del conocimiento, así que sin dar muchas vueltas porque sino me iba a arrepentir, lo desarme y use las partes para hacer las pruebas que como habrán visto fueron un éxito.
|
|
|---|
This whole world of laser cutting is new to me, I'm still looking for practical applications and although I know there are many I want to know the full range of possibilities to work with what most appeals to me, I am very happy to be able to do these tests and share them with you.
Todo este mundo del corte laser es nuevo para mí, todavía sigo buscando aplicaciones practicas y aunque se que hay muchas quiero conocer todo el abanico de posibilidades para trabajar con lo que mas me llame la atención, estoy muy contento de poder hacer estas pruebas y compartirlas con ustedes.
What do you think of my equipment, have you ever seen a laser engraver in action? I look forward to reading your opinions in the comments, I'm Nitsu and I wish you a great day!
¿Qué les parece mi equipo? ¿Alguna vez habían visto una grabadora laser en acción? Espero poder leer sus opiniones en los comentarios, soy Nitsu y les deseo un excelente día

My 3D printing works @nit_3dprinting
Mis trabajos de impresión 3D @nit_3dprinting
Translated by DeepL
Traducido con DeepL
All images are my own
Todas las imágenes son de mi autoría
My last post "Creative Recycling: Building a Tool Drawer." [ENG-ESP]
Mi último post "Creative Recycling: Building a Tool Drawer." [ENG-ESP]
0
0
0.000
Another excellent post, full of useful information, as expected from you Nitsu 😁. You set the bar high, even for yourself, but we don't mind. I love the outcome of your work. Congratulations my friend! Nice work!
Muchas gracias, cada vez que tengo un tiempo libre y ganas me gusta experimentar y probar con mis equipos, lo bueno es que al tener todo esto documentado le es de utilidad a otras personas.
Amazing! Do you think it could be used to shred carrots for soup? 😄 If so, I think I'll buy one 😂
JAJAJAJ no lo creo, ey pero n ose pierda nada intentando. Algo que si quiero probar es grabar un pan con el laser, no se hacerle la cara de Messi o el logo de Hive jajaja eso seria divertido cuanto menos. Gracias por pasarte @nd-and-eband
Hola bro… que genial que cada vez vas creciendo con tus equipos, el ver como creces en las cosas que te gustan es genial, muchas felicidades.
creo que una de las mejores cosas de los equipos nuevos, es aprender a calibrarlos, aunque eso también es estresante, cuando no se encuentra el punto exacto, la ventaja de ahora, es que hay muchos videos para ver como va todo ese asunto.
Un gran abrazo bro y muchas felicidades nuevamente.
Realmente es una gran ventaja contar con tanta información eso facilita mucho a la hora de comprar o resolver problemas así que ahora toca hacer mi partes y ayudar a otros con información que pueda obtener de esta gran máquina. Al igual que tu tambien me alegra ver el desarrollo de la gente aquí en Hive, tanto mejorando en sus post como en las herramientas para llevar a cabo sus trabajos o hobbies. Que tengas una buena semana @eliudgnzlz
Neat! I'd love to put my hands on a laser cutter, so many possibilities. Oh, and thanks for the tip mate! I wanted to send you one too...but that's kind of pointless, so I thought, maybe you'd like one of my models? You can check what I have by following a link on the bottom of my post.
Gracias @surrealis por pasarte, para mi es un gusto poder apoyarte en los increíbles trabajos que hace y te agradezco por el ofrecimiento pero no me parecería justo, es tu trabajo amigo y te merecer reconocimiento y buenas recompensas porque hay mucho trabajo detrás.
Amigo, muy entretenida su publicacion. La practica es lo que le hara conocer mas su equipo y mejorar su habilidad.
Cuando le llegue el pedido para usar la cortadora ya tendras muy adelantado el camino.
La informacion que comparte estoy seguro que sera bastante util.
La mejor de las suertes para usted.
Me paso hace no mucho que me cayo un pedido y n ose porque motivo mi programa achicaba las piezas un 3.7% así que salió todo mal y tuve que hacerlo de nuevo jajaja todo contra reloj fue muy estresante pero me sirvió para aprender. Gracias @soltecno se te aprecia tenerte por aquí siempre