Basic Guide to FreeCAD interface
FreeCAD draws and manages its interface using the Qt framework. Because this framework is utilized in a wide variety of applications, the FreeCAD interface is extremely traditional and easy to grasp. FreeCAD is a powerful and versatile open-source 3D modeling software that can be used for various purposes such as engineering, architecture, product design, and more. In this blog post, we will introduce you to the basic features and functions of the FreeCAD interface, and how to use them to create and modify your 3D models.
The FreeCAD interface consists of several components that allow you to access different tools and options. The main components are:
The Menu bar: This is located at the top of the window and contains menus such as File, Edit, View, Workbench, Macro, Tools, Windows, and Help. You can use these menus to perform various actions such as opening and saving files, changing the view mode, switching between workbenches, running macros, accessing preferences and help documentation, and more.
The Tool bar: This is located below the menu bar and contains icons that represent different commands and tools. The tool bar changes depending on the active workbench. A workbench is a set of tools and commands that are related to a specific task or domain. For example, the Part workbench contains tools for creating basic 3D shapes, while the Sketcher workbench contains tools for creating 2D sketches that can be used as the basis for 3D models.
The Tree view: This is located on the left side of the window and shows the structure and hierarchy of your 3D model. It displays all the objects and features that make up your model, such as parts, bodies, sketches, constraints, datum planes, etc. You can use the tree view to select, rename, hide, show, reorder, delete, or modify any object or feature in your model.
The Property editor: This is located below the tree view and shows the properties and parameters of the selected object or feature in the tree view. You can use the property editor to change the appearance, behavior, dimensions, position, orientation, or other attributes of your object or feature.
The 3D view: This is located on the right side of the window and shows a graphical representation of your 3D model. You can use the 3D view to navigate around your model using the mouse or keyboard shortcuts. You can also use the 3D view to select objects or features by clicking on them.
The Combo view: This is located below the 3D view and contains several tabs that provide additional information and options for your model. The most commonly used tabs are:
Model: This tab shows the same information as the tree view and property editor.
Tasks: This tab shows context-sensitive tasks and options that are related to the selected object or feature or the active tool.
Report view: This tab shows messages and errors that are generated by FreeCAD during your modeling process.
Python console: This tab shows a command-line interface that allows you to interact with FreeCAD using Python scripts.
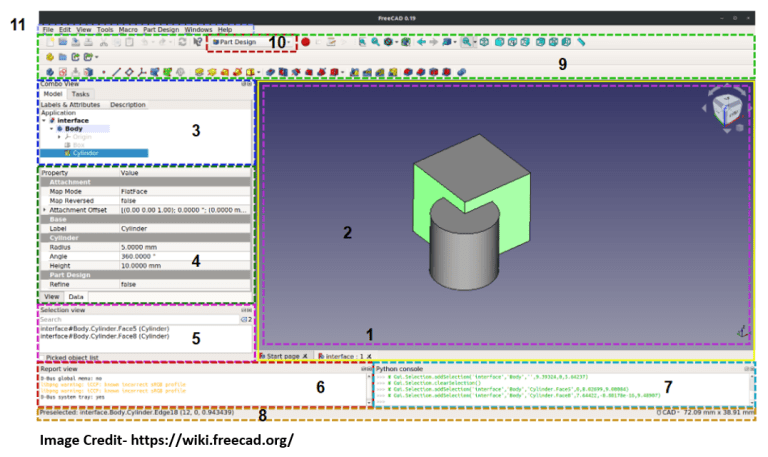
1.The main view area of FreeCAD contain different tabbed windows
2.The 3D view of Part, usually embedded in the main view area
3.The upper part of the combo view, which includes the tree view and task panel of opened file.
4.The lower part of the combo view, which includes the property editor where user can easily edit the properity.
5.The selection view show selected faces of object.
6.The report view shows the report of part and errors.
7.The Python console to write python script.
8.The status bar
9.The toolbar area, see the following information on the toolbars
10.The Workbench selector, which itself is a toolbar
11.The standard menu
These are the basic components of the FreeCAD interface that you need to know to start creating your 3D models. In future blog posts, we will explore each component in more detail and show you how to use them effectively. Stay tuned!
Posted from my Blog Mechnexus.com with Exxp: Basic Guide to FreeCAD interface
Congratulations @mechnexus! You have completed the following achievement on the Hive blockchain And have been rewarded with New badge(s)
You can view your badges on your board and compare yourself to others in the Ranking
If you no longer want to receive notifications, reply to this comment with the word
STOPCheck out our last posts:
Support the HiveBuzz project. Vote for our proposal!