Cool animation with CSS and JavaScript

I recently started learning JavaScript and I would say it's a very cool language which can be very frustrating sometimes. The frustrating aspect comes from its syntax, I already learned the fundamentals of programming using C and I also did a bit of Python before javascript. But thanks to my knowledge of C, learning JavaScript is a lot easier, as I understand concepts quickly but I just have to know what syntax to use when faced with a problem. The DOM was something new I hadn't come across before but it took just about a week for me to understand it and how to navigate the DOM (again, syntax was my challenge here)
The best way to learn a language is to practice with it, just build projects to reinforce concepts you have learned from courses and tutorials. So, I decided to start with frontend mentor and do some of their beginner JavaScript challenges. I have used frontend mentor before to practice HTML and CSS and it helped me a lot to get better at both of them, so I figured I should do the same for JavaScript. I started small with their beginner's challenge and the first one is building an interactive rating component.

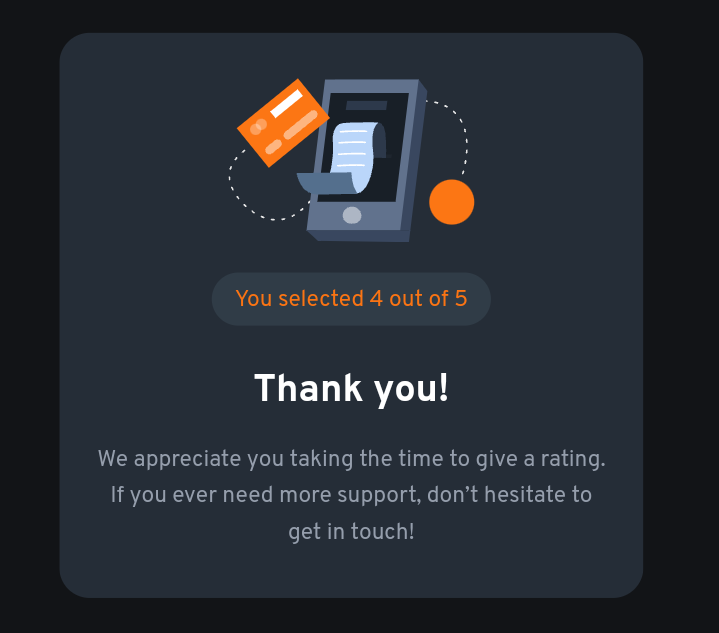
That was the provided sample and I'm to build it to look just like that. It wouldn't be a JavaScript challenge without some interactions, right? So, the interaction is basically how most rating systems work, a user picks a number from 1 to 5 indicating the rating they are giving, then once they press submit, the page changes to a thank you page that shows the number rating they pick. So, let's assume a user picks 4 and presses submit, this is what they see next.
It's a very easy thing to do and if you're familiar with JavaScript, you can already see how to do this with just a few lines of code. But, it would be boring to just click a button and the “thank you” card replaces the current one instantly. It felt too easy and I decided to add a few extra things to it. The challenge simply just asked for the “thank you” card to be displayed when the submit button is clicked, so they wouldn't mind me adding a few extra things, specifically animations.
My thought process
I won't be going in-depth about the HTML and CSS because it's a simple design and everyone familiar with those two languages (or whatever you want to call them) should know how to create that design but I will still drop a link to the source code in case you want to check it out. Luckily, the mobile and desktop designs are the same, so there's no need for much grid and flexbox but I used flex to position the buttons (coz why not). You can use margins instead to space them out, but I just love using Flexbox. I also used it to position the card in the centre of the page.
Since we are going to be having two cards (the main one and the “thank you” card that shows after submitting a rating), I used a class of card for both of them because they will have the same styles. The "thank-you" card has additional classes of: thank-you and hidden which have the following styles
.thank-you {
  position: absolute;
  text-align: center;
  transition: transform 0.2s ease-in, opacity 0.2s ease-in;
}

.hidden {
  transform: rotate(90deg) scale(0.5) translate3d(150%, -150%, 0);
  opacity: 0;
}
The hidden class rotates the card clockwise, reduces its size to half and then moves it 150% to the right (x-axis) and 150% to the top. The opacity is used to make sure the card is not visible at all on the page because on a very large screen, you can still see the card at the far top-right part. We are going to use JavaScript to reverse all these so that when the submit button is clicked, it will look like the card is coming from the top-right of the page to replace the main card.
But there's still one problem with this which I didn't even notice until I was done with the whole thing and was about to submit my solution. The “thank-you card is still on the page even though it's not visible and as we know with all HTML elements, it's still going to occupy space on the page. This means there was a very large space on the right side of the page with nothing visible there. To fix this, I added a display of none to the thank-you class. For now, we are done with this part and as I said before, you can check out the source code for everything. Let's move to the JavaScript.
Adding interactions
const ratingsBtnGroup = document.getElementById("rating-btns");
const ratingBtns = ratingsBtnGroup.children;
const submitBtn = document.getElementById("submit-btn");
const ratingResult = document.getElementById("rating-result");
const mainCard = document.getElementById("main");
const thankYouCard = document.getElementById("thank-you");
let ratingNum = "";
I started by creating variables of all the elements I will be using. The ratingsBtnGroup is a ul element that has the 5 rating buttons (from 1 to 5). So, the ratingBtns is an HTMLCollection that has all the li elements containing the buttons (they are all children of the ul element). ratingResult is an empty span element where we will be displaying what rating the user picks after they press submit.
Lastly, we have a ratingNum variable which is currently an empty string. This is where we will be saving the rating number the user selects before pressing the submit button. Now that all variables have been declared, the next step is to add an event listener to the ul element. With this, I don't need to add an event listener to all the buttons, I can know which button is clicked just with only the event listener on the parent element (ul).
Ps: when I say buttons, I'm actually talking about each li element holding individual buttons
const ratings = (e) => {
  Array.from(ratingBtns).forEach((list) => {
    list.firstChild.style = "";
  });

  ratingNum = e.target.innerText;
  e.target.style.backgroundColor = "#959eac";
  e.target.style.color = "#ffffff";
};

ratingsBtnGroup.addEventListener("click", ratings);
Let's start from the bottom. Once a button is clicked, it triggers the ratings function. The e parameter is the event object which tells us which element (in this case; button) was clicked. In the ratings function, the first thing I did was to create an array from the HTMLCollection of buttons which enables us to use the forEach method to reset the inline styles of each of them (I will explain why soon).
After that, I assign the innerText of e.target (this represents the button that was clicked) to the global ratingNum variable. This means that if a user clicks the button that has 2, 2 gets assigned to ratingNum. The user can click every button but only the inner text of the last clicked button will be saved to the ratingNum variable. Then from there, I add a background color of light-gray and text color of white to that clicked button to make it stand out.
This is where that inline style reset I mentioned earlier comes into play. If a user clicks a button and it becomes light-gray, he can click another button and now we will have 2 buttons that are light-gray and even up to 5 buttons if he clicks all. We don't want this behaviour, so once a button is clicked and it turns light-gray, the ratings function ends. When the user clicks another button, the first thing the ratings function does is remove the previous gray-coloured button, making sure that only the currently pressed one is gray. That's it for the ratings function, next we will look at the logic for the submit button.
const submitRating = () => {
if (!ratingNum) {
alert("Please pick a rating");
return;
}

ratingResult.innerText = ratingNum;
thankYouCard.style.display = "initial";

setTimeout(() => {
mainCard.classList.toggle("hidden2");
}, 800);

setTimeout(() => {
mainCard.style.display = "none";
thankYouCard.classList.toggle("hidden");
}, 1000);
};

addEventListener("click", submitRating);
When the submit button is clicked, it triggers the submitRating function and the first thing it does is to check that the user actually clicks a button which will mean that the ratingNum variable won't be an empty string but if it is, it means the user clicked the submit button without picking a number, and an alert will be displayed (I should probably change that to a dialog box). But if they did click a button whose value is then saved in ratingNum, that value would be displayed in the ratingResult variable (the empty span I talked about earlier). The next thing is to change the display of the “thank you” card (which is currently hidden) to the initial state (I could also just specifically set it to display of block).
I initially didn't use the setTimeout function but I later added it when I realized that the page looked boring without it. The first setTimeout triggers in 0.8 seconds after the submit button has been clicked. I forgot to mention that in my main card, I added a hidden2 class which basically does a similar animation as the hidden class on the “thank you” card but in the opposite direction.
.hidden {
  transform: rotate(90deg) scale(0.5) translate3d(150%, -150%, 0);
  opacity: 0;
}

.hidden2 {
  transform: rotate(-90deg) scale(0.5) translate3d(-150%, 150%, 0);
  opacity: 0;
}
So, the first setTimeout will add the hidden2 class to the main card which will trigger the animation. The card rolls to the bottom-left side of the page and the next setTimeout function comes in. This triggers in 0.2 seconds after the first one and it first hides the main card by setting its display to none, and then removes the hidden class from the “thank you” card which triggers the animation. So, when a user selects a rating, and clicks the submit button, the main card rotates out to the bottom-left while the “thank you” card rotates in from the top-right. You can see it in action on the live site
There is a slight delay between when the submit button is clicked and the animation starts, so I decided to add a button spinner that triggers when the submit button is clicked. You can find how I did it in the source code but it has a class of v-hidden which sets the visibility to hidden. And since I want it to trigger immediately after pressing the submit button, I added its logic before the first setTimeout function.
ratingResult.innerText = ratingNum;
spinner.classList.toggle("v-hidden");
thankYouCard.style.display = "initial";
It was fun building this small project and I really enjoyed it, especially the JavaScript aspect. I will take more frontend mentor JavaScript challenges and slowly increase the difficulty as I learn more JavaScript concepts.
Thanks for reading

Connect with me on:
Twitter: @kushyzeena
Readcash: @kushyzee
Edited with Canva
First image: from frontend mentor
Other images are mine
Congratulations @kushyzee! You have completed the following achievement on the Hive blockchain And have been rewarded with New badge(s)
You can view your badges on your board and compare yourself to others in the Ranking
If you no longer want to receive notifications, reply to this comment with the word
STOPCool animation.
Congrats!
Thank you 😊
Thanks for your contribution to the STEMsocial community. Feel free to join us on discord to get to know the rest of us!
Please consider delegating to the @stemsocial account (85% of the curation rewards are returned).
You may also include @stemsocial as a beneficiary of the rewards of this post to get a stronger support.
Post manually reviewed. 😊
Thank you very much! 😊