Welcome to My Homelab: Your Gateway to Self-Hosting!

Bing Image Creator: Docker whale, sea of cables, server room, dark, slr, cinematic
Welcome to my self-hosting adventure!
Over the past four years, I've spend many hours building my homelab, a place where I've explored open-source software, IT infrastructure, and the joys of self-hosting. In this first article, I'm excited to give you a glimpse into my homelab's general setup. From the hardware to the software stack, I'll paint the big picture. But hang tight, because this is just the beginning. In future articles, I'll dive deep into each component, offering guides and will be sharing the reasons behind my choices. My goal is simple: to empower you to embark on your self-hosting journey while inspiring you with the endless possibilities of open source.
Let's get started!
Hardware Overview
Let's kick things off by talking about the hardware I've got:
- Hyper1: The main server running Proxmox and the majority of my load is a old gaming PC from 2012. The graphics card, RAM, SSDs and CPU cooler have been upgraded.
- i7-3820 (overclocked to 8x 3,9 GHz)
- GTX 1060 6GB
- 32 GB DDR3 Ram
- Asgard: It all started on a self build mini server, which today runs TrueNAS-SCALE.
- J4105-ITX (up to 4x 2,5 GHz)
- 8 GB DDR3 Ram
- Thor: Raspberry Pi 4 8GB
- Bifroest: Old laptop from 2011 running my Proxmox backup server.
- i5-2410M (up to 4x 2,9 GHz)
- 8 GB Ram
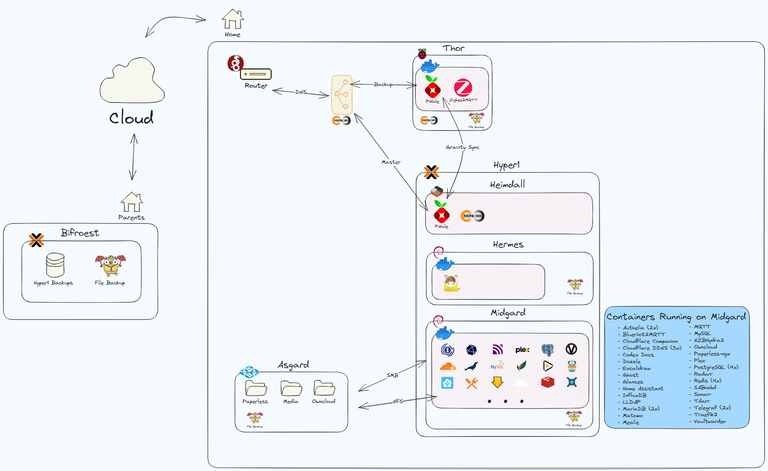
Overview of my HomeLab created in Excalidraw (state 02.10.2023)
Secure Off-Site Backup Strategy
Let's start with something simple yet crucial: Bifroest, my trusty backup server. It runs Proxmox Backup Server (PBS) and sits safely at my parents' house, serving as a reliable off-site backup. It is connected via VPN (WireGuard), although it's temporarily chilling in my basement due to some maintenance.
Every night, Bifroest gets to work. It receives the backups of my virtual machines (VMs) and LXC container from Proxmox. Plus, it's the go-to spot for my file backups via SFTP. Using Restic, I keep my Docker directories and important files (photos, documents, and OwnCloud files) safely stored away at set intervals. It's all locked up tight with encryption, and I maintain monthly, weekly, and daily incremental backups for a specific duration. Restoring? Piece of cake. Thanks to Proxmox, it's as simple as a few clicks, and with Restic, it's all about "just" mounting it. Stay tuned for more, as I will for sure cover this part in more detail.
Ad-Free Network with DNS Failover
I use Pi-hole as my network-wide ad blocker. It is set as my DNS server. There are two ways to set up the DNS (at least with the hardware at my disposal).
- Option 1
is to point my router to the Pi-hole DNS. The advantage is that I can configure a secondary DNS, but the downside is that all traffic appears to come from my router, which can be challenging for debugging and doesn't provide detailed statistics. Plus, there's an extra hop for data as it goes through the router as DNS, then to the Pi-hole, and finally to an upstream DNS like Cloudflare. - Option 2
is what I use. I edited my network's DHCP settings in my router (an AVM FritzBox 6660 Cable) and added the Pi-Hole DNS there . The advantage here is that all devices get assigned the DNS directly, eliminating the extra hop. The downside is that I can only assign one DNS. If that DNS goes down, most of my services won't work, authentication fails, and the internet goes down.
To address this, I've introduced a second backup Pi-hole running in a docker container on a Raspberry Pi 4. My main Pi-hole is running in a Debian based LXC container on Proxmox. The Pi-holes syncs its config every 5 minutes in both directions, and both devices run Keepalived. Keepalived issues a virtual IP, which is set as my DNS address, directing all traffic to the master Pi-hole. If the master Pi-hole goes down, it takes just one second to switch over to the backup Pi-hole. No more interruptions to the internet! And most importantly, your significant other won't come running asking about the internet!
I prefer using hostnames over IP addresses whenever possible. It's convenient and reduces the hassle of changing IP addresses everywhere. Just remember, your DNS becomes a critical part of your homelab setup.
Mail Servers: Proceed with Caution
Running a mail server with Mailcow and Mailjet works well for me, but I wouldn't recommend it. It's a complex setup that takes time and can be risky. I am not sure this is a topic I will be diving into here. I don't rely solely on it to avoid locking myself out completely.
Homelab's Core: Docker Host VM - Midgard
Let's dive into the heart of my homelab where the magic and fun really happens.
Midgard, my Debian-based VM, handles Docker, and all my containers are managed with a single docker-compose file. Don't worry; I'll explain my setup in detail soon. But here's a spoiler: I prioritize security while also aiming for convenience.
Networking with Traefik, Cloudflare, IPs, and SSL
I rely on Traefik as my reverse proxy for all web-based services. It handles my three domains, manages Let's Encrypt SSL certificates, and sets up routes based on Docker labels. The beauty? I rarely need to tinker with Traefik; Traefik adapts to new configurations without restarts.
I have three domains: one for this site, another for public services, and an internal one only reachable from my network (thanks to a wildcard DNS entry in Pi-hole). Even the internal domain has an official SSL certificate.
Cloudflare helps manage my public DNS entries. Since I lack a static IP, I run a Cloudflare-DDNS container per domain to keep IP addresses updated. For the public domain, the Cloudflare-Companion container handles DNS entries for subdomains I launch. It's a smooth setup!
Security with Authelia, OIDC, LDAP, MFA
Security is paramount, but convenience is key. I've set up LDAP with lldap and created separate groups. Now, let's check out Authelia: it's my security guardian for most services. It ensures I'm in the right LDAP group, sends MFA requests via DUO, and bars unauthorized access.
Authelia also lets me use OIDC on my network, reducing the need for proprietary logins. Once logged in, I usually don't see the extra security layer until my cookie expires.
Here's a pro tip: set up Redis with Authelia to keep your sessions alive, even when you need to restart the container for config changes. I use a "deny all, except configured otherwise" approach. It requires adding new services to the config, but it's a foolproof way to stay secure.
Talking about security, I use Vaultwarden (a Bitwarden spin-off) as my password manager. I always generate unique passwords and never reuse them for any account or service.
Home Entertainment: Highly Automated
Let's dive into something fun: entertainment! Surprisingly, I don't have many *arr apps deployed because I didn't really need them.
For my media server, I use Plex, though I must admit I'm not its biggest fan. Jellyfin had some issues with Chromecast and playback interaction (like pausing when someone's at the door). With my new TV (Samsung The Frame), it's even trickier, as some movies can't be played via the built-in Apple TV. But at least Plex has a great app on the TV.
To save storage, I'm experimenting with Tdarr, which transcodes files to H.265. Sonarr manages my shows, Radarr handles movies, NZBHydra2 searches Usenet, and SABnzbd gets it all.
Sharing is caring: Recipies and Nerdy Articles
I got tired of our overflowing physical recipe book and loose printed files. We often cook recipes from blog articles too. So, I discovered Mealie, a digital recipe collection that can import from websites and assist while cooking.
We decided to share these recipes with friends and family, making them accessible to the public.
Nerdy Articles is my latest venture to share my self-hosting knowledge. After teaching three people everything I've built and talking everyone's ears off about the latest services and enhanced security, I'm now sharing my knowledge here. By the way, this great website is based on Ghost. I use Matomo as my self-hosted Google Analytics, and don't worry, I've kept everything cookie-free (apart from the mandatory non avoidable cookies) for your privacy and to avoid annoying pop-ups.
Smart Home & Statistics
While it's not on the Midgard VM in Proxmox, it's still important. I have quite a lot of Zigbee-based devices. A Deconz Conbee II Zigbee dongle is my gateway to yield the power over my Zigbee network. It can't be in the basement due to the signal strength, therfore it's connected to the Raspberry Pi 4 in our living room, which also serves as my backup Pi-hole.
The living room Pi-Hole runs Zigbee2MQTT which is connected to my MQTT broker. Home Assistant is the heart of my smart home, connecting to a lot of things in our house. Zigbee devices, my lawn mower robot, rooftop solar panel data, current energy prices, and much more are all part of the Home Assistant ecosystem.
It serves as both a control center for smart devices and a hub for checking various statistics, including the outdoor temperature.
Speaking of statistics, Home Assistant deletes its data after 7 days (in a rolling cycle), except for the statistical sensors. I currently have over 700 sensors in Home Assistant, with 370 actively in use. To maintain performance, some data has to be cleared after a few days, as some of the sensors update nearly every second. However, there are specific statistics I want to retain for a longer period, like our solar panel energy production and hourly energy prices. These are gathered using Telegraf or sent by Home Assistant and stored in an InfluxDB.
File & Document storage
You might wonder, what's the difference between file and document storage? Well, let me explain. I use Owncloud for file storage, similar to Dropbox or OneDrive, and it's straightforward. We keep photos there, spreadsheets, ... , and our phones sync pictures on the local network.
But one thing annoyed me: sifting through physical folders for tax documents. So, I tackled this issue for good. After trying a few solutions, I settled on Paperless-ngx (formerly Paperless and then Paperless-ng). I'll write a more detailed guide later, but here's the core: unlike physical folders, I can tag my PDFs however I want, like Tax, Tax 2023, or Insurance. Plus, it has data science features and will pre set the meta data of your files according to previously set data.
I'll forward emails to Paperless-ngx or upload scanned documents. Periodically, I review the Paperless inbox, ensuring tags and metadata (like dates) are correct. Come tax time, I can easily access all the documents I need by searching for the relevant tags. Simple and efficient!
Documentation
Yes, I have a home wiki! It's not extensive, but it's really handy. Using Codex-Docs as the base, I've created instructions for things at home that we rarely do but need to remember how they work. It also includes a cheat sheet for less frequently used commands and tasks, as well as a step-by-step guide for setting up Debian (even though I know the steps by heart, it's convenient to have it on hand).
The diagram you saw earlier was created with Excalidraw, which is a new addition to my toolkit. I'll be using it more often when creating articles for you, my readers.
Handy tools for debugging
When you're tinkering with your homelab, quick access to logs is essential. Glances provides a speedy overview of your hardware's/VM's, processes, and system stats. To delve into the logs of all containers on the host, you can use Dozzle. Just remember, these are system logs, not service-specific logs written to disk files.
Ansible: Updating a Homelab with one command
Updating a homelab can be a breeze or a potential headache, especially when you're juggling numerous servers and containers. I've found Ansible to be my ultimate savior in this regard. With Ansible, I can orchestrate updates across all my servers, both physical and virtual, in a structured and efficient way. My playbook not only handles system updates but also knows how to deal with different applications running on each server. However, it's essential to exercise caution and ensure you have the time to oversee the process. Updates don't always go as planned, and I've had my share of hiccups, like dealing with broken Docker images. To mitigate risks, I keep core services on specific versions and manually update them only after creating a backup. I'll be sharing more about this process soon, so stay tuned for a detailed guide on how Ansible keeps my homelab up to date and hassle-free.
Article Wrap-Up: Stay Tuned for More!
I haven't covered all the background services I run, like PostgreSQL, MariaDB, or MySQL databases, Redis caches, ... These will be featured in more detailed articles about specific aspects of my homelab.
Thanks for sticking with me through this high-level overview of what I've built and what I plan to delve into in future articles. I hope you enjoyed reading it, found it insightful, and are excited to dive deeper with me in the upcoming articles.
If there are specific aspects of this homelab you're eager to learn more about, please let me know via a comment! Stay tuned, sign up to stay informed about new articles, and share with friends who might be interested in this topic too.
Farewell for now, fellow self-hosters. Keep the servers humming and the data flowing! Until next time, happy self-hosting.
Henning
Source: Nerdy Articles - written by myself as well
Hello, @killertic! This is @anggreklestari from @OCD team. We saw that you already posted your first post here in Hive Blockchain! Congratulations and welcome! However, it would be awesome if you do an introduction post. As a sample of what an intro post is, you can refer to this intro post for reference:
Keeping Up With the Buzz - My Introduction to the Hive Community
There's no specific format on how you do your intro post, but there is some suggested content that we would love to see in your post. Information like who are you and where you're from, how did you discover Hive or who invited you, what types of content you want to see here and the types that you want to produce, and what are your expectations in this platform. There's no pressure on this. You can choose whatever information you would like to share.
You can tag me @anggreklestari on your intro post then if you have done with it.
Well, you can explore the communities that are suitable for your content. You can read some of the communities in this post: OCD Communities Incubation Program
For tips and information as a Hive newbie, click here: newbie guide.
The important thing is Hive is a bit different from other social media platforms since you are monetizing your blog. You can't include content that you don't own without sources. For more information, check this post: Why and How People Abuse and Plagiarise.
If you have questions, you can hop into OCD's Discord server and we'll gladly answer your questions. For now, @lovesniper will follow you and we are looking forward to your intro post!
Welcome!
!LUV !LADY !HUG
I sent 1.0 HUG on behalf of @kvinna.
(1/3)
@killertic, @kvinna(2/10) sent LUV. | connect | community | HiveWiki | NFT | <>< daily
! help(no space) to get help on Hive. InfoView or trade
LOHtokens.@kvinna, you successfully shared 0.1000 LOH with @killertic and you earned 0.1000 LOH as tips. (1/1 calls)
Use !LADY command to share LOH! More details available in this post.
Willkommen auf Hive!
What a blogpost?! Welcome to HIVE