Numpy Part 3: The Random Module / Numpy Parte 3: El Módulo Random - Coding Basics #33
Random Numpy

Shoutout to Real Python

In this article you will find:
- Introduction
- What is the Random module?
- How do I use the Random module?
- random.choice
- A small example
So far, we have taken a walk through NumPy and how we can create, as well as perform operations with, the arrays that we can use in this library.
However, this package gives us much more than that. In this post, we will see another of the great features that numpy presents: the handling of random numbers.
For this, we delve into one of the Numpy modules, random, and how we can use it to generate random values in the form of integer DataTypes, float, string and even in arrays.
Without more to say,
What is the Random module?
Shoutout to Python Guides
The word chance has endless meanings, from:
Cause or force that supposedly determines that unforeseeable or unintended events and circumstances develop in one way or another.
However, these try to overexplain a fairly simple concept of randomness. That is, that which cannot be predicted.
Now, the design of a program is something defined and not unpredictable, even when it refers to the generation of algorithms for random numbers.
If we wanted to generate programs that show us random numbers, generally we will have to indicate as a parameter a sample of n numbers, making it certainly somewhat predictable, which is why these programs are not considered truly random.
Those programs or algorithms that are used to generate random data usually fall into the category of Pseudo Random, which are numbers generated by a process that appears to produce random numbers, but does not actually do so.
It is precisely these pseudo-random values that we can control with the numpy random module.
To use it, we just have to import it as follows:
from numpy import random
And now, we can create "random" numbers in our Python environment.
Now let's see how they are used:
How do I use the Random module?

Shoutout to w3resource
To use the random module, the first thing you must take into account is the datatype and the range of values you want to use. If, for example, you want a program that generates integers from 1 to 100, you must use the random randint method, being able to observe the following result:
from numpy import random

x = random.randint(100)

print(x)

>>> 45
In addition to this, we are not only limited to the sample size parameter, we can also express the minimum and maximum values that we can take from the sample through the low and high parameters. If, for example, we only wanted to take the numbers from 10 to 50:
from numpy import random

x = random.randint(low=10, high=50)

print(x)

>>> 19
And it does not exceed 50. In addition to this, we can indicate the number of random values we want. If we want 10 random values, we use the size parameter with the number.
from numpy import random

x = random.randint(low=10, high=50, size=10)

print(x)

>>> [36 33 22 21 47 11 44 16 13 49]
We can see that the generated values are saved within an array.
Now, if we wanted to generate floating numbers between 0 and 1 at random (Remembering that floating numbers are those with decimals), we use the rand operation:
from numpy import random

x = random.rand()

print(x)

>>> 0.42673291181135764
We already know that through the size parameter, we can generate an array with different random values in numpy. But what would happen if we want to increase the number of dimensions of the random arrays?
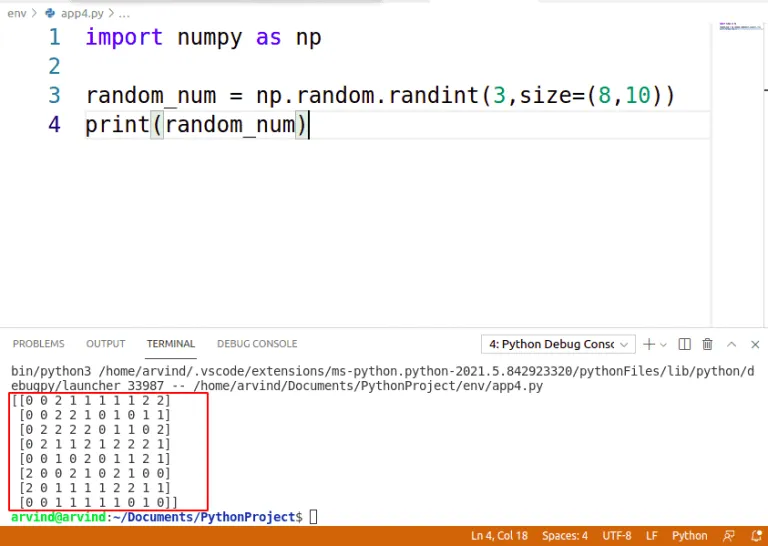
Easy, we just have to place the size value inside a parenthesis and place how many dimension parameters the arrays we want to generate have. If we go back to randint and use a size of (2,4), we can see that a two-dimensional array with two rows and 4 columns will be generated:
from numpy import random

x = random.randint(100, size=(2,4))

print(x)

>>>
[[18 24 22 82]
  [16 17 13 71]]
Operation that can also be carried out with rand.
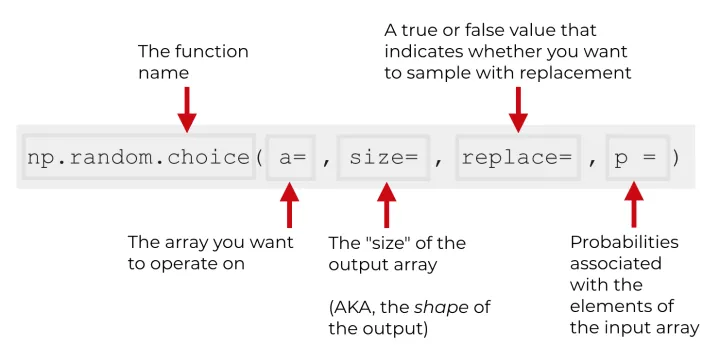
random.choice
Shoutout to R-Craft
There are certain cases where the number of values is really specific and we want to assign the numbers to be generated. For this, we have the choice method, with which we can generate a random value that is within the array that we assign. If we want a list with the numbers 2,4,6,8 and 10 and we want to take one of these numbers at random:
from numpy import random

x = random.choice([2, 4, 6, 8, 10])

print(x)

>>> 8
In addition, we can also manage the size of the dimensions in these by simply adding the size parameter. As we can observe:
from numpy import random

x = random.choice(([2, 4, 6, 8, 10]), size=5)

print(x)

>>> [2 4 4 6 4]
And if we want one of two dimensions:
from numpy import random

x = random.choice(([2, 4, 6, 8, 10]), size=(3,5))

print(x)

>>> [[ 2 4 2 6 10]
  [2 4 10 2 4]
  [2 4 6 6 6]]
A small example
Shoutout to ResearchGate
To capitalize on what we have learned about the numpy random module, we will see a small example. We are asked to make a random matrix creator, which asks the user for the number of columns and rows for this. It is a relatively simple example and I want you to do it on your own to see how it goes.
If you can't do it or want to see a different perspective regarding its resolution, just keep reading.
First, as we are told to ask the user for the size of the matrix, which is an array of dimension 2, we create the corresponding inputs.
from numpy import random

xsize = int(input('Insert how many rows you want the matrix to have: '))
ysize = int(input('Insert how many columns you want the matrix to have: '))
Now, based on this, we just have to use randint to generate the random numbers and use inside the size parameter a xsize and ysize. Thus, it would be as follows:
from numpy import random

xsize = int(input('Insert how many rows you want the matrix to have: '))
ysize = int(input('Insert how many columns you want the matrix to have: '))

def generate_random(xsize,ysize):
gen_matrix = random.randint(100, size=(xsize,ysize))

print(gen_matrix)

generate_random(xsize,ysize)
Note: Enter a sample value or the program will tell us that a positional argument is missing.
Now, when executed, we will have:
>>>
Insert how many rows you want the matrix to have: 2
Insert how many columns you want the matrix to have: 2
[[49 42]
  [6 3]]
With which we will have the matrices created
As you can see, handling random values in NumPy is really simple and very flexible, allowing you to perform a large number of tasks if you use it correctly.
It is precisely for this reason that it is worth seeing some other examples of its use in practice, so that you can see how it can help you in your development as a programmer.
I hope this post has been helpful to you and that after this, you are one step closer to being a NumPy master. Many congratulations if you have made it to this point.

Numpy al azar
Shoutout to Real Python
En este artículo encontrarás:
- Introducción
- ¿Qué es el módulo Random?
- ¿Cómo se usa el módulo Random?
- random.choice
- Un pequeño ejemplo
Hasta ahora, hemos dado un paseo por NumPy y como podemos crear, así como realizar operaciones con los arreglos que podemos usar en esta librería.
Sin embargo, este paquete nos brinda mucho más que eso. En este post, veremos otra de las geniales características que presenta numpy: el manejo de números al azar.
Para esto, nos adentramos en uno de los módulos de Numpy, random, y como podemos usarlo para generar valores aleatorios en forma de DataTypes enteros, float, string e incluso en arreglos.
Sin más que decir,
¿Qué es el módulo Random?
Shoutout to Python Guides
La palabra azar tiene un sinfín de significados, desde:
Causa o fuerza que supuestamente determina que los hechos y circunstancias imprevisibles o no intencionados se desarrollen de una manera o de otra.
Sin embargo, estas tratan de sobreexplicar un concepto bastante sencillo de lo aleatorio. Esto es, aquello que no se puede predecir.
Ahora bien, el diseño de un programa es algo definido y nada impredecible, incluso cuando se refiere a la generación de algoritmos para números al azar.
Si quisieramos generar programas que nos muestren números al azar, por lo general tendremos que indicar como parámetro una muestra de n números, haciéndolo ciertamente algo predecible, razón por la que no se consideran verdaderamente aleatorios estos programas.
Aquellos programas o algoritmos que son usados para la generación de datos al azar, suelen entrar en la categoría de Pseudo Aleatorios, que son números generados por un proceso que parece producir números al azar, pero no lo hace de verdad.
Precisamente son estos valores pseudo aleatorios los que podemos controlar con el módulo random de numpy.
Para usarlo, solo tenemos que importarlo de la siguiente manera:
from numpy import random
Y ahora, podremos crear números "aleatorios" en nuestro entorno Python.
Ahora veamos como son usados:
¿Como se usa el módulo Random?
Shoutout to w3resource
Para usar el módulo de random, lo primero que debes de tomar en cuenta es el datatype y el rango de valores que quieres utilizar. Si por ejemplo, quieres un programa que te genere números enteros del 1 al 100, deberás de usar el método randint de random, pudiendo observar el siguiente resultado:
from numpy import random

x = random.randint(100)

print(x)

>>> 45
Además de esto, no solo nos vemos limitados al parámetro de el tamaño de la muestra, también podemos expresar los mínimos y máximos valores que podemos tomar de la muestra por medio de los parámetros low y high. Si por ejemplo, solo quisieramos tomar los números del 10 al 50:
from numpy import random

x = random.randint(low=10, high=50)

print(x)

>>> 19
Y no se sobrepasa los 50. Además de esto, podemos indicar la cantidad de valores aleatorios que queremos. Si queremos 10 valores aleatorios, usamos el parámetro size con el número.
from numpy import random

x = random.randint(low=10, high=50, size=10)

print(x)

>>> [36 33 22 21 47 11 44 16 13 49]
Podemos ver que los valores generados se guardan dentro de un arreglo.
Ahora, si quisieramos generar números flotantes entre el 0 y el 1 al azar (Recordando que números flotantes son aquellos con decimales), usamos la operación rand:
from numpy import random

x = random.rand()

print(x)

>>> 0.42673291181135764
Ya sabemos que por medio del parámetro size, podemos generar un arreglo con distintos valores aleatorios en numpy. Pero ¿Qué pasaría si queremos aumentar el número de dimensiones de los arreglos aleatorios?
Fácil, solo debemos de colocar el valor de size dentro de un paréntesis y colocar cuantos parámetros dimensiones tengan los arreglos que queremos generar. Si volvemos a randint y usamos un size de (2,4), podremos ver que se generará un arreglo de dos dimensiones con dos filas y 4 columnas:
from numpy import random

x = random.randint(100, size=(2,4))

print(x)

>>>
[[18 24 22 82]
 [16 17 13 71]]
Operación que tambien podrá llevarse a cabo con rand.
random.choice
Shoutout to R-Craft
Existen ciertos casos donde la cantidad de valores es realmente específica y queremos asignar los números a generar. Para esto, tenemos el método choice, con el que podremos generar un valor al azar que se encuentre dentro del arreglo que asignemos. Si queremos una lista con los números 2,4,6,8 y 10 y buscamos tomar uno de estos números al azar:
from numpy import random

x = random.choice([2, 4, 6, 8, 10])

print(x)

>>> 8
Además, tambien podemos manejar el tamaño de las dimensiones en estos con tan solo agregar el parámetro size. Como podemos observar:
from numpy import random

x = random.choice(([2, 4, 6, 8, 10]), size=5)

print(x)

>>> [2 4 4 6 4]
Y si queremos uno de dos dimensiones:
from numpy import random

x = random.choice(([2, 4, 6, 8, 10]), size=(3,5))

print(x)

>>> [[ 2  4  2  6 10]
 [ 2  4 10  2  4]
 [ 2  4  6  6  6]]
Un pequeño ejemplo
Shoutout to ResearchGate
Para capitalizar en lo aprendido sobre el módulo random de numpy, veremos un pequeño ejemplo. Se nos solicita realizar un creador de matrices al azar, que pida al usuario la cantidad de columnas y de filas para esto. Es un ejemplo relativamente sencillo y quiero que lo realices por tu cuenta a ver que tal te va.
En caso de no poder hacerlo o querer ver una perspectiva distinta con respecto a su resolución, solo sigue leyendo.
Primero, como nos indican que preguntemos al usuario por el tamaño de la matriz, que es un arreglo de dimensión 2, creamos los inputs correspondientes.
from numpy import random

xsize = int(input('Insert how many rows you want the matrix to have: '))
ysize = int(input('Insert how many columns you want the matrix to have: '))
Ahora, en base a esto, solo tenemos que usar randint para generar los números al azar y usar dentro del parámetro size a xsize y ysize. Así, quedaría de la siguiente manera:
from numpy import random

xsize = int(input('Insert how many rows you want the matrix to have: '))
ysize = int(input('Insert how many columns you want the matrix to have: '))

def generate_random(xsize,ysize):
    gen_matrix = random.randint(100, size=(xsize,ysize))

    print(gen_matrix)

generate_random(xsize,ysize)
Nota: Colocar un valor de muestra o el programa nos indicará que falta un argumento posicional.
Ahora, al ejecutar, tendremos:
>>>
Insert how many rows you want the matrix to have: 2
Insert how many columns you want the matrix to have: 2
[[49 42]
 [ 6  3]]
Con lo que ya tendremos las matrices creadas
Como puedes ver, el manejo de valores aleatorios en NumPy es realmente sencillo y muy flexible, permitiéndote realizar una gran cantidad de tareas si lo usas de forma correcta.
Es precisamente por esto, que vale la pena ver algunos otros ejemplos de su uso en la práctica, esto para que veas como puede ayudarte en tu desarrollo como programador.
Espero que este post te haya sido de ayuda y que tras esto, estés un paso más cerca de ser un maestro de NumPy. Muchas felicitaciones si lo has hecho hasta este punto.
Thanks for your contribution to the STEMsocial community. Feel free to join us on discord to get to know the rest of us!
Please consider delegating to the @stemsocial account (85% of the curation rewards are returned).
You may also include @stemsocial as a beneficiary of the rewards of this post to get a stronger support.