My Programming Journey - Making a Slack Welcoming Bot with Python
Cutting the Slack
Shoutout to

In this article you'll find:
- Introduction
- The Task at Hand
- The Boring Part
- Creating the Virtual Environment
- The code
- Setting the App to Run
- Running our App
As a soon-to-be Electronics Engineer, I thought Programming outside of Microcontrollers was a logical way to expand my skills further, hence why I decided to study more Python Programming. Let me tell you, It was a delight learning!
While the most boring but essential part (The fundamentals) is over, now I can practice by making some cool projects that push the limits of my knowledge. While searching for challenging tasks, I stumbled upon a "Make a Welcoming Slack bot" blog, so I decided to recreate It and then use Reverse Engineering to figure out what It's all about.
That's why, In this Article, I'll explain how I implemented my Slack Bot and how you can do It too! This so you can make your creations and see the beauty of programming languages like Python.
Let's dive into It!
The Task at Hand
Shoutout to digitalocean and Github.com
The task was clear: Create a Slack Bot that tells every user who joins your workspace "WELCOME". Nothing less, nothing more.
What is Slack?
Slack is an instant messaging platform designed especially for workspaces and organizations. With a GUI very similar to that of Discord, This community tool can use bots to make their users' lives easier, with tasks such as choosing a specific type of image that suits their projects through AI or just saying hello whenever someone enters a channel. Which is precisely what we'll do today.
To get our task done, we'll have to use virtual environments and get the authorization tokens of Slack through Its API so we can let our Bot operate.
The Boring Part
To begin this project, we should log in to Slack and create a workspace (Check this helpful article).
Then, to create our bot, we should access the Slack API website, this in order to get our app credentials and assign Its events. Once we're there, you'll see a button that says Create an App. Hit there and select From Scratch.
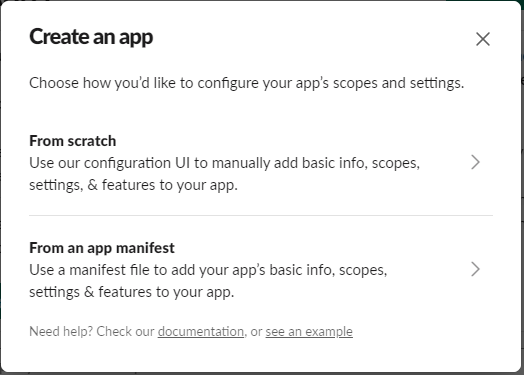
Then you have to give It a name and select the workspace you're going to work in (The one you just created in this case). Once finished, click on the green Create an App below the form.
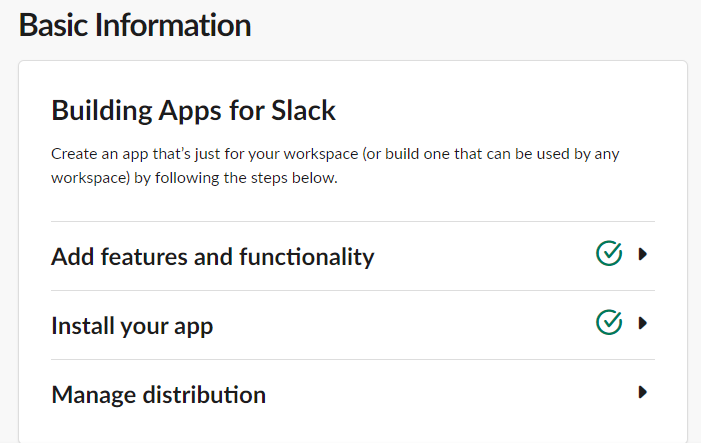
You'll see a window like this:
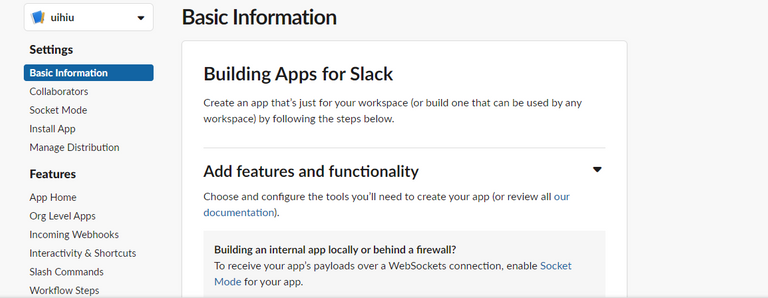
It's here that you'll see all the information about your apps, including your bots. Buckle Up! There's still a lot of things to go over.
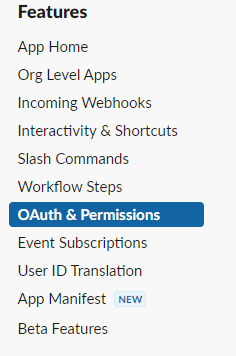
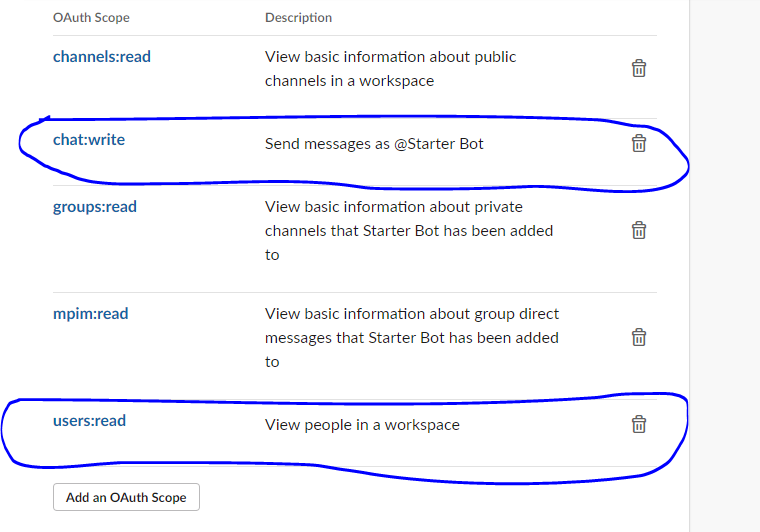
Now, to determine what your bot can do, you should go to the OAuth & Permissions sections in features. Once there, head to Scopes and Bot Token Scopes. Then, click Add an Oauth Scope, selecting two in this case:
- users:read
- chat:write
This is so the bot can write on the channel chat and see what the users typed.
Once this is done, go back to the Basic Information window and go to "Install your App", here you'll see a button that says "Install to Workspace". In the next window, select the name of the workspace and click on allow. Then, you should have the app in your workspace.
Now, we have to prepare our environment.
Creating the Virtual Environment
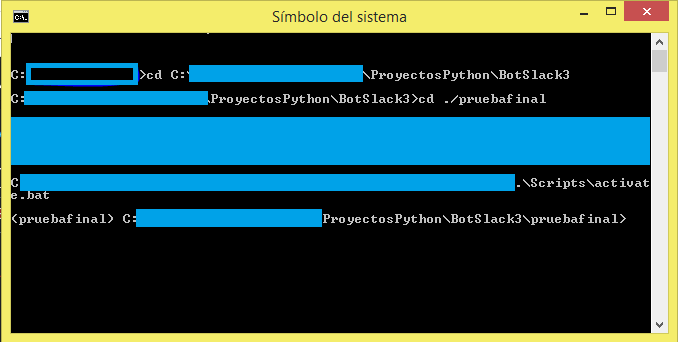
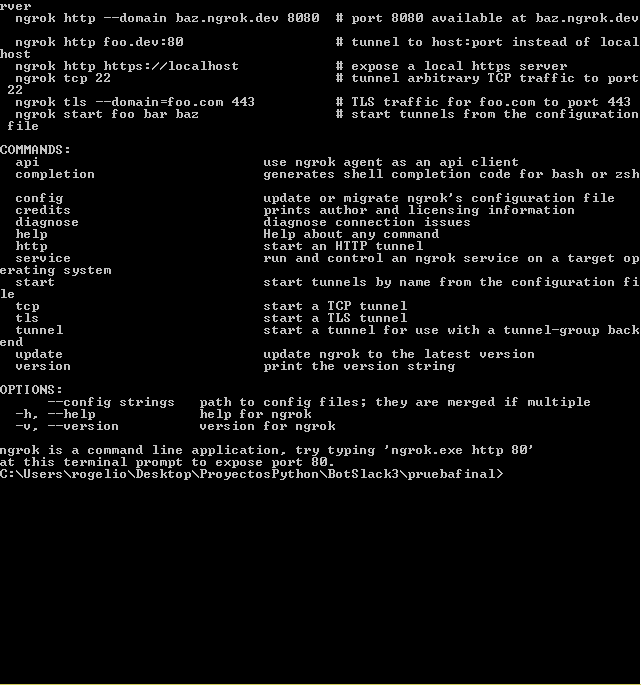
To create our environment, we'll have to use our system's terminal, whether It's OS/Linux command prompt or Windows CMD/Powershell. In this case, since my system has Windows, we'll use the CMD.
First, we'll have to create a folder where we want to store the data of our virtual environment. I named myself BotSlack3. Then, you'll have to access this folder with the cmd command. For Windows, use:
cd [Path of your folder]
then, once there, you should use the following to create the virtual environment:
virtualenv (Name of the virtual environment)
This will create a folder where you'll environment assets will be saved. You'll see inside some files and folders that represent these assets. But this doesn't mean that you're ready to work in your virtual environment.
To work directly in your virtual environment, you should activate
It first. How do we do It? By accessing to its activate.bat script, in [name of the virtual environment]/Scripts. To activate It:
> nameofyourvenv\Scripts\activate.bat
Once you do this, you'll see that at the side of your folder path, there's the name of your virtual environment under parentheses. This means that It's activated. But we still have to import our libraries.
To install these libraries, we should have pip, which is the package installer for Python. To do this, you should just type in the cmd:
> pip install pip
Once this is done, you should install the following libraries with the command pip:
> pip install slack-sdk pathlib python-dotenv flask slackeventsapi
As a last step to set up our virtual environment, we should create a file where we'll store the authorization token for our bot and for our slack sign-in as environmental variables we'll access with our code.
To get the sign-in code, go back to Slack API, and in the basic information tab, head to the app credentials and copy the Signing Secrets.
For your bot token, go to Oauth & Permissions and under OAuth Tokens for Your Workspace copy your Bot User Oauth Token
Once we do this, we'll create a .env file in our virtual environment folder, to do this, head to your cmd and write:
type nul > .env
This will create a text file with a .env extension. Open It with your text editor and type the following:
SLACK_BOT_TOKEN=[Your bot token here]
SLACK_SIGNING_SECRET=[Your Signing Secret Here]
The code
Then we'll have to code, which for me, It was the easiest part. First, we'll have to create a .py file that will be our main app file.
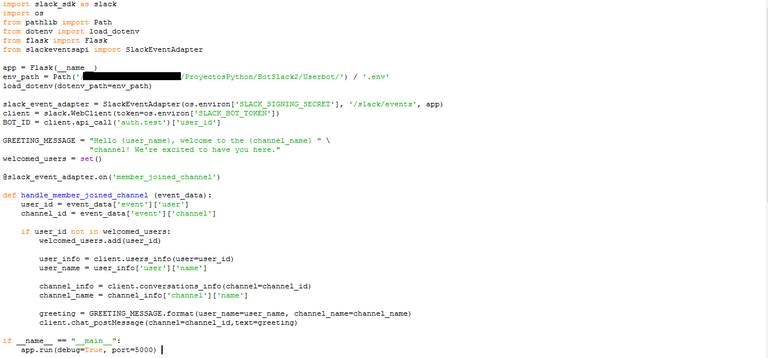
Whenever you see the main file of a Python application, the first thing you'll see most of the time are the libraries being imported. To do this, use import, If you want to bring whole libraries or use from (library) import (specific function or class). In our code:
import slack_sdk as slack
import os
from pathlib import Path
from dotenv import load_dotenv
from flask import Flask
from slackeventsapi import SlackEventAdapter
Then, to use Flask, we have to create an Object of the Flask Class and use Path to get to our file's folder. This is so we can use dotenv to load the environmental variables stored in our .env file.
app = Flask(__name__)
env_path = Path('/Users/rogelio/Desktop/ProyectosPython/BotSlack2/Userbot/') / '.env'
load_dotenv(dotenv_path=env_path)
Then we'll have to use the slackeventsapi, which is a library created to process events from the Slack API, acting as an adapter by designing functions through decorators. For our code:
slack_event_adapter=SlackEventAdapter(os.environ['SLACK_SIGNING_SECRET'], '/slack/events', app)
Note that we use os, which is a library that we use in this case to get the Environmental variables from the .env file, in this SLACK_SIGNING_SECRET to access. /slack/events will be the endpoint that the API uses to send the events.
Then we'll create an object of the WebClient, which is what the bot uses to get in touch with the API. To do this, we have to specify the Bot token, which is why we'll use os again.
Then, we do a call to retrieve our bot's ID.
client = slack.WebClient(token=os.environ['SLACK_BOT_TOKEN'])
BOT_ID = client.api_call("auth.test")['user_id']
Since our bot will say hello to all our users, we'll create a string message with variables that we'll assign later with a function, this while creating a set that will contain all users that have joined the workspace. If a user is inside this set, then It means that It doesn't have to say hello, since It has already joined.
GREETING_MESSAGE = "Hello {user_name}, welcome to the {channel_name} " \
                   "channel! We're excited to have you here."
welcomed_users = set()
Then, we'll have to create a function to make the "welcome" message possible. to do this, we use a decorator:
@slack_event_adapter.on('member_joined_channel')
And then we create our function.
def handle_member_joined_channel(event_data):
    user_id = event_data['event']['user']
    channel_id = event_data['event']['channel']

    if user_id not in welcomed_users:
        welcomed_users.add(user_id)

        user_info = client.users_info(user=user_id)
        user_name = user_info['user']['name']

        channel_info = client.conversations_info(channel=channel_id)
        channel_name = channel_info['channel']['name']

        greeting = GREETING_MESSAGE.format(user_name=user_name,
                                          channel_name=channel_name)

        client.chat_postMessage(channel=channel_id, text=greeting)
event_data will be the events from the Slack workspace. events from where we'll take the user that sent It and the channel the request comes from.
Then, we'll use some basic conditional logic. If a user is not in the set, we'll add them to the set, then we'll use the WebClient to take the info of the client and the channel he's in. In the end, we Format the message we wrote previously by giving a value to the user_name as the user we took from the web client and the channel name that we selected.
Then, in the end, we post this message in the channel's chat.
Finally, to guarantee that complementary files don't open the Slack Adapter, we'll use another If Statement and If It happens, we'll run the app from Flask.
if __name__ == "__main__":
    app.run(debug=True, port=5000)
Setting the App to Run
Before running our app, we have to make sure we give a valid request URL for our Slack API to run. To do this, we have to download ngrok, which is a service to put Apps on the web for a limited time. You can do this by downloading It in a zip file and putting the executable (.exe) file in the folder of your virtual environment.
Then we run our app.py file. We do this by typing in our cmd:
> python [nameofyourapp].py
Note: If you have more than one version of Python installed (Let's say Python 2 and Python 3), you'll have to put python3 If you want to run the latest version.
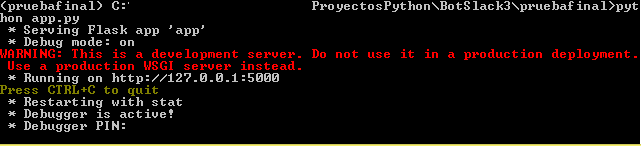
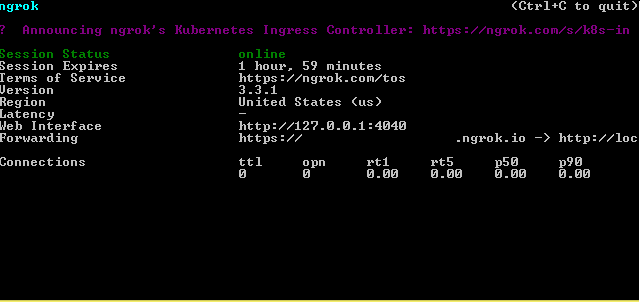
Then, our Flask host will be running, but we'll still need to give It a forwarding domain that Slack can get access to. Then, we'll use ngrok.
We open the ngrok.exe file we downloaded and we'll see a screen like this:
From where we'll use the ngrok HTTP [number of our port], this to secure a public URL. In our case, our port is the 5000, so we'll type:
> ngrok HTTP 5000
Then, the window will display a series of addresses, which will mean that your public session is now online. From this, we'll take the Forwarding URL, copying It and putting /slack/events after It, which means that It'll capture events from the slack API.
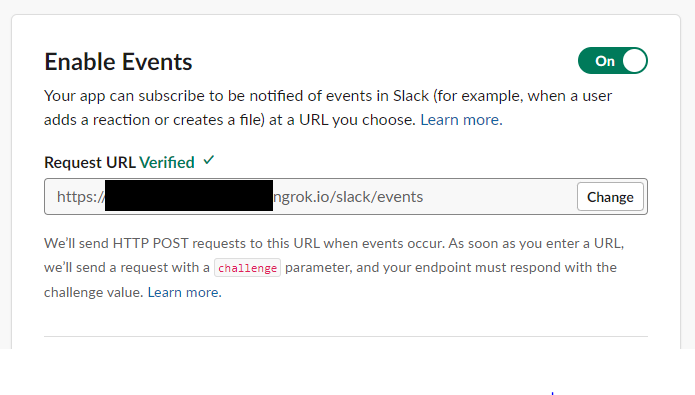
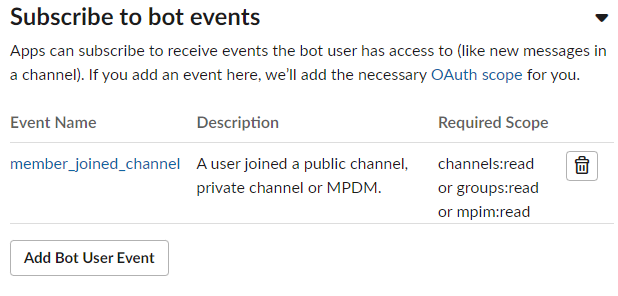
We'll head back to the Slack API website to the event subscriptions tab, enabling events. Then, under this feature, we'll get a field that asks us for our request URL. It is here that we'll put the ngrok direction.
If everything's fine, then we'll get a Verified checkmark. Finally, we'll scroll down and we'll click Add Bot User Event under the Subscribe to Bot Events feature. It's here that we'll select the member_joined_channel event.
.
.
.
After saving our new event, we'll execute the last thing before testing our app, which is going back to basic information and reinstalling our app to the workspace.
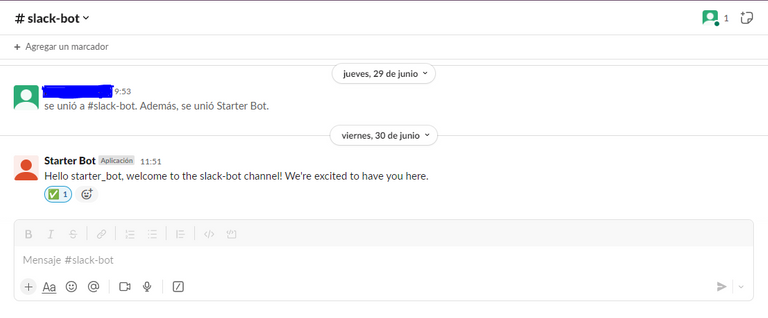
Running our App
Finally, our bot should be running.
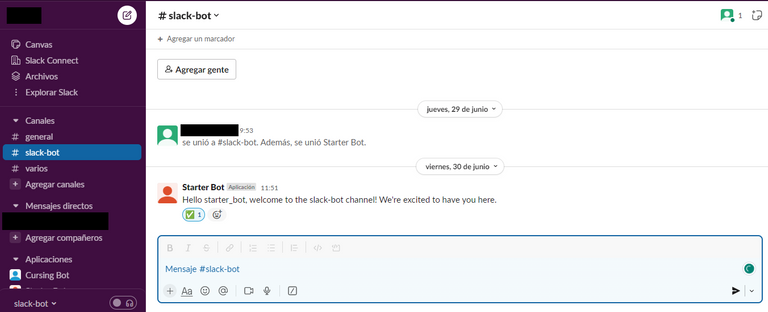
To test this, we go to our workspace and click on the channel where we want to add the bot. To do this, we type on the chat @(Name of the bot). Then, slack will ask us If we want to add the bot. This we'll do.
Then, our bot will be up and running on our channel. Now, every time a new member enters the channel, the bot will welcome them.
I hope this article could have been useful to you, opening your eyes to the power of Python and Its versatility, with lots of libraries that can help us create whatever project we want.
Thank you for your support and good luck!
Thanks for your contribution to the STEMsocial community. Feel free to join us on discord to get to know the rest of us!
Please consider delegating to the @stemsocial account (85% of the curation rewards are returned).
You may also include @stemsocial as a beneficiary of the rewards of this post to get a stronger support.
Congratulations @jesalmofficial! You have completed the following achievement on the Hive blockchain And have been rewarded with New badge(s)
Your next target is to reach 1750 upvotes.
You can view your badges on your board and compare yourself to others in the Ranking
If you no longer want to receive notifications, reply to this comment with the word
STOPCheck out our last posts: