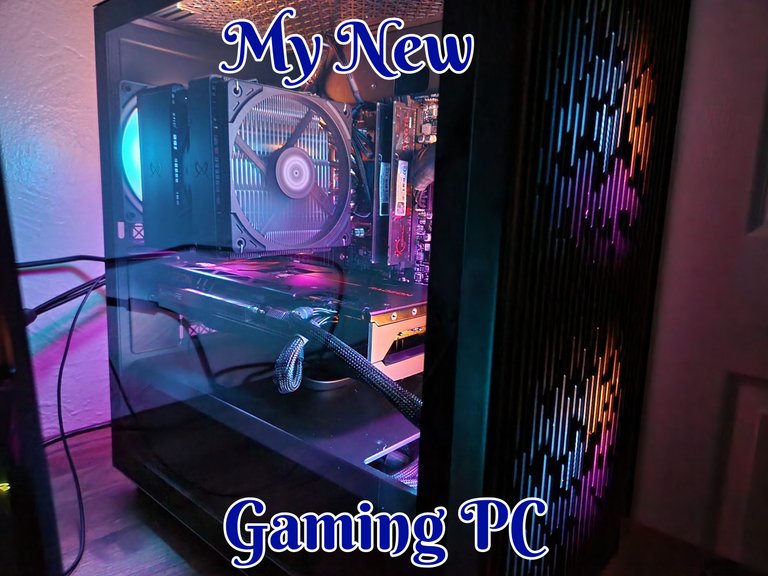
My New Gaming PC
I had no idea the PC I built back in 2015 would have to carry me into 2023. At that time, I was replacing a system that had been going on for eight to ten years. I did not want that to happen again and was expecting to build a new computer around 2020. Needless to say, 2020 ended up being a year where any plans you had went out the window.
Why It Took So Long
Almost two months ago my GPU died and I’ve been trying to keep things going on an old backup GPU I have that I can still somewhat game on and do other basic tasks. While I had plans to build a new system at some point this could not have happened at a worse time.
The GPU died after I got back from an extended trip and before I needed to move. At the time all my efforts across the board needed to be focused on moving. There were quite a few complications along the way, and I won’t bore you with the exact details of that move.
As such I did not even want to attempt just replacing the GPU and it did not get to me in time before I had to move. I had already replaced the PSU this year which along with a 2TB HDD are the only things I'm taking from the old build. I need to replace everything. Most of the parts in my computer I ordered back in 2015. While the GPU I ended up getting in that build was released in 2015 I ended up getting it sometime in 2016.
So, everything is quite old and despite that, I was still able to play games below the minimum for quite a while before my old R9 380 died. However, that took its toll on things. So, it’s no shock things ended up having issues the way they were.
Once I arrived at my new location, I could not exactly start ordering new parts either. It takes a while to move everything in and even try and rest. I was quite exhausted and had many things I needed to juggle more than just playing video games and writing about them.
On top of that, there were issues even trying to get internet here. At first, they did not want to send someone out but in the end the internet provider, despite not wanting to do so, sent someone. Once that person arrived, they more or less said that it was no wonder I couldn't resolve the issue on my own. They had to hook up some lines to get things working. Yay at least for getting the internet.
I then was at a point where I needed to spend the most money, I have ever had on a computer build and could not afford to do so. The good news is I had a bunch of offers at least I thought I had where I could earn many hundreds of dollars in cash back and the amount of money my new build was going to cost would ensure I’d spend enough to get it.
However yet again just moving caused some issues. I thought I could avoid issues by waiting a little while till all the things you need to do once you move have taken effect. I even verified that they should have the correct information as enough time had passed.
I went to accept the offers and turns out moving removed them, so I was not able to get all the ones I wanted. Then the legacy financial system showed me how slow they were. It took them over two weeks to resolve to have my old address despite the fact they should have had my new one in the first place by then.
While I was waiting for that to get resolved I found out a new graphic card was about to launch. For a gamer, the jewel in your build is the graphic card and I had to at least attempt to get one if possible.
The graphic card release was a mid-ranged card and for slightly more than what I was going to spend anyway, it should blow what I was going to buy out of the water. So naturally I had to give it a try and get one if I could. I also did not want any issues with being able to afford it if I ended up having to pay way above MSRP since that has been the trend for a while now. So, I decided this was well worth waiting for and trying to get one, if possible, first before working out what else I could afford. More on that in the individual section for the graphics cards.
In the middle of all of this, we naturally had many possible hurricanes coming. One of them ended up making landfall but don’t worry I am more than fine. It’s a large state and it ended up not landing anywhere near where they were expecting it to in the first few days of the forecast.
This, however, delayed a lot of things including the mail service, response times resolving some other issues, and trying to get further settled in so I could relax somewhat. Not to mention phone services and towers were overloaded and there were some lingering issues among many other things.
I at least got approved in the end for the credit I needed. Once the offers arrived, however, my credit limit was a lot less than expected. This is when I got to play with the legacy system even further. I’d have to buy a few parts and wait for transactions to go from pending to processed which took days unless it was the weekend then even longer. Then, I’d pay off to get the credit availability back up to buy more parts which took even longer.
This naturally caused my attempted purchases to get flagged as possible fraud. OMFG as soon as that happened, I got so many alerts from everywhere I thought the world must be ending or something. So, there were even further delays, at least those were quickly fixed yet delaying shipping slightly further.
I think in part because the transactions got flagged by the company, I ordered my parts from attempted to break up the order into a few different shipments each time I went to order things. Ordering what should have been standard parts is no longer all shipped from a single location.
This also resulted in over six different shipments for everything to get here. On top of that since I had already blown my budget, and everything ended up being slightly more than expected I had to go with whatever free shipping options were given. I had no idea at the time they would take anything that could be sent via the post office and split it off my order to do so.
Needless to say, critical parts took a lot longer than expected to get here. Along with all the other issues compounding made this take forever. Instead of getting to play Starfield in early release, I was still waiting for parts to arrive after that game launched.
The good news is at least from all the cash back I’ll be getting. I have got to afford this computer. I won’t have to sell things to afford what is left that I owe. While the waiting part sucked it’s not like I don’t have way too many other things going on anyways.
Getting Ready
With all that out of the way, there was still a lot to do while waiting for everything to get shipped here. I’ve been on the same system since 2015 and there is just a lot of stuff. I needed to double check I had backups if possible and many other things I had to do.
A move like this comes with its costs. There is just some software I've had for forever that I am fully losing in this move. While sure I could attempt to clone or clone the whole drive. The drive where most of the software sits is a boot drive. This alone has created some issues over the years and even the loss of stuff.
Thankfully not everything software-wise would be a loss. Some of the older stuff I'm using that no longer have a legit download and a working authenticate system to approve of my code have alternatives. So, in a way I'm not just upgrading my hardware there are some software upgrades for me as well along the way.
One of the bigger losses was going to be the massive database of gaming words I've built up over the years in the software I used to write for all my content. Granted there are also a lot of games I don’t see myself ever playing again but for quite some time. There will be lots of underlined red marks I'll have to click on and hit add to the dictionary.
A couple of months before this I invested to upgrade my offline storage capacity both for bulk storage and for encrypting data. This in part helped offload quite a lot of stuff off old hard drives or put me in a position where I could move everything over to a single 2 TB hard drive, I'd be taking along with me that wouldn’t be my boot drive.
I then went and made quite an extensive checklist. Everything that I was going to need to set up, download, and so forth. That checklist included URLs and any other important information I’d need. While this was a time-intensive activity it would allow me to get back my operations back up and running quickly.
There was also just a lot of stuff I don’t need and have not in forever. While some of it will be archived to remember the good old days like certain screenshots in video games. There was well over a terabyte of stuff that had zero usefulness or memories for me to hold onto. In a way, this was quite a massive spring cleaning.
Sometimes you just can’t understate the importance of staying organized. With everything properly backed up, secured, and ready to go on the move. It was now a waiting game till all my parts arrived.
The Build
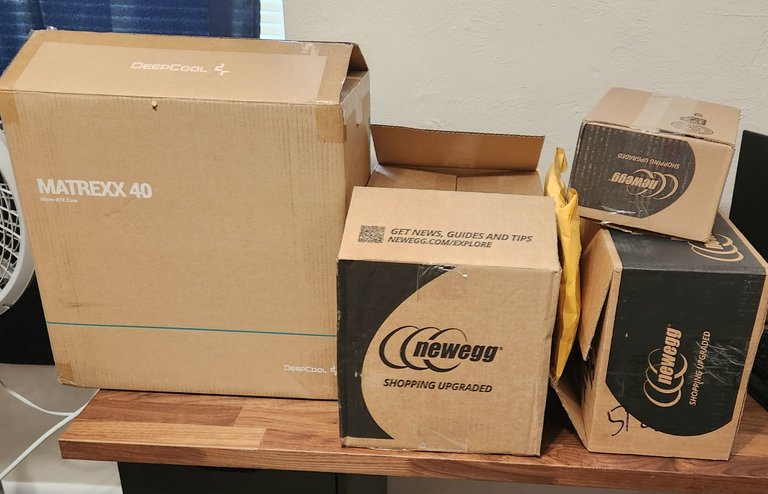
One by one packages started to arrive. I, however, could not do much of anything since both the GPU and heatsink arrived quite a bit later than expected. I could do nothing but wait around and look at the pile of PC parts as they started to amass till finally the last package showed up.
This build took a lot longer than I was expecting. I’ve built a couple of computers in the past. The last one was however in 2015 and there are quite a lot of different things. Technologies I just never had or at the time were simply an afterthought I did not need to even consider. Thankfully it all worked out.
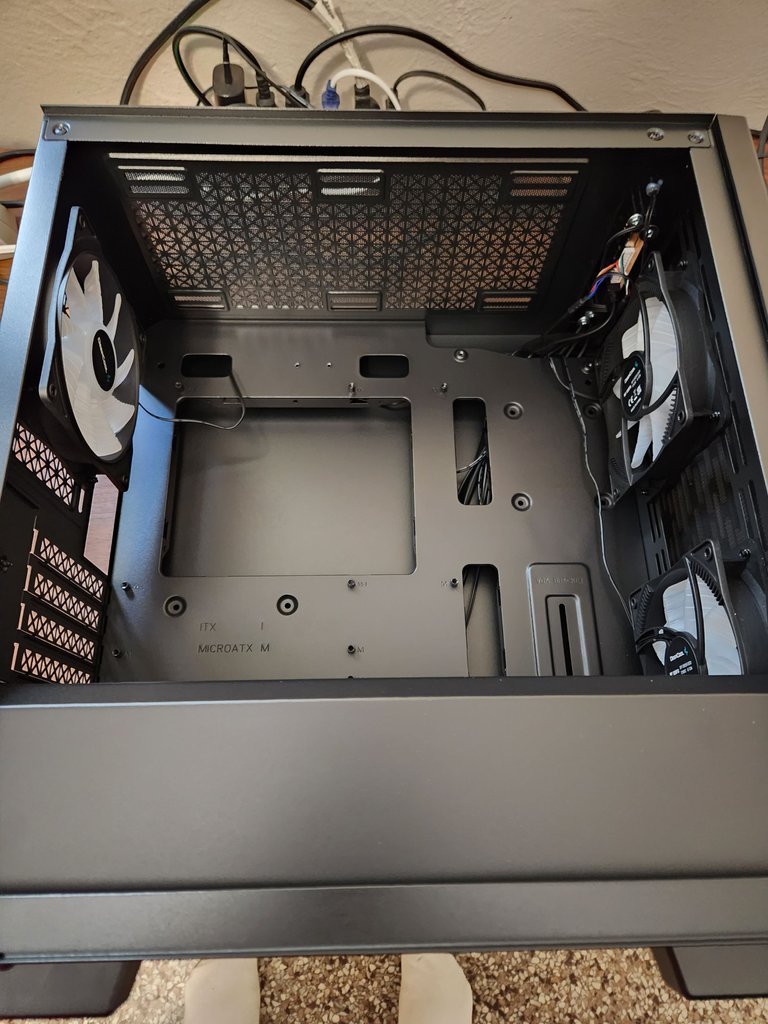
This also was not going to be another ATX build like I've done in the past. Since I have plans to move around a bit, I wanted a smaller and lighter case. I decided to go with Micro-ATX (MATX). While you can certainly go a lot smaller than that I felt it gives me a decent balance between wanting to reduce the overall size while still having lots of room to play around with.
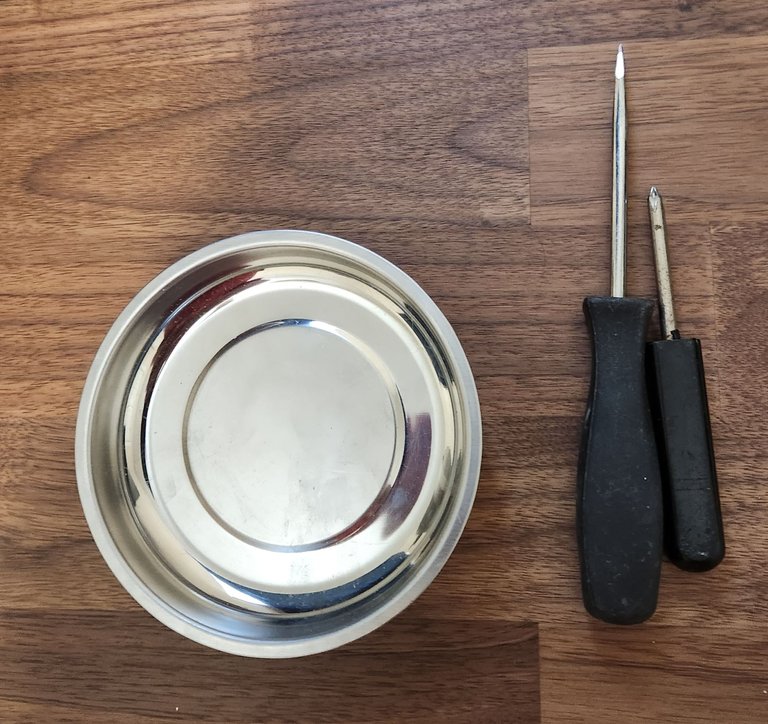
I ended up assembling a little tool kit. I have a magnetic tray for holding screws and a couple of different screwdrivers. I also had a knife and a pair of scissors for opening up packaging. They sure don’t want you to get the stuff you bought!
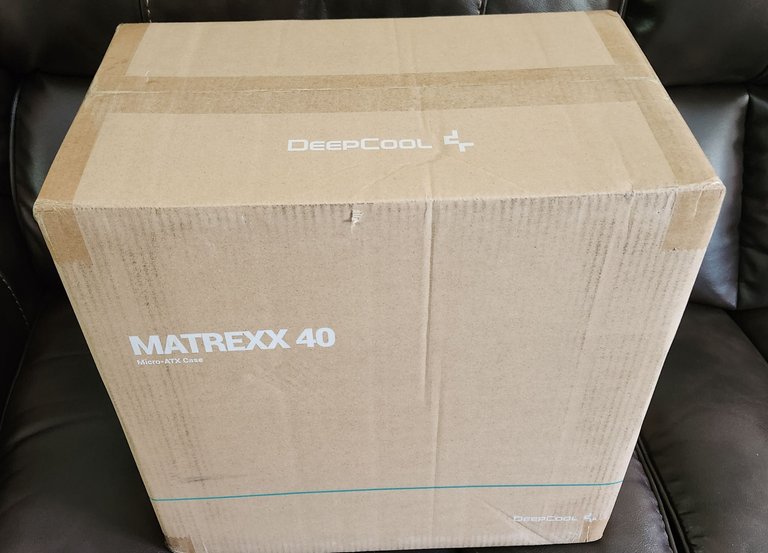
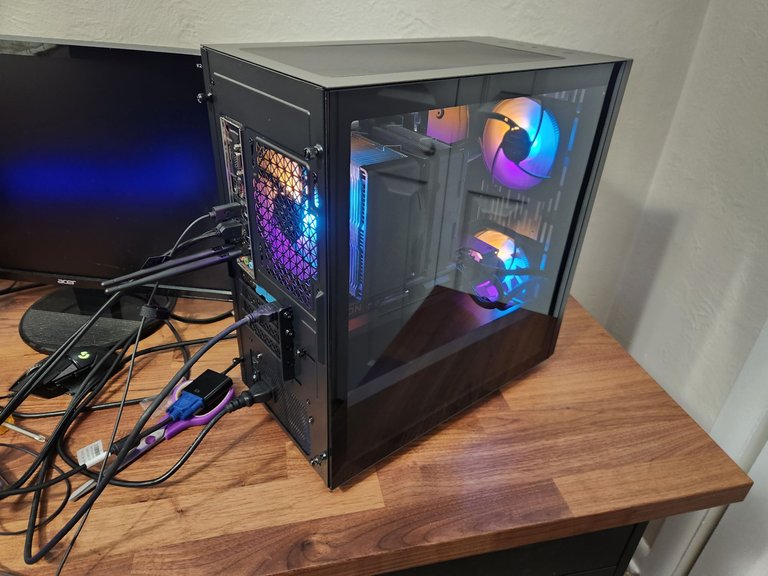
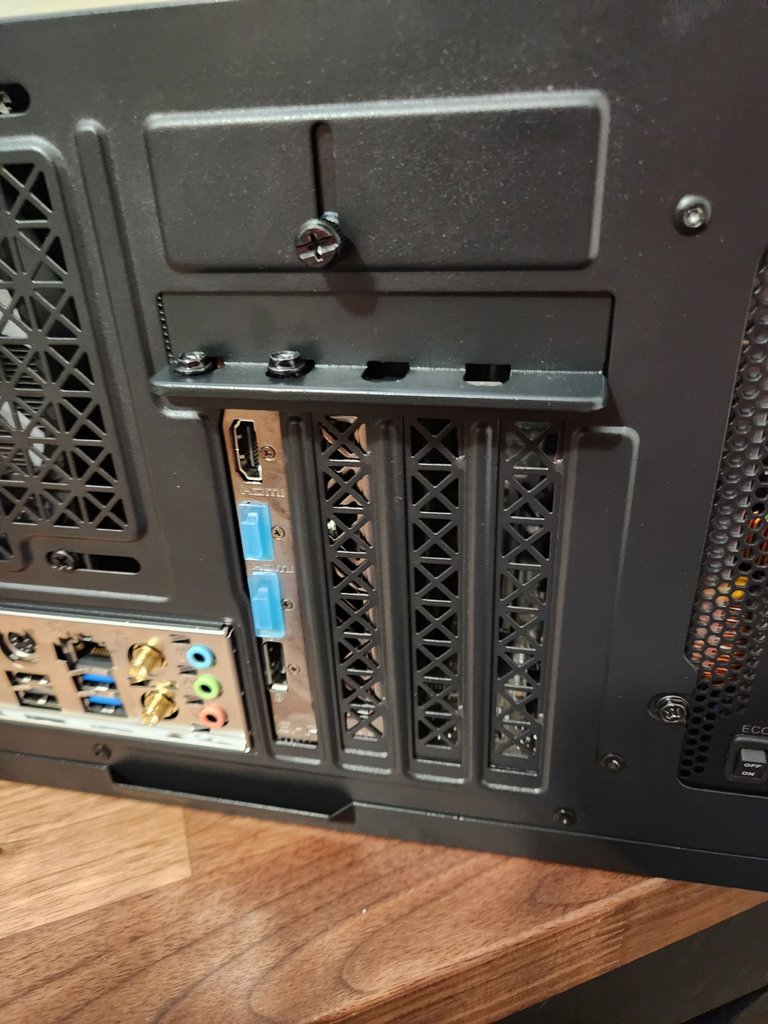
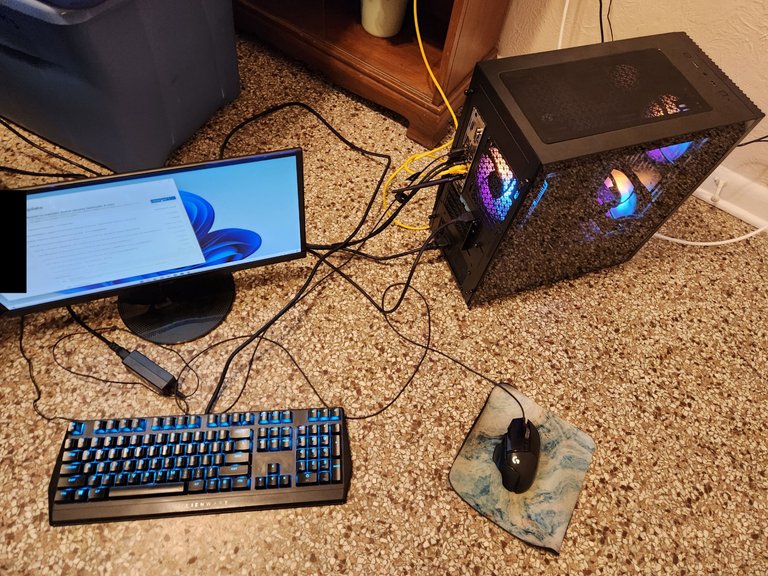
The Case Matrexx 40 3FS
The case I went with is where I'd say I did not have a lot of space in my budget. You will end up seeing there were categories I was willing to go over my budget on and places I had to make some cuts. I ended up going for a Matrexx 40 3FS.
While I had considered not buying a new case at all. There would not have been much of a point going for a MATX build if I was going to be building in an ATX case anyway. Cases are also a lot cheaper than one would think for what they are. Perhaps one day I'll spend way too much on some blinged-out case. Today was not the day.
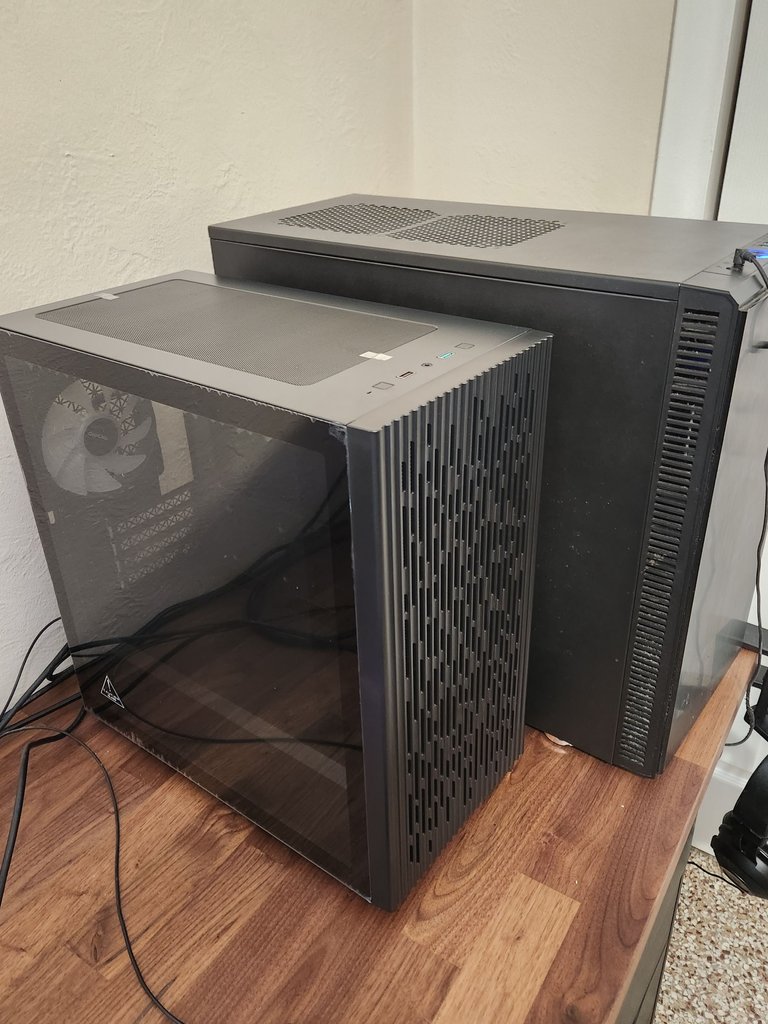
My new case the Matrexx 40 3FS is on the left. My old case, the Fractal Design R4 is on the right. While I loved that Fractal case, I have to admit I can’t stand the new Fractal designs with their nameplate on the front the way they have it. It's just a massive turn-off.
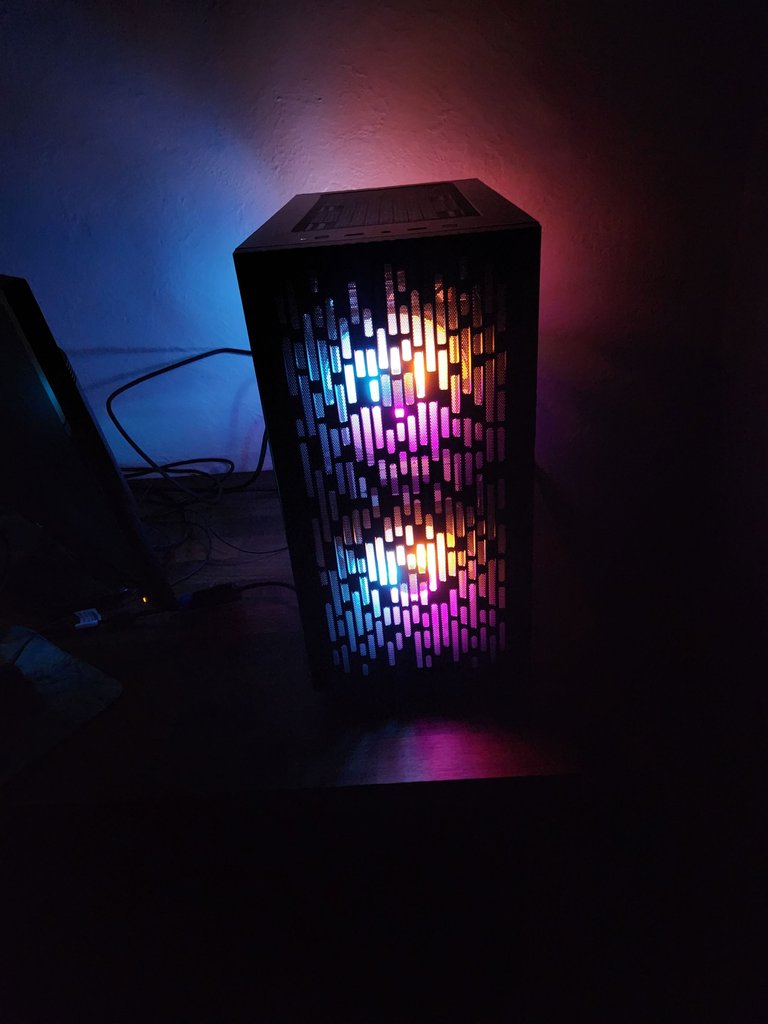
As far as why I picked the Matrexx 40 3FS. It was within reason of my price range for a case. It was a MATX and there was going to be enough space for everything I wanted to put into this build. It also came with three fans with lights!
I’ll admit I've never cared for lighting and RGB everything. It was, however, a nice thing to have and something my former builds always lacked. Even though the fans are just a tricolor. It adds to the overall look of the room.
This case also had a nice tempered glass side panel. Once I got all the fingerprints from people coming over to see my new setup off the side panel. Along with the case that shows every single spot someone touched it. I rather enjoy the overall appearance of it.
One thing I ended up hating the most, at least for building in this case that I thought I'd like was the PSU having its compartment that you reach from the back side panel to access. Needless to say, with my size hands there might have been some cursing trying to plug things into the motherboard along the bottom.
It did, however, force me to route everything through the back and into the many areas they have for you to reach the front. While I hated building in it. I love the outcome of not being allowed to be lazy and just having cables running all over the place.
Cable management has never been my strong suit. While I did not put in an A effort either in this build. It was at least an improvement over my last build.
You really can only understand so much about a case till you build it. The real lack of information they gave ended up leading to almost a disaster in me needing to pull everything out to resolve. I’ll be talking about that more later on.
Overall, I got what I got for spending the kind of money I did for a case. It ended up meeting my needs. At the end of the day that is all you need in a case unless you are going all out for looks.
Ram 16 Gigabits

This was yet another spot I just had to take the cheaper option on. DDR4 is quite cheap and it’s not like I was going to spend a lot on a higher-end motherboard to get into those DDR5 RAM speeds anyway. This also meant I did not need to spend crazy on a motherboard that supported DDR5.
Sure, DDR5 would be amazing for games. However, that adds up to a few hundred bucks onto this build once everything else is considered. Perhaps my next build could consider getting it. My old build only had DDR3 so even with this being just DDR4 is quite an improvement.
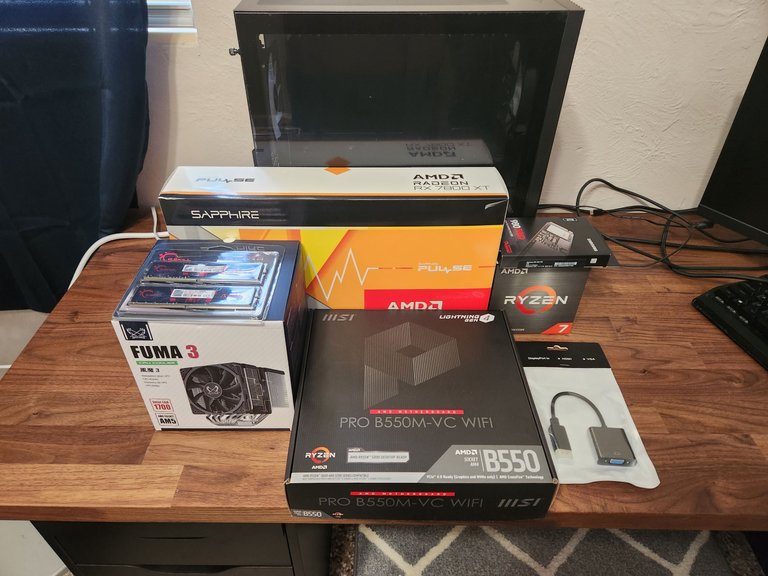
I ended up going with two eight-gigabyte sticks of RAM. I’ve used G. Skill in the past, so it was just a brand I've known and recognized. It was also cheap enough if in the future I want to add another two sticks of eight gigabits I can.
One thing I knew I was not going to get was anything fancy with RGB. Since this was going to be a MATX build there are certainly things you need to start thinking about when it comes to how tall a ram could get. Not to mention I don’t need any issues if something goes wrong with the lighting which has on rare occasions happened with people's RAM.
While I was considering looking for only low-profile ram. That ended up not even being a factor with some other choices I've made with the build. So, I just made sure they were not silly tall.
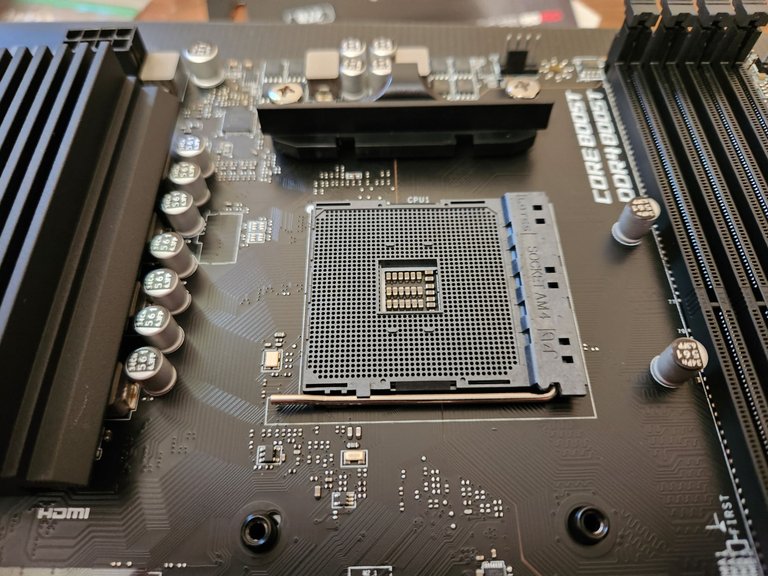
The Motherboard MSI Pro B550M-VC Wi-Fi
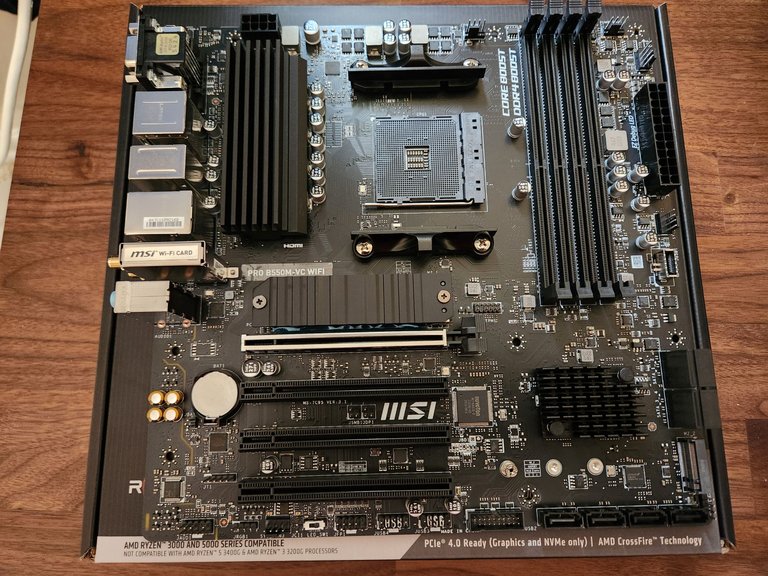
Originally, I had plans to go with a different motherboard entirely. The issue I became concerned with is that since I was going with a full-on AMD build my Ryzen CPU needed to have a motherboard with at least an updated enough bios that it would work in. Otherwise, you run the risk of the CPU not working and requiring another older Ryzen CPU to update bios which is rather silly.
Thankfully it was quite certain that the MSI Pro B550M-VC Wi-Fi was not going to have any issue for the CPU in question. While it had some features, I did not care for it had enough other things I did it ended up being an easy choice to make.
While it would been nice to have more USB ports on it. It is a MATX motherboard, so you expect there to be some kind of compromise. I have to say I did not feel I had to make it.
My old motherboard came with this wonderful, printed guidebook that laid out everything in such an amazing way I found it helpful throughout the years. The MSI Pro B550M-VC Wi-Fi on the other hand had a QR code I had to scan for a PDF that I was not a huge fan of. Sure, it gave me everything I wanted I was just not a huge fan of it not showing everything in a certain manner I was accustomed to with the printed book for my old motherboard.
I am also not going with an AMD 3D CPU. As such the included support for a CPU with integrated graphics is not needed and I would have preferred more USB ports. However, if I do decide to upgrade or change the CPU someday, I might have a motherboard I could still use if it ends up having that feature set.
One thing I did love that made this motherboard something that stood out was the AMD Wi-Fi 6E. It’s kind of funny I have two antennas I can rotate that are sticking out of the back of my case. I however now have up to 2.4 Gig Wi-Fi speeds if I could ever find a connection fast enough.
Needless to say, I can at least now max out the internet speeds I can get here. I also seemed to hit most speed limits on many of the sites I use for downloading things from.
When I used to download a game off say Steam with my old build, I'd have to cap it at 10 MB/s. Otherwise, it would overheat the Wi-Fi dongle I was using and cause issues. Even more so since I just had an HDD for storage. While it was tempting to try and buy something better, I originally was going to get a new system back in 2020 so every time I thought about it just felt like I'd be possibly wasting money if I got a system that had one built in.
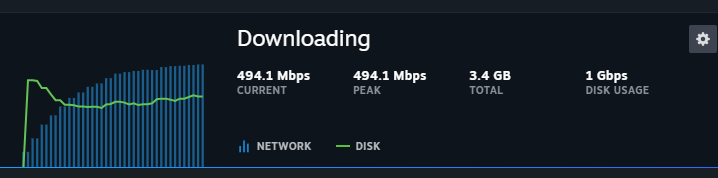
In comparison, this blows that out of the water. I had no idea you could get these kinds of download speeds off Steam when downloading a game. I’ve downloaded a few since then and this seems to be the great average speed I get if the game is over a couple of gigabits.
I also felt like it was a nice touch that the PCI-E 4 for the graphic card comes reinforced. While it is a MATX build that is still a concern since I tend to hold onto a build for quite a few years before upgrading.
Otherwise, this motherboard just had everything that is expected these days. I liked it had its cooling shield for an M.2 that I ended up using. Along with another slot if I wanted to do so in the future.
Storage
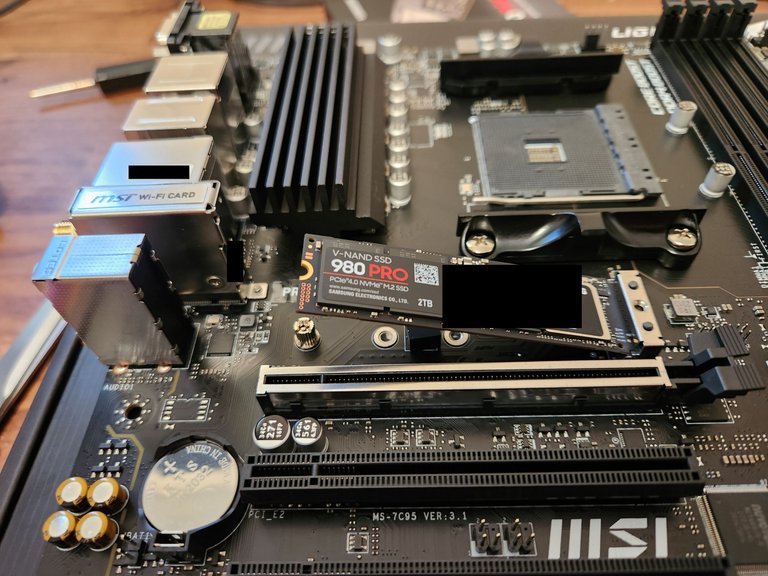
Indeed, I've never had an M.2 let alone an SSD. I know that sounds crazy games these days are all adding “SSD” required. Quite a few years ago I thought about it, but the prices even back then put things out of reach for what I was willing to spend.
The last time I considered it I needed to expand my storage. I ended up going with a 2 TB HDD over getting a much smaller SSD. I more than needed than much space than I could get for what I was looking to spend. That 2 TB HDD did get moved over to this build for mass slower storage.
This time around I could have gotten an amazing deal on a 1 TB M.2. I almost took that deal as well. I however pulled the trigger on this monster and 2 TB of storage for my boot and game drive.
Since I've never bought let alone installed M.2, I was a bit lost on what I even needed. I ended up working out that my motherboard had a heatsink for these and buying one without.
The cool thing is I do have a second M.2 slot and if I ever see a crazy deal, I'll pick up a second one with a heatsink for that slot to expand my storage and have a better place to put some games.
So far, the speeds out of this thing have been amazing. It’s been crazy when downloading games seeing Steam show my storage doing 500 MB to 1 Gig. I’ve yet to see things hit 100%.
In my old build, I'd start up my PC and wait 10 minutes or longer for everything to be fully done loading in and whatnot. Now I press a button, and I blink. It's ready to go. Just mind-blowing.
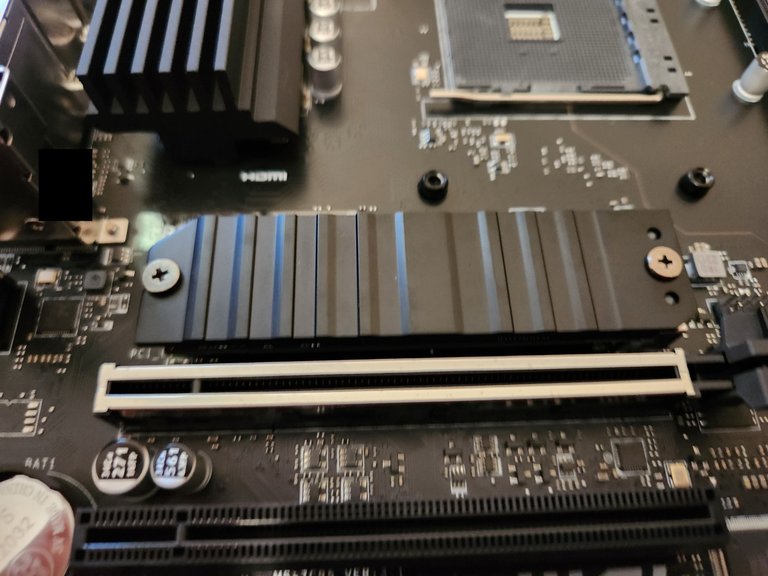
As far as installing. I ended up removing three screws. One of them ended up being a standing mount for a short M.2. I had to also peel some protective film on the thermal pad that comes with this M.2 shield. Then I just slotted it in at an angle and closed it up. I preferred installing this over an HDD.
It’s also great I have not quite 4 TB of total storage. If only 2 TB meant you were getting 2 TB of usable space per drive. There is also room in the case to mount some SSDs if for whatever reason I wanted to try one of them out one day.
CPU And Cooler
Back in my day, the CPU came with a cooler, so I never had to think about cooling. Granted the cooler on my last CPU did die once and it’s on the verge of dying again. So perhaps it was best just to make people get their own.
This was a spot in the build I struggled to work out what on earth and in the gaming verse to get. Did I make the right choices? I doubt it but so far, no issues. So that is good.
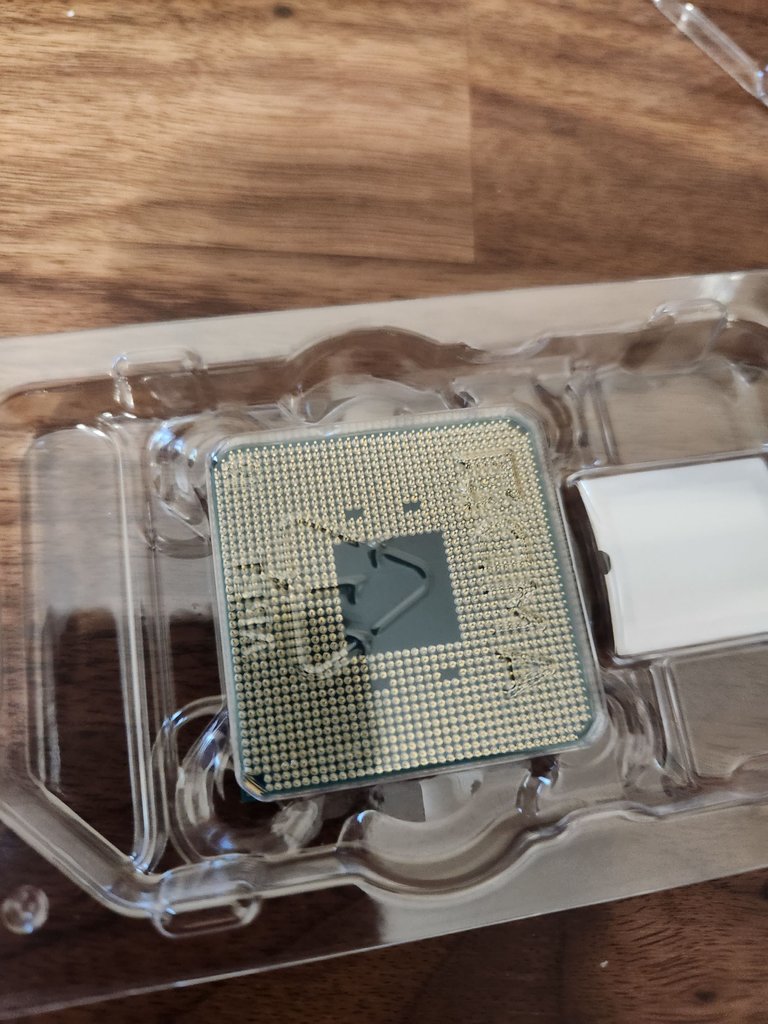
For the CPU I ended up going with a Ryzen 7 5800x. Should I have spent maybe $50 more and gotten something a bit better? Well, it’s easy to say that about everything in a computer builds. While it is a little older than I would have liked for a CPU it should fit my needs.
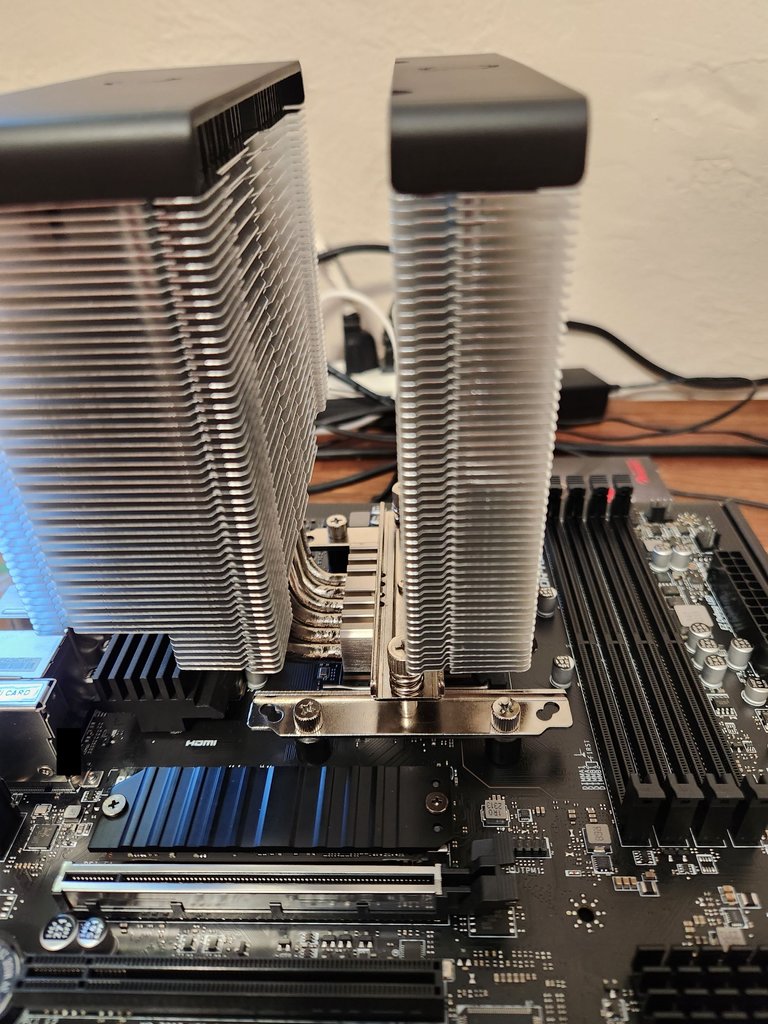
The only thing I struggled more with was the cooling solution. So many options and yet I did not have a great grasp on what I needed to cool this thing. After quite a bit of research, I ended up settling at the time on Scythe Fuma 2.
Then I learned not that long ago the Scythe Fuma 3 came out. From what I could tell it was better designed for MATX builds and I have to say it looked insane. I did a triple check to make sure it would fit into my case and while it was close enough to question if it was going to be too big. It did fit.
This is perhaps the part of the build that took the longest. I’ve never had to install anything other than a stock cooler onto a CPU before. Some assembly and disassembly are required this time around. This was the part of the build that took me the longest to work out.
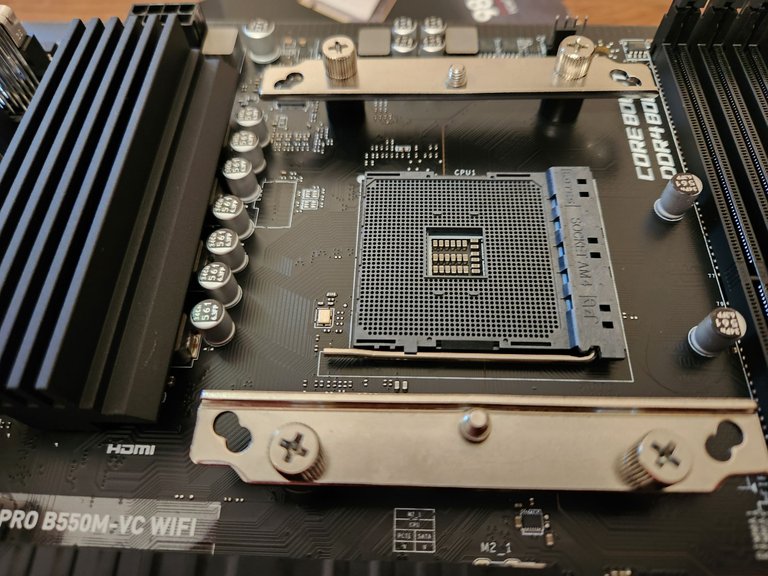
The first part was removing the current installed brackets on the motherboard. This thing came with its bracket. So, I unscrewed the old and put in the new.
Then I installed the CPU and applied thermal paste. The great thing is they even provided you with a little spatula which made spreading the paste easy. When I have to move again, I'll be removing this cooler anyway for transporting and getting a better thermal paste to apply.
After that, it was time to mount it on the bracket. This thing is quite odd-looking. It’s designed to try and create clearance for the RAM slots while also having a cutout on the back fins to clear anything on that side of the motherboard.
Then came the part I might have sworn at a few times and had a bit of a mental freeze on. They have these clips that you use to attach the two fans to the cooler. They show an image in the directions. Ya, I did not understand, and the lack of directions sucked.
It’s also a new product so I did not find anything that helpful when trying to work out what I simply did not understand. I ended up working out the four edges are some rubber types of material that compress allowing me to jam the hooked side of the clips into.
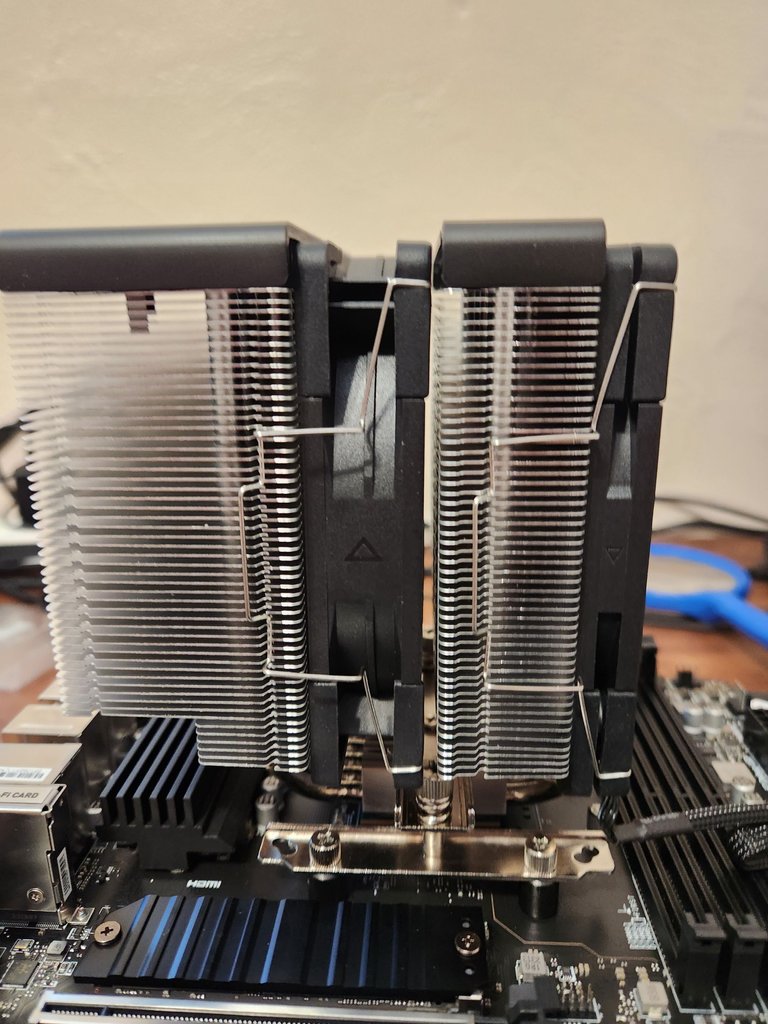
Then there are some grooves that the fan clips looked like they were supposed to sit in since they lined up. The issue then became I could not stretch what was left onto the cooler where there were further grooves for the clips to hold onto. In the end, I ended up popping them out of the grooves on the CPU fans that part of the clip was resting in and that gave me enough room to fit the rest of the clips into the proper grooves on the cooler.
Now that I know what I'm doing could I do this again in a fraction of the time? You bet! I can only hope I did them right. So far, there are no overheating issues so I can only assume the answer is yes. Kind of an odd thing to have to do yourself.
Did it clear alright? Yes, it did. Thankfully they were not slightly taller. I at first thought that since I picked the black top version, I made a grave mistake. Thankfully I did not.
PSU And Cabling
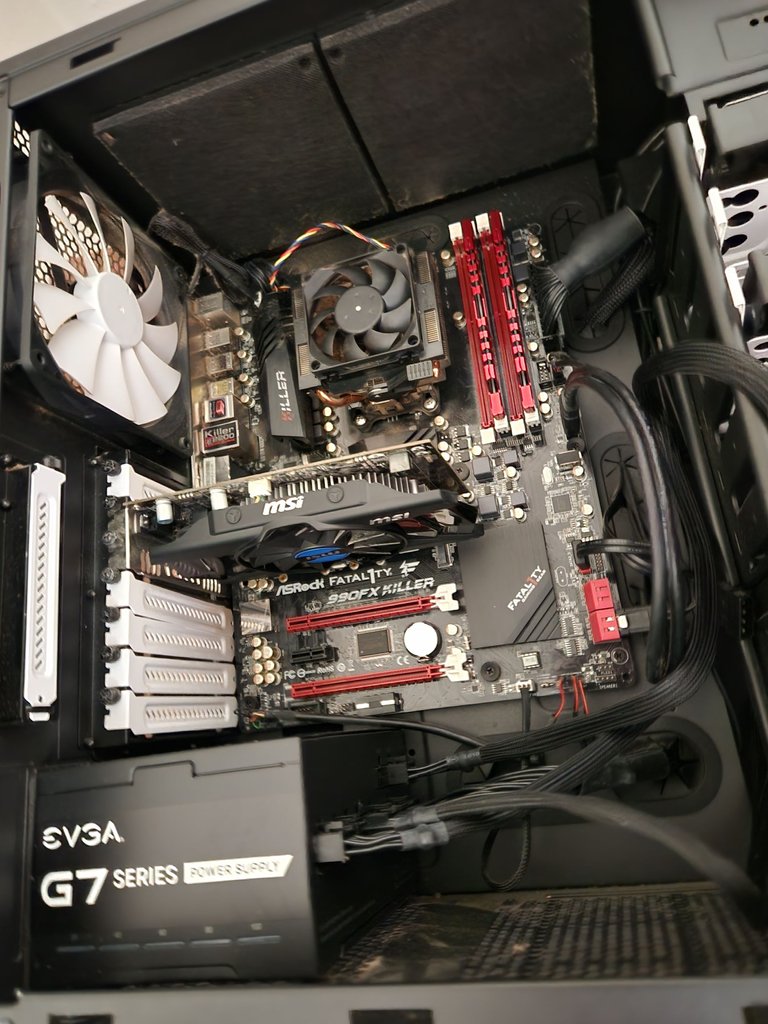
Next up it was time to work on the PSU and some of the cabling for this build. Early into this year, my old PSU died, and I ended up replacing it with an EVGA 7 650-watt. It’s the only other thing I'm bringing over from my old build.
At the time when I did buy the 650 Watt PSU it was an upgrade over the last one, I had. I thought for sure what I was going to build would be enough. Then the graphic card I ended up picking came out and I started to question that. Thankfully after checking the math, I'm more than good at that end.
It was now time to return to my old build and start taking it apart for the PSU and cables. There is a little backup GPU that I've been using over the past two months or so.
This old build of mine has gotten to the point where there is only so much dust I can get out with the current tools I have, which is just a can of air. It’s not enough anymore. You can also see my former cable management is something that is left to be desired, but it worked for me.
One fun thing about this PSU is the power usage light indicators. Those are sadly blocked from view in the new case. That will be something I miss but it is what it is.
It was also a bit sad ripping apart my old build. We have been through so much together. I had this thing years before I even started writing content online. So, there is just a special place in my heart for it.
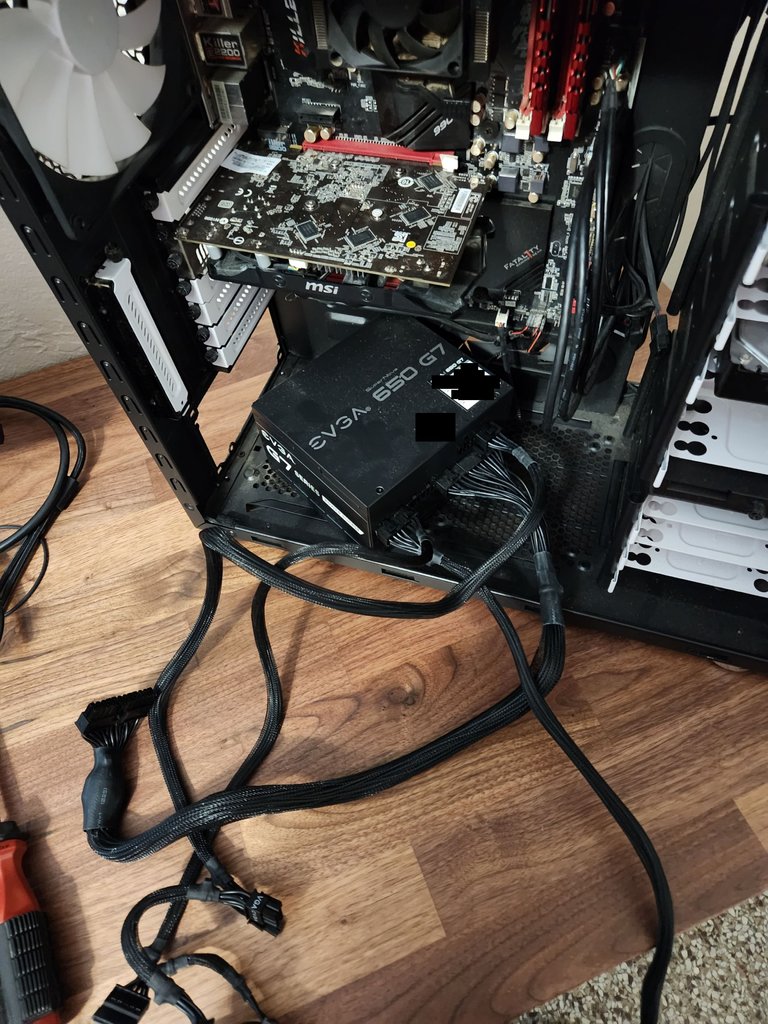
Once I was done I needless to say gave the PSU a bit of dusting before I installed it into my new build. I swear I had given the old system a quick dusting before I moved.
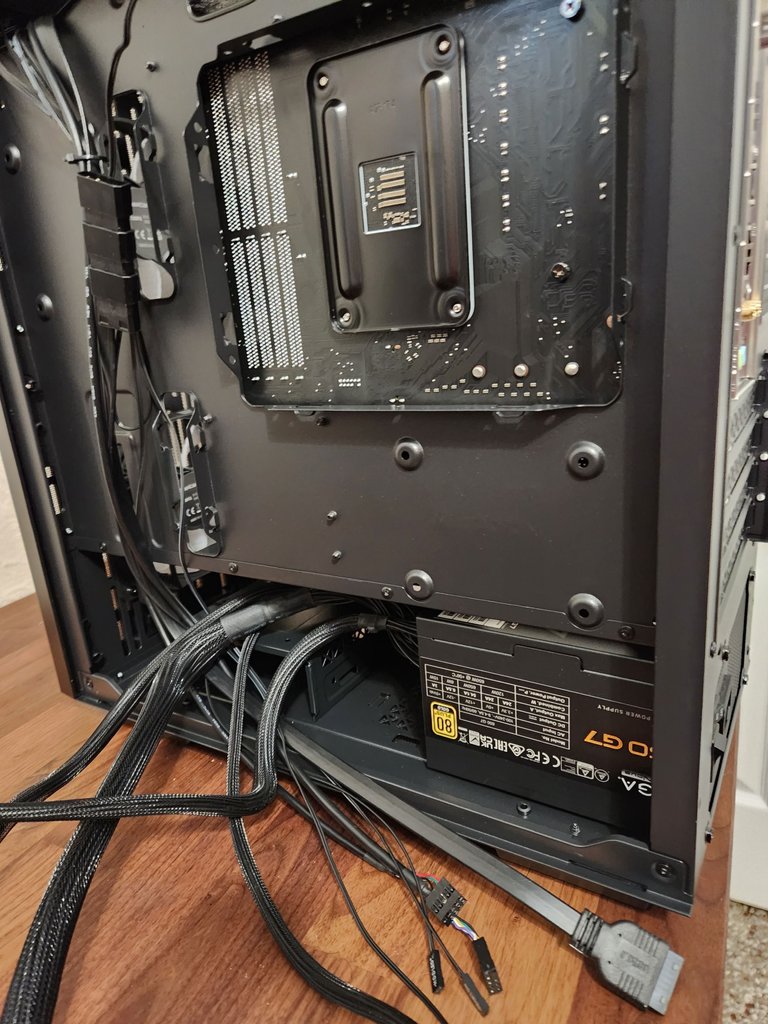
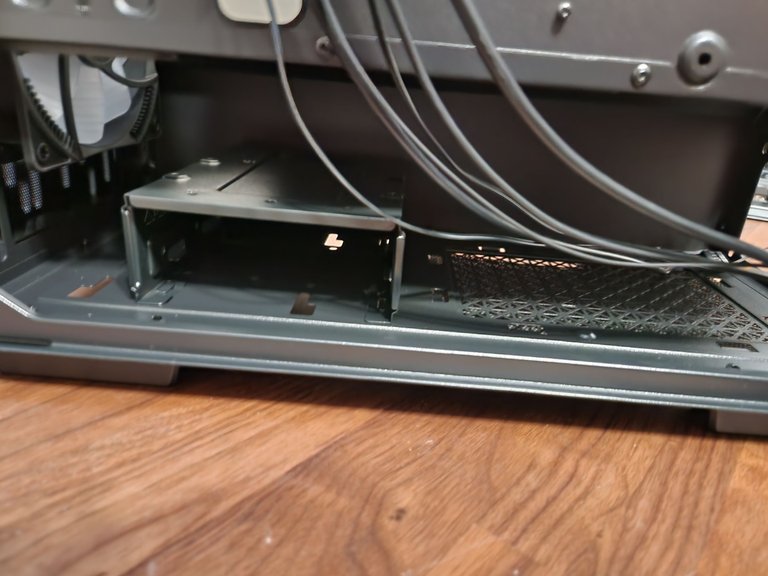
To say this thing fits into the new build is an understatement. I’d later need to plug in another set of cables to the PSU and I could not get it out since I had used the cabling holes over the PSU to pass some wires though and that was enough to trap it in. Thankfully the HDD cage was removable so I could get in there.
At least the case has quite a few slots to put cables in through. There are even some natural grooves to put cabling into on the back side. Along with a few holes to wire manage with zip ties and other stuff for anyone who loves that kind of stuff.
How did my cable management go on the backside? Yeah, I'm not ready to share a photo of that yet. For the short term, in case I add anything else I wanted to keep everything loose. Maybe when I get some time in a month or so I'll deal with things more adequately.
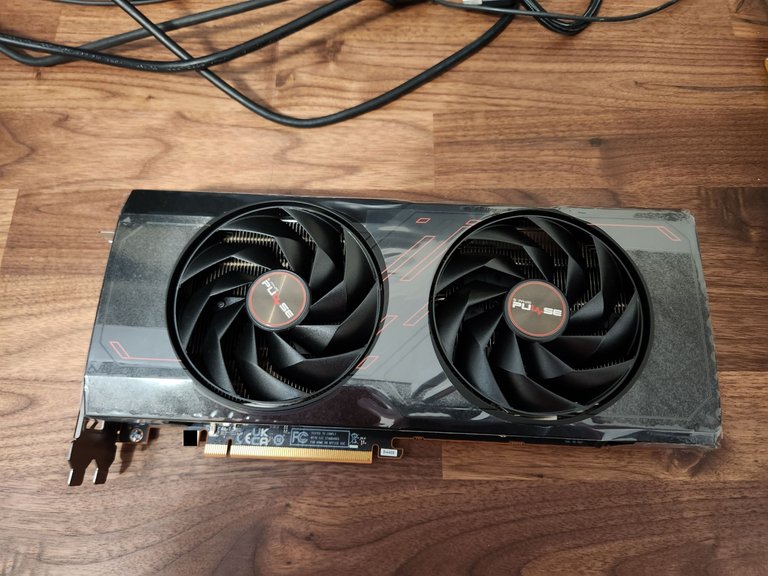
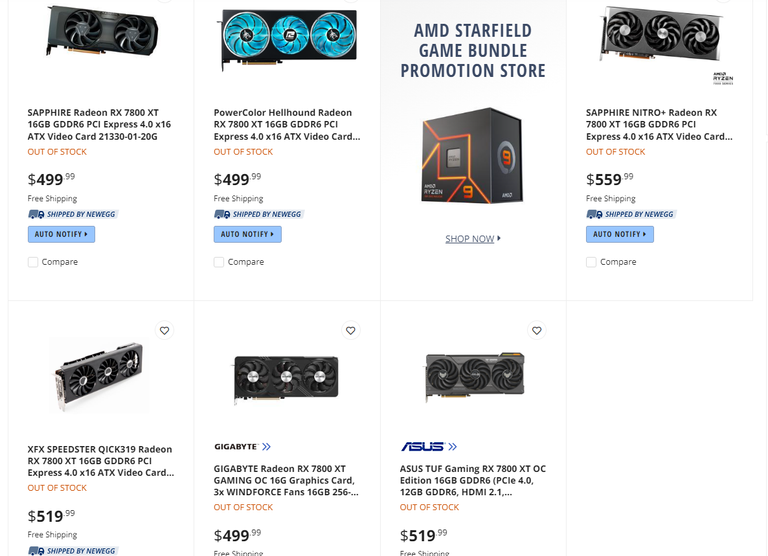
GPU Sapphire Pulse Radeon Rx 7800 XT 16 Gig
There was a point while working out the parts list for this build when I thought I for sure was finally done. I was going to get a Radeon RX 6700 XT 12 Gig or an RX 6800 16 Gig.
I was quite set on getting at least a 16 Gig graphic card if I could, but I was already so over my budget. In my old build, I ended up splurging and getting the 4 Gig version of the card that I did instead of the 2 Gig. That ended up being a huge enough difference that allowed me for so long to keep that build. So, I was quite dead set on getting the higher amount this time around.
Then right before I'm about ready to start buying parts I see a new recommended video and it’s talking about the up-and-coming new release from AMD for graphic cards. Before I even clicked on that video, I was like shoot if this ends up being something I could get I just have to go for it.
The funny thing at the time is I was just looking at the normal RX 6800 and not the RX 6800 XT that uses quite a lot more power and costs a bit more. The issue is it was getting harder and harder to find the RX 6800 non-XT. From a budget standpoint, it was where I was standing, and with the cost of electricity these days, I wanted the lower-watt one.
Even more strange after the 7800 XT release the 6800 XTs are the same price as before which is around the same price as the 7800 XT. The 6800’s use more power and have the older RDNA 2 architecture. Some of the 6800 are getting harder and harder to find which makes sense since they first released back in 2020.
I decided to delay getting a graphic card till the new ones came out. I had a feeling they would sell out at release, and they sure did. In some places, I was shocked at how quickly everything sold out. People were buying up anything they could get their hands on.
I don’t blame people. With the current state of the world and endless issues between shortages and other sectors always wanting to eat up chips and GPUs. People are getting what they can. Even more so with the way AI is going and many of these companies want to put every fab they have into those cards instead for a lot more money than producing to sell to gamers.
Then they hit and there was an issue I ran into quickly. I have a slightly smaller PSU than recommended on the official AMD website and I'm trying to build in a MATX case. Some of the board partners blew the 700-watt PSU out of the water with 800+ suggested.
The other issue is most of the cards were just a couple of units too long to fit into my case. Sure, I had not ordered anything yet. I could have tried a different case. I, however, up till this point, have already picked everything else out to fit into the case.
So, while everything was selling out within hours if not instantly everywhere I was still running around trying to see if I could even get this to work at all. The answer after checking a lot of specs that were lacking in information and official board partner's websites was yes, I could.
You might notice I went for the two-fan instead of the three-fan styler cooler. Not only will it fit, but it uses a nice chunk less power than the one I want since it’s not overclocking as high. I don’t care for a 10-15% performance boost at the cost of 30% electricity usage. Electricity bills during the summer are disgusting enough as they are.
So, I pulled the trigger. It was the first item I bought. After that, I went off and slowly worked on ordering everything else. That graphics card and the CPU cooler was the last package to arrive. The tracking information had not been updated other than to show it had been shipped out. I certainly thought something went wrong, and I was not going to get this card in the first place. I was thrilled to see an update it was getting close a week after I ordered.
The next issue ended up getting it into my build. It turns out I did not realize something that could cause me to have to take everything out of the case to fix it. The directions for the case just show an image of a screw being loosed and two things sliding out.
It failed to warn me of one of the pieces you had to break off to get it loose in the first place. Thankfully all of the inputs for this graphics card were in the top slot. There were no transistors or other parts of the motherboard in the way of me slowly wiggling the metal piece till it snapped off. I would not have been able to do that if another slot was needed that was for sure as it was blocked by stuff on the motherboard.
I’m also really glad I could screw in some screws from the outside of the case to secure the graphic card a little more than the special plate this case has. It’s just far too tight of a fit inside the case to have done it in there for me without getting a special long magnetic screwdriver to do so.
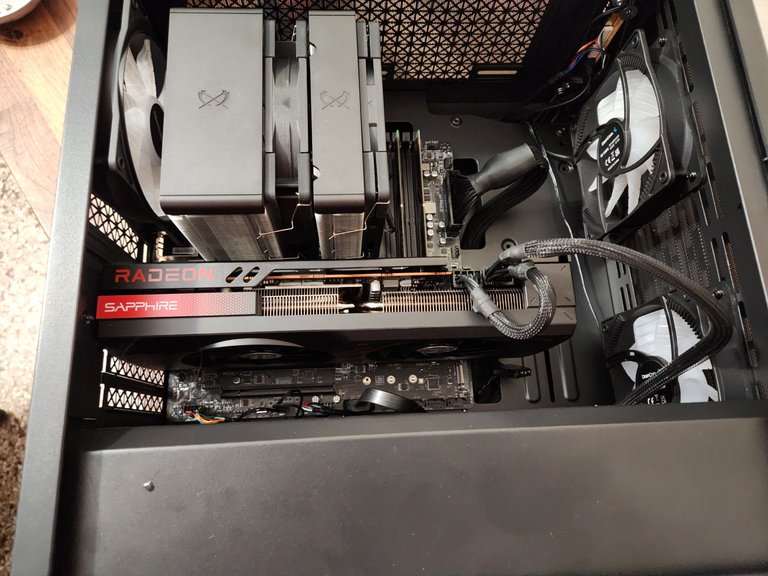
It’s quite a tight fit now in this case but all the parts are now in! I was however still far from done.
OS Time
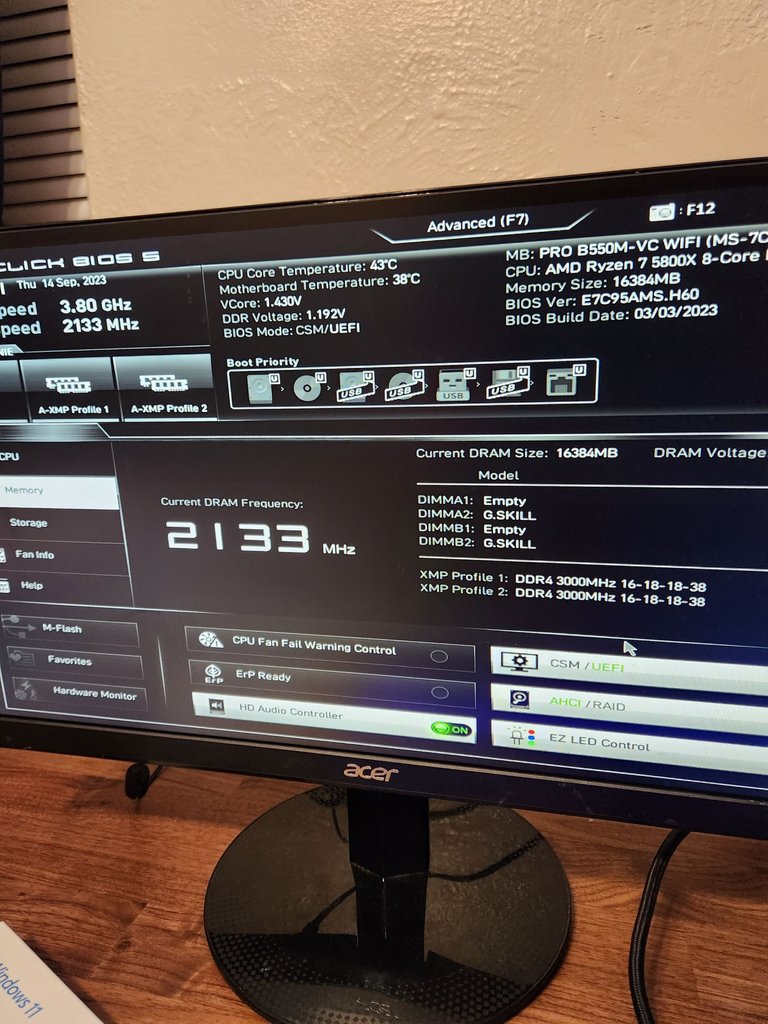
I pushed the button, and everything came alive. I loaded it into BIOS and was thrilled! Everything up to this point took a lot longer than I'd have liked. I’d later go back in and mess around a bit with stuff but for now, I had more important things to do.
I was expecting this to be the easy part. I put the thumb drive in for the OS and like lighting it should be quick and done with. Not so dang fast I ended up finding out.
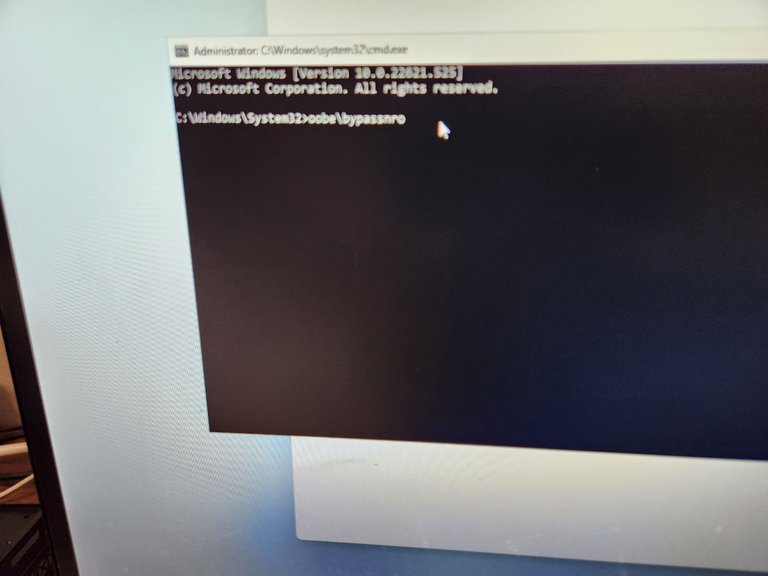
You know what, I’m not on an ethernet connection. You know what they demand an ethernet connection. So, I thought I'd be clever and work around that. The workaround allowed me to continue. At least I thought I was now set.
The OS finished installing and I got to log in. I went to update, and it said no internet. I’m like fine maybe my fancy onboard Wi-Fi needs an update to work. I’ll just put in my old Wi-Fi dongle and update it that way. NOOOOOOO.
Do you know what was not included in the OS installation? The files to enable Wi-Fi. I hunted around and tried all kinds of things. There was no Wi-Fi. Unless I bend the knee and plug into Ethernet for my first update.
It was like 3 a.m. I had to take apart my setup and find myself a hardline connection!!!!!! After the first updates were done what do you know Wi-Fi was now enabled. WTF??? WHY make me do it the hard way???
I then spent the next couple of days downloading everything I needed from games to software and getting anything else set up I'd need.
I was going to run some benchmarks to see how this stacked up, and I know are no longer free. I also don’t have a copy of anything my old setup numbers would have been since that program is not showing up in my Steam library anymore.
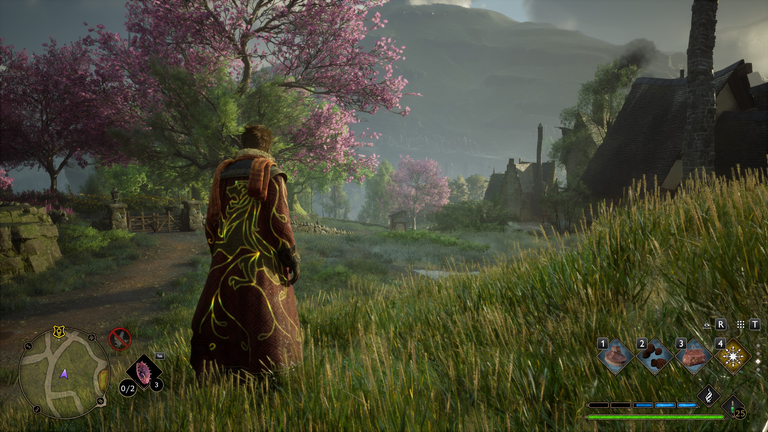
So instead, I went into Hogwarts Legacy and got to turn everything on max! Good enough test for me from downloading the game in like twenty minutes to running around without any issues. The game looks quite a bit different than when I was playing it in low settings on my old build.
Moving Forward
It’s been an interesting year from getting a new desk to my old GPU dyeing that led me to need a new build. There are still some things I might keep an eye on for getting at some point.
Short term I'll more than likely be getting new headphones and yes, a better mouse pad the old one is trashed. Nothing crazy on those fronts.
After that, more than likely I'll start looking for new monitors. While I don’t mind what I have that has always been a place I've cheap out on or gotten lucky and gotten used ones. Thankfully I was able to buy a cable to get my one monitor that has VGA to work.
Perhaps at some point, I'll get more RAM, another M.2 or SSD, and a better chair. For now, though, it’s off to enjoy some games and turn those settings up a lot higher than I'm used to them being.
Information
Content written by @Enjar. Photos and screenshots taken by @Enjar.
Congratulations bro, you have a monster! Enjoy it. Greetings
Thanks, i sure will!
Nice that you were able to get it after so much effort dude, congratulations, it looks beautiful. By the way very nice pictures, I love to see the process of assembling a PC, I find it rewarding haha.
Thanks. I had a lot of fun taking the photos as i went along and reliving it while I wrote this up.
Dang dude, that's a beast!! This should keep ya going for a few years for sure!
Yep! Going to be fun going into some older games and turning up the settings to see how they look on max.
Heck yeah. Crank everything up as far as it goes and enjoy!
Anyone's dream PC. Congratulations! I hope you bring us games at 16k Full HD, that we even have to pay to read the post hahaha. Once again, congratulations!
Thanks. Nothing quite that high res. but I do get to bump the setting up quite a bit on many games.
PC is too cool, man. 2020 was a tough year, somehow it impacted us all, although there is always some light after the darkness. I'm fascinated by the fact that you assembled it yourself, here in my country a PC like that must be over $1000 or maybe more. It looks great, and the way Hogwarts Legacy looks is too epic. I hope you enjoy your new PC to the fullest, I'm sure you will. congratulations!
A bit more then that. I'm hoping to get a few years out of this build. Hoping it won't be 8 years till the next one. Who knows by then what insanity will be common place by then. It's shocking how quick this pc is with a M.2 installed.
congrats brah, beatiful one! I appreciate your detailed account of your PC building journey. It's impressive how you managed to navigate through various challenges and make thoughtful choices for your build. Enjoy your new system, and may it bring you many hours of gaming and productivity! 🖥️🎮
Thanks, it already is I'm having a blast with this setup.
Moving from place to place is really hard. On top of that keeping with your daily tasks, plans, and building a new PC. After all that things you went through it must be really satisyfing to finally be able to download things at this speed and to play games at max settings. Congrats man! Enjoy
Very much so it is. Still can't relax as much as I'd like as I'm behind on quite a lot of things as expected. At least I'm up and running again.
Dang, assembling it from scratch is a lot of work for me. It looks so cool though, especially in that last show. Why I am so jealous right now...hehe
!LUV
!PIZZA
@enjar, @pravesh0(6/10) sent LUV. | connect | community | HiveWiki | NFT | <>< daily
! help(no space) to get help on Hive. InfoIt's quite satisfying when everything works in the end. I might at some point add more lighting around the desk to build on it's amazing look at night time.
You sure a genius and this was beautifully presented as you tried not to miss any detail.
Congratulations friend!
Thanks.
GZ for new PC
Thanks.
RAM is something that I found gives a pretty good bang for the buck. Especially for RAM eaters like FL Studio and such.
What surprised me when I built two years ago was how much can be spent on the case. I ended up with pretty glass and the colored fans etc, Lian Li that was over budget from the start lol.
Ya those Li cases are amazing. Maybe one day I'll be tempting to drop some bucks on an amazing case. For now it's just nice to have some lighting.
Biggest upgrade I noticed this time around for me other then the gcards was upgrading from a HDD to M.2. This thing boots so fast it's more or less ready before the monitors flicker on lol.
Oh for sure, the old HDD boot... may as well go get a coffee and come back to it lol. The good old days lol.