LabView: VI for restricted use EN/ES
There are circumstances in which you want to restrict access to an application, in a control room an operator is responsible for all the operations that are carried out in the process from the SCADA that has been assigned to him.
However an operator will not work 24 hours a day, it is necessary that there is a shift change and this adds a minimum of 2 operators per day per system, also in a control room enter other people who are not authorized to interact with the process.
Today we will learn how to create restricted access applications in LabView, when our designs provide security and reliability begin to acquire greater value and competitiveness.
Existen circunstancias en las que se desea restringir el acceso a una aplicación, en una sala de control un operador es responsable de todas las operaciones que se lleven a cabo en el proceso desde el SCADA que se le ha asignado.
Sin embargo un operador no trabajara las 24 horas del día, es necesario que exista el cambio de turno y esto añade un mínimo de 2 operadores al dia por sistema, además en una sala de control entran otras personas que no están autorizadas a interactuar con el proceso.
Hoy aprenderemos como crear aplicaciones de acceso restringido en LabView, cuando nuestros diseños brindan seguridad y confiabilidad comienzan adquieren mayor valor y competitividad.

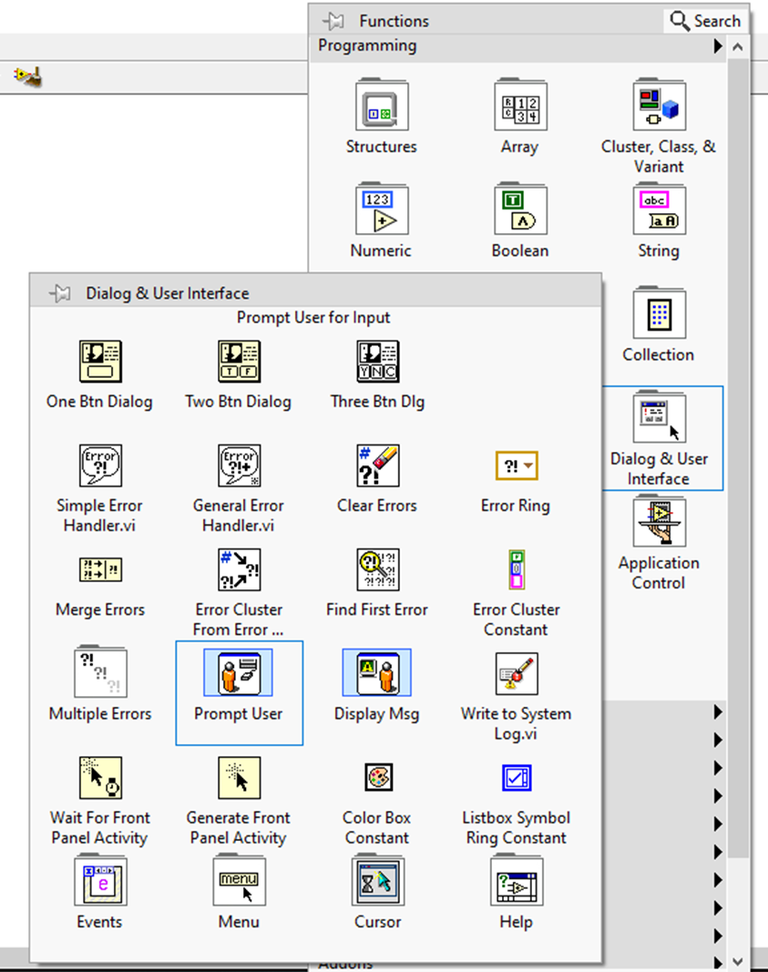
In the dialog-oriented functions folder we choose the prompt user block, which allows us to configure the data that will be requested to a user who tries to run the program.
En la carpeta de funciones orientadas a diálogos escogemos el bloque prompt user, este nos permitirá configurar los datos que serán solicitados a un usuario que intente correr el programa.
Once we place the block a configuration window will appear where we can write the name of the data we want to request and the type of data, in this case the user and password will be requested and the type of data will be alphanumeric in both cases.
Una vez que coloquemos el bloque aparecerá una ventana de configuración en la que podemos escribir el nombre del dato que queremos solicitar y el tipo de datos, en este caso se solicitarán usuario y contraseña y el tipo de dato sera alfanumérico en ambos casos.

In first button name we can edit the button to say accept, ok, next or whatever we want, we can also add a second button to cancel the access attempt.
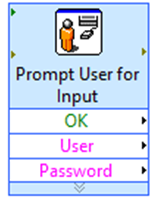
Once configured the block will produce outputs that will correspond to the data entered by a user for each case.
En first button name podemos editar que el botón diga aceptar, ok, next o lo que queramos, también podemos añadir un segundo botón para cancelar el intento de acceso.
Una vez configurado el bloque producirá salidas que se corresponderá a los datos introducidos por un usuario para cada caso.
We take advantage of this situation and a comparative logic to allow or prohibit access according to the data entered, you can even create access for multiple users, but in this case we will do it only for one because adding the others from this will be very simple.
Aprovechamos esta situación y una lógica comparativa para permitir o prohibir el acceso segun los datos introducidos, incluso se puede crear acceso para varios usuarios, pero en este caso lo haremos solo para uno ya que añadir los demás partiendo de esto sera muy sencillo.
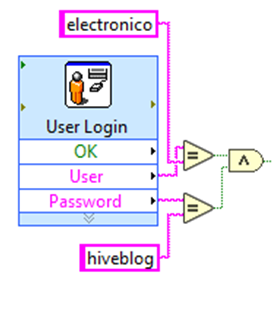
As we can see "electronico" has been selected as correct user and "hiveblog" as correct password, both data are processed through an AND, which implies that if any of the two data is correct but the other incorrect the system will issue the same message as if both were incorrect (only accesses who has the complete information and no clues are thrown to unauthorized users with messages such as "correct user incorrect password").
If you want to add more authorizations you can do it by AND and OR combination, that way you give access to different users with different passwords as much as you want.
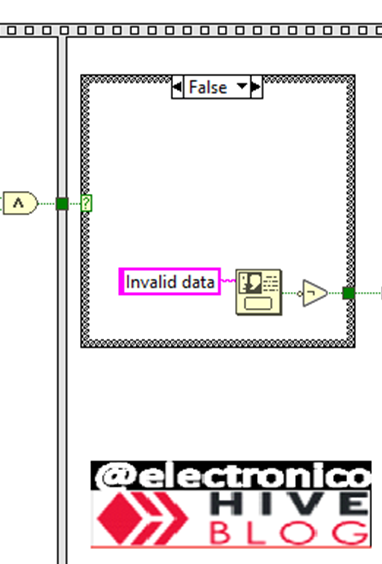
This is one of those applications in which we want everything to happen sequentially and the execution of the program is the last sequence when the correct data have been verified, here we will rely on a Flat Sequence structure.
The AND operation will only output a TRUE when the user and password are correct, otherwise it will be false, this output will be placed in a CASE structure, and this will have two possible cases.
When it is false a message will be thrown indicating incorrect data, and the true output of the indicator block will be made false by a NOT operation, to be used in the third sequence.
Como podemos ver se ha seleccionado "electronico" como usuario correcto y "hiveblog" como contraseña correcta, ambos datos se procesan mediante una AND, lo que implica que si alguno de los dos datos es correcto pero el otro incorrecto el sistema emitirá el mismo mensaje que si ambos fuesen incorrectos (solo accede quien tenga la información completa y no se arrojan pistas a usuarios no autorizados con mensajes como "usuario correcto contraseña incorrecta").
Si desea añadir más autorizaciones se puede hacer mediante combinación de AND y OR, de esa forma se da acceso a distintos usuarios con distintas contraseñas tanto como se desee.
Esta es una de esas aplicaciones en las que queremos que todo ocurra de forma secuencial y la ejecución del programa es la última secuencia cuando ya los datos correctos han sido verificados, aquí nos apoyaremos con una estructura Flat Sequence.
De la operación AND solo saldrá un TRUE cuando el usuario y la contraseña sean correctos, de lo contrario sera false, esta salida la colocaremos en una estructura CASE, y esta tendrá dos casos posibles.
Cuando sea false se arrojará un mensaje indicando dato incorrecto, y la salida true del bloque indicador se hará false mediante una operación NOT, para ser usada en la tercera secuencia.
In the TRUE case a welcome message will be added and by the time the NEXT button is pressed the TRUE output will be used to operate on the third and last sequence.
En el caso TRUE se añadirá un mensaje de bienvenida y para cuando se pulse el botón NEXT la salida TRUE se usará para operar en la tercera y última secuencia.

In the third sequence we use a CASE structure, and in the TRUE case we write our main program, the false case we can leave it without anything, that way the FALSE case will enter when the data is incorrect and nothing will happen, and the TRUE case will enter when the data is correct and the program will run.
En la tercera secuencia usamos una estructura CASE, y en el caso TRUE escribimos nuestro programa principal, el caso falso lo podemos dejar sin nada, de esa forma el caso FALSE entrara cuando los datos sean incorrectos y no ocurrirá nada, y el caso TRUE entrara cuando los datos sean correctos y correrá el programa.
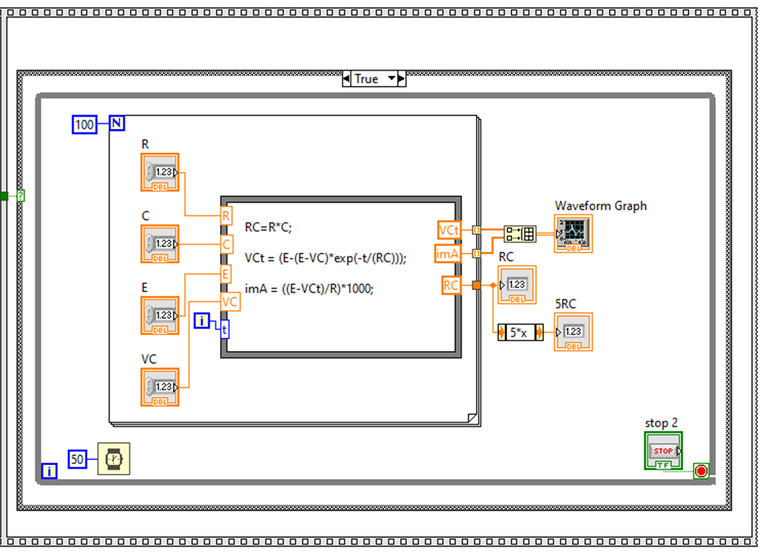
In the last sequence I have purposely used the same program from my last article Simulating RC circuit behavior.
There is no difference in the front panel, but we are going to notice that this time when we try to run the program it will ask for the data we set up and if we don't enter the correct data the program will not run, but let's look at this running the program.
Remember that the correct user is "electronico" and the correct password is "hiveblog" but I will enter first an incorrect user and incorrect password, then correct user and incorrect password, then incorrect user and correct password and finally the correct data.
En la última secuencia he usado a propósito el mismo programa de mi último artículo Simulating RC circuit behavior.
No hay diferencias en el panel frontal, pero vamos a notar que esta vez al intentar correr el programa solicitará los datos que configuramos y si no introducimos los correctos el programa no correrá, pero miremos esto corriendo el programa.
Recuerda que el usuario correcto es "electronico" y la contraseña correcta "hiveblog" pero introduciré primero un usuario incorrecto y contraseña incorrecta, luego usuario correcto y contraseña incorrecta, luego usuario incorrecto y contraseña correcta y finalmente los datos correctos.


Thanks for your contribution to the STEMsocial community. Feel free to join us on discord to get to know the rest of us!
Please consider delegating to the @stemsocial account (85% of the curation rewards are returned).
Thanks for including @stemsocial as a beneficiary, which gives you stronger support.
Excelente artículo. No sabía que se podía controlar el acceso a un circuito con LabView. Lo tomaré en cuenta para mis proyectos.
¡Enhorabuena!
✅ Has hecho un buen trabajo, por lo cual tu publicación ha sido valorada y ha recibido el apoyo de parte de CHESS BROTHERS ♔ 💪
♟ Te invitamos a usar nuestra etiqueta #chessbrothers y a que aprendas más sobre nosotros.
♟♟ También puedes contactarnos en nuestro servidor de Discord y promocionar allí tus publicaciones.
♟♟♟ Considera unirte a nuestro trail de curación para que trabajemos en equipo y recibas recompensas automáticamente.
♞♟ Echa un vistazo a nuestra cuenta @chessbrotherspro para que te informes sobre el proceso de curación llevado a diario por nuestro equipo.
🏅 Si quieres obtener ganancias con tu delegacion de HP y apoyar a nuestro proyecto, te invitamos a unirte al plan Master Investor. Aquí puedes aprender cómo hacerlo.
Cordialmente
El equipo de CHESS BROTHERS